OpenSSL生成CA自签名根证书和颁发证书和证书提取
CA根证书 生成流程
第一步 生成CA证书私钥
1、#生成ca私钥 (.key 和 pem 只是格式不一样)
openssl genrsa -aes128 -passout pass:Test@2022 -out ca_private.key 2048 # 生成aes128位编码的 密码为Test@2022 2048位的 key 文件 (带密码 、加密格式 aes、des 3des等)
openssl genrsa -out ca_private.key 2048 #生成 2048位的 key 文件 (不带密码,加密格式 等)
#也可生成 ca_private.pem 文件,将后缀.key 变更为.pem
openssl genrsa -aes128 -passout pass:Test@2022 -out ca_private.pem 2048 # 生成aes128位编码的 密码为Test@2022 2048位的 key 文件 (带密码 、加密格式 aes、des 3des等)
openssl genrsa -out ca_private.pem 2048 #生成 2048位的 key 文件 (不带密码,加密格式 等)
第二步 生成CA证书请求文件 (格式 同第一步)
2、# 有效期20年:
openssl req -new -key ca_private.key -passin pass:Test@2022 -out ca_req.csr -days 7300
# 也可以 将后缀.key 变更为.pem (注意目录,文件放在哪个目录下,一会用的到,别找不到路径)
openssl req -new -key ca/ca_private.pem -out ca/ca_req.csr -days 7300
# 填写 国家、机构、密码等,按实际情况填写即可
第三步、生成CA根证书
3、CA根证书 (注意目录,文件放在哪个目录下,一会用的到,别找不到路径)
openssl x509 -req -in ca_req.csr -signkey ca_private.key -out ca_root.crt -days 7300 -passin pass:Test@2022
# 也可以 将后缀.key 变更为.pem
openssl x509 -req -in ca_req.csr -signkey ca_private.pem -out ca_root.pem -days 7300 #不带密码
自此 根证书文件生成完毕 注:接下来服务器证书要根据 以上证书 来生成
第四步、服务器证书生成 与根节点服务器证书类似,只是生成 服务器证书的第三部要依赖 生成的 ca 根证书
4、生成服务器私钥
openssl genrsa -aes128 -passout pass:Test@2022 -out server_private.key 2048 # 带秘钥 带加密方式 等同 ca 第一步
# 可以 去掉密码 去掉加密 方式
openssl genrsa -out server_private.key 2048
第五步、生成服务端的待签名证书
5、有效期10年:
openssl req -new -key server_private.key -passin pass:Test@2022 -out server_req.csr -days 3650
无密码可以去掉密码部分
openssl req -new -key server_private.pem -out server_req.csr -days 3650
第六步、使用CA根证书对服务端证书签名
6、
openssl x509 -req -in server_req.csr -days 3650 -CAkey ca_private.key -CA ca_root.crt -CAcreateserial -out server.crt
pem 版本
openssl x509 -req -in server_req.csr -days 3650 -CAkey ca_private.pem -CA ca_root.pem -CAcreateserial -out server.crt
注 5、6步可以合成:
$>openssl x509 -req -in xxx/xxx-req.csr -out xxx/xxx-cert.pem -signkey xxx/xxx-key.pem -CA ca/ca-cert.pem -CAkey ca/root-key.pem -CAcreateserial -days 3650 ##签署服务器证书
Signature ok
subject=/C=CN/ST=Zhejiang/L=Hangzhou/O=xxx
Getting Private key
Getting CA Private Key
第七步、证书提取
7、
$>openssl pkcs12 -export -clcerts -in xxx/xxx-cert.pem -inkey xxx/xxx-key.pem -out xxx/xxx.pfx #这个是平台的私钥
Enter Export Password:123456
Verifying - Enter Export Password:123456
$>openssl rsa -in xxx-key.pem -pubout -out xxx-pubkey.pem #提取公钥,这个是平台的公钥
writing RSA key
双横线上边 和 下边 流程基本一样,上边为理解后 自己总结,下边为快速 生成步骤
=========================================================================
1. 生成CA证书
$>mkdir ca
$>openssl genrsa -out ca/root-key.pem 2048 ##创建根证书私钥
$>openssl req -new -out ca/ca-req.csr -key ca/root-key.pem #创建证书请求
You are about to be asked to enter information that will be incorporated
into your certificate request.
What you are about to enter is what is called a Distinguished Name or a DN.
There are quite a few fields but you can leave some blank
For some fields there will be a default value,
If you enter '.', the field will be left blank.
-----
Country Name (2 letter code) [AU]:CN
State or Province Name (full name) [Some-State]:ZheJiang
Locality Name (eg, city) []:Hangzhou
Organization Name (eg, company) [Internet Widgits Pty Ltd]:xxx
Organizational Unit Name (eg, section) []:
Common Name (e.g. server FQDN or YOUR name) []:
Email Address []:
Please enter the following 'extra' attributes
to be sent with your certificate request
A challenge password []:123456
An optional company name []:
$>openssl x509 -req -in ca/ca-req.csr -out ca/ca-cert.pem -signkey ca/root-key.pem -days 3650 #自签署根证书
Signature ok
subject=/C=CN/ST=ZheJiang/L=Hangzhou/O=xxx
Getting Private key
$>openssl pkcs12 -export -clcerts -in ca/ca-cert.pem -inkey ca/root-key.pem -out ca/root.pfx #导出这PKCS12格式的证书
Enter Export Password:123456
Verifying - Enter Export Password:123456
2. 创建服务器证书
$>mkdir xxx
$>openssl genrsa -out xxx/xxx-key.pem 2048 ##创建私钥
$>openssl req -new -out xxx/xxx-req.csr -key xxx/xxx-key.pem ##创建证书请求
You are about to be asked to enter information that will be incorporated
into your certificate request.
What you are about to enter is what is called a Distinguished Name or a DN.
There are quite a few fields but you can leave some blank
For some fields there will be a default value,
If you enter '.', the field will be left blank.
-----
Country Name (2 letter code) [AU]:CN
State or Province Name (full name) [Some-State]:Zhejiang
Locality Name (eg, city) []:Hangzhou
Organization Name (eg, company) [Internet Widgits Pty Ltd]:xxx
Organizational Unit Name (eg, section) []:
Common Name (e.g. server FQDN or YOUR name) []:
Email Address []:
Please enter the following 'extra' attributes
to be sent with your certificate request
A challenge password []:123456
An optional company name []:
$>openssl x509 -req -in xxx/xxx-req.csr -out xxx/xxx-cert.pem -signkey xxx/xxx-key.pem -CA ca/ca-cert.pem -CAkey ca/root-key.pem -CAcreateserial -days 3650 ##签署服务器证书
Signature ok
subject=/C=CN/ST=Zhejiang/L=Hangzhou/O=xxx
Getting Private key
Getting CA Private Key
$>openssl pkcs12 -export -clcerts -in xxx/xxx-cert.pem -inkey xxx/xxx-key.pem -out xxx/xxx.pfx #这个是平台的私钥
Enter Export Password:123456
Verifying - Enter Export Password:123456
$>openssl rsa -in xxx-key.pem -pubout -out xxx-pubkey.pem #提取公钥,这个是平台的公钥,发给合作方侧
writing RSA key
==================================================================================================================================================
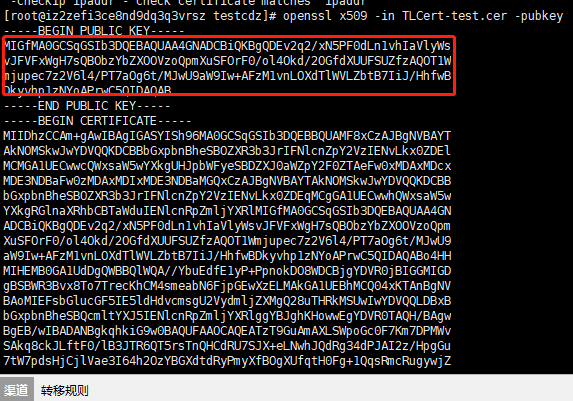
提取:cer证书公钥:
提取命令:
openssl x509 -in XX.cer -pubkey -noout > XX.pem
如果提示没有这个命令 -noout ,去掉它即可
下面这部分就是 要提取的公钥
参考链接:https://blog.csdn.net/qq_44734154/article/details/126167945
