nginx负载均衡器的部署(5层\7层)
目录
什么是负载均衡?
实验:实现Web业务的负载均衡(http协议负载均衡)
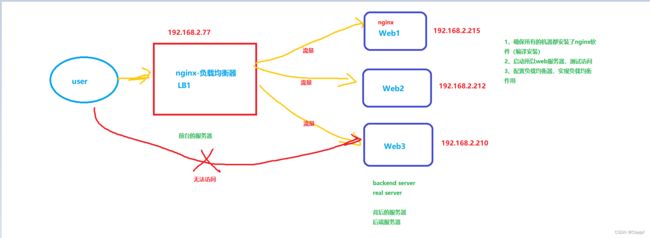
一、实验规划图:
如何实现克隆虚拟机呢?
二、实验步骤:
1、准备4台服务器,一台做负载均衡器,另外的3台做web服务器,每台都需要安装nginx,建议都编译安装nginx,统一安装配置
2、安装nginx成功后配置nginx里的网页,使之呈现对应的效果
3、修改四台linux机器的名字:
4、检查配置是否成功
5、对nginx-LB1负载均衡器进行配置
6、对nginx负载均衡器进行测试
三、配置HTTPS的负载均衡器(前提是需要会配置nginx的HTTPS环境)
服务器web服务上都有日志,日志里的ip是nginx-LB的函数用户user的呢?
1、在阿里云(也可以在腾讯云等云上)上购买域名(买一个最便宜的),并申请https证书(如下图所示)
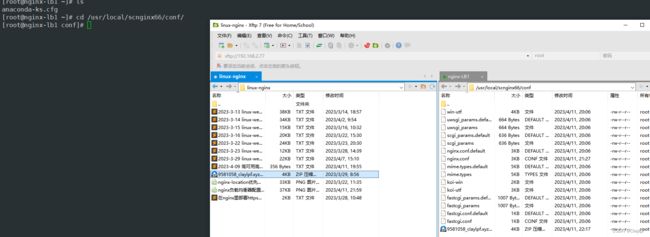
2、将证书传递到我们的负载均衡器的nginx配置文件夹里,并给予解压如图所示
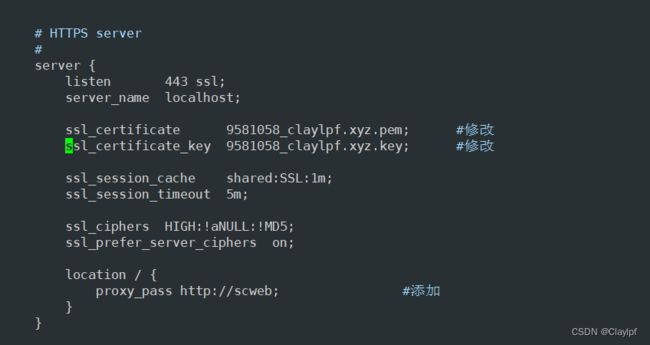
3、编辑nginx.conf文件,配置HTTPS环境
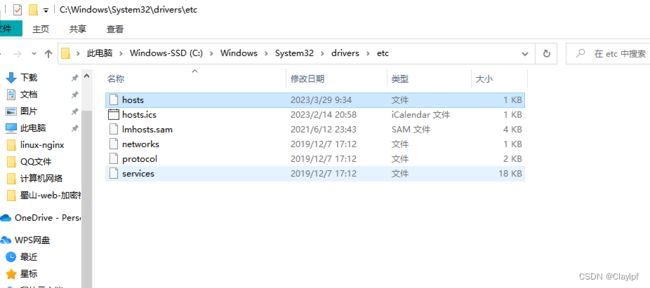
4、修改windows的hosts文件配置(配置对应的DNS服务)
5、在自己电脑上的浏览器进行测试(访问https://www.claylpf.xyz)
什么是负载均衡?
负载均衡,英文名称为Load Balance,是指将网络流量分配到多个服务器上,以达到提高系统性能、增加可靠性、降低延迟等目的的技术。负载均衡器可以根据不同的算法(如轮询、最少连接数等)将请求分发到不同的服务器上,从而实现服务器资源的均衡利用,提高系统的可扩展性和可用性。负载均衡通常用于高流量的网站、应用程序和数据库服务器等场景。
负载均衡构建在原有网络结构之上,它提供了一种透明且廉价有效的方法扩展服务器和网络设备的带宽、加强网络数据处理能力、增加吞吐量、提高网络的可用性和灵活性。
理解:
负载:很多人访问 --》负担 load
均衡:很多台机器 --》平衡 balance
流量:用户的访问就是流量
实验:实现Web业务的负载均衡(http协议负载均衡)
一、实验规划图:
准备至少四台虚拟机,可以通过克隆虚拟机实现,如Web端的三台虚拟机就可以通过克隆实现
如何实现克隆虚拟机呢?
首先如下图所示:
然后进入克隆界面,之后点击创建链接克隆功能 (能减少磁盘空间的消耗)
之后就能自己选择安装位置和设置虚拟机名称啦
是不是很简单呀!!
注:如果你使用的网卡模式是桥接模式下静态配置的IP地址,则可能会出现IP地址出现冲突的问题,解决这个问题则需要你去重新配置IP地址哦,而且你有可能需要改变nginx输出的端口,不然可能会导致端口冲突。
完成环境的配置后:
二、实验步骤:
1、准备4台服务器,一台做负载均衡器,另外的3台做web服务器,每台都需要安装nginx,建议都编译安装nginx,统一安装配置
下面是统一安装配置nginx的脚本:
完整版一键安装配置nginx脚本
[root@mysql nginx]# cat onekey_install_henshan_nginx.sh
#!/bin/bash

#新建一个文件夹用来存放下载的nginx源码包
mkdir -p  /nginx
cd /nginx

#新建工具人用户、设置无法登录模式
useradd  -s /sbin/nologin  clay

#下载nginx
#wget  http://nginx.org/download/nginx-1.23.2.tar.gz
curl -O http://nginx.org/download/nginx-1.23.2.tar.gz

#解压nginx源码包
tar xf nginx-1.23.2.tar.gz

#解决软件依赖关系、需要安装的软件包
yum install epel-release -y
yum install gcc gcc-c++ openssl openssl-devel  pcre pcre-devel  automake  make  psmisc  net-tools lsof vim geoip  geoip-devel wget  zlib zlib-devel -y

#到达nginx配置文件目录下
cd nginx-1.23.2

#编译前的配置
./configure  --prefix=/usr/local/scnginx66  --user=clay  --with-http_ssl_module --with-http_v2_module --with-stream --with-http_stub_status_module --with-threads

#编译、开启一个进程同时编译
make -j 1

#编译安装
make install

#启动nginx
/usr/local/scnginx66/sbin/nginx

#永久修改PATH变量
PATH=$PATH:/usr/local/scnginx66/sbin
echo "PATH=$PATH:/usr/local/scnginx66/sbin"  >>/root/.bashrc

#设置nginx的开机启动--手动添加
#在/etc/rc.local中添加启动命令
#/usr/local/scnginx66/sbin/nginx
echo "/usr/local/scnginx66/sbin/nginx"  >>/etc/rc.local

#给文件可执行权限
chmod +x /etc/rc.d/rc.local

#selinux和firewalld防火墙都需要关闭
service firewalld stop
systemctl disable firewalld

#临时关闭selinux
setenforce 0

#永久关闭selinux (需要开机重启)
#vim /etc/selinx/config
sed -i '/^SELINUX=/ s/enforcing/disabled/'  /etc/selinux/config

[root@mysql nginx]#
2、安装nginx成功后配置nginx里的网页,使之呈现对应的效果
[root@web-1 html]# pwd
/usr/local/scnginx66/html
[root@web-1 html]# ls
50x.html index.html
[root@web-1 html]#
[root@web-1 html]# vim index.html
[root@web-1 html]# cat index.html
Welcome to Web-1! #修改为Web-1
Welcome to Web-1!
#修改为Web-1
If you see this page, the nginx web server is successfully installed and
working. Further configuration is required.
For online documentation and support please refer to
nginx.org.
Commercial support is available at
nginx.com.
Thank you for using nginx.
[root@web-1 html]#
3、修改四台linux机器的名字:
[root@localhost /]# hostnamectl set-hostname nginx-LB1
[root@localhost /]# su
[root@nginx-lb1 /]#
4、检查配置是否成功
IP是否对应成功:
nginx-LB1 --》192.168.2.77
Web-1 --》192.168.2.215
Web-2 --》192.168.2.212
Web-3 --》192.168.2.210
检测主机名是否对应上:
![]()
![]()
![]()
![]()
检测3台Web端的nginx是否能连接的上:
下面是nginx连接成功的图片
5、对nginx-LB1负载均衡器进行配置
nginx是工作在应用层的,而我们需要对nginx配置文件中的http协议进行配置
http协议也是工作在应用层的。
因此我们可以叫做配置负载均衡5层,也可以叫做负载均衡7层
我们通过对默认的配置文件nginx.conf文件进行配置
[root@nginx-lb1 /]# cd /usr/local/scnginx66/conf/     #nginx配置文件路径
[root@nginx-lb1 conf]# ls
fastcgi.conf          fastcgi_params          koi-utf  mime.types          nginx.conf          scgi_params          uwsgi_params          win-utf
fastcgi.conf.default  fastcgi_params.default  koi-win  mime.types.default  nginx.conf.default  scgi_params.default  uwsgi_params.default
[root@nginx-lb1 conf]# vim nginx.conf        #编译配置文件
参考官方网站:Using nginx as HTTP load balancer
Load balancing methods --》 负载均衡的算法--》调度算法
The following load balancing mechanisms (or methods) are supported in nginx:
- 1、轮询:轮转 --》rr
- round-robin — requests to the application servers are distributed in a round-robin fashion,
- 轮询是一种调度算法,其基本原理是依次轮流分配CPU时间片给每个进程,每个进程都有相同的机会获得CPU时间片,直到所有进程都被执行完毕或者达到预设的时间片长度。在轮询算法中,每个进程被分配的时间片通常是固定的,因此长时间运行的进程可能会阻塞其他进程的执行,导致响应时间较长。轮询算法适用于进程的执行时间相对较短,且没有特别紧急的进程需要优先处理的情况。
- 2、最小连接数
- least-connected — next request is assigned to the server with the least number of active connections,
- 最小连接数调度算法是一种负载均衡算法,它的主要思想是将请求分配到当前连接数最少的服务器上,以达到负载均衡的目的。该算法适用于集群中的服务器数量较少的场景,因为在服务器数量较多的情况下,该算法的优势会逐渐减弱。最小连接数调度算法可以提高服务器的利用率,避免某些服务器过度负载的情况,从而提高整个系统的稳定性和可靠性。
- ip-hash算法
- ip-hash — a hash-function is used to determine what server should be selected for the next request (based on the client’s IP address).
- 我们可以保持会话的一致性,总是让客户机去访问到相同的后端服务器,这是因为它是根据客户机的IP地址进行选择的,相同的ip地址总是会访问第一的那个后端服务器
- IP-hash算法是一种调度算法,它将客户端的IP地址作为散列键,将其映射到服务器组中的一个服务器上。在负载均衡的过程中,当客户端发送请求时,该请求的IP地址将被散列,并根据散列值将请求发送到服务器组中的一个服务器上。IP-hash算法的优点是可以确保同一客户端的请求始终被发送到同一台服务器上,从而避免了一些可能由于服务器之间的状态不同而导致的问题。此外,该算法还可以在服务器组中实现负载均衡,从而提高整个系统的性能和可靠性。
我们的负载均衡的配置是放在http协议里面的:
http {
    include       mime.types;
    default_type  application/octet-stream;

    .....
    #添加这一条
    upstream scweb{                 #对其进行负载均衡,命名为scweb
        server 192.168.2.215;
        server 192.168.2.212;
        server 192.168.2.210;
    }

    server {
        listen       80;
        server_name  localhost;

        #charset koi8-r;

        #access_log  logs/host.access.log  main;

        location / {
            proxy_pass http://scweb;        #修改这一条
        }


        .....
    }
    ....
}
完成配置后重载nginx-LB1负载均衡器:
[root@nginx-lb1 conf]# vim nginx.conf
[root@nginx-lb1 conf]# cd ..
[root@nginx-lb1 scnginx66]# nginx -t
nginx: the configuration file /usr/local/scnginx66/conf/nginx.conf syntax is ok
nginx: configuration file /usr/local/scnginx66/conf/nginx.conf test is successful
[root@nginx-lb1 scnginx66]# cd sbin
[root@nginx-lb1 sbin]# ./nginx -s reload     #对nginx进行重载,不影响nginx服务的进行
[root@nginx-lb1 sbin]#
6、对nginx负载均衡器进行测试
我们访问192.168.2.77(负载均衡器的IP),他会自动跳转到我们设置的Web服务器里去
如果出现以上图片,说明nginx的7层负载均衡器完成配置啦!
注:我们默认使用的负载均衡器的算法是 轮询算法
如果我们需要使用其他的调度算法,我们需要在nginx的配置文件里设置:
ip_hash算法:
最小连接数算法:
三、配置HTTPS的负载均衡器(前提是需要会配置nginx的HTTPS环境)
可以参考我的:(36条消息) 使用nginx搭建http和https环境_Claylpf的博客-CSDN博客
先搭建好https的环境哦
先回答下面这个问题:
服务器web服务上都有日志,日志里的ip是nginx-LB的函数用户user的呢?
access.log 访问日志
tail -f access.log :意思是动态查看访问日志
由上图可知,我们的web后端服务是不告诉用户的,用户是不知道的,我们的web服务也是不知道是哪个用户访问了它的,他知道是负载均衡器访问了它,因此我们在配置https协议的时候,可以直接对用户访问的负载均衡器进行配置即可。因为负载均衡器才是对外提供的接口。
步骤:
1、在阿里云(也可以在腾讯云等云上)上购买域名(买一个最便宜的),并申请https证书(如下图所示)
![]()
2、将证书传递到我们的负载均衡器的nginx配置文件夹里,并给予解压如图所示
3、编辑nginx.conf文件,配置HTTPS环境
配置如下图所示:
重新编译nginx
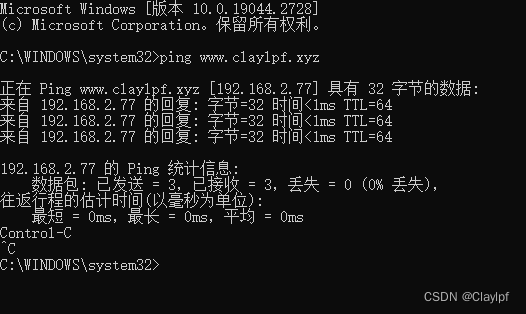
4、修改windows的hosts文件配置(配置对应的DNS服务)
增加这一条
最后再验证一下(cmd.exe)
5、在自己电脑上的浏览器进行测试(访问https://www.claylpf.xyz)
完成配置啦!!
