Service生命周期详解【2023年最新】
一、Service介绍以及生命周期
1、生命周期图
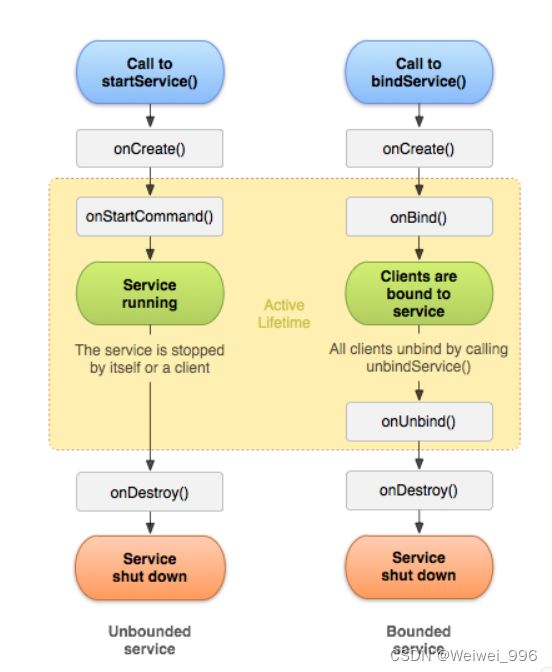
首先,话不多说,先上图。
左边是Service的生命周期,右边数Service绑定服务的生命周期。
2、服务概述
Service是一种在后台执行长时间运行操作的组件,它没有用户界面。Service可以在后台处理耗时任务、执行网络请求、播放音乐、处理传感器数据等。
3、服务生命周期
下面将介绍几个重要的生命周期。
onCreate()
服务第一次创建的时候调用,如果服务已经存在,则不调用。
onStartComment()
这是通过startService()启动服务以后会调用此方法,当该方法执行的时候服务将启动。
onBind()
服务的绑定,当创建的服务想和一个Activity或者其他绑定时候,即需要使用方法。不过,这需要你自己写一个类去继承Binder重写一些方法来实现。
onDestroy()
服务的销毁。
二、服务的创建
这里的话,就简单的概述了。
1、创建服务
首先是创建服务,然后重写服务的几个重要的方法,或者你需要重写什么方法就重写什么方法。我自己懒得写了,这下面有些代码是Android官网提供的几个例子。
public class ExampleService extends Service {
    int startMode;       // indicates how to behave if the service is killed
    IBinder binder;      // interface for clients that bind
    boolean allowRebind; // indicates whether onRebind should be used

    @Override
    public void onCreate() {
        // The service is being created
    }
    @Override
    public int onStartCommand(Intent intent, int flags, int startId) {
        // The service is starting, due to a call to startService()
        return startMode;
    }
    @Override
    public IBinder onBind(Intent intent) {
        // A client is binding to the service with bindService()
        return binder;
    }
    @Override
    public boolean onUnbind(Intent intent) {
        // All clients have unbound with unbindService()
        return allowRebind;
    }
    @Override
    public void onRebind(Intent intent) {
        // A client is binding to the service with bindService(),
        // after onUnbind() has already been called
    }
    @Override
    public void onDestroy() {
        // The service is no longer used and is being destroyed
    }
}
如果你不会手动创建服务你就直接去new,去你所在的包的文件夹创建就行了,和创建Activity一样类似。
2、服务声明
其次,在AndroidManifest清单中声明服务。
  ...


//这里还有几个属性 一般会有android:enabled和android:exported
      ...
说明:
-
android:enabled:该属性用于指定组件是否可用。默认情况下,组件是启用的(enabled="true")。如果将该属性设置为false(enabled="false"),则表示该组件被禁用,将无法被系统或其他应用程序使用。
-
android:exported:该属性用于指定组件是否可以被其他应用程序访问。默认情况下,组件是可导出的(exported="true"),即其他应用程序可以通过Intent启动或与该组件进行交互。如果将该属性设置为false(exported="false"),则表示该组件不可导出,只能被同一应用程序内的其他组件访问
3、服务绑定
然后,就是绑定服务了,可以通过bindService()或者startService()绑定。startService一般是绑定后台服务,而bindService适合通信的时候绑定。而且startService和Activity的生命周期无关,bindService会和Activity的生命周期有关。
当然,如果你不需要通信(例如两个活动之间的通信)的话,你可以不用绑定。
4、服务启动
然后,就是启动服务了。
这个启动服务和启动Activity类似
Intent serviceIntent = new Intent(this, MyService.class);
startService(serviceIntent);
5、服务停止
如果不用了就停止
Intent serviceIntent = new Intent(this, MyService.class);
stopService(serviceIntent);
这个停止还有另外一个方法,stopSelf()
停止服务是通过stopelf()或者stopService(),但是stopService()方法用于从外部组件停止服务,而stopSelf()方法用于在服务内部停止自身。如果有多个Activity持有服务,那么需要等所有服务都调用stopService才可以关闭服务。解除绑定是通过onUnbind(Intent)
三、IntentService
这是一个多线程的一个服务,就是可以通过该服务实现多线程通信。
这里我就说一下这个服务的用法吧。
1、IntentService创建
首选需要创建一个服务继承IntentService,然后重写方法。
public class myIntentService extends IntentService {
/**
* 在构造函数中传入线程名字
**/
public myIntentService() {
// 调用父类的构造函数
// 参数 = 工作线程的名字
super("myIntentService");
}/**
* 复写onHandleIntent()方法
* 根据 Intent实现 耗时任务 操作
**/
@Override
protected void onHandleIntent(Intent intent) {// 根据 Intent的不同,进行不同的事务处理
String taskName = intent.getExtras().getString("taskName");
switch (taskName) {
case "task1":
Log.i("myIntentService", "do task1");
break;
case "task2":
Log.i("myIntentService", "do task2");
break;
default:
break;
}
}@Override
public void onCreate() {
Log.i("myIntentService", "onCreate");
super.onCreate();
}
/**
* 复写onStartCommand()方法
* 默认实现 = 将请求的Intent添加到工作队列里
**/
@Override
public int onStartCommand(Intent intent, int flags, int startId) {
Log.i("myIntentService", "onStartCommand");
return super.onStartCommand(intent, flags, startId);
}@Override
public void onDestroy() {
Log.i("myIntentService", "onDestroy");
super.onDestroy();
}
}
2、IntentService绑定
然后和上面一样,在AndroidManifest里面注册。这里就不累赘了,和上面一样。
3、IntentService开启
随后,开启服务,也和上面一样。不过这里需要通信,你可以用bind携带一些bunder数据,携带的数据在onHandleIntent中会获取到,这里可以实现你线程的通信。onHandleIntent方法里面的东西也可以通过handler发到主线程里面去执行,这里你根据自己的需求写。
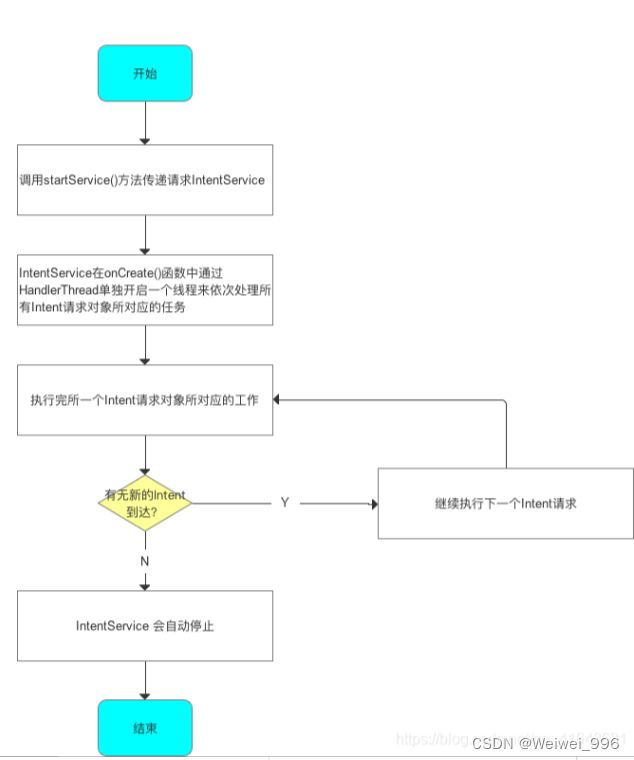
在IntentService执行完后,它会自动关闭,不需要你去手动关闭,下面一个图是对IntentService使用的一个推导。
若启动IntentService 多次,那么 每个耗时操作 则 以队列的方式 在 IntentService的 onHandleIntent回调方法中依次执行,执行完自动结束。
另外,IntentService的底层是HandlerThread+handler实现的。
四、Service和IntentService的对比
五、Service和其他线程的对比
文章的有一些图是来自Android开发者官网的,有一些是来自这位大佬的。
学生所做,若有错误,欢迎指出!


