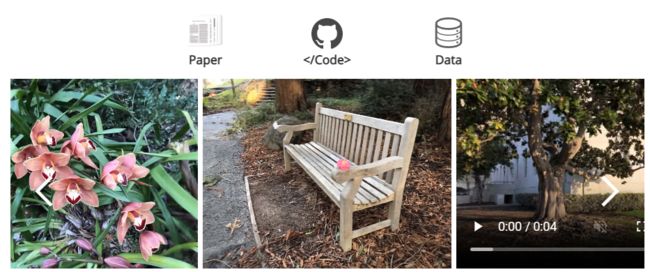
Nerf(Representing Scenes as Neural Radiance Fields for View Synthesis)代码复现笔记
前言:本文旨在帮助小白快速了解or学习复现出Nerf的代码,整体结构保持不变,不过会针对部分细节为了更好理解进行了修改。
本文会相应更新讲解视频于B站,id 出门吃三碗饭,有问题到b站评论区留言
同步更新于 公众号《AI知识物语》
B站讲解视频,任意门,点这里
准备:python编程基础,阅读过Nerf(2020)论文,配置好GPU环境(建议),工具Pycharm
Abstract:
(1)Nerf简单来说就是通过输入的5维向量通过函数生成多视角下的场景。
(2)我们倒过来思考,最终返回我们一个多视角下的场景,也可以理解为多视角图片,图片由众多像素组成,那么其需要是通过给定输入计算像素,计算像素的方法可以是:相机发出一条射线经过某像素坐标,以及三维场景下(真实世界下)的很多点,像素最终是由这条光线上所有点共同努力形成的,这些点我们亲切地叫做采样点。这个过程我们叫做体渲染。那么我们现在知道了为了获得多视角图片,nerf模型需用经过体渲染操作来得到一个个像素值。
(3)我们再对上述步骤细分下,体渲染需要的道具有:光线,或者叫光线上的采样点.
(4)如何获得采样点?通过对输入数据进行一个处理,论文采用了MLP神经网络,输出密度sigma和rgb值,再通过sigma和rgb值去获得采样点。然后有各种采样方式,见下文。
上面大概就包括了本文的内容,文章将主要侧重代码的解释分析,尽量对必要的数学和概念做出解释。
本文内容包括以下,
1导入包→2加载数据→3设计Nerf网络→4设计位置编码函数→5光线采样函数→6分层采样函数→7归一化采样点→8计算光线造成的像素值→9渲染模拟光线→10处理光线数据→11训练(优化)→12以视频形式导出
Method:
1:导入库
这是我们本次项目需要使用的包,补充,关于torch建议,下载与自己笔记本(电脑)GPU版本对应的torch库,比如我的显卡是11.6,去pytorch官网下载对应gpu版torch指令是:
pip install torch==1.13.1+cu116 torchvision==0.14.1+cu116 torchaudio==0.13.1 --extra-index-url https://download.pytorch.org/whl/cu116 --user
import os
import numpy as np
import matplotlib.pyplot as plt
import torch.nn as nn
import torch
import torch.nn.functional as F
from tqdm import tqdm`
2:加载数据
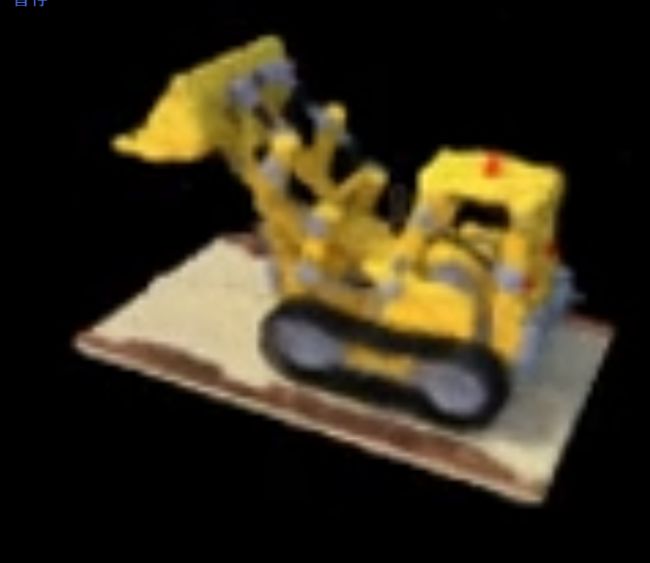
首先我们加载数据集,其包括图片(lego)、位姿、焦距
images.shpae 的值 [106,100,100,3] 代表的是加载的有106个图片,每个图片高宽为100,且通道数为3
#加载数据
data = np.load('tiny_nerf_data.npz')
images = data['images'] # 图片
poses = data['poses']# 位姿
focal = data['focal']# 焦距
H,W = images.shape[1:3]# 高和宽
print("images.shape:",images.shape) # images.shape--> N,H,W,3 N代表用于train test val的总数量 ,H,W,3分别代表高 宽 通道数
print("poses.shape:",poses.shape) # 转置矩阵 N,4,4
print("focal.shape:",focal.shape)
print("H:",H)
print("W:",W)
n_train = 100 # 训练使用的照片
test_img, test_pose = images[101],poses[101]
images = images[:n_train] #从加载的数据里面选100个数据来训练使用(原来是106个-->100个
poses = poses[:n_train]
plt.imshow(test_img)
plt.show()
3:设计Nerf网络结构(重点)
这里强烈建议跟着论文里面的图片自己对照着复现下
# 构建Nerf 网络结构
class Nerf(nn.Module):
    #D=8 netdepth网络的深度 ,也就是网络的层数 layers in network
    # W=256 netwidth网络宽度 , 也就每一层的神经元的个数 channels per layer
    # input_ch=60 输入的通道,(这里稍微解释下,这里输入的数据是经过位置编码操作的)
    # input_ch_views=24  输入经过PE升维的视角数据
    # skip=4,  用来决定在什么时候加入 视角数据
    # use_view_dirs=True

    def __init__(self,D=8,W=256, input_ch=60,input_ch_views=24,skip=4,use_view_dirs=True):
        self.D=D
        self.W=W
        self.input_ch=input_ch
        self.input_ch_views=input_ch_views
        self.skip=skip
        self.use_view_dirs =use_view_dirs
       #开始编写网络
        self.net =nn.ModuleList([nn.Linear(input_ch,W)])
        for i in range(D-1):
            if i== skip:#在网络的第5层,添加 60维的输入数据  为什么加??? 256-->316
                self.net.append(nn.Linear(W+input_ch,W))
            else:
                self.net.append(nn.Linear(W,W))#这里的意思就是传入的数据是W 维,也就是256维,输出也是256维

        self.alpha_linear =nn.Linear(W,1) #输出透明度值的卷积层,由256维输出1维数值
        self.feature_linear = nn.Linear(W,W) # 第9层
        #上面已经完成了 0-7层的卷积层
        if use_view_dirs:# 如果添加使用视角数据,那么在第9层添加24维度的方向数据,并且输出128维的信息
            self.proj = nn.Linear(W+input_ch_views,W//2)
        else:
            self.proj=nn.Linear(W,W//2)# 如果不添加使用视角数据,那么不在第9层添加24维度的方向数据,并且输出128维的信息
        self.rgb_linear = nn.Linear(W//2,3)#在最后一层,输入是128维信息,输出的是 rgb值

    def forward(self, input_pts, input_views=None):
        h = input_pts.clone() # 分别代表 输入的位置信息以及视角信息 or方向信息

          #这里的作用就是依次给相连每层添加激活层
        for i , _ in enumerate(self.net): #这个循环依次返回 net网络的 索引(也就是层数,从0开始) 以及  索引对应的内容
            h = F.relu(self.net[i](h))
            if i == self.skip:# 如果遇到第5层,也就是索引为4的时候
                h == torch.cat([input_pts,h],-1)
        #经过上面8个relu激活层处理,通过最后一个relu层后输出 透明度值
        #forward 函数的作用是将输入数据经过网络中各个层的计算和变换后,得到输出结果 (前向传播计算)
        alpha = F.relu(self.alpha_linear(h))# 这里可以这么理解,h为经过前面7层处理得到的数据,然后传到alpha_linear层,再对拥有h信息的alpha_linear层进行relu处理,输出alpha值
        feature = self.feature_linear #第9个卷积层

        if self.use_view_dirs:# 如果添加视角数据,那么在该层通过torch.cat 将其加入原有的信息, 这里的h理解为经过前面8个卷积层前面传播的结果+24维的视角信息
            h = torch.cat([feature,input_views],-1)

        h =F.relu(self.proj(h))#这里的操作对应于图中 256--》128的激活操作
        #128层的网络层最后通过sigmoid激活函数 输出rgb值
        rgb= torch.sigmoid(self.rgb_linear(h))

        return rgb,alpha#这里指正下 alpha代表的是论文里面的输出值 sigma
代码上面注释写的很明白了,这里就大概介绍下论文的网络图,具体讲解可以观看我的讲解视频。
3.1解释:
输入:60维的数据
注释:应该是3维的位置+2维的方向向量通过PE位置编码操作升维为60维,高维信息也叫高频信息,简单理解为表达更真实。
输出:在第9层输出透明度,在最后一层输出RGB值
3.2需要注意的地方:
在第5层的时候额外添加了60维的位置信息, 在第9层的时候加了24维的方向信息(这里可以简单理解为增加最终生成值的真实效果)
3.3补充:
首先理解论文的MLP结构图,每层为全连接层,并且黑色箭头代表Relu激活,橙色箭头代表没有激活,虚线箭头代表Sigmoid激活
NeRF(
  (net): ModuleList(
    (0): Linear(in_features=60, out_features=256, bias=True)
    (1): Linear(in_features=256, out_features=256, bias=True)
    (2): Linear(in_features=256, out_features=256, bias=True)
    (3): Linear(in_features=256, out_features=256, bias=True)
    (4): Linear(in_features=256, out_features=256, bias=True)
    (5): Linear(in_features=316, out_features=256, bias=True)
    (6): Linear(in_features=256, out_features=256, bias=True)
    (7): Linear(in_features=256, out_features=256, bias=True)
  )
4:位置编码(重点)
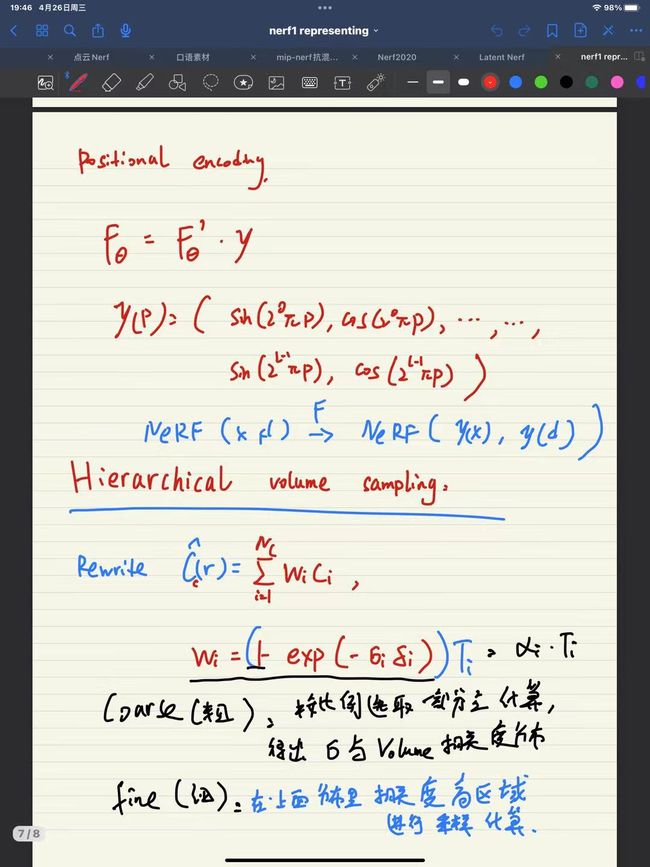
这里结合数学公式看,
4.1:
左边是函数y,变量为p,表示为y(p)
右边是 sin,cos先后表达的式子,我们可以自己找到规律。
4.2为什么引入位置编码:
基于先前的论文,其表明了MLP网络不善于学习高频信息,但是纹理等信息都是高频的(比如某张图片上的轮廓信息就是高频的,因为在轮廓周围信息变化剧烈),如果直接使用MLP学习,会导致学得生成的图片太近会模糊,太远会产生锯齿。因此引入了位置编码,让MLP同时学习高低频信息,提升清晰度。
def PE(x, L):#位置编码 低频信息转换为高频信息-  x代表输入给编码器的数据维度,也就是3,2,5, l为数学公式中的L
    #这个函数对x坐标的3个值和向量d 的2个值都进行了编码。实验中设置了 L=10 for y(x),L=4 for y(d)
#这里为了方便统一处理,应该会影响最后效果
  pai = 3.14
  pe = []
  for i in range(L):
    for fn in [torch.sin, torch.cos]:#依次 先后读取sin cos 函数
      pe.append(fn(2.**i * x * pai))
  return torch.cat(pe, -1)  #对tensor 进行拼接
5:光线采集(重点)
5.1:
这里简单描述下,光线采集就是求解图片(屏幕)上每个像素(颜色)对应的相机射线,类似下图

5.2:
我们需要做的是进行如下的坐标变换: 屏幕坐标系—>相机坐标系—>世界坐标系

5.3原理: 射线经过空间上的每个点的密度(只和空间坐标相关)和颜色(同时依赖空间坐标和入射角),通过对二者进行某种积分就可以得到每个像素的颜色。当每个像素的颜色都计算出来,那么这个视角下的图像就被渲染出来了,这也是我们为什么要生成光线并采集光线上点的原因。下面的公式就表达了积分的过程(视频会展开讲) sigma和c分别代码体密度和颜色。

T(t)理解为沿t_n到t着射线累积的透过率,或者理解为射线从t_n到t,没有碰到任何其他粒子的概率
#光线采集 。   屏幕坐标系---》相机坐标系---》世界坐标系
#射线经过空间上的每个点的密度(只和空间坐标相关)和颜色(同时依赖空间坐标和入射角),对二者进行某种积分就可以得到每个像素的颜色。当每个像素的颜色都计算出来,那么这个视角下的图像就被渲染出来了

#先在三维空间利用几何关系和内参矩阵K求得表示光线方向的向量;
#随后利用外参矩阵将相机坐标系变换到世界坐标系;
def sample_rays_np(H,W,f,c2w):
    #生成网格点坐标矩阵,i,j分别表示每个像素的坐标,i每一行表示x轴坐标,j每行代表y轴坐标
    i,j = np.meshgrid(np.arange(W,dtype=np.float32),np.arange(H,dtype=np.float32),indexing='xy')
   ##利用相机内参 K 计算每个像素坐标相对于光心的单位方向,由屏幕坐标系转换为相机坐标系,   因为Nerf坐标系和 colmap的坐标系相反的,所以计算的时候前面要带个 负号
    dirs = np.stack([(i-W*.5+.5)/f, -(j-H*.5+.5)/f, -np.ones_like(i)],-1)
    # 把光线方向从相机坐标系转移到 世界坐标系。 注意这里d表示的是光线方向,求在世界坐标系的方向
    rays_d = np.sum(dirs[...,None,:] * c2w[:3,:3],-1)
    #把相机坐标系的原点转变为世界坐标系的原点,其表示为所有光线的起点
    rays_o = np.broadcast_to(c2w[:3,-1],np.shape(rays_d))
    return rays_o,rays_d
6:分层采样(重点)
6.1 概念:
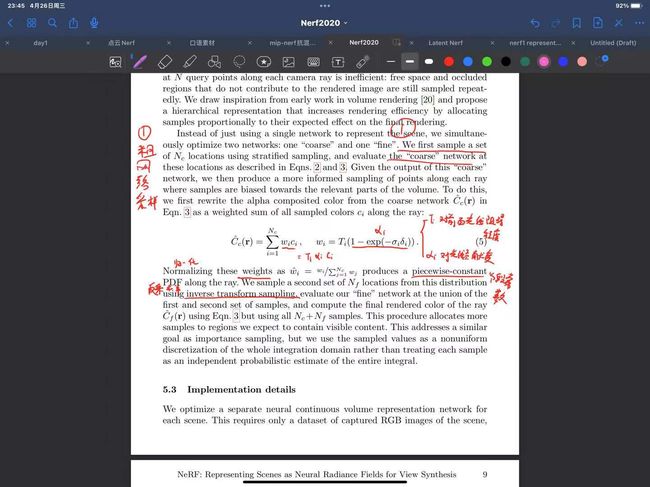
论文提出先对一条光线均匀采样,也叫粗采样(N_samples),在粗采样的基础上选取信息更丰富的区间进行细采样(N_importance),这样可以一定程度上节约算力,更高效地完成采样。
6.2 分析下面的公式:
(1)左边的式子表示的是 预测的颜色值 = Σ 每个像素值*每个像素值的权重 。
权重可以理解为这个像素对最终成像的贡献,如果为0,那么就没有贡献,图片的颜色与其毫无关系

(下面的图可跳过,主要就补充些数学知识,视频讲解会用到)

6.3:
Nerf使用两个网络同时进行训练 (后称 coarse 和 fine 网络), coarse 网络输入的点是通过对光线均匀采样得到的,根据 coarse 网络预测的体密度值,对光线的分布进行估计,然后根据估计出的分布进行第二次重要性采样,然后再把所有的采样点一起输入到 fine 网络进行预测。具体过程请见下图。
参考文章
先使用粗采样(在起点、终点之间均匀采样)得到 Nc个点,采样通过 coarse 的渲染方程的计算

之后需要对 w_i 进行归一化,得到分段常数pdf概率密度函数,然后通过逆变换采样(inverse transform sampling)获得N_f个点,添加至已有点中,用于fine网络采样。
6.5为什么用逆变换采样:
逆变换采样的作用是,在分布 p 的 CDF 值域上均匀采样,其采样结果与原分布 p 中的采样同分布。因此如果获取当前分布困难,可以通过逆变换采样,简化问题难度。
# Hierarchical sampling (section 5.2)
# #大概步骤
# 1根据pdf 求 cdf
# 2 做0-1的均匀采样
# 3求采样点值在cdf中的对应分块和传播时间
# 4求解采样点对应的z_vals
# bins  论文里表示为箱,可以理解为区间的 1/n      , weights      , N_samples
def sample_pdf_point(bins, weights, N_samples, device):
    pdf = F.normalize(weights, p=1, dim=-1)
    cdf = torch.cumsum(pdf, -1)
    cdf = torch.cat([torch.zeros_like(cdf[..., :1]), cdf], -1)

    # uniform sampling   归一化后,变成概率密度
    u = torch.rand(list(cdf.shape[:-1]) + [N_samples], device=device).contiguous()

    # invert 逆变换采样
    ids = torch.searchsorted(cdf, u, right=True)
    below = torch.max(torch.zeros_like(ids - 1, device=device), ids - 1)
    above = torch.min((cdf.shape[-1] - 1) * torch.ones_like(ids, device=device), ids)
    ids_g = torch.stack([below, above], -1)
    # ids_g => (batch, N_samples, 2)

    # matched_shape : [batch, N_samples, bins]
    matched_shape = [ids_g.shape[0], ids_g.shape[1], cdf.shape[-1]]
    # gather cdf value
    cdf_val = torch.gather(cdf.unsqueeze(1).expand(matched_shape), -1, ids_g)
    # gather z_val
    bins_val = torch.gather(bins[None, None, :].expand(matched_shape), -1, ids_g)

    # get z_val for the fine sampling 得到精细采样的z值
    cdf_d = (cdf_val[..., 1] - cdf_val[..., 0])
    cdf_d = torch.where(cdf_d < 1e-5, torch.ones_like(cdf_d, device=device), cdf_d)
    t = (u - cdf_val[..., 0]) / cdf_d
    samples = bins_val[..., 0] + t * (bins_val[..., 1] - bins_val[..., 0])

    return samples
7:归一化采样点
t_n,t_f 分别表示为采样区间的起始与终点
结合下图的论文看,代码的含义可以理解为,
(1)对t_n,t_f 的区间分n等份
(2)从每个等份区间里面随机采样1个点(区间公式如下图)
(3)返回位置值(这里存疑,不清楚)
虽然我们使用离散的样本集来估计积分,但分层抽样使我们能够表示连续的场景表示,因为它导致在优化过程中在连续位置评估MLP。
def uniform_sample_point(tn,tf,N_samples,device):
    k = torch.rand([N_samples],device=device)/ float(N_samples)
    pt_value = torch.linspace(0.0,1.0,N_samples+1,device=device)[:-1]
    pt_value+=k
    return tn+(tf-tn)*pt_value
8:获取像素值,也叫体渲染过程1
8.1原理:
已知:上文我们已经构建过nerf网络,我们知道其可以返回rgb,以及sigma(体密度)。
补充下,这里神经网络返回的rgb,sigma是网络基于公式、数据给出的预测值
数学公式:下图公式5
需要返回:rgb, weights (后续我们需要对通过这2个数据计算、预测color值)
#输入依次为 网络,位置,光线方向
def get_rgb_w(net, pts, rays_d, z_vals, device, noise_std=.0, use_view=False):
    # pts => tensor(Batch_Size, uniform_N, 3)
    # rays_d => tensor(Batch_Size, 3)
    # Run network
    pts_flat = torch.reshape(pts, [-1, 3])
    pts_flat = PE(pts_flat, L=10) #对位置数据进行位置编码操作, 设L=10
    dir_flat = None  #方向/视角初始化为空
    if use_view:  #如果使用视角数据
        dir_flat = F.normalize(torch.reshape(rays_d.unsqueeze(-2).expand_as(pts), [-1, 3]), p=2, dim=-1)
        dir_flat = PE(dir_flat, L=4)#同样进行PE操作
   #把位置以及方向信息传入网络,返回 rgb以及alpha值
    rgb, sigma = net(pts_flat, dir_flat)
    rgb = rgb.view(list(pts.shape[:-1]) + [3])
    sigma = sigma.view(list(pts.shape[:-1]))

    # get the interval 获取间隔值
    delta = z_vals[..., 1:] - z_vals[..., :-1]
    INF = torch.ones(delta[..., :1].shape, device=device).fill_(1e10)
    delta = torch.cat([delta, INF], -1)
    delta = delta * torch.norm(rays_d, dim=-1, keepdim=True)

    # add noise to sigma
    if noise_std > 0.:
        sigma += torch.randn(sigma.size(), device=device) * noise_std

    # get weights   对应数学公式去看
    alpha = 1. - torch.exp(-sigma * delta)#sigmia表示密度 delta表示相邻采样点的距离
    ones = torch.ones(alpha[..., :1].shape, device=device)
    weights = alpha * torch.cumprod(torch.cat([ones, 1. - alpha], dim=-1), dim=-1)[..., :-1]
    return rgb, weights
9:渲染光线(重点),也叫体渲染过程2
9.1原理:
1光线由起点以及方向组成,也就是ray_o 以及 ray_d
2结合步骤8得出的两个值,我们可以算出“屏幕”上的color值,许多的color值可以最终形成一幅图像
3 步骤8,9也就是通过对大部分的光线进行体渲染然后得出对应的像素值,最终生成一幅图片。
from torch import unsqueeze
#net 网络,rays  光线(包含原点以及方向),bound(范围,理解为近 or远),N_samples(粗采样点),device, noise_std=.0,use_view=False
def render_rays(net,rays,bound,N_samples,device,noise_std=.0,use_view=False):
    rays_o,rays_d =rays
    bs = rays_o.shape[0]
    near , far = bound #相机视角下场景点离相机中心最近(near)和最远(far)的距离,
    # 通过colmap重建的3D稀疏点在各个相机视角下最近和最远的距离得到的
    #near和far就是定义了采样区间的最近点和最远点
    uniform_N,important_N = N_samples
    #得到z轴在边界框的位置
    z_vals = uniform_sample_point(near,far,uniform_N,device)
    # 位置 = 原点+ 方向* z, 表示为生成光线上每个采样点的位置
    pts = rays_o[...,None,:]+ rays_d[...,None,:]*z_vals[...,None]

#如果经过了细采样操作,执行以下操作  (论文表述是从粗--细采样)
    if important_N is not None:
        with torch.no_grad():
            #获取 color和 weights值
            rgb, weights = get_rgb_w(net,pts,rays_d,z_vals,device,noise_std,use_view=use_view)
            z_vals_mid = .5*(z_vals[...,1:]+z_vals[...,:-1])
            samples = sample_pdf_point([z_vals_mid,weights[...,1:-1],important_N,device])

        z_vals = z_vals,unsqueeze(0).expand([bs,uniform_N])
        z_vals , _ =torch.sort(torch.cat([z_vals,samples],dim=-1),dim=-1)
        pts = rays_o[..., None,:] + rays_d[...,None,:]*z_vals[...,None]

#获取color,weights值  后者权重可以理解为每个color对最终成像的贡献度
    rgb,weights =get_rgb_w(net,pts,rays_d,z_vals,device,noise_std=noise_std,use_view=use_view)
    # 每个 color * 对应的权重---》理解为得到一幅图片,图片上每个点颜色的贡献度、权重都不同,对应有数学公式
    rgb_map = torch.sum(weights[...,None]*rgb,dim=2)
    # 深度图
    depth_map = torch.sum(weights*z_vals,-1)

    acc_map = torch.sum(weights,-1)

    return  rgb_map,depth_map,acc_map
10:处理光线数据
这里的主要工作就是对输入的图片、位姿、焦距等数据进行处理,并合成光线数据。
可以理解为提供一张图片(包含许多像素值),根据其生成光线数据,其是真实数据(与预测生成的数据取反)
from torch import device

print("process rays data")
#分别用来存放 光线起点,方向,对应的rgb值
rays_o_list =list()
rays_d_list =list()
rays_rgb_list =list()

for i in range(n_train):#对100个照片进行依次加载处理
    img =images[i]
    pose = poses[i]
    rays_o,rays_d = sample_rays_np(H,W,focal,pose)#根据每个图及对应位姿、相机信息等生成 光线
   #添加进 list列表里面
    rays_o_list.append(rays_o.reshape(-1,3))
    rays_d_list.append(rays_d.reshape(-1,3))
    rays_rgb_list.append(img.reshape(-1,3))
#np.concatenate函数对矩阵在第0维度上做合并操作
rays_o_npy = np.concatenate(rays_o_list,axis=0)
rays_d_npy = np.concatenate(rays_d_list,axis=0)
rays_rgb_npy = np.concatenate(rays_rgb_list,axis=0)
#将上面三个数据合并成rays变量,可以理解为rays包含了训练数据100张图片对应的光线信息,简单叫做 打包
rays = torch.tensor(np.concatenate([rays_o_npy, rays_d_npy, rays_rgb_npy], axis=1), device=device)
11:训练参数
主要内容就是对预测的像素值与真实的像素值使用损失函数来进行优化,使预测生成的像素(图片)更加真实。
#############################
# training parameters
#############################   Batch_size = 4096
N = rays.shape[0]#光线总数
Batch_size = 1024  #batch_size 表示每一批需要处理的光线数量,可以自己结合显卡情况设置
iterations = N // Batch_size # 光线总数/每一次处理的光线数量 =处理的批数
print(f"There are {iterations} batches of rays and each batch contains {Batch_size} rays")

bound = (2., 6.)
N_samples = (64, None)
use_view = True
epoch = 10
psnr_list = []
e_nums = []   #峰值信噪比,是一种评价图像的客观标准

#############################
# test data
############################# 加载测试所需的数据
test_rays_o, test_rays_d = sample_rays_np(H, W, focal, test_pose)
test_rays_o = torch.tensor(test_rays_o, device=device)
test_rays_d = torch.tensor(test_rays_d, device=device)
test_rgb = torch.tensor(test_img, device=device)

训练

#############################
# training
#############################
net = Nerf(use_view_dirs=use_view).to(device) #创建Nerf MLP网络,并放在GPU上
optimizer = torch.optim.Adam(net.parameters(), 5e-4)#定义优化器
# #Adam的特点有:
# 1、结合了Adagrad善于处理稀疏梯度和RMSprop善于处理非平稳目标的优点;
# 2、对内存需求较小;
# 3、为不同的参数计算不同的自适应学习率;
# 4、也适用于大多非凸优化-适用于大数据集和高维空间。
mse = torch.nn.MSELoss() #计算两个输入对应元素差值平方和的均值  ,or表示为可以使用该函数用来计算两个数据的相似性

for e in range(epoch):
    # create iteration for training
    rays = rays[torch.randperm(N), :]#随机获取光线
    train_iter = iter(torch.split(rays, Batch_size, dim=0)) #创建训练过程会使用的 迭代器iter

    # render + mse
    with tqdm(total=iterations, desc=f"Epoch {e+1}", ncols=100) as p_bar: #简单理解为设置顺利过程的 进度条
        for i in range(iterations):
            train_rays = next(train_iter)#获得光线 数据
            assert train_rays.shape == (Batch_size, 9) #判断语句 为false会异常
#torch.chunk(tensor, chunk_num, dim)将tensor按dim(行或列)分割成chunk_num个tensor块,返回的是一个元组
            #这里理解为 把 train_rays 切分为rays_o, rays_d, target_rgb
            rays_o, rays_d, target_rgb = torch.chunk(train_rays, 3, dim=-1)
            rays_od = (rays_o, rays_d)
            #调用render_rays 函数,获取返回的rgb_map,depth_map,acc_map 值。 也就是给定光线,获取其贡献形成的像素,color
            rgb, _, __ = render_rays(net, rays_od, bound=bound, N_samples=N_samples, device=device, use_view=use_view)
           #调用损失函数,对预测生成的值与真实值进行计算
            loss = mse(rgb, target_rgb)
            optimizer.zero_grad()#  梯度初始化为零,把loss关于weight的导数变成0
            loss.backward()#  loss.backward()
            optimizer.step()# optimizer:更新所有参数
          #理解为设置进度条,输出每轮迭代计算的损失值
            p_bar.set_postfix({'loss': '{0:1.5f}'.format(loss.item())})
            p_bar.update(1)
#在该模块下,所有计算得出的tensor的requires_grad都自动设置为False。
    with torch.no_grad():
        rgb_list = list()# 存rgb值
        for j in range(test_rays_o.shape[0]):
            rays_od = (test_rays_o[j], test_rays_d[j])#把光线原点和方向组合为rays
            #返回测试光线的rgb
            rgb, _, __ = render_rays(net, rays_od, bound=bound, N_samples=N_samples, device=device, use_view=use_view)
            rgb_list.append(rgb.unsqueeze(0))
            #把所有rgb值拼接在一起
        rgb = torch.cat(rgb_list, dim=0)
           #拼接的rhb值  与图片上rgb值 代入损失函数
        loss = mse(rgb, torch.tensor(test_img, device=device)).cpu()
        #设置 psnr参数 峰值信噪比
        psnr = -10. * torch.log(loss).item() / torch.log(torch.tensor([10.]))
        print(f"PSNR={psnr.item()}")
        #显示,描述psnr变化曲线
        plt.figure(figsize=(10, 4))
        plt.subplot(121)
        plt.imshow(rgb.cpu().detach().numpy())
        plt.title(f'Epoch: {e + 1}')
        plt.subplot(122)

        e_nums.append(e+1)
        psnr_list.append(psnr.numpy())
        plt.plot(e_nums, psnr_list)
        plt.title('PSNR')
        plt.show()

print('Done')
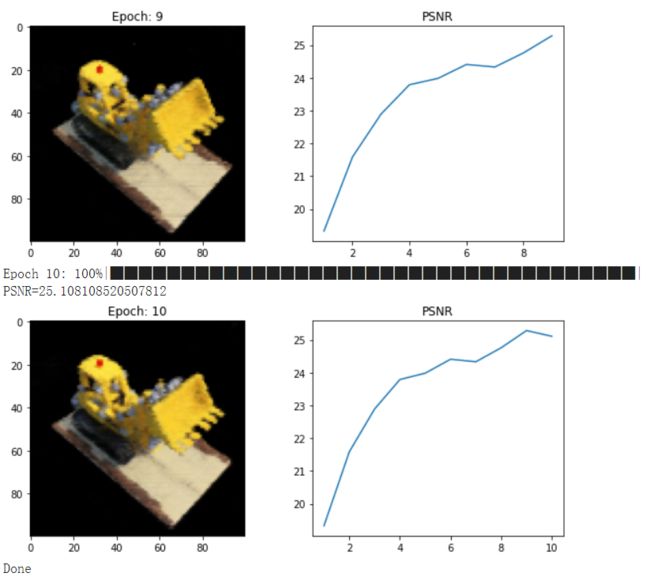
训练结果如下,虽然效果比不上文章展示的效果好,但本文目的在帮助大家在快速搭建起关于Nerf的编程逻辑,后续大家可以在此基础上去进行修改,或者参考mip-nerf等等论文提出的方向进行改进!!!
12:导出视频
补充:如果要生成视频的话,依次运行下面的代码
from ipywidgets import interactive, widgets


trans_t = lambda t : np.array([
    [1,0,0,0],
    [0,1,0,0],
    [0,0,1,t],
    [0,0,0,1],
], dtype=float)

rot_phi = lambda phi : np.array([
    [1,0,0,0],
    [0,np.cos(phi),-np.sin(phi),0],
    [0,np.sin(phi), np.cos(phi),0],
    [0,0,0,1],
], dtype=float)

rot_theta = lambda th : np.array([
    [np.cos(th),0,-np.sin(th),0],
    [0,1,0,0],
    [np.sin(th),0, np.cos(th),0],
    [0,0,0,1],
], dtype=float)


def pose_spherical(theta, phi, radius):
    c2w = trans_t(radius)
    c2w = rot_phi(phi/180.*np.pi) @ c2w
    c2w = rot_theta(theta/180.*np.pi) @ c2w
    c2w = np.array([[-1,0,0,0],[0,0,1,0],[0,1,0,0],[0,0,0,1]]) @ c2w
    return c2w


def f(**kwargs):
    c2w = pose_spherical(**kwargs)
    rays_o, rays_d = sample_rays_np(H, W, focal, c2w[:3,:4])
    with torch.no_grad():
      rays_o = torch.tensor(rays_o, device=device)
      rays_d = torch.tensor(rays_d, device=device)
      rgb_list = list()
      for j in range(rays_o.shape[0]):
        rays_od = (rays_o[j], rays_d[j])
        rgb, _, __ = render_rays(net, rays_od, bound=bound, N_samples=N_samples, device=device, use_view=use_view)
        rgb_list.append(rgb.unsqueeze(0))
      rgb = torch.cat(rgb_list, dim=0)

    plt.figure(2, figsize=(20,6))
    plt.imshow(rgb.cpu().detach().numpy())
    plt.show()


sldr = lambda v, mi, ma: widgets.FloatSlider(
    value=v,
    min=mi,
    max=ma,
    step=.01,
)

names = [
    ['theta', [100., 0., 360]],
    ['phi', [-30., -90, 0]],
    ['radius', [4., 3., 5.]],
]
frames = []
for th in tqdm(np.linspace(0., 360., 120, endpoint=False)):
    with torch.no_grad():
      c2w = pose_spherical(th, -30., 4.)
      rays_o, rays_d = sample_rays_np(H, W, focal, c2w[:3,:4])
      rays_od = (torch.tensor(rays_o, device=device,dtype=torch.float32),torch.tensor(rays_d, device=device,dtype=torch.float32))
      rgb, depth, acc = render_rays(net, rays_od, bound=bound, N_samples=N_samples, device=device, use_view=use_view)
    frames.append((255*np.clip(rgb.cpu().numpy(),0,1)).astype(np.uint8))

import imageio
f = 'video.mp4'
imageio.mimwrite(f, frames, fps=30, quality=7)
from IPython.display import HTML
from base64 import b64encode
mp4 = open('video.mp4','rb').read()
data_url = "data:video/mp4;base64," + b64encode(mp4).decode()
HTML("""


""" % data_url)
本文的代码以及数据集会同步更新到我的Github,自行取,如果对你有帮助,可以给我点个star吗?❥(^_-)
Github Nerf代码,上文代码获取,点这里
同时,非常感谢学习Nerf并且写文章录视频分享的各位同学,大佬,有你们世界会更美好。我参考的文章链接在下面。
[NeRF]NeRFの入门教程(代码向)
[NeRF]NeRFの入门教程(原理向)
推荐学习的nerf数学推导讲解视频
Nerf论文 必读
Github 大佬的pytorch代码
大佬1代码解析
大佬2代码解析
大佬3代码解析 推荐
参考文章1
参考文章2
参考文章3 等等
