制作及运行 WebUI(NovelAI)Docker 镜像
准备 Novel AI 模型文件
下载地址:
magnet:?xt=urn:btih:5bde442da86265b670a3e5ea3163afad2c6f8ecc
只需要部分下载其中的文件;
- 必须的文件:
- 文件
stableckpt/animevae.pt - 文件夹
stableckpt/animefull-final-pruned
- 文件
- 可选的文件:
- 文件夹
stableckpt/animefull-latest(全量模型,暂时没发现有什么特殊用途) - 文件夹
stableckpt/modules/modules(差分模型,针对特定风格强化训练)
- 文件夹
将下载后的文件重命名,并放到同一个目录下的 models/ 子目录下
stableckpt/animevae.pt->models/nai.vae.ptstableckpt/animefull-final-pruned/model.ckpt->models/nai.ckptstableckpt/animefull-final-pruned/config.yaml->models/nai.yaml
Dockerfile 示例
注:没有对镜像大小做特殊优化
FROM python:3.10-bullseye
LABEL org.opencontainers.image.authors="ObjectNotFound"
WORKDIR /root
# Prepare
RUN apt-get update && \
    apt-get upgrade -y && \
    apt-get install -y python3-opencv && \
    apt-get clean && \
    rm -rf /var/lib/apt/lists/*
# Python environment setup
RUN pip install --upgrade --no-cache-dir pip && \
    pip install --upgrade --no-cache-dir setuptools && \
    pip install --upgrade --no-cache-dir opencv-python && \
    pip install --no-cache-dir torch torchvision torchaudio --extra-index-url https://download.pytorch.org/whl/cu117 && \
    pip install --no-cache-dir jupyterlab gfpgan clip open_clip_torch xformers==0.0.16rc425 && \
    rm -rf ~/.cache/pip
# Clone files
RUN git clone --depth=1 https://github.com/AUTOMATIC1111/stable-diffusion-webui.git && \
    cd stable-diffusion-webui && \
    mkdir repositories && \
    cd repositories && \
    git clone https://github.com/Stability-AI/stablediffusion.git stable-diffusion-stability-ai && \
    git clone https://github.com/CompVis/taming-transformers.git && \
    git clone https://github.com/crowsonkb/k-diffusion.git && \
    git clone https://github.com/sczhou/CodeFormer.git && \
    git clone https://github.com/salesforce/BLIP.git && \
    cd .. && \
    pip install --no-cache-dir -r requirements.txt && \
    pip install --no-cache-dir -r repositories/CodeFormer/requirements.txt && \
    rm -rf ~/.cache/pip
# Place model files under models/
# Rename to nai.yaml nai.ckpt nai.vae.pt
ADD models/ /root/stable-diffusion-webui/models/Stable-diffusion
WORKDIR /root/stable-diffusion-webui
EXPOSE 7860
ENTRYPOINT [ "python3", "./launch.py", "--listen", "--port", "7860" ]
以上代码保存到 Dockerfile,和 models/ 放到一起,然后 docker build 即可;
# 以localhost:5000/aipaint-novelai:latest 为 tag 示例
docker build . -t localhost:5000/aipaint-novelai:latest
使用 Docker Image
环境设置
- 硬件要求
- 需要至少 16 GB 运行内存
- 需要 NVIDIA 独立显卡
- 需要是以下受 NVIDIA 官方支持的Linux发行版:
- Amazon Linux (AWS)
- OpenSUSE / SUSE Linux Enterprise Server
- CentOS
- Red Hat Enterprise Linux
- Ubuntu
- Debian
- 需要安装以下软件
- 闭源的 NVIDIA 官方 Linux 驱动
- Docker
- 安装
nvidia-container-toolkit- 参考:Installation Guide — NVIDIA Cloud Native Technologies documentation
- 安装后需要重启 Docker 服务,
sudo systemctl restart docker
- 检查是否安装成功
- 查看 Docker 是否接受
--gpu参数:docker run --help | grep -i gpus - 尝试在 Docker 容器中运行
nvidia-smi
- 查看 Docker 是否接受
# 镜像版本建议先查看 Docker Hub 页面
# https://hub.docker.com/r/nvidia/cuda
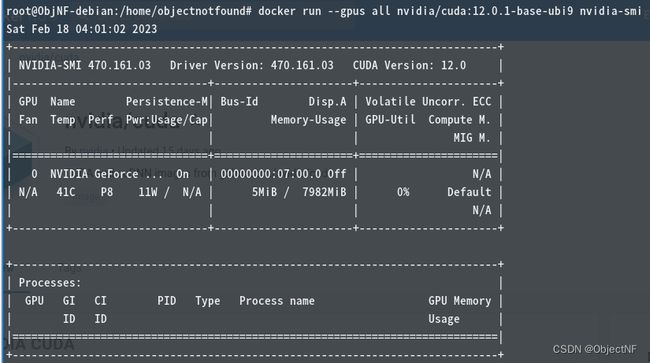
docker run --gpus all nvidia/cuda:12.0.1-base-ubi9 nvidia-smi
若输出正常则证明 nvidia-container-toolkit 安装成功。
运行镜像
# 可加 -d 让其后台运行
docker run --gpus all -p 7860:7860 localhost:5000/aipaint-novelai:latest
多个显卡情况下,可以使用 --gpus 的参数选择使用哪些显卡:
- 使用2块显卡:
--gpus 2 - 使用第一块和第三块显卡:
--gpus device=1,3 - 使用显卡 UUID 指定显卡:
--gpus device=GPU-3a23c669-1f69-c64e-cf85-44e9b07e7a2a- 显卡 UUID 可从 NVIDIA X Server Settings -> (选择GPU) -> GPU UUID 查看
访问 http://localhost:7860 即可使用带 Novel AI 模型的 stable-diffusion-webui;


