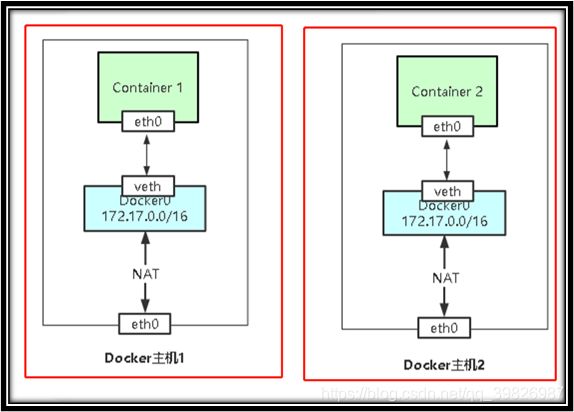
Docker容器网络
一、虚拟化网络
- Docker 镜像启动容器,默认Docker 容器可以直接访问互联网(前提:宿主机能够上外网),Docker 容器的IP 专属IP段,默认跟宿主机不在同网段。
- Docker Engine 引擎服务,默认会在宿主机创建网卡&命名:Docker0,Docker0 网卡IP 属于B 类网络,掩码:255.255.0.0;
二、网络模式
bridge:
- –net=bridge:默认网络,Docker启动后创建一个docker0网桥,默认创建的容器也是添加到这个网桥中。
- 自定义网络与默认的bridge原理一样,但自定义网络具备内部DNS发现,可以通过容器名或者主机名容器之间网络通信。
host:
- –net=host:容器不会获得一个独立的network namespace,而是与宿主机共用一个。这就意味着容器不会有自己的网卡信息,而是使用宿主机的。容器除了网络,其他都是隔离的。
none:
- –net=none:获取独立的network namespace,但不为容器进行任何网络配置,需要我们手动配置。
container
- –net=container:Name/ID:与指定的容器使用同一个network namespace,具有同样的网络配置信息,两个容器除了网络,其他都还是隔离的。
1、bridge默认网络指定验证
- Bridge模式,容器会得到Network NameSpace子系统,Docker引擎会给容器分配IP地址、网关、掩码信息,IP地址、网关全自动获取的,无需人工干预,Docker引擎启动容器时默认模式,无需通过–net去指定,企业中使用也比较广泛。
#查看网络模式
[root@localhost ~]# docker network ls
NETWORK ID     NAME      DRIVER    SCOPE
e912744f35e3   bridge    bridge    local
607eaa942b8d   host      host      local
fb69cebb6feb   none      null      local

#创建一个容器
[root@localhost ~]# docker run -itd -P nginx

#查看创建
[root@localhost ~]# docker ps
CONTAINER ID   IMAGE     COMMAND                  CREATED         STATUS         PORTS                                     NAMES
98683a1054d1   nginx     "/docker-entrypoint.…"   8 minutes ago

#查看bridge网络详细信息
[root@localhost ~]# docker network inspect  bridge
[
    {
        "Name": "bridge",    #网络名称
        "Id": "e912744f35e313e972c5edfb247b4f2d8a16d6c1bfb2d174f051bfa903f22ba1",
        "Created": "2021-08-14T13:42:06.163918001+08:00", #网络创建时间
        "Scope": "local",
        "Driver": "bridge",  #网络模式
        "EnableIPv6": false,
        "IPAM": {                  #IP池
            "Driver": "default",
            "Options": null,
            "Config": [
                {
                    "Subnet": "172.17.0.0/16"    #IP段
                }
            ]
        },
        "Internal": false,
        "Attachable": false,
        "Ingress": false,
        "ConfigFrom": {
            "Network": ""
        },
        "ConfigOnly": false,
        "Containers": {
            "98683a1054d1f6d364a0ce6829571f590635fa82ca3eb6eeeb08da7d48affbab": {   #创建容器ID
                "Name": "magical_black",
                "EndpointID": "a5914e9f5bcd47e1a669830f145967be83997eb59bffa00bef78083e27346254",
                "MacAddress": "02:42:ac:11:00:02",
                "IPv4Address": "172.17.0.2/16", #创建容器被分配的IP地址
                "IPv6Address": ""
            }
        },
        "Options": {
            "com.docker.network.bridge.default_bridge": "true",
            "com.docker.network.bridge.enable_icc": "true",
            "com.docker.network.bridge.enable_ip_masquerade": "true",
            "com.docker.network.bridge.host_binding_ipv4": "0.0.0.0",
            "com.docker.network.bridge.name": "docker0",
            "com.docker.network.driver.mtu": "1500"
        },
        "Labels": {}
    }
]

#查看容器是否加入网桥
 [root@localhost ~]# yum install bridge-utils -y      #安装包

#发现容器已经加入网桥中
[root@localhost ~]# brctl show docker0
bridge name	bridge id		STP enabled	interfaces
docker0		8000.02425ca7ad9b	no		vethb932ace(设备对,相当于一根网线)
2、自定义网桥指定网络验证:
#创建自定义网桥
[root@localhost ~]# docker network create test
fcf47f5462d0dffa069bcd6aa24901bdae908a752cbb3da9d97138e9be94d295

#查看创建网桥
[root@localhost ~]# docker network ls
NETWORK ID     NAME      DRIVER    SCOPE
e912744f35e3   bridge    bridge    local
607eaa942b8d   host      host      local
fb69cebb6feb   none      null      local
fcf47f5462d0   test      bridge    local    #新创建的网桥

#将创建的容器加新网桥
[root@localhost ~]# docker run -d --name jia --network test nginx

#查看创建
[root@localhost ~]# docker ps|grep jia
[root@localhost ~]# docker ps|grep jia
54f9479a5321   nginx     "/docker-entrypoint.…"   59 seconds ago   Up 58 seconds   80/tcp        jia

#查看自定义test的IP段段
[root@localhost ~]# docker network inspect test|grep "Subnet"
                    "Subnet": "172.18.0.0/16",

#查看jia加入网桥的IP地址是否和test的IP段一致
[root@localhost ~]# docker inspect jia |grep "IPAddress"
            "SecondaryIPAddresses": null,
            "IPAddress": "",
                    "IPAddress": "172.18.0.2",      #确认在同一网段,加入成功
3、自定义网桥容器互通验证
1)验证默认网桥主机名称不能互相通信
#创建容器jia2
[root@localhost ~]# docker run -it --name jia2  busybox sh
/ # ifconfig|grep "Bcast"  |grep "inet addr:"
          inet addr:172.17.0.4  Bcast:172.17.255.255  Mask:255.255.0.0
/ # hostname
7e65698ae8ee


#创建容jia1
[root@localhost ~]# docker run -it --name jia1  busybox sh
/ # ifconfig|grep "Bcast"  |grep "inet addr:"
          inet addr:172.17.0.3  Bcast:172.17.255.255  Mask:255.255.0.0

#在容器jia1中ping容器jia2的IP能ping通
/ # ping 172.17.0.4
PING 172.17.0.4 (172.17.0.4): 56 data bytes
64 bytes from 172.17.0.4: seq=0 ttl=64 time=0.149 ms
^C
--- 172.17.0.4 ping statistics ---
1 packets transmitted, 1 packets received, 0% packet loss
round-trip min/avg/max = 0.149/0.149/0.149 ms

#在容器jia1中ping容器jia2的主机名称不能ping通
/ # ping 7e65698ae8ee
ping: bad address '7e65698ae8ee'
2)验证自定义网桥主机名称能互相通信
#将jia4加入test网桥中
[root@localhost ~]# docker run -it --name jia4  --network test  busybox sh
WARNING: IPv4 forwarding is disabled. Networking will not work.
/ # ifconfig|grep "Bcast"  |grep "inet addr:"
          inet addr:172.18.0.3  Bcast:172.18.255.255  Mask:255.255.0.0
/ # hostname
d721cc9ee97d

#创建jia5并加入test网桥中
[root@localhost ~]# docker run -it --name jia5 --network test  busybox sh
WARNING: IPv4 forwarding is disabled. Networking will not work.
/ #  ifconfig|grep "Bcast"  |grep "inet addr:"
          inet addr:172.18.0.4  Bcast:172.18.255.255  Mask:255.255.0.0

#ping容器jia4的主机名是否能通信
/ # ping d721cc9ee97d
PING d721cc9ee97d (172.18.0.3): 56 data bytes
64 bytes from 172.18.0.3: seq=0 ttl=64 time=0.043 ms
64 bytes from 172.18.0.3: seq=1 ttl=64 time=0.050 ms

【说明】:
1、说明创建的自定义网桥主机名称只能能互通。
2、解决DB等容器宕机后IP变动导致不能访问的问题。
3)自定义网桥和宿主同段
- Docker引擎默认启动容器使用的doker0网桥,分配的IP为172.x内部IP,跟宿主机不在同网段,真实企业中使用会带来影响,为了能够跟宿主机保持同网段,可以通过自建br0网桥来实现。
- Br0网桥IP地址设置为宿主机的IP地址,将br0桥接至ens33网卡,经过br0的流量,最终通过ens33,配置网桥方法如下:
#配置ens33
 cd /etc/sysconfig/network-scripts/
 cp ifcfg-ens33 ifcfg-br0
 cp ifcfg-ens33 ifcfg-ens33.bak

#ifcfg-ens33网卡配置文件如下
cat > /etc/sysconfig/network-scripts/ifcfg-ens33 <
#ifcfg-br0网卡配置文件如下:
cat > /etc/sysconfig/network-scripts/ifcfg-br0 <#重启网卡
[root@localhost network-scripts]# service network restart
Restarting network (via systemctl): [ OK ]
[root@localhost network-scripts]# ifconfig
br0: flags=4163 mtu 1500
inet 192.168.80.80 netmask 255.255.255.0 broadcast 192.168.80.255
inet6 fe80::f8ed:59ff:fe98:d4aa prefixlen 64 scopeid 0x20
ether 00:0c:29:bb:fc:2a txqueuelen 1000 (Ethernet)
RX packets 44 bytes 3036 (2.9 KiB)
RX errors 0 dropped 0 overruns 0 frame 0
TX packets 32 bytes 3324 (3.2 KiB)
TX errors 0 dropped 0 overruns 0 carrier 0 collisions 0
docker0: flags=4163 mtu 1500
inet 172.17.0.1 netmask 255.255.0.0 broadcast 0.0.0.0
inet6 fe80::42:c5ff:fe7b:ca1f prefixlen 64 scopeid 0x20
ether 02:42:c5:7b:ca:1f txqueuelen 0 (Ethernet)
RX packets 216 bytes 17955 (17.5 KiB)
RX errors 0 dropped 0 overruns 0 frame 0
TX packets 221 bytes 20407 (19.9 KiB)
TX errors 0 dropped 0 overruns 0 carrier 0 collisions 0
ens33: flags=4163 mtu 1500
ether 00:0c:29:bb:fc:2a txqueuelen 1000 (Ethernet)
RX packets 335244 bytes 492264540 (469.4 MiB)
RX errors 0 dropped 0 overruns 0 frame 0
TX packets 89632 bytes 6490170 (6.1 MiB)
TX errors 0 dropped 0 overruns 0 carrier 0 collisions 0
lo: flags=73 mtu 65536
inet 127.0.0.1 netmask 255.0.0.0
inet6 ::1 prefixlen 128 scopeid 0x10
loop txqueuelen 1 (Local Loopback)
RX packets 28 bytes 2408 (2.3 KiB)
RX errors 0 dropped 0 overruns 0 frame 0
TX packets 28 bytes 2408 (2.3 KiB)
TX errors 0 dropped 0 overruns 0 carrier 0 collisions 0
veth692ec6e: flags=4163 mtu 1500
inet6 fe80::d458:f4ff:fe45:691d prefixlen 64 scopeid 0x20
ether d6:58:f4:45:69:1d txqueuelen 0 (Ethernet)
RX packets 26 bytes 2028 (1.9 KiB)
RX errors 0 dropped 0 overruns 0 frame 0
TX packets 10 bytes 732 (732.0 B)
TX errors 0 dropped 0 overruns 0 carrier 0 collisions 0
#修改docker-network配置:/etc/sysconfig/docker-network,加入如下内容:
cat /etc/sysconfig/docker-network

# /etc/sysconfig/docker-network
DOCKER_NETWORK_OPTIONS="-b=br0"
或者
 sed  -i 's/DOCKER_NETWORK_OPTIONS=/DOCKER_NETWORK_OPTIONS="-b=br0"/g' /etc/sysconfig/docker-network

#重启docker
service  docker restart
【检测容器IP】
#停止所有容器
[root@localhost ~]# docker ps -aq|xargs docker rm -f

#查看容器镜像
[root@localhost ~]# docker images
REPOSITORY                       TAG                 IMAGE ID            CREATED             SIZE
docker.io/lemonbar/centos6-ssh   latest              efd998bd6817        4 years ago         297 MB

#启动容器
docker run -itd docker.io/lemonbar/centos6-ssh
docker run -itd docker.io/lemonbar/centos6-ssh
docker run -itd docker.io/lemonbar/centos6-ssh

#查看容器ID
[root@localhost ~]# docker ps
CONTAINER ID        IMAGE                            COMMAND                  CREATED             STATUS              PORTS               NAMES
107372e2d1ab        docker.io/lemonbar/centos6-ssh   "/bin/sh -c '/usr/..."   7 minutes ago       Up 7 minutes        22/tcp              upbeat_mirzakhani
463807f93747        docker.io/lemonbar/centos6-ssh   "/bin/sh -c '/usr/..."   9 minutes ago       Up 9 minutes        22/tcp              festive_panini
2643a4de63c2        docker.io/lemonbar/centos6-ssh   "/bin/sh -c '/usr/..."   9 minutes ago       Up 9 minutes        22/tcp              kind_perlman

#查看容器IP为(0.2)网关之后的地址
[root@localhost ~]#  docker inspect 107372e2d1ab |grep -i ipaddr
            "SecondaryIPAddresses": null,
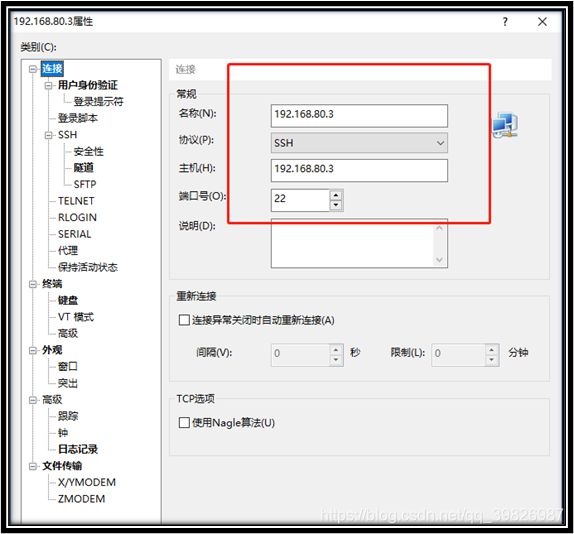
            "IPAddress": "192.168.80.3",
                    "IPAddress": "192.168.80.3",
#统计全部IP
for i in `docker ps -aq`;do docker inspect $i|grep -i ipaddr|tail -1|awk -F: '{print "'$i' "$2}'|sed 's/"//g;s/,//g;s/ / /g';done

#将其余两台杀死或者删除
[root@localhost ~]# docker rm -f 377fcb98cb1c
463807f93747
[root@localhost ~]# docker rm -f 5643edef2234
2643a4de63c2
-
启Docker引擎服务即可,默认Docker启动的虚拟机IP从192.168.80.x网段分配,docker内部有DHCP,为了防止DHCP分配冲突,我们可以手工静态配置IP地址。
-
启动Docker容器时,指定网络类型为none,然后通过pipework设置容器的网卡和IP地址即可,操作如下:
# 安装pipework
git clone https://github.com/jpetazzo/pipework
cp ~/pipework/pipework /usr/local/bin/
启动容器并设置网络
docker run -itd --net=none --name=lamp2 centos7 /bin/bash
pipework br0 lamp2 192.168.80.11/[email protected]
入容器查看ip
docker exe lamp2 ifconfig
4、Host 模式验证
- Host网络模式,Docker容器启动之后,没有自己的Network NameSpace子系统,不会分配IP 地址、网关、掩码,而是跟宿主机共享,共享宿主机的网络命名空间,容器的IP、网关、掩码即是宿主机的IP。
1)、创建的容器会占用宿主上端口
#基于host 模式启动容器;
[root@localhost ~]# docker run -itd --net=host --name=jf-centos001  efd998bd6817  /bin/bash
7a26acac2c1ba445444dc07d92ed7b63116a36a63e34962800eb0682273ca47d
[root@localhost ~]# docker ps
CONTAINER ID        IMAGE               COMMAND             CREATED             STATUS              PORTS               NAMES
7a26acac2c1b        efd998bd6817        "/bin/bash"         10 seconds ago      Up 9 seconds                            jf-centos001

#登陆到centos6-ssh容器中
[root@localhost ~]# docker exec -it 7a26acac2c1b   /bin/bash

#拷贝文件
bash-4.1# cp /etc/skel/.bash* /root/
bash-4.1# su

#宿主机和容器sshd的22端口冲突需要修改
[root@localhost /]# vi /etc/ssh/sshd_config
将#Port 22			改为:Port 6022

#重启sshd服务
[root@localhost /]# service  sshd restart
Stopping sshd:                                             [FAILED]
Generating SSH1 RSA host key:                              [  OK  ]
Starting sshd:                                             [  OK  ]

#查看端口
[root@localhost /]# netstat  -tnl
Active Internet connections (only servers)
Proto Recv-Q Send-Q Local Address               Foreign Address             State
tcp        0      0 0.0.0.0:22                  0.0.0.0:*                   LISTEN
tcp        0      0 127.0.0.1:25                0.0.0.0:*                   LISTEN
tcp        0      0 0.0.0.0:6022                0.0.0.0:*                   LISTEN
tcp        0      0 :::22                       :::*                        LISTEN
tcp        0      0 ::1:25                      :::*                        LISTEN
tcp        0      0 :::6022                     :::*                        LISTEN
【说明】
1、除了网络其他都是隔离。
2、直接占用宿主机端口。
3、访问服务不用暴露端口,直接访问服务端口。
4、端口冲突,防止占用可以修改端口。
5、none网络模式
- None网络模式,Docker容器启动之后,容器会得到Network NameSpace子系统,Docker 引擎不会给容器分配IP 地址、网关、掩码信息,IP地址、网关需要人工或者脚本手工去配置,企业中使用也比较广泛。
#停止其它网路模式ID
[root@localhost ~]# docker ps -aq|xargs docker rm -f

#启动none模式
[root@localhost ~]# docker run -itd --net=none docker.io/lemonbar/centos6-ssh
1345e0604155651dc4bf5316af11f92c285b511ca9eb9433c40df83b0f6d5a4c
[root@localhost ~]# docker ps
CONTAINER ID        IMAGE                            COMMAND                  CREATED             STATUS              PORTS               NAMES
1345e0604155        docker.io/lemonbar/centos6-ssh   "/bin/sh -c '/usr/..."   5 minutes ago       Up 5 minutes                            lucid_pare

#登陆
[root@localhost ~]# docker exec -it 1345e0604155 /bin/bash
bash-4.1# ifconfig  #少了eth(X)
lo        Link encap:Local Loopback
          inet addr:127.0.0.1  Mask:255.0.0.0
          inet6 addr: ::1/128 Scope:Host
          UP LOOPBACK RUNNING  MTU:65536  Metric:1
          RX packets:0 errors:0 dropped:0 overruns:0 frame:0
          TX packets:0 errors:0 dropped:0 overruns:0 carrier:0
          collisions:0 txqueuelen:1
          RX bytes:0 (0.0 b)  TX bytes:0 (0.0 b)
【说明】
1、使用场景:自己手动配置网络
2、希望使用公司IP池的网络,定制化需求。
3、少了eth0
6、Container 模式
- Container 网络模式,Docker 容器启动之后,没有自己的Network NameSpace 子系统,不会分配IP 地址、网关、掩码,而是跟已存在的容器共享,共享指定容器的网络命名空间,容器的IP、网关、掩码即是指定的容器的IP。
#停止其它网路模式ID
[root@localhost ~]# docker ps -aq|xargs docker rm -f
7a26acac2c1b
[root@localhost ~]# docker ps
CONTAINER ID        IMAGE               COMMAND             CREATED             STATUS              PORTS               NAMES

#启动一个容器
[root@localhost ~]# docker run -itd  --name=jf-centos002  docker.io/lemonbar/centos6-ssh
4211e36c8726ba401b5471bcb646de03c4cef0fc24ee5336bf9e57a1e8595a6f

#查看容器的IP
[root@localhost ~]# docker ps
CONTAINER ID        IMAGE                            COMMAND             CREATED             STATUS              PORTS               NAMES
4211e36c8726        docker.io/lemonbar/centos6-ssh   "/bin/bash"         2 minutes ago       Up 2 minutes        22/tcp              jf-centos002
[root@localhost ~]# docker inspect 4211e36c8726 |grep -i ipaddr
            "SecondaryIPAddresses": null,
            "IPAddress": "172.17.0.2",
                    "IPAddress": "172.17.0.2",

#远程登陆查看IP
[root@localhost ~]# ssh -l root 172.17.0.2
The authenticity of host '172.17.0.2 (172.17.0.2)' can't be established.
RSA key fingerprint is SHA256:XU2cguhaoFNurajle03XKW2rUHEKWJ5o1eE1vShbxD0.
RSA key fingerprint is MD5:92:94:bf:09:a4:3a:3e:55:90:9c:47:75:97:a6:57:26.
Are you sure you want to continue connecting (yes/no)? yes
Warning: Permanently added '172.17.0.2' (RSA) to the list of known hosts.
[email protected]'s password: 输入密码
-bash-4.1# ifconfig |grep "inte addr"
-bash-4.1# ifconfig |grep "inet addr"
          inet addr:172.17.0.2  Bcast:0.0.0.0  Mask:255.255.0.0

#基于container 模式启动容器;
docker run -itd --net=container:4211e36c8726  docker.io/lemonbar/centos6-ssh  /bin/bash
"!!!!!container:ID(此处ID为共享容器ID)

#查看启动结果
[root@localhost ~]# docker ps
CONTAINER ID        IMAGE                            COMMAND             CREATED             STATUS              PORTS               NAMES
4c7cf5cca52c        docker.io/lemonbar/centos6-ssh   "/bin/bash"         25 seconds ago      Up 24 seconds                           happy_kowalevski
4211e36c8726        docker.io/lemonbar/centos6-ssh   "/bin/bash"         20 minutes ago      Up 20 minutes       22/tcp              jf-centos002

#查看新建容器和已存在容器共享IP/端口/网卡/掩码/网关,其他服务相互隔离
[root@localhost ~]# docker exec -it 4c7cf5cca52c /bin/bash
bash-4.1# ifconfig|grep "inet addr"
          inet addr:172.17.0.2  Bcast:0.0.0.0  Mask:255.255.0.0
三、Docker网络模型
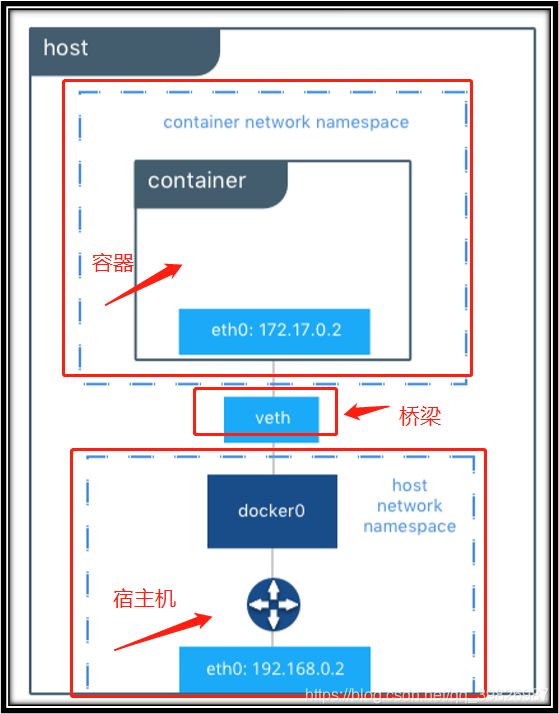
- veth pair:成对出现的一种虚拟网络设备,数据从一端进,从另一端出。 用于解决网络命名空间之间隔离。
- docker0:网桥是一个二层网络设备(交换机),通过网桥可以将Linux支持的不同的端口连接起来,并实现类似交换机那样的多对多的通信。
四、容器网络访问原理
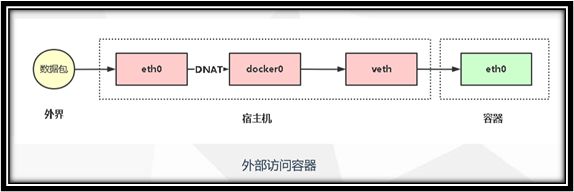
【详细访问过程可参考】https://pea328.blog.csdn.net/article/details/105251302
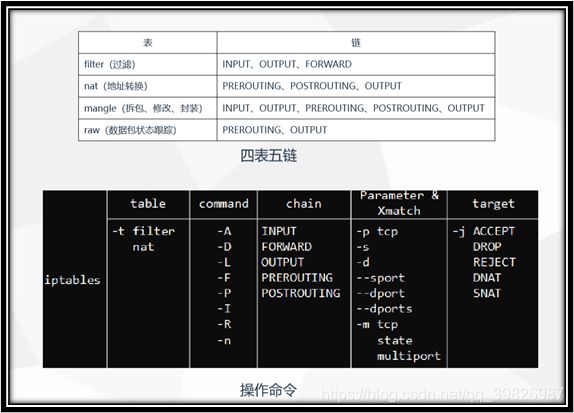
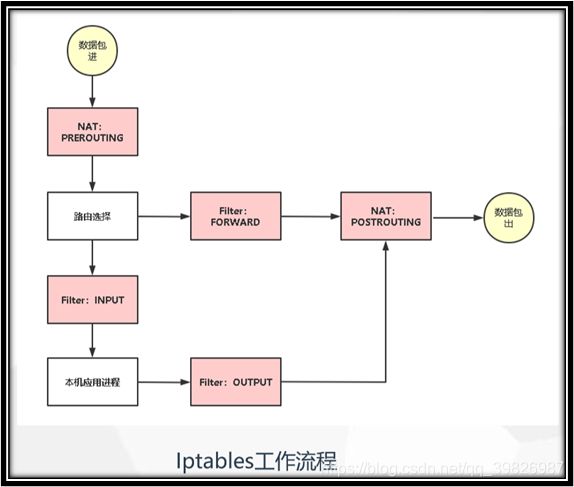
五、容器网络实现核心技术Iptables
- INPUT链:接收的数据包是本机(入站)时,应用此链中的规则。
- OUTPUT链:本机向外发送数据包(出站)时,应用此链中的规则。
- FORWARD链:需要通过防火墙中转发送给其他地址的数据包(转发)时,应用测 链中的规则。
- PREROUTING链:在对数据包做路由选择之前,应用此链中的规则。DNAT
- POSTROUTING链:在对数据包做路由选择之后,应用此链中的规则。SNAT
#外部访问容器:
[root@localhost ~]#iptables -t nat -vnL DOCKER
Chain DOCKER (2 references)
pkts bytes target     prot opt in     out     source              destination
0     0 RETURN     all  -- docker0 *       0.0.0.0/0            0.0.0.0/0
1    52 DNAT       tcp  -- !docker0 *       0.0.0.0/0            0.0.0.0/0            tcp dpt:8080 to:172.17.0.2:80
#容器访问外部:
[root@localhost ~]# iptables -t nat -vnL POSTROUTING
Chain POSTROUTING (policy ACCEPT 0 packets, 0 bytes)
pkts bytes target     prot opt in     out     source               destination
0     0 MASQUERADE  all  -- *      !docker0  172.17.0.0/16        0.0.0.0/0
六、跨主机网络:实现Docker主机容器通信
Flannel是CoreOS维护的一个网络组件,在每个主机上运行守护进程负责维护本地路由转发,Flannel使用ETCD来存储容器网络与主机之前的关系。
其他主流容器跨主机网络方案:
1、配置安装etcd
#etcd安装
yum install etcd -y
:%s/localhost/192.168.4.114/g

#修改配置
vi /etc/etcd/etcd.conf
:%s/localhost/192.168.4.114/g


#flanneld安装并配置
yum install flannel -y

#启动etcd
systemctl restart etcd
systemctl enable  etcd

#确认端口已经监听
[root@localhost ~]# ss -antp|grep 2379
LISTEN     0      128    127.0.0.1:2379                     *:*                   users:(("etcd",pid=21949,fd=6))
ESTAB      0      0      127.0.0.1:2379               127.0.0.1:34716               users:(("etcd",pid=21949,fd=12))
ESTAB      0      0      127.0.0.1:34716              127.0.0.1:2379                users:(("etcd",pid=21949,fd=10))

#查看进程
[root@localhost ~]# ps -ef|grep etcd
etcd      22147      1  0 22:28 ?        00:00:00 /usr/bin/etcd --name=default --data-dir=/var/lib/etcd/default.etcd --listen-client-urls=http://192.168.4.114:2379
root      22159      1  0 22:28 ?        00:00:00 /usr/bin/flanneld -etcd-endpoints=http://192.168.4.114:2379 -etcd-prefix=/atomic.io/network
root      22220  21804  0 22:28 pts/0    00:00:00 grep --color=auto etcd
2、配置网络
#安装flannel
yum install flannel -y

#修改配置
vim /etc/sysconfig/flanneld
:%s/127.0.0.1/192.168.4.114/g             ##替换成ETCD数据IP地址

#向etcd写入子网 ,不要于宿主机网络冲突,或其他网了冲突。
etcdctl --endpoints="http://192.168.4.114:2379" set /atomic.io/network/config '{ "Network": "172.17.0.0/16", "Backend": {"Type": "vxlan"}} '
{ "Network": "172.17.0.0/16", "Backend": {"Type": "vxlan"}}

 #启动flanneld
systemctl start flanneld
tail /var/log/messages -f


#查看网段是否存在,获取key值
[root@localhost ~]# etcdctl --endpoints="http://192.168.4.114:2379" get  /atomic.io/network/config '{ "Network": "172.17.0.0/16", "Backend": {"Type": "vxlan"}} '
{ "Network": "172.17.0.0/16", "Backend": {"Type": "vxlan"}}

#启动flanneld生成的文件
[root@localhost ~]# cat /var/run/flannel/docker
DOCKER_OPT_BIP="--bip=172.17.46.1/24"
DOCKER_OPT_IPMASQ="--ip-masq=true"
DOCKER_OPT_MTU="--mtu=1472"
DOCKER_NETWORK_OPTIONS=" --bip=172.17.46.1/24 --ip-masq=true --mtu=1472"

#配置Docker使用flannel生成的网络信息
#vi /usr/lib/systemd/system/docker.service
EnvironmentFile=/run/flannel/docker         #加入EnvironmentFile引用$DOCKER_NETWORK_OPTIONS
ExecStart=/usr/bin/dockerd -H fd:// --containerd=/run/containerd/containerd.sock  $DOCKER_NETWORK_OPTIONS  #加入变量DOCKER_NETWORK_OPTIONS

#使配置docker生效
[root@localhost ~]# source  /run/flannel/docker
[root@localhost ~]# echo $DOCKER_NETWORK_OPTIONS
--bip=172.17.46.1/24 --ip-masq=true --mtu=1472


#动所有服务并设置开机启动:
systemctl daemon-reload
systemctl restart docker
systemctl enable docker

#查看doocker进程
[root@localhost ~]# ps -ef|grep docker
root      21304      1  0 22:49 ?        00:00:00 /usr/bin/dockerd -H fd:// --containerd=/run/containerd/containerd.sock
root      21424  21304  0 22:49 ?        00:00:00 /usr/bin/docker-proxy -proto tcp -host-ip 0.0.0.0 -host-port 8081 -container-ip 172.17.0.2 -container-port 80
root      21430  21304  0 22:49 ?        00:00:00 /usr/bin/docker-proxy -proto tcp -host-ip :: -host-port 8081 -container-ip 172.17.0.2 -container-port 80
root      21533  21098  0 22:50 pts/0    00:00:00 grep --color=auto docker
3、所有主机同样方式配置生成IP段唯一
#安装flannel
yum install flannel -y

#修改配置
vim /etc/sysconfig/flanneld
:%s/127.0.0.1/192.168.4.114/g             ##替换成ETCD数据IP地址

#向etcd写入子网 ,不要于宿主机网络冲突,或其他网了冲突。
yum install etcd -y         #安装etcdtl命令
etcdctl --endpoints="http://192.168.4.114:2379" set /atomic.io/network/config '{ "Network": "172.17.0.0/16", "Backend": {"Type": "vxlan"}} '


 #启动flanneld
systemctl start flanneld
tail /var/log/messages -f


#查看网段是否存在,获取key值
 etcdctl --endpoints="http://192.168.4.114:2379" get  /atomic.io/network/config '{ "Network": "172.17.0.0/16", "Backend": {"Type": "vxlan"}} '

#启动flanneld生成的文件
cat /var/run/flannel/docker

#配置 /usr/lib/systemd/system/docker.service 使用flannel生成的网络信息
EnvironmentFile=/run/flannel/docker         #加入EnvironmentFile引用$DOCKER_NETWORK_OPTIONS
ExecStart=/usr/bin/dockerd -H fd:// --containerd=/run/containerd/containerd.sock  $DOCKER_NETWORK_OPTIONS  #加入变量DOCKER_NETWORK_OPTIONS

#使配置docker生效
source  /run/flannel/docker
echo $DOCKER_NETWORK_OPTIONS

#动所有服务并设置开机启动:
systemctl daemon-reload
systemctl restart docker
systemctl enable docker

#查看doocker进程,发现两个主机子网段不同。
[[root@localhost ~]#  ps -ef|grep docker
root      21727      1  1 23:15 ?        00:00:00 /usr/bin/dockerd -H fd:// --containerd=/run/containerd/containerd.sock --bip=172.17.23.1/24 --ip-masq=true --mtu=1450
root      21847  21727  0 23:15 ?        00:00:00 /usr/bin/docker-proxy -proto tcp -host-ip 0.0.0.0 -host-port 8081 -container-ip 172.17.23.2 -container-port 80
root      21853  21727  0 23:15 ?        00:00:00 /usr/bin/docker-proxy -proto tcp -host-ip :: -host-port 8081 -container-ip 172.17.23.2 -container-port 80
root      21974  21098  0 23:16 pts/0    00:00:00 grep --color=auto docker
4、两台主机创建容器相互ping验证
#两台主机去启动docker
docker run -it busybox sh

#查看IP地址
/ # ifconfig |grep "inet addr"|grep "Bcast"     #主机1
          inet addr:172.17.0.3  Bcast:172.17.255.255  Mask:255.255.0.0

/ #  ifconfig |grep "inet addr"|grep "Bcast"    #主机2
          inet addr:172.17.23.3  Bcast:172.17.23.255  Mask:255.255.255.0

#主机1ping主机2不通
 ping 172.17.23.3
【说明】
1、由于防火墙中 FORWARD链限制导致转发失败。
2、开放权限:iptables -P FORWARD ACCEPT

#所有主机开放权限并且按照顺先重启flanneld,再重启docker
iptables -P FORWARD ACCEPT
service flanneld restart
service docker restart

#重新创建容器测试
docker run -it busybox sh

#主机1
/ # ifconfig |grep "inet addr"|grep "Bcast"
          inet addr:172.17.46.2  Bcast:172.17.46.255  Mask:255.255.255.0

#主机2
/ # ifconfig |grep "inet addr"|grep "Bcast"
          inet addr:172.17.23.3  Bcast:172.17.23.255  Mask:255.255.255.0

#主机1ping主机2
/ # ping 172.17.23.3 -c 2
PING 172.17.23.3 (172.17.23.3): 56 data bytes
64 bytes from 172.17.23.3: seq=0 ttl=62 time=0.820 ms
64 bytes from 172.17.23.3: seq=1 ttl=62 time=2.268 ms

--- 172.17.23.3 ping statistics ---
2 packets transmitted, 2 packets received, 0% packet loss
round-trip min/avg/max = 0.820/1.544/2.268 ms

#主机2ping主机1
/ # ping 172.17.46.2 -c 2
PING 172.17.46.2 (172.17.46.2): 56 data bytes
64 bytes from 172.17.46.2: seq=0 ttl=62 time=1.950 ms
64 bytes from 172.17.46.2: seq=1 ttl=62 time=0.455 ms

--- 172.17.46.2 ping statistics ---
2 packets transmitted, 2 packets received, 0% packet loss
round-trip min/avg/max = 0.455/1.202/1.950 ms
