4种分布式session解决方案
4种分布式session解决方案
介绍
cookie和session的区别和联系
cookie是本地客户端用来存储少量数据信息的,保存在客户端,用户能够很容易的获取,安全性不高,存储的数据量小
session是服务器用来存储部分数据信息,保存在服务器,用户不容易获取,安全性高,储存的数据量相对大,存储在服务器,会占用一些服务器资源,但是对于它的优点来说,这个缺点可以忽略了
session有什么用
在一次客户端和服务器为之间的会话中,客户端(浏览器)向服务器发送请求,首先cookie会自动携带上次请求存储的数据(JSESSIONID)到服务器,服务器根据请求参数中的JSESSIONID到服务器中的session库中查询是否存在此JSESSIONID的信息,如果存在,那么服务器就知道此用户是谁,如果不存在,就会创建一个JSESSIONID,并在本次请求结束后将JSESSIONID返回给客户端,同时将此JSESSIONID在客户端cookie中进行保存客户端和服务器之间是通过http协议进行通信,但是http协议是无状态的,不同次请求会话是没有任何关联的,但是优点是处理速度快session是一次浏览器和服务器的交互的会话,当浏览器关闭的时候,会话就结束了,但是会话session还在,默认session是还保留30分钟的
分布式session一致性
客户端发送一个请求,经过负载均衡后该请求会被分配到服务器中的其中一个,由于不同服务器含有不同的web服务器(例如Tomcat),不同的web服务器中并不能发现之前web服务器保存的session信息,就会再次生成一个JSESSIONID,之前的状态就会丢失
4种分布式session解决方案
方案一:客户端存储
直接将信息存储在cookie中
cookie是存储在客户端上的一小段数据,客户端通过http协议和服务器进行cookie交互,通常用来存储一些不敏感信息
缺点:
- 数据存储在客户端,存在安全隐患
- cookie存储大小、类型存在限制
- 数据存储在cookie中,如果一次请求cookie过大,会给网络增加更大的开销
方案二:session复制
session复制是小型企业应用使用较多的一种服务器集群session管理机制,在真正的开发使用的并不是很多,通过对web服务器(例如Tomcat)进行搭建集群。
存在的问题:
- session同步的原理是在同一个局域网里面通过发送广播来异步同步session的,一旦服务器多了,并发上来了,session需要同步的数据量就大了,需要将其他服务器上的session全部同步到本服务器上,会带来一定的网路开销,在用户量特别大的时候,会出现内存不足的情况
优点:
- 服务器之间的session信息都是同步的,任何一台服务器宕机的时候不会影响另外服务器中session的状态,配置相对简单
- Tomcat内部已经支持分布式架构开发管理机制,可以对tomcat修改配置来支持session复制,在集群中的几台服务器之间同步session对象,使每台服务器上都保存了所有用户的session信息,这样任何一台本机宕机都不会导致session数据的丢失,而服务器使用session时,也只需要在本机获取即可
如何配置:
在Tomcat安装目录下的config目录中的server.xml文件中,将注释打开,tomcat必须在同一个网关内,要不然收不到广播,同步不了session`
在配置文件server.xml的或者添加如下代码
<Cluster className="org.apache.catalina.ha.tcp.SimpleTcpCluster" channelSendOptions="8">
    <Manager className="org.apache.catalina.ha.session.DeltaManager" expireSessionsOnShutdown="false" notifyListenersOnReplication="true" />
    <Channel className="org.apache.catalina.tribes.group.GroupChannel">

        <Membership className="org.apache.catalina.tribes.membership.McastService" address="228.0.0.4"
                    port="45564" frequency="500" dropTime="3000" />


        <Receiver className="org.apache.catalina.tribes.transport.nio.NioReceiver" address="auto" port="4000"
                  autoBind="100" selectorTimeout="5000" maxThreads="6" />

        <Sender className="org.apache.catalina.tribes.transport.ReplicationTransmitter">
            <Transport className="org.apache.catalina.tribes.transport.nio.PooledParallelSender" />
        Sender>

        <Interceptor className="org.apache.catalina.tribes.group.interceptors.TcpFailureDetector" />
        <Interceptor className="org.apache.catalina.tribes.group.interceptors.MessageDispatchInterceptor" />
    Channel>
    <Valve className="org.apache.catalina.ha.tcp.ReplicationValve" filter="" />
    <Valve className="org.apache.catalina.ha.session.JvmRouteBinderValve" />
    <Deployer className="org.apache.catalina.ha.deploy.FarmWarDeployer" tempDir="/tmp/war-temp/"
              deployDir="/tmp/war-deploy/" watchDir="/tmp/war-listen/" watchEnabled="false" />

    <ClusterListener className="org.apache.catalina.ha.session.ClusterSessionListener" />


<distributable/>
方案三:session绑定:
Nginx介绍:
Nginx是一款自由的、开源的、高性能的http服务器和反向代理服务器
Nginx能做什么:
反向代理、负载均衡、http服务器(动静代理)、正向代理
如何使用nginx进行session绑定
我们利用nginx的反向代理和负载均衡,之前是客户端会被分配到其中一台服务器进行处理,具体分配到哪台服务器进行处理还得看服务器的负载均衡算法(轮询、随机、ip-hash、权重等),但是我们可以基于nginx的ip-hash策略,可以对客户端和服务器进行绑定,同一个客户端就只能访问该服务器,无论客户端发送多少次请求都被同一个服务器处理
在nginx安装目录下的conf目录中的nginx.conf文件
upstream sessionCluster {
	Ip_hash;
	server 127.0.0.1:8080;
	Server 127.0.0.1:8081;
}
server {
	listen 80;
	server_name 127.0.0.1;
	#root /usr/local/nginx/html;
	#index index.html index.htm;
	location / {
		proxy_pass http://sessionCluster;
		index index.html index.htm;
	}
}
缺点:
- 容易造成单点故障,session 还是村你在web-server 中的 所以服务重启可能导致部分session丢失,影响业务,部分用户需要重新登录
- 前端不能有负载均衡,如果有,session绑定将会出问题
- 如果web-server 水平扩展的,rehash后session冲洗分布,也会有一部分用户路由不到正确的session
优点:
- 配置简单 只需要配置nginx ,不需要更改应用代码
- 负载均衡,只要hash属性的值是均匀分布的,多台web-server的负载是均衡的
- 可以支持web-server水平扩展(session 同步法收到内存的限制)
方案四:基于redis存储session方案
官方文档地址:spring-session-data-redis
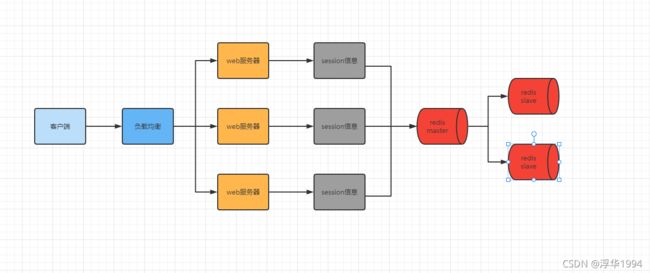
基于redis存储session方案流程示意图

引入依赖
<dependency>
	<groupId>org.springframework.bootgroupId>
	<artifactId>spring-session-data-redisartifactId>
dependency>
<dependency>
	<groupId>org.springframework.bootgroupId>
	<artifactId>spring-boot-data-starter-redisartifactId>
dependency>
配置文件
spring:
  redis:
    host: 192.168.139.187
    port: 6379
    jedis:
      pool:
        max-active: 100
        max-wait: 1ms
        max-idle: 10
        min-idle: 2

    timeout: 500ms
整合springboot
@EnableRedisHttpSession //整合Redis作为session存储 可以放在项目的启动类上
配置类增大session 的作用域
/**
 * @Author : 清风冷影
 * @Description: springSession配置类
 * maxInactiveIntervalInSeconds: 设置 Session 失效时间,使用 Redis Session 之后,原 Spring Boot 的 server.session.timeout 属性不再生效。
 * @Date : 2021/11/18  17:44
 */
@Configuration
@EnableRedisHttpSession(maxInactiveIntervalInSeconds = 60*60*24)
public class GuLiMallSessionConfig {
    @Bean
    public CookieSerializer cookieSerializer() {

        DefaultCookieSerializer cookieSerializer = new DefaultCookieSerializer();

        //放大作用域
        cookieSerializer.setDomainName("qingfenglengying.com");
        cookieSerializer.setCookieName("QFLYSESSION");

        return cookieSerializer;
    }


    @Bean
    public RedisSerializer<Object> springSessionDefaultRedisSerializer() {
        return new GenericJackson2JsonRedisSerializer();
    }
}
Spring Session Redis的原理简析
@Retention(RetentionPolicy.RUNTIME)
@Target(ElementType.TYPE)
@Documented
@Import(RedisHttpSessionConfiguration.class)
@Configuration(proxyBeanMethods = false)
public @interface EnableRedisHttpSession {
    //Session默认过期时间,秒为单位,默认30分钟
	int maxInactiveIntervalInSeconds() default MapSession.DEFAULT_MAX_INACTIVE_INTERVAL_SECONDS;
//配置key的namespace,默认的是spring:session,如果不同的应用共用一个redis,应该为应用配置不同的namespace,这样才能区分这个Session是来自哪个应用的
	//spring:session
    String redisNamespace() default RedisIndexedSessionRepository.DEFAULT_NAMESPACE;

	@Deprecated
	RedisFlushMode redisFlushMode() default RedisFlushMode.ON_SAVE;
	//配置刷新Redis中Session的方式,默认是ON_SAVE模式,只有当Response提交后才会将Session提交到Redis
    //这个模式也可以配置成IMMEDIATE模式,这样的话所有对Session的更改会立即更新到Redis
	FlushMode flushMode() default FlushMode.ON_SAVE;
	//清理过期Session的定时任务默认一分钟一次。
    //	static final String DEFAULT_CLEANUP_CRON = "0 * * * * *";
	String cleanupCron() default RedisHttpSessionConfiguration.DEFAULT_CLEANUP_CRON;

	SaveMode saveMode() default SaveMode.ON_SET_ATTRIBUTE;

}
这个注解的主要作用是注册一个SessionFactoryFilter ,这个Filter会拦截到所有的请求,注入SessionRepositoryFilter的代码在RedisHttpSessionConfiguration这个类中。
@Configuration
@EnableScheduling
public class RedisHttpSessionConfiguration extends SpringHttpSessionConfiguration
		implements BeanClassLoaderAware, EmbeddedValueResolverAware, ImportAware,
		SchedulingConfigurer {
            ...
        }
//RedisHttpSessionConfiguration继承了SpringHttpSessionConfiguration,
//SpringHttpSessionConfiguration中注册了SessionRepositoryFilter。见下面代码。


@Configuration
public class SpringHttpSessionConfiguration implements ApplicationContextAware {
	...
     @Bean
	public <S extends Session> SessionRepositoryFilter<? extends Session> springSessionRepositoryFilter(
			SessionRepository<S> sessionRepository) {

			SessionRepositoryFilter<S> sessionRepositoryFilter = new SessionRepositoryFilter<>(sessionRepository);
		sessionRepositoryFilter.setHttpSessionIdResolver(this.httpSessionIdResolver);
		return sessionRepositoryFilter;
	}
     ...
}
我们发现注册SessionRepositoryFilter时需要一个SessionRepository参数,这个参数是在RedisHttpSessionConfiguration中被注入进入的。
	@Bean
	public RedisIndexedSessionRepository sessionRepository() {
		RedisTemplate<Object, Object> redisTemplate = createRedisTemplate();
		RedisIndexedSessionRepository sessionRepository = new RedisIndexedSessionRepository(redisTemplate);
		sessionRepository.setApplicationEventPublisher(this.applicationEventPublisher);
		if (this.indexResolver != null) {
			sessionRepository.setIndexResolver(this.indexResolver);
		}
		if (this.defaultRedisSerializer != null) {
			sessionRepository.setDefaultSerializer(this.defaultRedisSerializer);
		}
		sessionRepository.setDefaultMaxInactiveInterval(this.maxInactiveIntervalInSeconds);
		if (StringUtils.hasText(this.redisNamespace)) {
			sessionRepository.setRedisKeyNamespace(this.redisNamespace);
		}
		sessionRepository.setFlushMode(this.flushMode);
		sessionRepository.setSaveMode(this.saveMode);
		int database = resolveDatabase();
		sessionRepository.setDatabase(database);
		this.sessionRepositoryCustomizers
				.forEach((sessionRepositoryCustomizer) -> sessionRepositoryCustomizer.customize(sessionRepository));
		return sessionRepository;
	}
请求进来的时候拦截器会先将request和response拦截住,然后将这两个对象转换成Spring内部的包装类SessionRepositoryRequestWrapper和SessionRepositoryResponseWrapper对象。SessionRepositoryRequestWrapper类重写了原生的getSession方法。代码如下:
		@Override
		public HttpSessionWrapper getSession(boolean create) {
            //通过request的getAttribue方法查找CURRENT_SESSION属性,有直接返回
			HttpSessionWrapper currentSession = getCurrentSession();
			if (currentSession != null) {
				return currentSession;
			}
            查找客户端中一个叫SESSION的cookie,通过sessionRepository对象根据SESSIONID去Redis中查找Session
			S requestedSession = getRequestedSession();
			if (requestedSession != null) {
				if (getAttribute(INVALID_SESSION_ID_ATTR) == null) {
					requestedSession.setLastAccessedTime(Instant.now());
					this.requestedSessionIdValid = true;
					currentSession = new HttpSessionWrapper(requestedSession, getServletContext());
					currentSession.markNotNew();
                    //将Session设置到request属性中
					setCurrentSession(currentSession);
                     //返回Session
					return currentSession;
				}
			}
			else {
				// This is an invalid session id. No need to ask again if
				// request.getSession is invoked for the duration of this request
				if (SESSION_LOGGER.isDebugEnabled()) {
					SESSION_LOGGER.debug(
							"No session found by id: Caching result for getSession(false) for this HttpServletRequest.");
				}
				setAttribute(INVALID_SESSION_ID_ATTR, "true");
			}
            //不创建Session就直接返回null
			if (!create) {
				return null;
			}
			if (SESSION_LOGGER.isDebugEnabled()) {
				SESSION_LOGGER.debug(
						"A new session was created. To help you troubleshoot where the session was created we provided a StackTrace (this is not an error). You can prevent this from appearing by disabling DEBUG logging for "
								+ SESSION_LOGGER_NAME,
						new RuntimeException("For debugging purposes only (not an error)"));
			}
             //通过sessionRepository创建RedisSession这个对象,可以看下这个类的源代码,如果
			S session = SessionRepositoryFilter.this.sessionRepository.createSession();
			session.setLastAccessedTime(Instant.now());
			currentSession = new HttpSessionWrapper(session, getServletContext());
			setCurrentSession(currentSession);
			return currentSession;
		}
当调用SessionRepositoryRequestWrapper对象的getSession方法拿Session的时候,会先从当前请求的属性中查找.CURRENT_SESSION属性,如果能拿到直接返回,这样操作能减少Redis操作,提升性能。
到现在为止我们发现如果flushMode配置为ON_SAVE模式的话,Session信息还没被保存到Redis中,那么这个同步操作到底是在哪里执行的呢?我们发现SessionRepositoryFilter的doFilterInternal方法最后有一个finally代码块,这个代码块的功能就是将Session同步到Redis。
	@Override
	protected void doFilterInternal(HttpServletRequest request, HttpServletResponse response, FilterChain filterChain)
			throws ServletException, IOException {
		request.setAttribute(SESSION_REPOSITORY_ATTR, this.sessionRepository);

		SessionRepositoryRequestWrapper wrappedRequest = new SessionRepositoryRequestWrapper(request, response);
		SessionRepositoryResponseWrapper wrappedResponse = new SessionRepositoryResponseWrapper(wrappedRequest,
				response);

		try {
			filterChain.doFilter(wrappedRequest, wrappedResponse);
		}
		finally {
             //将Session同步到Redis,同时这个方法还会将当前的SESSIONID写到cookie中去,同时还会发布一
         //SESSION创建事件到队列里面去
			wrappedRequest.commitSession();
		}
	}
@EnableRedisHttpSession:开启Session共享功能
RedisHttpSessionConfiguration:配置类,一般不需要我们自己配置。主要功能是配置SessionRepositoryFilter和RedisOperationsSessionRepository这两个Bean
SessionRepositoryFilter:拦截器
RedisOperationsSessionRepository:可以认为是一个Redis操作的客户端,有在Redis中增删改查Session的功能
SessionRepositoryRequestWrapper:Request的包装类,主要是重写了getSession方法
SessionRepositoryResponseWrapper:Response的包装类。
原理简要总结:
当请求进来的时候,SessionRepositoryFilter会先拦截到请求,将request和Response对象转换成SessionRepositoryRequestWrapper和SessionRepositoryResponseWrapper。后续当第一次调用request的getSession方法时,会调用到SessionRepositoryRequestWrapper的getSession方法。这个方法的逻辑是先从request的属性中查找,如果找不到;再查找一个key值是"SESSION"的cookie,通过这个cookie拿到sessionId去redis中查找,如果查不到,就直接创建一个RedisSession对象,同步到Redis中(同步的时机根据配置来)。
优点:
这是企业中使用的最多的一种方式
spring为我们封装好了spring-session,直接引入依赖即可
数据保存在redis中,无缝接入,不存在任何安全隐患
redis自身可做集群,搭建主从,同时方便管理
缺点:
多了一次网络调用,web容器需要向redis访问
总结:
一般会将web容器所在的服务器和redis所在的服务器放在同一个机房,减少网络开销,走内网进行连接