Maven高级
1.分模块开发与设计
1.1 概念
-
为什么要分模块开发
- 随着发展,系统需要的功能逐渐变多,这些功能在系统设计之初无法预计;后期添加的各种功能,可以以新模块的形式接入原有系统
- 比较大的系统,单体开发协作效率低,内耗大;拆分成多个模块后,独立开发效率高。
-
模块拆分原则
目的:项目的扩展性变强了,方便其他项目引用相同的功能
-
拆分方式
可以按照层级拆:
pojo、controller、service、dao...也可以按照业务功能拆:
user、order...原始单体工程拆分成若干个子模块,方便模块间的相互调用,接口共享
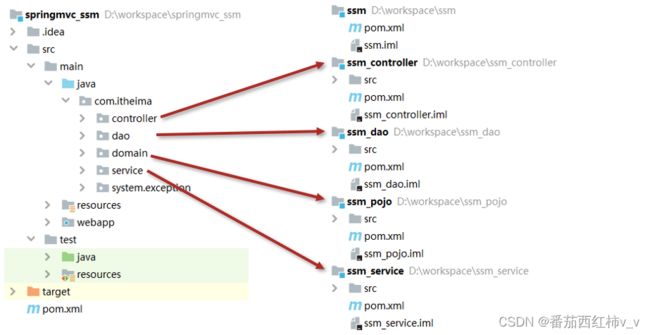
1.2 拆分
1.2.1 拆分POJO
新建一个模块,复制原单体模块中pojo代码到新模块中即可。
pom.xml
<project xmlns="http://maven.apache.org/POM/4.0.0"
         xmlns:xsi="http://www.w3.org/2001/XMLSchema-instance"
         xsi:schemaLocation="http://maven.apache.org/POM/4.0.0 http://maven.apache.org/xsd/maven-4.0.0.xsd">


    <groupId>com.itheimagroupId>
    <artifactId>ssm_pojoartifactId>
    <version>1.0-SNAPSHOTversion>


    <modelVersion>4.0.0modelVersion>


    <properties>
        <project.build.sourceEncoding>UTF-8project.build.sourceEncoding>
        <maven.compiler.source>1.8maven.compiler.source>
        <maven.compiler.target>1.8maven.compiler.target>
    properties>
project>
配置文件
// 无
代码
// Book实体类代码
之后各层模块都依赖pojo,所以要把pojo模块打包成jar包,放入本地仓库,以便dao等各层独立出来的模块使用:
pojo模块的打包方式为jar(默认值)- 在
pojo模块上Install- idea中双击
recycle中的install - 命令行,在
pom.xml同级目录,运行命令mvn install
- idea中双击
1.2.2 拆分Dao
新建一个模块,复制原单体模块中dao代码到新模块中即可。
pom.xml中添加pojo模块的坐标。
打包当前模块进本地仓库。在dao模块上Install
- 方式1:
idea中双击recycle中的install - 方式2:命令行,在
pom.xml同级目录,运行命令mvn install
1.2.3 拆分Service
新建一个模块,复制原单体模块中service代码到新模块中即可。
pom.xml中添加dao模块的坐标。
打包当前模块进本地仓库。在service模块上Install
- 方式1:
idea中双击recycle中的install - 方式2:命令行,在
pom.xml同级目录,运行命令mvn install
1.2.4 拆分Controller
新建一个模块,复制剩余代码到新模块中即可。
pom.xml中添加service模块的坐标。
2. 依赖管理
2.1 概念
-
依赖管理:配置管理当前项目运行所需的
jar,一个项目可以设置多个依赖 -
格式:
<dependencies>

    <dependency>

        <groupId>org.springframeworkgroupId>

        <artifactId>spring-webmvcartifactId>

        <version>5.2.10.RELEASEversion>
    dependency>
dependencies>
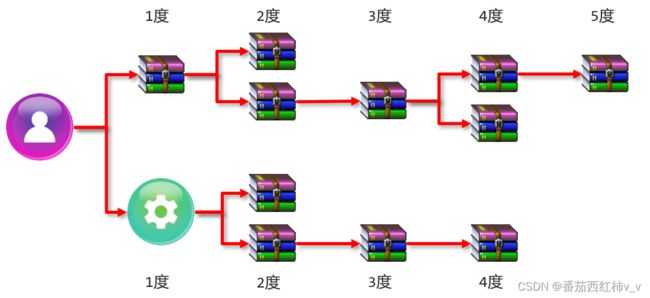
2.2. 依赖传递
- 依赖具有传递性
- 直接依赖:在当前项目中通过依赖配置建立的依赖关系
- 间接依赖:被资源的资源如果依赖其他资源,当前项目间接依赖其他资源
- 特殊优先:当同级配置了相同资源的不同版本,后配置的覆盖先配置的
-
最佳实践
Maven管理界面,Dependencies界面看到的就是最终的结果,只要最终结果符合预期即可。
2.3 可选依赖/排除依赖
可选依赖 - 不透明 - 私房钱 – 别人用你的,不知道也就不能使用
- 你的某个依赖可选,你给别人用,不想提供某些依赖给他用
排除依赖 - 不需要 - 拒绝 - 你用别人时,但是不想用,可以拒绝
- 你用别人的,别人某个依赖你不喜欢,直接排除拒绝掉
3. 聚合
3.1 作用:
方便统一管理多个有关联模块的生命周期(方便统一构建),需要通过一个空模块承载该功能。
构建:模块生命周期中的各个操作。
3.2 实现步骤
新建一个模块,其pom.xml内容如下:
<project xmlns="http://maven.apache.org/POM/4.0.0"
         xmlns:xsi="http://www.w3.org/2001/XMLSchema-instance"
         xsi:schemaLocation="http://maven.apache.org/POM/4.0.0 http://maven.apache.org/xsd/maven-4.0.0.xsd">
    <modelVersion>4.0.0modelVersion>

    <groupId>com.itheimagroupId>
    <artifactId>maven_01_parentartifactId>
    <version>1.0-RELEASEversion>

    <packaging>pompackaging>


    <modules>

        <module>../maven_02_ssmmodule>
        <module>../maven_03_pojomodule>
        <module>../maven_04_daomodule>
    modules>
project>
也就是在负责聚合的模块中完成如下两个工作:
- 修改本模块打包方式为
pom - 在本模块
pom文件中,通过modules和module标签把其他模块聚合进来
3.3 maven打包方式
通过pom.xml配置文件中packing标签体现。
| 打包方式 | ||
|---|---|---|
| jar | 把当前项目打包成一个jar包,方便其他工程直接引入 | 默认 |
| war | 打包成war包,方便发布到tomcat | web项目打包的方式 |
pom |
标识当前项目是一个聚合/父项目 | 用于项目结构管理和项目构建管理 |
3.4 聚合模块之间的关系
配置顺序不是决定其编译/引入顺序主要因素,最终顺序主要由相互之间的依赖关系决定,在上述条件不能决定顺序时,参考配置顺序。
4. 继承
4.1 作用
方便统一POM文件中依赖\插件管理,同样需要通过一个空模块承载该功能。
下面描述中,工程和模块一般是同一个意思。
4.2 实现步骤
-
新建模块(可以复用聚合模块,就不需要新建新模块)
-
聚合模块和继承中的父模块都需要用到一个新模块,我们可以使用同一个新模块承担着两个职能(推荐做法)
-
聚合模块的原有配置保持不变
<project xmlns="http://maven.apache.org/POM/4.0.0"
         xmlns:xsi="http://www.w3.org/2001/XMLSchema-instance"
         xsi:schemaLocation="http://maven.apache.org/POM/4.0.0 http://maven.apache.org/xsd/maven-4.0.0.xsd">
    <modelVersion>4.0.0modelVersion>

    <groupId>com.itheimagroupId>
    <artifactId>maven_01_parentartifactId>
    <version>1.0-RELEASEversion>

    <packaging>pompackaging>


    <modules>

        <module>../maven_02_ssmmodule>
        <module>../maven_03_pojomodule>
        <module>../maven_04_daomodule>
    modules>
project>
继承中,父模块打包方式同样需要设置为
pom<packaging>pompackaging>
-
-
子模块中,指定父模块
模块的继承关系建立中,父模块只需要指定自己为pom方式,主要工作是在子模块中配置的。
<project xmlns="http://maven.apache.org/POM/4.0.0"
         xmlns:xsi="http://www.w3.org/2001/XMLSchema-instance"
         xsi:schemaLocation="http://maven.apache.org/POM/4.0.0 http://maven.apache.org/xsd/maven-4.0.0.xsd">
    <modelVersion>4.0.0modelVersion>

    <groupId>com.itheimagroupId>
    <artifactId>maven_03_pojoartifactId>
    <version>1.0-SNAPSHOTversion>


    <parent>
        <groupId>com.itheimagroupId>
        <artifactId>maven_01_parentartifactId>
        <version>1.0-RELEASEversion>
        <relativePath>../maven_01_parent/pom.xmlrelativePath>
    parent>
project>
至此,子父模块关系已经建成
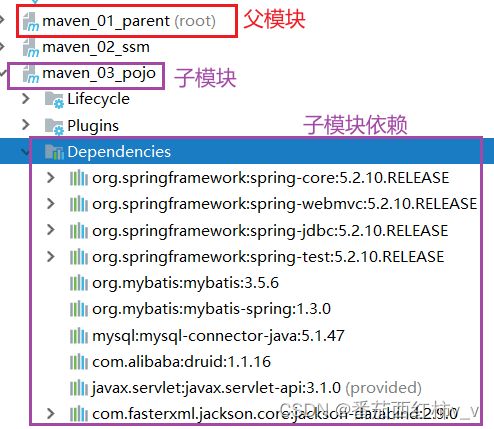
4.3 父模块的作用1:统一导入依赖
父模块中配置导入好的依赖,子模块可以直接继承并使用。
-
父模块中导入依赖
<project xmlns="http://maven.apache.org/POM/4.0.0" xmlns:xsi="http://www.w3.org/2001/XMLSchema-instance" xsi:schemaLocation="http://maven.apache.org/POM/4.0.0 http://maven.apache.org/xsd/maven-4.0.0.xsd"> <modelVersion>4.0.0modelVersion> <groupId>com.itheimagroupId> <artifactId>maven_01_parentartifactId> <version>1.0-RELEASEversion> <packaging>pompackaging> <modules> <module>../maven_02_ssmmodule> <module>../maven_03_pojomodule> <module>../maven_04_daomodule> modules> <dependencies> <dependency> <groupId>org.springframeworkgroupId> <artifactId>spring-coreartifactId> <version>5.2.10.RELEASEversion> dependency> <dependency> <groupId>org.springframeworkgroupId> <artifactId>spring-webmvcartifactId> <version>5.2.10.RELEASEversion> dependency> <dependency> <groupId>org.springframeworkgroupId> <artifactId>spring-jdbcartifactId> <version>5.2.10.RELEASEversion> dependency> <dependency> <groupId>org.springframeworkgroupId> <artifactId>spring-testartifactId> <version>5.2.10.RELEASEversion> dependency> <dependency> <groupId>org.mybatisgroupId> <artifactId>mybatisartifactId> <version>3.5.6version> dependency> <dependency> <groupId>org.mybatisgroupId> <artifactId>mybatis-springartifactId> <version>1.3.0version> dependency> <dependency> <groupId>mysqlgroupId> <artifactId>mysql-connector-javaartifactId> <version>5.1.47version> dependency> <dependency> <groupId>com.alibabagroupId> <artifactId>druidartifactId> <version>1.1.16version> dependency> <dependency> <groupId>javax.servletgroupId> <artifactId>javax.servlet-apiartifactId> <version>3.1.0version> <scope>providedscope> dependency> <dependency> <groupId>com.fasterxml.jackson.coregroupId> <artifactId>jackson-databindartifactId> <version>2.9.0version> dependency> dependencies> project> -
子模块中可以直接看到并使用父工程中的依赖
4…4 父模块的作用2:管理统一依赖版本
统一管理依赖和插件的版本,但是不会引入任何依赖或者插件。
父模块中使用
<dependencyManagement>

    <dependencies>

        <dependency>
            <groupId>junitgroupId>
            <artifactId>junitartifactId>
            <version>4.12version>
        dependency>
    dependencies>
dependencyManagement>
父模块中使用
<build>
	<pluginManagement>

		<plugins>

			<plugin>
				<groupId>org.apache.tomcat.mavengroupId>
				<artifactId>tomcat7-maven-pluginartifactId>
				<version>2.1version>
				<configuration>
					<port>80port>
					<path>/path>
				configuration>
			plugin>
		plugins>
	pluginManagement>
build>
管理:
-
在父模块中声明了其子模块中可能会用到的依赖/插件,并规定好了版本;
-
子模块中,如果使用到了某个依赖,就可以只配置
组织id和依赖id(groupId、artifactId),而不需要配置版本(version)等其他信息;版本(version)由父模块统一管理。 -
子模块也可以自己指定与父模块不同的版本,但是如非必要,不要这么做。
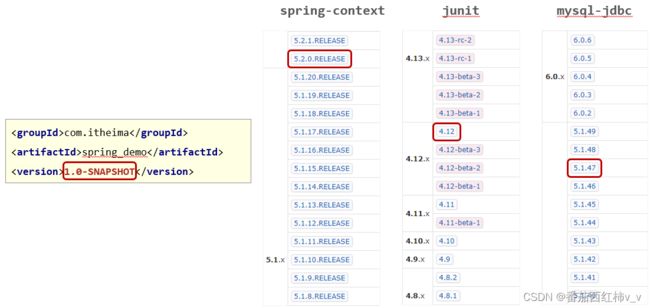
<parent>
    <groupId>com.itheimagroupId>
    <artifactId>ssmartifactId>
    <version>1.0-SNAPSHOTversion>

    <relativePath>../ssm/pom.xmlrelativePath>
parent>

<modelVersion>4.0.0modelVersion>
<artifactId>ssm_controllerartifactId>


    <dependencies>

        <dependency>
            <groupId>junitgroupId>
            <artifactId>junitartifactId>


            <version>4.13version>
        dependency>
    dependencies>

<build>

    <plugins>

        <plugin>
            <groupId>org.apache.tomcat.mavengroupId>
            <artifactId>tomcat7-maven-pluginartifactId>


        plugin>
    plugins>
build>
4.5 继承中需要注意的问题
关于依赖/插件导入及版本问题
-
如果子模块中,使用了父模块规定好的依赖/插件,但是不想使用父规定的版本:只需要在子模块中自己指定版本就可以
-
如果子模块中,使用了父模块没有规定的依赖/插件:只需要自己编写完整的坐标(GAV)即可。
4.6 聚合和继承的关系
| 继承 | 聚合 | |
|---|---|---|
| 作用/目的 | 统一POM管理<依赖、插件…版本> |
统一构建管理,eg:编译、打包、安装等 |
| 配置位置 | 关系维护相关配置,配置在父工程中 | 关系维护相关配置,主要配置在主工程中 |
| 实现配置1 | 父工程的打包方式为POM:pluginManagement和dependencyManagement |
主工程的打包方式为POM: |
| 实现配置2 | 子工程的坐标中用parent标签指定父工程:父工程pom文件的相对路径等 |
在主工程的pom.xml中使用标签将其他模块聚合到一起。 |
| 不同 | 配置在子工程中:在子工程配置继承于哪个父工程,父工程中无法感知 | 配置在主工程中:在主工程中配置关系,可以感知到有哪些工程被聚合了 |
| 关系 | 聚合和继承可以配置在不同的模块,两者都无需编码 建议:继承的同时配聚合 共同完成统一版本管理和统一构建管理 |
聚合和继承可以配置在不同的模块,两者都无需编码 建议:聚合的同时配继承 共同完成统一版本管理和统一构建管理 |
5. 属性
5.1 自定义属性
5.1.1 作用
相当于Java中的变量,方便统一维护
5.1.2 定义属性
pom.xml中通过
<properties>

    <spring.version>5.1.9.RELEASEspring.version>
    <junit.version>4.12junit.version>
properties>
5.1.3 使用
<dependency>
    <version>${spring.version}version>
dependency>
5.2 统一维护依赖版本
同一个pom文件中,某个技术的多个依赖可能使用相同的版本。
为了方便维护版本,可以自定义版本属性,然后在各个依赖中使用自定义的属性
-
定义版本
<properties>

    <spring.version>5.2.10.RELEASEspring.version>
properties>
-
使用版本
<dependencies>
    <dependency>
        <groupId>org.springframeworkgroupId>
        <artifactId>spring-coreartifactId>
        <version>${spring.version}version>
    dependency>

    <dependency>
        <groupId>org.springframeworkgroupId>
        <artifactId>spring-webmvcartifactId>
        <version>${spring.version}version>
    dependency>

    <dependency>
        <groupId>org.springframeworkgroupId>
        <artifactId>spring-jdbcartifactId>
        <version>${spring.version}version>
    dependency>

    <dependency>
        <groupId>org.springframeworkgroupId>
        <artifactId>spring-testartifactId>
        <version>${spring.version}version>
    dependency>
dependencies>
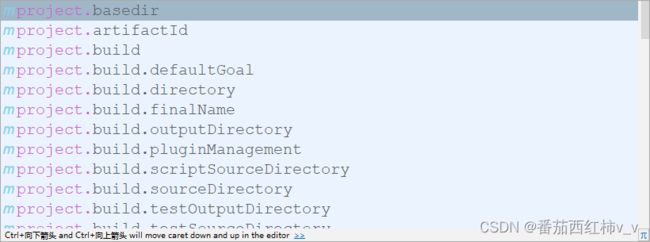
5.3 项目内置属性
5.3.1 作用
获取项目相关的参数及属性
5.3.2 使用
使用project开头,且project前缀可省略;建议写上。
${project.version}
${project.basedir}
5.4 Maven的settings属性
5.4.1 作用
读取maven的settings.xml配置文件中配置的信息
使用Maven配置文件settings.xml中的标签属性,用于动态配置。
5.4.2 调用格式:
${settings.localRepository}
5.5 java系统属性
5.5.1 系统属性查询方式
mvn help:system # 确保maven的bin路径配置进系统path
命令结果中的System Properties部分
5.5.2 作用
读取Java系统属性
5.5.3 调用格式
${user.home}
5.6 操作系统环境变量属性
5.6.1 系统属性查询方式
mvn help:system # 确保maven的bin路径配置进系统path
命令结果中的Environment Variables部分
5.6.2 作用
读取系统属性
5.6.3 调用格式
${env.JAVA_HOME}
6. 资源配置(了解)
目的:集中统一管理properties文件配置的参数的值
模块 pom.xml中
<properties>
    <jdbc.url>jdbc:mysql://127.0.0.1:3306/ssm_dbjdbc.url>
properties>
模块pom.xml中
<resources>
    <resource>

        <directory>${project.basedir}/src/main/resourcesdirectory>
        <filtering>truefiltering>
    resource>
resources>

<testResources>
    <testResource>

        <directory>${project.basedir}/src/test/resourcesdirectory>
        <filtering>truefiltering>
    testResource>
testResources>
jdbc.properties中${jdbc.url}读取该值
jdbc.driver=com.mysql.jdbc.Driver
jdbc.url=${jdbc.url}
jdbc.username=root
jdbc.password=root
web项目使用Maven打war包时候,如果项目中没有web.xml会报错,并打包失败。
解决方式:
-
新建一个空的
web.xml文件,无任何内容 -
配置插件
mave-war-plugin,并指定找不到xml时不报错。<plugin> <groupId>org.apache.maven.pluginsgroupId> <artifactId>maven-war-pluginartifactId> <version>3.2.3version> <configuration> <failOnMissingWebXml>falsefailOnMissingWebXml> configuration> plugin>
7. 版本管理
7.1 概述
为了区别开发过程中,或者不同时间对外公布的项目,常为项目定义版本。
版本一般构成:
- 主版本号、次版本号、小版本号-常见版本标识
eg:1.0.1-Snapshot
常见版本标识
-
Snapshot:快照版,测试版 -
Release:发布版本,稳定版本 -
RC:Release Candidate':准发步版本 -
GA:General Availability:正式发布的版本 -
M1:MileStone,里程碑版本 -
Stable:稳定版本
7.2 工程版本
- SNAPSHOT(快照版本)
- 项目开发过程中临时输出的版本,称为快照版本
- 快照版本会随着开发的进展不断更新
- RELEASE(发布版本)
- 项目开发到进入阶段里程碑后,向团队外部发布较为稳定的版本,这种版本所对应的构件文件是稳定的
- 即便进行功能的后续开发,也不会改变当前发布版本内容,这种版本称为发布版本
7.3 发布版本
- alpha版-α
bug已修复,开始内测。
- beta版-β
- 内测通过了,开始公测,欢迎广大小白鼠们来踩坑。
- 纯数字版
- 对外发布的稳定版本。
- 对外发布的稳定版本。
8. 跳过测试
8.1 什么时候会测试
Maven构建过程中每个生命周期执行时,都会把它之前的所有生命周期执行一遍 ,每个生命周期通过之后,才会执行之后的,依次进行。
所以test及之后的生命周期环境都会执行测试。
8.2 跳过测试的应用场景
- 模块中某个功能未开发完毕
- 单个功能更新调试导致其他功能失败
- 快速打包,避免过多不必要的测试
- ……
8.3 跳过测试方式1(极力推荐)
idea右侧Maven窗口,聚焦到某个模块,然后点击右上角小闪电–(toggle 'skip tests' Mode )即可。
8.4 跳过测试方式2(命令跳过)
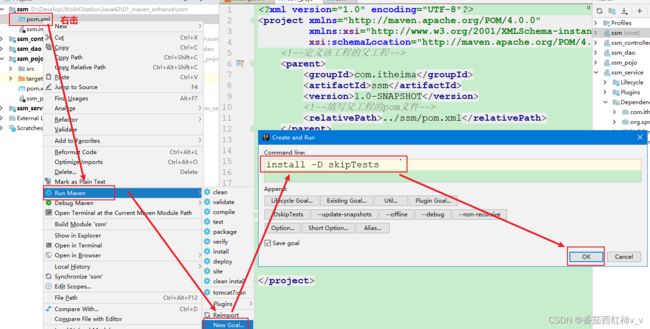
8.5 跳过测试方式3(配置跳过)
pom.xml中配置跳过测试,功能最强大
<plugin>
    <artifactId>maven-surefire-pluginartifactId>
    <version>2.22.1version>

    <configuration>
        <includes>

            <include>**/User*Test.javainclude>
        includes>


    configuration>
plugin>
9. 私服
9.1 概念
私有服务器,Maven仓库的私有服务器,我们常用的就是nexus。
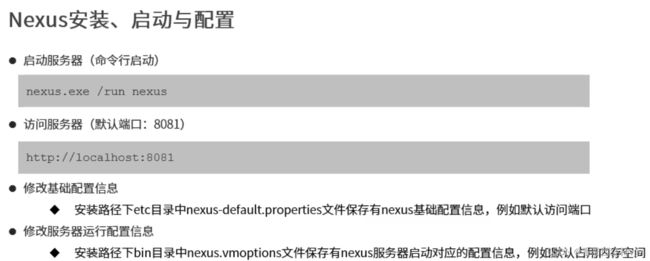
9.2 安装启动
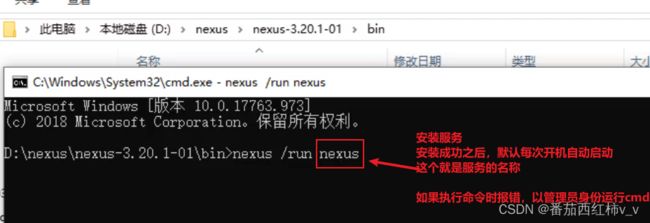
如果运行上述命令、关闭黑窗口后nexus无法访问,说明服务没有安装成功。
以管理员身份运行cmd,进入上述图片中目录,运行 nexus.exe /install [可选服务名称]来安装nexus的服务;服务默认是开机启动,但是本次没有启动,需要手动启动之后,才能正常运行;首次启动较慢,多访问几次即可。
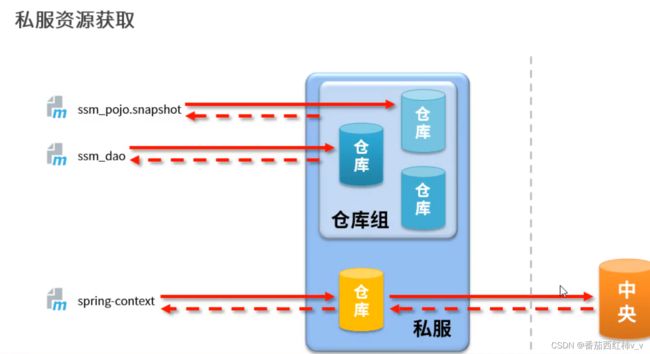
9.3 仓库分类
hosted:宿主仓库,自己写的模块打包的依赖,或有产权的依赖,用于维护内部依赖资源;proxy:代理仓库,代理中央仓库、中央仓库的镜像仓库,用于缓存中央仓库的依赖资源;group:仓库分组,不存储具体数据资源,内可包含多个仓库。仓库分组用于下载依赖资源使用。
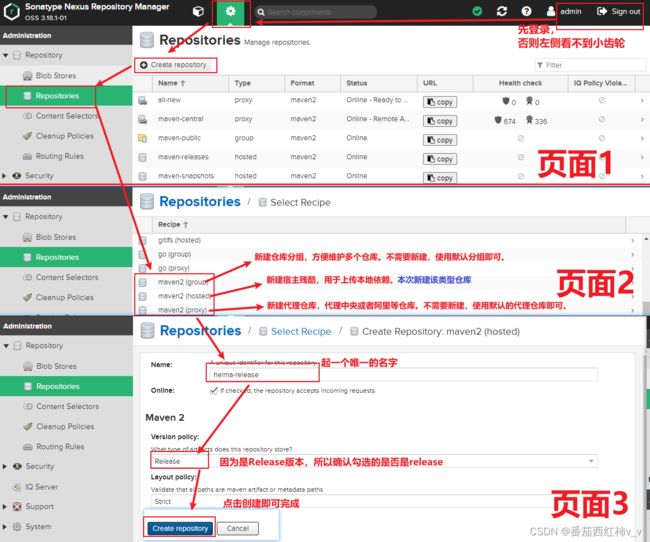
9.4 新建仓库
登录私服,默认账号admin,密码在工作目录/nexus3/admin.password文件中,第一次登录要求修改密码。
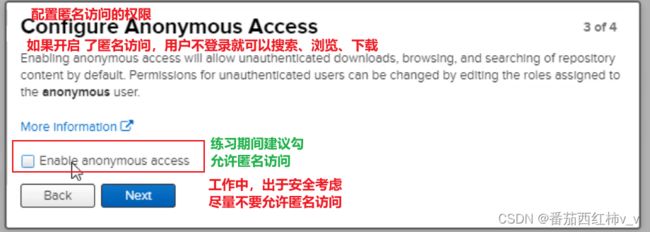
修改完成后,有是否开启匿名访问权限的提示:
新建仓库(也可以直接使用系统自带的hosted仓库),并在默认仓库分组中添加刚才添加的仓库
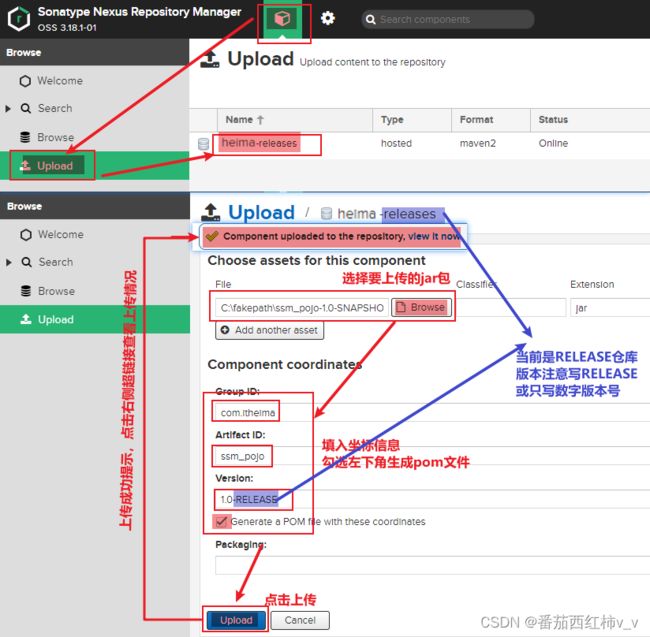
手动上传依赖到私服
9.4 从私服下载依赖
配置仓库的镜像(阿里云 + 私服 或者 单独配置私服)
<mirror>
    <id>nexus-heimaid>
    <mirrorOf>*mirrorOf>

    <url>http://localhost:8081/repository/maven-public/url>
mirror>

<mirror>
    <id>nexus-aliyunid>
    <mirrorOf>centralmirrorOf>
    <name>Nexus aliyunname>
    <url>http://maven.aliyun.com/nexus/content/groups/publicurl>
mirror>
如果是下载,配置好上述内容之后,就可以从私服下载中央仓库中没有的依赖。
9.5 发布依赖到私服
发布依赖到私服,需要验证用户名和密码后,才能发布。Idea集成发布的时候也一样。
打开settings.xml,添加如下访问私服使用的账密
<servers>
	<server>
		<id>heima-releaseid>
		<username>adminusername>
		<password>adminpassword>
	server>
	<server>
		<id>heima-snapshotsid>
		<username>adminusername>
		<password>adminpassword>
	server>
servers>
在要上传依赖(发布依赖)的模块pom.xml中,添加如下内容
<distributionManagement>
    <repository>

        <id>heima-releaseid>

        <url>http://localhost:8081/repository/itheima-release/url>
    repository>
    <snapshotRepository>

        <id>heima-snapshotsid>

        <url>http://localhost:8081/repository/itheima-snapshot/url>
    snapshotRepository>
distributionManagement>
配合settings.xml中server配置的用户名和密码即可完成依赖发布的基本配置。
双击deploy,或键入[mvn] deploy即可发布依赖到私服。
。
9.5 发布依赖到私服
发布依赖到私服,需要验证用户名和密码后,才能发布。Idea集成发布的时候也一样。
打开settings.xml,添加如下访问私服使用的账密
<servers>
	<server>
		<id>heima-releaseid>
		<username>adminusername>
		<password>adminpassword>
	server>
	<server>
		<id>heima-snapshotsid>
		<username>adminusername>
		<password>adminpassword>
	server>
servers>
在要上传依赖(发布依赖)的模块pom.xml中,添加如下内容
<distributionManagement>
    <repository>

        <id>heima-releaseid>

        <url>http://localhost:8081/repository/itheima-release/url>
    repository>
    <snapshotRepository>

        <id>heima-snapshotsid>

        <url>http://localhost:8081/repository/itheima-snapshot/url>
    snapshotRepository>
distributionManagement>
配合settings.xml中server配置的用户名和密码即可完成依赖发布的基本配置。
双击deploy,或键入[mvn] deploy即可发布依赖到私服。