【APUE】文件系统 — 进程环境
目录
一、再提 main 函数
二、进程的终止
2.1 正常终止
2.1.1 从 main 函数用 return 返回
2.1.2 主动调用 exit 函数
2.1.3 钩子函数
2.1.4 调用 _exit 或 _Exit
2.2 异常终止
三、命令行参数的分析
3.1 getopt
3.2 示例
四、环境变量
4.1 简介
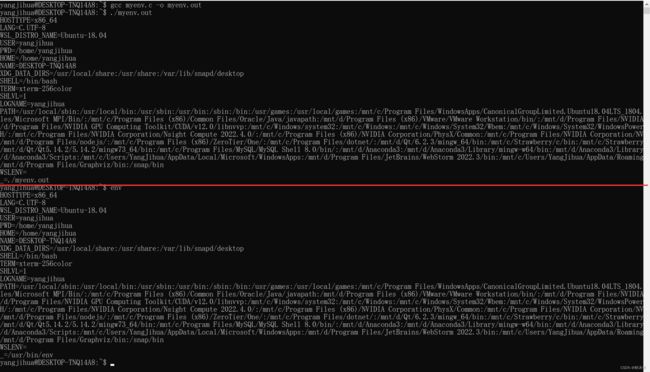
4.2 查看环境变量
4.3 environ
4.4 getenv
4.5 setenv
4.6 putenv
五、C程序的存储空间布局
六、库
6.1 动态库
6.2 静态库
6.3 共享库(手动装载库)
6.3.1 dlopen
6.3.2 dlclose
6.3.3 dlerror
6.3.4 dlsym
6.3.5 man 手册中的代码示例
七、函数跳转
7.1 setjmp
7.2 longjmp
代码示例
八、资源的获取及控制
8.1 ulimit 命令
8.2 getrlimit
8.3 setrlimit
一、再提 main 函数
int main(int argc, char *argv[]) {

}
C 程序总是从 main 函数开始执行,从 main 函数结束执行。即 main 是程序的入口和出口
二、进程的终止
2.1 正常终止
- 从 main 函数用 return返回
- 主动调用 exit 函数
- 调用 _exit 或 _Exit
- 最后一个线程从其启动例程(启动例程说白了就是一个线程本身)返回
- 最后一个线程调用了 pthread_exit
下面介绍其中一部分
2.1.1 从 main 函数用 return 返回
#include
#include

int main() {
    printf("hello\n");
    return 0;    // 正常终止
{
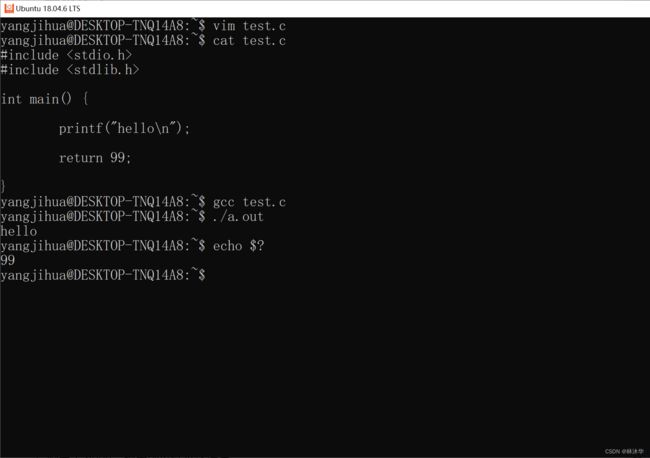
其中,正常终止的语句 return 0 是给父进程看的
如上所示,在上述情况下,父进程为 shell,也就是说 return 的值给 shell 了,可以在 shell 中通过如下命令显示最后命令的退出状态
echo $?2.1.2 主动调用 exit 函数
man exit
NAME
       exit - cause normal process termination

SYNOPSIS
       #include

       void exit(int status);

DESCRIPTION
       The exit() function causes normal process termination and the value of status & 0377 is returned to the parent.
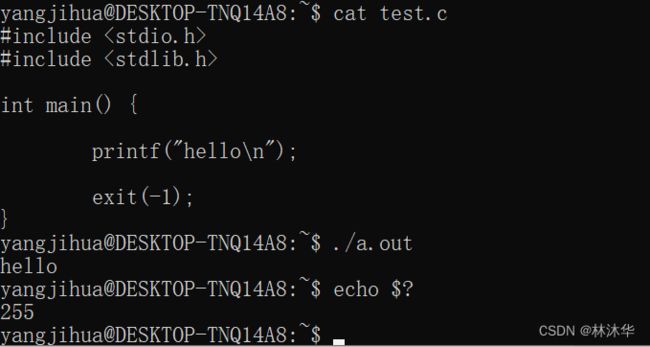
注意, 调用该函数后,返回给父进程的值只保留 status 的低八位,即返回给父进程的值只可能是 0 到 255
此外,return n 等同于 exit(n)
2.1.3 钩子函数
基本概念:当程序从 main 函数中通过 return 或者 exit 正常终止程序时,会被自动调用的函数,有时又称这些函数为退出处理程序
那么,如何能够让一个函数成为钩子函数?
man 3 atxit
#include

int atexit(void (*function)(void)); 功能:将特定函数注册成为钩子函数
- function — 指向拟希望注册为钩子函数的函数,注意只有形参为 void 且返回值也为 void 的函数才能被注册为钩子函数
- 注册成功返回 0,失败返回非 0
代码示例
#include
#include

// 终止处理程序
static void f1() {
        puts("f1() is working!");
}

// 终止处理程序
static void f2() {
        puts("f2() is working!");
}

// 终止处理程序
static void f3() {
        puts("f3() is working!");
}

int main() {
        puts("Begin");
        // 先注册的后被调用
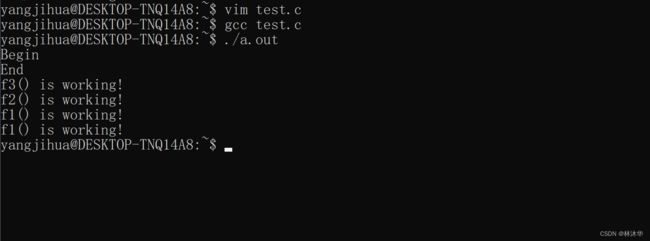
        // 钩子函数注册的时候并不会执行,当main通过exit或者return终止程序的时候才执行
        // atexit参数用指针来接收,因此需要传入地址,而函数名就是函数的地址
        // 可以重复注册同一函数多次,这样会在程序终止时执行该函数多次
        atexit(f1);
        atexit(f1);
        atexit(f2);
        atexit(f3);

        puts("End");

        exit(0);
}
2.1.4 调用 _exit 或 _Exit
_exit 和 _Exit 完全等价! 功能是立即正常终止程序
这和上面讲的 exit 有什么联系与区别呢?
exit 是库函数,而 _exit 是系统调用,对 _exit 进行封装从而实现了 exit
也就是说,调用 exit,然后 exit 会调用 _exit. 不过 exit 在调用 _exit 之前还会执行一系列动作:
- 调用退出处理程序
- 刷新 stdio 流缓冲区
在这之后才会使用由 status 提供的值执行 _exit 系统调用
2.2 异常终止
- 调用了 abort,给当前进程发送信号
- 接受到一个信号并终止,如 ctrl + C
- 最后一个线程收到取消请求,并作出响应
三、命令行参数的分析
C 语言程序主要通过 main 函数的参数来传递命令行参数,其中 argc 表示参数个数(包含程序本身),argv 是保存所有这些参数的 char* 数组
int main(int argc, char * argv[]) {

}
我们可以自己写东东,通过 argc 和 argv 来处理命令行参数,但是 C 标准库提供了一个更丰富的处理命令行参数的方法:getopt
有人说,为什么需要这个方法?原因在于相同功能的等价命令可能有不同的书写形式
一个典型的 UNIX 命令行有着如下的形式
选项的形式为连字符(-)紧跟着一个唯一的字符用来标识该选项,以及一个针对该选项
的可选参数。带有一个参数的选项能够以可选的方式在参数和选项之间用空格分开。多个选
项可以在一个单独的连字符后归组在一起,而组中最后一个选项可能会带有一个参数。根据这些规则,下面这些命令都是等同的
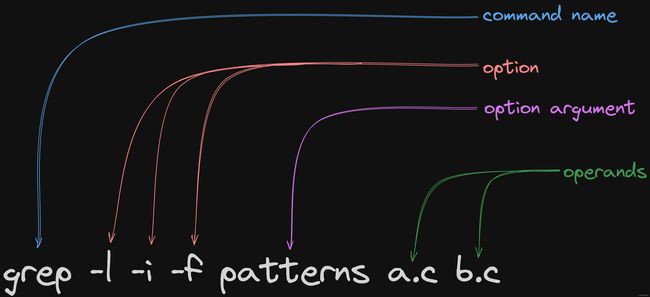
在上面这些命令中, -l 和 -i 选项没有参数,而 -f 选项将字符串 pattern 当做它的参数,因为许多程序都需要按照上述格式来解析选项,而仅靠手动通过 argc 和 argv 达到这样的效果是很麻烦的。因此引入了 getopt
在介绍 getopt 之前,先介绍一下命令行参数各组成部分的名称
命令行参数由 Command name,Option,Option argument 以及 Operands 组成
- Command name — 程序名
- Operands — 操作对象,又称 nonoption argument
- Option — 选项,它是用来用来决定程序的行为,而选项参数 Option argument 是选项 Option 所需要的信息
3.1 getopt
man 3 getopt
函数声明:
#include

int getopt(int argc, char * const argv[], const char *optstring);
- argc — 直接从 main() 的参数直接传递而来,表示命令行参数个数
- argv — 直接从 main() 的参数直接传递而来,表示命令行参数内容
- optstring — 由选项 Option 字母组成的字符串
关于 optstring 的格式规范简单总结如下:
- 单个字符,表示该选项 Option 不需要参数。
- 单个字符后接一个冒号 ":",表示该选项 Option 需要一个选项参数 Option argument。选项参数 Option argument 可以紧跟在选项 Option 之后,或者以空格隔开。选项参数Option argument 的首地址赋给 optarg。
- 单个字符后接两个冒号 "::",表示该选项 Option 的选项参数 Option argument 是可选的。当提供了 Option argument 时,必须紧跟 Option 之后,不能以空格隔开,否则 getopt() 会认为该选项 Option 没有选项参数 Option argument,optarg 赋值为 NULL。相反,提供了选项参数 Option argument,则 optarg 指向 Option argument。
为了使用 getopt(),我们需要在 while 循环中不断地调用直到其返回 -1 为止。每一次调用,当 getopt() 找到一个有效的 Option 的时候就会返回这个 Option 字符,并设置几个全局变量
外部全局变量:
extern char *optarg;
extern int optind, opterr, optopt;- char *optarg — 当匹配一个选项后,如果该选项带选项参数,则 optarg 指向选项参数字符串;若该选项不带选项参数,则 optarg 为 NULL;若该选项的选项参数为可选时,optarg 为 NULL 表明无选项参数,optarg 不为 NULL 时则指向选项参数字符串。
- int optind — 下一个待处理元素在 argv 中的索引值。即下一次调用 getopt 的时候,从 optind 存储的位置处开始扫描选项。当 getopt() 返回 -1 后,optind 是 argv 中第一个 Operands 的索引值。optind 的初始值为1。
- int opterr — opterr 的值非 0 时,在 getopt() 遇到无法识别的选项,或者某个选项丢失选项参数的时候,getopt() 会打印错误信息到标准错误输出。opterr 值为 0 时,则不打印错误信息。
- int optopt — 在上述两种错误之一发生时,一般情况下 getopt() 会返回 '?',并且将 optopt 赋值为发生错误的选项。
使用getopt()时,会犯的错误无外乎有两个:无法识别的选项(Invalid option) 和丢失选项参数(Missing option argument)
通常情况下,getopt() 在发现这两个错误时,会打印相应的错误信息,并且返回字符 "?" 。例如,遇见无法识别的选项时会打印 "invalid option",发现丢失参数时打印 "option requires an argument"。但是当设置 opterr 为 0 时,则不会打印这些信息,因此为了便于发现错误,默认情况下,opterr 都是非零值。如果你想亲自处理这两种错误的话,应该怎么做呢? 首先你要知道什么时候发生的错误是无法识别的选项,什么时候发生的错误是丢失选项参数。如果像上面描述的那样,都是返回字符 "?" 的话,肯定是无法分辨出的。有什么办法吗? 有! getopt() 允许我们设置 optstring 的首字符为冒号 ":",在这种情况下,当发生无法识别的选项错误时 getopt() 返回字符 "?",当发生丢失选项参数错误时返回字符 ":"。这样我们就可以很轻松地分辨出错误类型了,不过代价是 getopt() 不会再打印错误信息了,一切事物都由我们自己来处理了。
3.2 示例
多说无益,直接代码示例
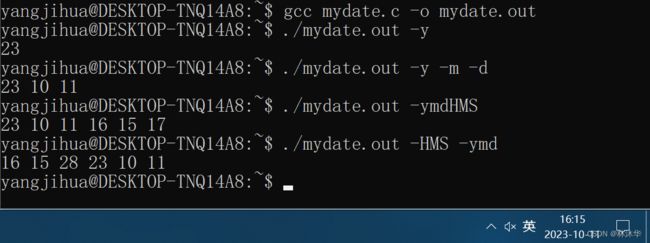
实现一个命令,能够通过命令行参数中的选项控制打印时间的内容和格式
选项如下:
- -y:year
- -m:month
- -d:day
- -H:hour
- -M:minute
- -S:second
使用方法:
./mydate -y:打印年份
./mydate -y -m:打印年月,以空格分隔
./mydate -H -M -S:打印时分秒,以空格分隔
......
#include
#include
#include
#include
#include

#define TIMESTRSIZE 1024
#define FMTSTRSIZE 1024

int main(int argc, char ** argv) {

        time_t stamp;
        struct tm* tm;
        char timestr[TIMESTRSIZE];

        stamp = time(NULL);    // 获取时间戳
        tm = localtime(&stamp);    // 获取用于表示时间的结构体

        char c;
        char fmtstr[FMTSTRSIZE];
        fmtstr[0] = '\0';
        while (1) {
                c = getopt(argc, argv, "ymdHMS");    // 找到一个有效的option字符就会返回
                if (c < 0) {
                        break;
                }
                switch (c) {
                        case 'y':
                                strncat(fmtstr, "%y ", FMTSTRSIZE);
                                break;
                        case 'm':
                                strncat(fmtstr, "%m ", FMTSTRSIZE);
                                break;
                        case 'd':
                                strncat(fmtstr, "%d ", FMTSTRSIZE);
                                break;
                        case 'H':
                                strncat(fmtstr, "%H ", FMTSTRSIZE);
                                break;
                        case 'M':
                                strncat(fmtstr, "%M ", FMTSTRSIZE);
                                break;
                        case 'S':
                                strncat(fmtstr, "%S ", FMTSTRSIZE);
                                break;
                        default:
                                break;
                }
        }

        // 根据格式fmtstr格式化tm,并将结果放入容量为TIMESTRSIZE的字符数组timestr中
        strftime(timestr, TIMESTRSIZE, fmtstr,tm);
        puts(timestr);

        exit(0);

} 现在希望增加难度,当使用选项时,对特定选项需要输入选项参数
- -y 4:年份输出四位
- -y 2 :年份输出两位
- -H 12:十二小时制输出小时
- -H 24:二十四小时制输出小时
#include
#include
#include
#include
#include

#define TIMESTRSIZE 1024
#define FMTSTRSIZE 1024

int main(int argc, char ** argv) {

        time_t stamp;
        struct tm* tm;
        char timestr[TIMESTRSIZE];

        stamp = time(NULL);
        tm = localtime(&stamp);

        char c;
        char fmtstr[FMTSTRSIZE];
        fmtstr[0] = '\0';
        while (1) {
                c = getopt(argc, argv, "y:mdH:MS");     // 需要有argument修饰的选项后面加 ":"
                if (c < 0) {
                        break;
                }
                switch (c) {
                        case 'y':
                                if (strcmp(optarg, "2") == 0)   // 如果选项为-y,通过optarg获取选项参数
                                        strncat(fmtstr, "%y ", FMTSTRSIZE);
                                else if (strcmp(optarg, "4") == 0)
                                        strncat(fmtstr, "%Y ", FMTSTRSIZE);
                                else
                                        fprintf(stderr, "Invalid argument of -y\n");
                                break;
                        case 'm':
                                strncat(fmtstr, "%m ", FMTSTRSIZE);
                                break;
                        case 'd':
                                strncat(fmtstr, "%d ", FMTSTRSIZE);
                                break;
                        case 'H':
                                if (strcmp(optarg, "12") == 0)  // 如果选项为-H,通过optarg获取选项参数
                                        strncat(fmtstr, "%I(%P) ", FMTSTRSIZE); // 格式控制为12小时制显示
                                else if (strcmp(optarg, "24") == 0)
                                        strncat(fmtstr, "%H ", FMTSTRSIZE);
                                else
                                        fprintf(stderr, "Invalid argument of -H\n");
                                break;
                        case 'M':
                                strncat(fmtstr, "%M ", FMTSTRSIZE);
                                break;
                        case 'S':
                                strncat(fmtstr, "%S ", FMTSTRSIZE);
                                break;
                        default:
                                break;
                }
        }

        strftime(timestr, TIMESTRSIZE, fmtstr,tm);
        puts(timestr);

        exit(0);

}
现在希望继续增加难度,当指定了操作对象(非选项参数)时,则将时间输出入到指定操作对象中;否则还是输出到终端
使用方法:
./mydate -y 4:打印年份到终端
./mydate -y 4 filename:写入年份到文件 filename
需要用到如下知识点:
If the first character of optstring is '-', then each nonoption argv-element is handled as if it were the argument of an option with character code 1.
#include
#include
#include
#include
#include

#define TIMESTRSIZE 1024
#define FMTSTRSIZE 1024

int main(int argc, char ** argv) {

        time_t stamp;
        struct tm* tm;
        char timestr[TIMESTRSIZE];

        stamp = time(NULL);
        tm = localtime(&stamp);

        char c;
        char fmtstr[FMTSTRSIZE];
        fmtstr[0] = '\0';

        FILE *fp = stdout;

        while (1) {
                c = getopt(argc, argv, "-y:mdH:MS");    // 需要有argument修饰的选项后面加 ":"
                if (c < 0) {
                        break;
                }

                switch (c) {
                        case 1: // 读取到非选项,非选项argv元素都会被当作字符代码为1的选项来处理,因此返回1
                                fp = fopen(argv[optind-1], "w");        // optind为下一个待读取的元素在argv的索引,因此上一个刚读取的索引应 该是optind-1
                                if (fp == NULL) {
                                        perror("fopen()");
                                        fp = stdout;    // 打开失败,说明fp还是终端
                                }
                                break;
                        case 'y':
                                if (strcmp(optarg, "2") == 0)   // 如果选项为-y,通过optarg获取选项参数
                                        strncat(fmtstr, "%y ", FMTSTRSIZE);
                                else if (strcmp(optarg, "4") == 0)
                                        strncat(fmtstr, "%Y ", FMTSTRSIZE);
                                else
                                        fprintf(stderr, "Invalid argument of -y\n");
                                break;
                        case 'm':
                                strncat(fmtstr, "%m ", FMTSTRSIZE);
                                break;
                        case 'd':
                                strncat(fmtstr, "%d ", FMTSTRSIZE);
                                break;
                        case 'H':
                                if (strcmp(optarg, "12") == 0)  // 如果选项为-H,通过optarg获取选项参数
                                        strncat(fmtstr, "%I(%P) ", FMTSTRSIZE); // 格式控制为12小时制显示
                                else if (strcmp(optarg, "24") == 0)
                                        strncat(fmtstr, "%H ", FMTSTRSIZE);
                                else
                                        fprintf(stderr, "Invalid argument of -H\n");
                                break;
                        case 'M':
                                strncat(fmtstr, "%M ", FMTSTRSIZE);
                                break;
                        case 'S':
                                strncat(fmtstr, "%S ", FMTSTRSIZE);
                                break;
                        default:
                                break;
                }
        }

        strftime(timestr, TIMESTRSIZE, fmtstr,tm);
        strncat(timestr, "\n", TIMESTRSIZE);    // fputs后面不会自动加上换行,需要手动添加
        fputs(timestr, fp);

        if (fp != stdout)    // 别忘了关闭,只有fp不是stdout的时候,才需要关闭。别忘了我们需要尽量恢复程序调用之前的状态
                fclose(fp);

        exit(0);

}
命令行参数分析部分好多
°(°ˊДˋ°) ° (இ﹏இ`。) ♡o(╥﹏╥)o ♥♡
根本记不住诶,只能多看手册
四、环境变量
4.1 简介
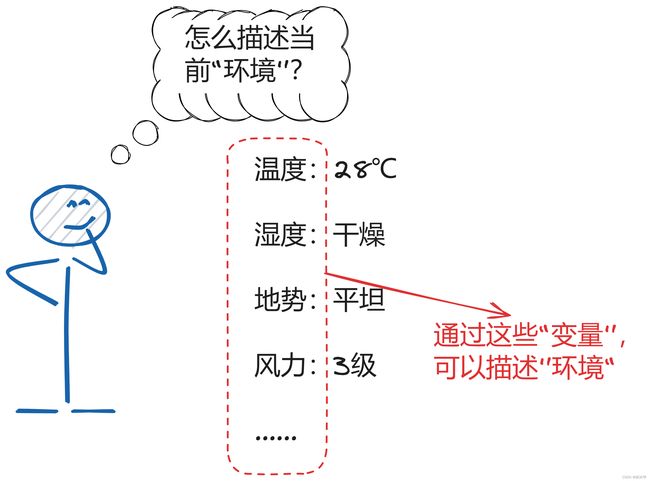
环境变量的含义:程序(操作系统命令和应用程序)的执行都需要运行环境,这个环境通过多个变量来描述,这些变量就是环境变量
举例:想想生活中的“环境”是什么?
按变量的周期划为永久变量和临时性变量 2 种:
- 永久变量:通过修改配置文件,配置之后变量永久生效
- 临时性变量:使用命令如 export 等命令设置,设置之后马上生效。当关闭 shell 的时候失效(这种主要用于测试比较多)
按照影响范围分为用户变量和系统变量2种:
- 用户变量(局部变量):修改的设置只对某个用户的路径或执行起作用,即仅特定用户可见
- 系统变量(全局变量):影响范围是整个操作系统,所有用户可见
环境变量本质上是一个键值对:KEY = VALUE
4.2 查看环境变量
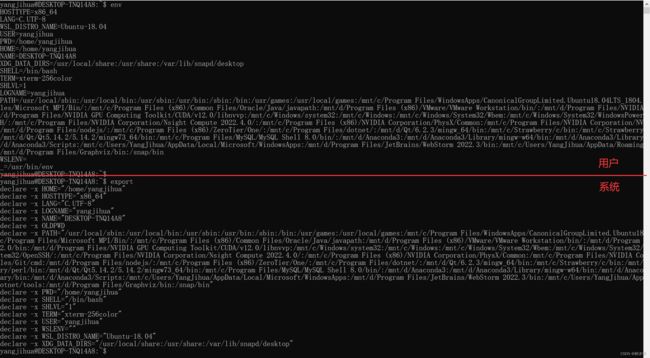
在 Shell 下,用 env 命令查看当前用户的用户环境变量;export 命令显示当前系统定义的系统环境变量
查看某个环境变量的值
echo $KEY4.3 environ
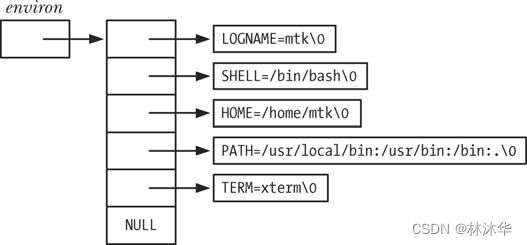
在 C 程序中,可以通过全局变量 char ** environ 访问环境列表
C 运行时启动代码定义了该 environ 变量并以环境列表位置为其赋值。environ 与 argv 参数类似,指向一个以 NULL 结尾的指针列表,每个指针又指向一个以空字节终止的字符串,这些字符串的内容就描述了一个又一个环境变量
可以通过下面代码查看用户环境变量
#include
#include

// 引用声明外部的变量
extern char **environ;

int main(void) {
    int i;
    for(i = 0; environ[i] != NULL; i++) {
        puts(environ[i]);
    }
    exit(0);
}
4.4 getenv
man 3 getenv
#include

char *getenv(const char *name); 功能:获取环境变量的值(VALUE)
- name — 环境变量的 KEY
- 返回环境变量的值
4.5 setenv
man 3 setenv
#include

int setenv(const char *name, const char *value, int overwrite);

int unsetenv(const char *name); // 删除环境变量 功能:改变或添加环境变量
- name — 指定环境变量的 KEY
- value — 指定环境变量的VALUE
- overwrite — 当 KEY 为 name 的环境变量已经存在时,若 overwrite 为 0,则不覆盖原环境变量的值
注意:当 KEY 为 name 的环境变量已存在且 overwrite 非 0,则说明希望对环境变量进行改变。 这里说的“改变”不是原位置改变!系统会将原环境变量储存的空间释放掉,然后新申请一片堆内存用于记录环境变量新的内容
4.6 putenv
man 3 putenv
#include

int putenv(char *string); 功能:改变或添加环境变量
- string — 指定环境变量。应该具有 "name=value" 这样的形式
- 成功返回 0;失败返回非 0 并设置 errno
和 setenv 差不多功能,不建议使用(自己想想原因)
五、C程序的存储空间布局
这部分在文件I/O那部分其实介绍过
可以结合现在介绍的,互补一下知识
可以通过命令 pmap 显示进程的所映射的地址空间,具体看手册
六、库
动态库和静态库相关知识建议网上搜。这里主要介绍一下共享库的手动装载方式,然后分析一下 man 手册中的那个 demo
6.1 动态库
- 静态库的代码在编译的过程中已经载入到可执行文件中,所以最后生成的可执行文件相对较大
- 静态库在程序编译时会被连接到目标代码中,程序运行时将不再需要该静态库
6.2 静态库
- 动态库的代码在可执行程序运行时才载入内存,在编译过程中仅简单的引用,所以最后生成的可执行文件相对较小
- 动态库在程序编译时并不会被连接到目标代码中,而是在程序运行是才被载入,因此在程序运行时还需要动态库存在
6.3 共享库(手动装载库)
6.3.1 dlopen
man 3 dlopen
#include

void *dlopen(const char *filename, int flags); 功能:以 flags 方式将名为 filename 的共享库装入内存,返回一个表示“已装载的库”的句柄(指针)
6.3.2 dlclose
man 3 dlclose
#include

int dlclose(void *handle); 功能:通过表示“已装载的库”的句柄 handle,关闭该动态库
6.3.3 dlerror
man 3 dlerror
#include

char *dlerror(void);

Link with -ldl. 功能:返回一个描述最后一次调用 dlopen、dlsym,或 dlclose 的错误信息的字符串
6.3.4 dlsym
#include

void *dlsym(void *handle, const char *symbol);
// obtain address of a symbol in a shared object or executable 功能:在已装载的库中查找特定符号
- handle — 句柄,用于表示某个“已装载的库”
- symbol — 符号,通常为某个函数名
- 如果 symbol 是个函数名,则返回指向这个函数的指针
6.3.5 man 手册中的代码示例
手动装载 math 库,获取库中 cos 函数的地址,并调用该函数
详见注释
#include
#include
#include
#include   /* Defines LIBM_SO (which will be a
                                      string such as "libm.so.6") */
int
main(void)
{
    void *handle;    // 用于接收dlopen的返回值,用于表示某个“已装载的库”
    double (*cosine)(double);    // 指向函数的指针,函数指针
    char *error;

    handle = dlopen(LIBM_SO, RTLD_LAZY);    // 以执行延迟绑定的方式装载库libm.so.6
    if (!handle) {
        fprintf(stderr, "%s\n", dlerror());    // dlerror返回错误信息
        exit(EXIT_FAILURE);
    }

    dlerror();    /* Clear any existing error */

    cosine = (double (*)(double)) dlsym(handle, "cos");    // 返回cos函数的地址,并类型转换

    /* According to the ISO C standard, casting between function
       pointers and 'void *', as done above, produces undefined results.
       POSIX.1-2003 and POSIX.1-2008 accepted this state of affairs and
       proposed the following workaround:

           *(void **) (&cosine) = dlsym(handle, "cos");    // &cosine获得二级指针,二级指针转化为void **,再解引用成一级指针void *

       This (clumsy) cast conforms with the ISO C standard and will
       avoid any compiler warnings.

       The 2013 Technical Corrigendum to POSIX.1-2008 (a.k.a.
       POSIX.1-2013) improved matters by requiring that conforming
       implementations support casting 'void *' to a function pointer.
       Nevertheless, some compilers (e.g., gcc with the '-pedantic'
       option) may complain about the cast used in this program. */

    error = dlerror();
    if (error != NULL) {
        fprintf(stderr, "%s\n", error);
        exit(EXIT_FAILURE);
    }

    printf("%f\n", (*cosine)(2.0));    // 解引用函数指针,调用函数
    dlclose(handle);
    exit(EXIT_SUCCESS);
}
七、函数跳转
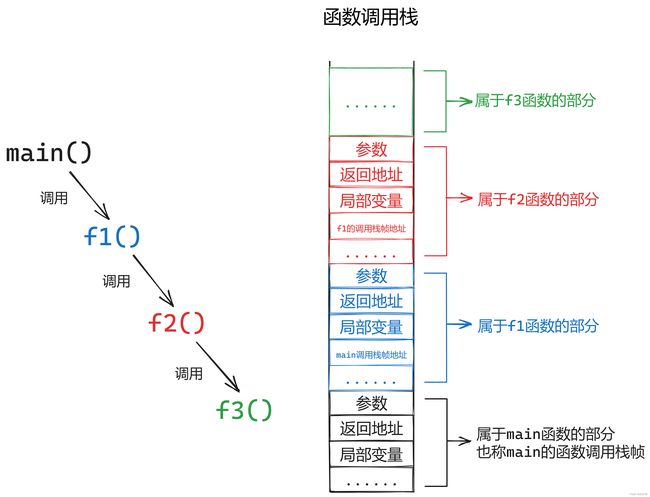
先介绍一下基本函数调用和返回的过程中的函数调用栈
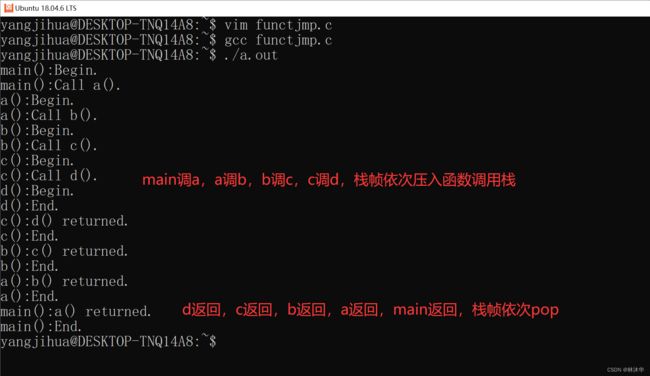
调用某个函数时,将该函数的调用栈帧压入函数调用栈;从该函数返回时,将该函数的调用栈帧 pop 出栈
补充:goto 语句
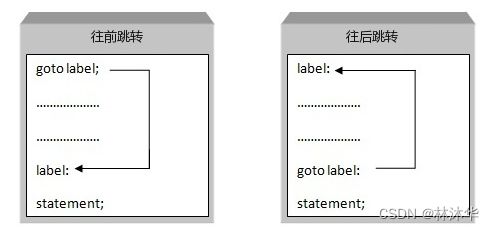
C 语言中的 goto 语句允许把控制无条件转移到同一函数内的被标记的语句
语法:
goto label;
..
.
label: statement;
在这里,label 可以是任何除 C 关键字以外的纯文本,它可以设置在 C 程序中 goto 语句的前面或者后面
但是注意:goto 只能在同一个函数内跳转,不能跨函数跳转,而有些时候跨函数跳转时很有必要的。比如在一个树中,通过递归函数遍历树并查找某个节点,如果我们在第 100W 层找到了这个节点,则从该递归函数一层一层向上返回该节点,函数调用栈不断 pop 调用栈帧,就很麻烦。如果希望能够直接将节点返回至最上层,就涉及到了跨函数跳转
下面介绍的 setjmp 和 longjmp 可以从实现一个函数到另外一个函数的跳转
7.1 setjmp
man 3 setjmp
#include

int setjmp(jmp_buf env); 功能:设置跳转点
- env — setjmp 函数用于将当前函数调用时候的状态记录在 jmp_buf env 中(相当于保护现场)
- 如果直接调用该函数,则返回 0;如果是从别的地方跳回来再调用的该函数,则返回非 0
7.2 longjmp
man 3 longjmp
#include

void longjmp(jmp_buf env, int val); 功能:跳转
- env — 记录了一个函数调用时候的状态,即记录了一个“现场”,调用 longjmp 能够前往该“现场”
- val — val 是调用 longjmp 时 setjmp 函数返回的值,为非零值,如果故意设置为0,也会被修改为1
感觉很抽象,没事,画图理解!
喵的还是很抽象......
那直接看代码吧
代码示例
先看看正常的函数跳转过程
#include
#include

static void d(void) {
        printf("%s():Begin.\n", __FUNCTION__);
        printf("%s():End.\n", __FUNCTION__);
}

static void c(void) {
        printf("%s():Begin.\n", __FUNCTION__);
        printf("%s():Call d().\n", __FUNCTION__);
        d();
        printf("%s():d() returned.\n", __FUNCTION__);
        printf("%s():End.\n", __FUNCTION__);
}


static void b(void) {
        printf("%s():Begin.\n", __FUNCTION__);
        printf("%s():Call c().\n", __FUNCTION__);
        c();
        printf("%s():c() returned.\n", __FUNCTION__);
        printf("%s():End.\n", __FUNCTION__);
}


static void a(void) {
        printf("%s():Begin.\n", __FUNCTION__);
        printf("%s():Call b().\n", __FUNCTION__);
        b();
        printf("%s():b() returned.\n", __FUNCTION__);
        printf("%s():End.\n", __FUNCTION__);
}

int main(void) {

        printf("%s():Begin.\n", __FUNCTION__);
        printf("%s():Call a().\n", __FUNCTION__);
        a();
        printf("%s():a() returned.\n", __FUNCTION__);
        printf("%s():End.\n", __FUNCTION__);
        exit(0);
}
注:ANSI C 定义了许多宏。在编程中可以使用这些宏,但是不能直接修改这些预定义的宏
__DATE__ 当前日期,一个以 “MMM DD YYYY” 格式表示的字符串常量;
__TIME__ 当前时间,一个以 “HH:MM:SS” 格式表示的字符串常量;
__FILE__ 这会包含当前文件名,一个字符串常量;
__LINE__ 这会包含当前行号,一个十进制常量;
__FUNCTION__ 程序预编译时预编译器将用所在的函数名,返回值是字符串;
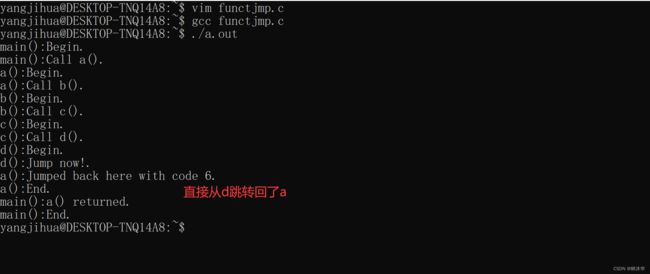
接下来我们希望:能够从函数 d 直接跳到函数 a
#include
#include
#include

// 用于记录跳转点的现场环境
static jmp_buf save;

static void d(void) {
        printf("%s():Begin.\n", __FUNCTION__);
        printf("%s():Jump now!.\n", __FUNCTION__);
        // 前往save所记录的环境(即跳转),并携带返回值为6
        longjmp(save, 6);
        printf("%s():End.\n", __FUNCTION__);
}

static void c(void) {
        printf("%s():Begin.\n", __FUNCTION__);
        printf("%s():Call d().\n", __FUNCTION__);
        d();
        printf("%s():d() returned.\n", __FUNCTION__);
        printf("%s():End.\n", __FUNCTION__);
}


static void b(void) {
        printf("%s():Begin.\n", __FUNCTION__);
        printf("%s():Call c().\n", __FUNCTION__);
        c();
        printf("%s():c() returned.\n", __FUNCTION__);
        printf("%s():End.\n", __FUNCTION__);
}


static void a(void) {
        // 返回值
        int ret;
        printf("%s():Begin.\n", __FUNCTION__);
        // 记录跳转点“现场”(其实就是记录一堆数据),便于从别的地方到达该“现场”
        ret = setjmp(save);

        if(ret == 0) {  // 如果直接调用的setjmp,返回0
                printf("%s():Call b().\n", __FUNCTION__);
                b();
                printf("%s():b() returned.\n", __FUNCTION__);
        } else {        // 如果是从别的地方跳回来再调用的该函数,返回非0
                printf("%s():Jumped back here with code %d.\n", __FUNCTION__, ret);
        }
        printf("%s():End.\n", __FUNCTION__);
}

int main(void) {

        printf("%s():Begin.\n", __FUNCTION__);
        printf("%s():Call a().\n", __FUNCTION__);
        a();
        printf("%s():a() returned.\n", __FUNCTION__);
        printf("%s():End.\n", __FUNCTION__);
        exit(0);
}
八、资源的获取及控制
8.1 ulimit 命令
man 1 bash
然后进行搜索:输入/ulimit回车
可以通过 man 手册查看详细命令
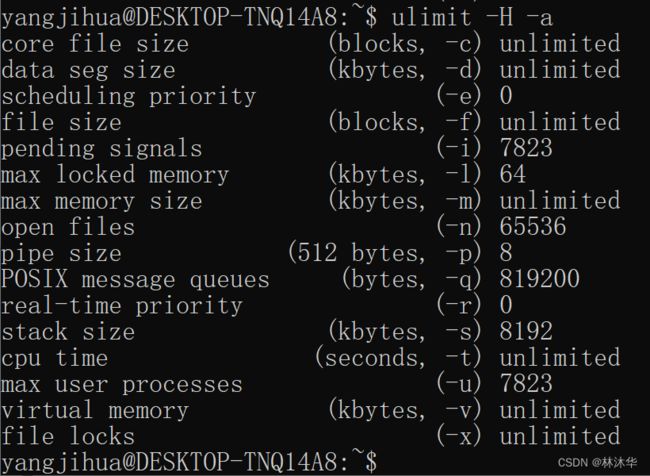
先介绍一下硬性限制和软性限制
- 软限制:软限制是内核给进程资源的限制值
- 硬限制:硬限制是允许内核给进程资源的限制值的最大值
怎么理解这个软限制和硬限制呢?打个比方:
注意:
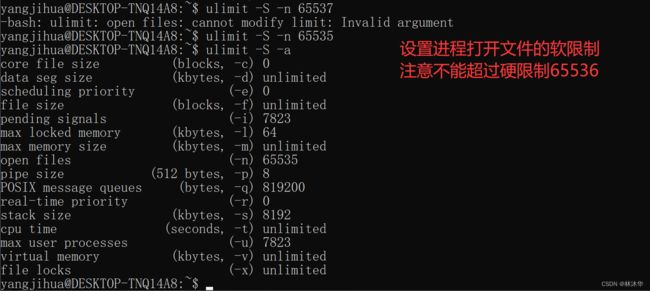
非授权调用的进程只能将其软限制指定为 0~硬限制范围中的某个值,同时能降低硬限制,但不能增加硬限制
授权进程(root用户)可以任意增减其软硬限制
某个时刻对某个资源的硬限制一定大于等于软限制
几个示例
查看目前对一个进程资源的软限制
查看目前对一个进程资源的硬限制
设置软限制
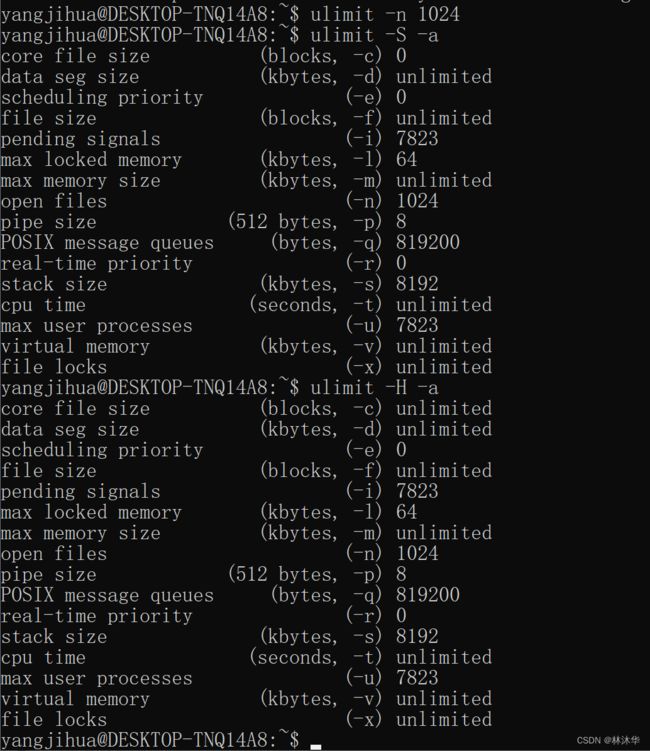
同时设置软限制与硬限制
8.2 getrlimit
man 2 getrlimit
#include
#include

int getrlimit(int resource, struct rlimit *rlim); 功能:获取特定资源的限制
- resoure — 用于指定特定资源
- rlim — 指向结构体 struct rlimit 的指针,getrlimit 会将获取到的特定资源限制信息存入其指向的结构体中
- 成功返回 0;失败返回 -1,并设置 errno
struct rlimit 结构体内容如下
struct rlimit {
    rlim_t rlim_cur;  /* Soft limit */
    rlim_t rlim_max;  /* Hard limit (ceiling for rlim_cur) */
};
8.3 setrlimit
man 2 setrlimit
#include
#include

int setrlimit(int resource, const struct rlimit *rlim); 功能:设置特定资源的限制
- resoure — 用于指定特定资源
- rlim — 指向结构体 struct rlimit 的指针,setrlimit 会依据其指向的结构体中的内容设置资源限制
- 成功返回 0;失败返回 -1,并设置 errno
本章字数。。。
就很泪目~~~,文件系统连续发了几个博文,终于讲完了,过程中感觉自己有画动漫的天赋hhh
文件系统这部分都是知识性内容,没啥难度主打一个看 man 和背
