springboot整合RabbitMQ消息中间件
Springboot整合RabbitMQ
学习参考网站
安装RabbitMQ
1.安装Erlang语言包
https://www.erlang.org/downloads【官网下载地址】
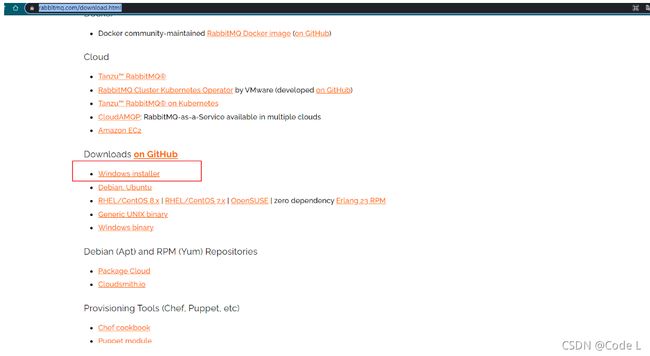
2.安装rabbitMq
https://www.rabbitmq.com/download.html
安装路径不能有中文,否则找不到路径

3.重启rabbitmq程序
net stop RabbitMQ && net start RabbitMQ

页面的登录账号密码都是guest
服务端口为:5672
界面化端口:15672
4.配置自定义序列化的时候遇到问题:
解决
rabbitmq无法设置messageconverter 设置Jackson2JsonMessageConverter 就报错,问题解决。
org.springframework.beans.factory.BeanCreationException: Error creating bean with name 'messageConverter' defined in class path resource [com/cyberbim/modbusdriver/config/MyAMQPconfig.class]: Bean instantiation via factory method failed; nested exception is org.springframework.beans.BeanInstantiationException: Failed to instantiate [org.springframework.amqp.support.converter.MessageConverter]: Factory method 'messageConverter' threw exception; nested exception is java.lang.NoClassDefFoundError: com/fasterxml/jackson/databind/ObjectMapper
这个错误就是缺少了依赖
<dependency>
<groupId>com.fasterxml.jackson.core</groupId>
<artifactId>jackson-databind</artifactId>
<version>2.11.3</version>
</dependency>

加上这个就好了!
5.了解一个消息推送到接收的流程

黄色的圈圈是消息推送服务,将消息推送到 中间方框里面也就是 rabbitMq的服务器,然后经过服务器里面的交换机、队列等各种关系将数据处理入列后,最终右边的蓝色圈圈消费者获取对应监听的消息。
常用的交换机有以下三种,因为消费者是从队列获取信息的,队列是绑定交换机的(一般),所以对应的消息推送/接收模式也会有以下几种:
Direct Exchange 直连型交换机
直连型交换机,根据消息携带的路由键将消息投递给对应队列。
大致流程,有一个队列绑定到一个直连交换机上,同时赋予一个路由键 routing key 。
然后当一个消息携带着路由值为X,这个消息通过生产者发送给交换机时,交换机就会根据这个路由值X去寻找绑定值也是X的队列。
Fanout Exchange 扇型交换机
扇型交换机,这个交换机没有路由键概念,就算你绑了路由键也是无视的。 这个交换机在接收到消息后,会直接转发到绑定到它上面的所有队列。
Topic Exchange 主题交换机
主题交换机,这个交换机其实跟直连交换机流程差不多,但是它的特点就是在它的路由键和绑定键之间是有规则的。
简单地介绍下规则:
*(星号) 用来表示一个单词 (必须出现的)
*# (井号) 用来表示任意数量(零个或多个)单词
通配的绑定键是跟队列进行绑定的,举个小例子
队列Q1 绑定键为 .TT. 队列Q2绑定键为 TT.#
如果一条消息携带的路由键为 A.TT.B,那么队列Q1将会收到;
如果一条消息携带的路由键为TT.AA.BB,那么队列Q2将会收到;

主题交换机是非常强大的,为啥这么膨胀?
当一个队列的绑定键为 “#”(井号) 的时候,这个队列将会无视消息的路由键,接收所有的消息。
当 * (星号) 和 # (井号) 这两个特殊字符都未在绑定键中出现的时候,此时主题交换机就拥有的直连交换机的行为。
所以主题交换机也就实现了扇形交换机的功能,和直连交换机的功能。
整合使用RabbitMq
1、添加整合依赖
 <dependency>
            <groupId>org.springframework.boot</groupId>
            <artifactId>spring-boot-starter-amqp</artifactId>
        </dependency>
2、配置application.properties
#rabibitmq的基本配置
spring.rabbitmq.host=localhost
spring.rabbitmq.port=5672
spring.rabbitmq.username=guest
spring.rabbitmq.password=guest

#配置rabbitmq的虚拟主机路径
spring.rabbitmq.virtual-host=/
3.基于API的方式创建交换器和队列
创建了一个交换器和两个队列。
  //   1. 基于API的方式整合rabbitmq和springboot   APi的方式自定义组件
    @Test
    public void test() {

//        1.定义fanout类型的交换机器
        amqpAdmin.declareExchange(new FanoutExchange("fanout_exchange"));

//        2.定义两个默认的持久化队列,分别处理email和sms
        amqpAdmin.declareQueue(new Queue("fanout_queue_email"));
        amqpAdmin.declareQueue(new Queue("fanout_queue_sms"));

//        3.将队列分别与交换机进行绑定
        amqpAdmin.declareBinding(new Binding("fanout_queue_email", Binding.DestinationType.QUEUE, "fanout_exchange", "", null));
        amqpAdmin.declareBinding(new Binding("fanout_queue_sms", Binding.DestinationType.QUEUE, "fanout_exchange", "", null));
    }
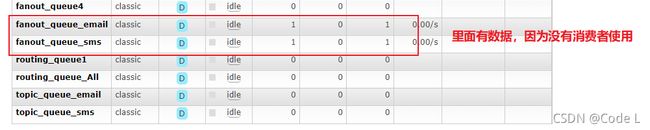
运行这个测试类,发现rabbitMq页面添加成功了。

添加信息到消息队列里面。
  //   2. 把信息注入到消息转换器里面
    //   这样直接启动会报错,因为没有对存储进来的信息进行序列化,转换器不支持,可以使用jdk自带的序列化接口,也可以自定义序列化配置类
    @Test
    public void testUser() {
        User user = new User();
        user.setName("codeL");
        user.setAge("22");
       // 转换并发送=============================

        /*基于api*/
        rabbitTemplate.convertAndSend("fanout_exchange", "", user);}
运行这个测试类,发现报错

是因为没有序列化,那么我们要配置一个序列化加到rabbitMq的配置类里面。
package com.codel.rabbitmq.config;

import org.springframework.amqp.support.converter.Jackson2JsonMessageConverter;
import org.springframework.amqp.support.converter.MessageConverter;
import org.springframework.context.annotation.Bean;
import org.springframework.context.annotation.Configuration;

/**
 * 基于配置类 的Rabbitmq配置
 *
 * @author codel
 * @date 2021/09/22
 */
@Configuration
public class RabbitMqConfig {
    //    自定义消息转换器    序列化
    @Bean
    public MessageConverter messageConverter() {
        return new Jackson2JsonMessageConverter();
    }
 }
配置完成后,就重新启动
配置消费者
package com.codel.rabbitmq.service;

import org.springframework.amqp.core.Message;
import org.springframework.amqp.rabbit.annotation.RabbitListener;
import org.springframework.stereotype.Service;

@Service
public class RabbitMqService {

    /*通过注解来监听队 列名为 fanout_queue_email 的消息*/

    @RabbitListener(queues = "fanout_queue_email")
    public void psubConsumerEmail(Message message) {
        byte[] body = message.getBody();
        String s = new String(body);
        System.out.println("API方式邮箱业务接收到消息:" + s);
    }

    @RabbitListener(queues = "fanout_queue_sms")
    public void psubConsumerSms(Message message) {
        byte[] body = message.getBody();
        String s = new String(body);
        System.out.println("API方式短息业务接收到消息:" + s);
    }}
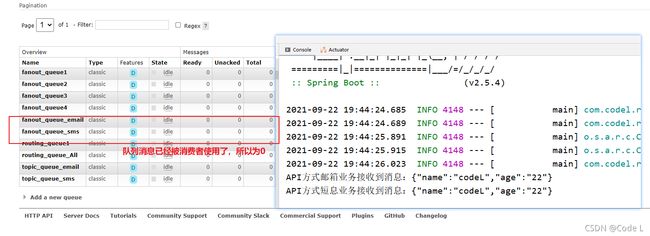
重新启动项目,会发现消费者会从消息队列里面自动的拿取数据。
4.基于配置类的方式
在RabbitMqConfig配置类里面配置新的交换器和队列
 /*      2.这是基于配置类的方式来配置中间件,
        也就是用配置类的方式进行 定义交换器 和 定义消息队列 和进行两者的绑定
*/

    //    1.定义fanout类型的交换器   扇出交换
    @Bean
    public Exchange fanout_exchange2() {
        return ExchangeBuilder.fanoutExchange("fanout_exchange2").build();
    }

    //2.定义两个消息队列
    @Bean
    public Queue fanout_queue1() {
        return new Queue("fanout_queue1");
    }

    @Bean
    public Queue fanout_queue2() {
        return new Queue("fanout_queue2");
    }

    //    3.将两个消息队列和交换器进行绑定
    @Bean
    public Binding binding1() {
//        因为没有路由,所以routing为空
        return BindingBuilder.bind(fanout_queue1()).to(fanout_exchange2()).with("").noargs();
    }

    @Bean
    public Binding binding2() {
        return BindingBuilder.bind(fanout_queue2()).to(fanout_exchange2()).with("").noargs();
    }
在测试类里面添加测试数据user,把数据转移到fanout_exchange2交换器中。
 //添加配置类创建交换器的测试数据
        User user2 = new User();
        user2.setName("codeL2");
        user2.setAge("223"
         /*基于配置类*/
        rabbitTemplate.convertAndSend("fanout_exchange2", "", user2);
//
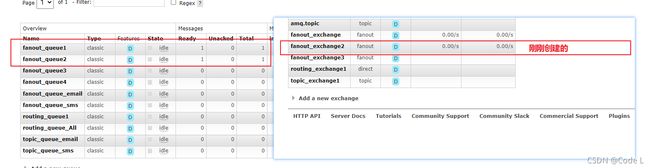
运行看rabbitmq后台,发现交换器和队列以及数据页传递进去了。
然后再创建一个消费者,把队列里面的数据取出来
  //    测试:基于配置类的方式
    @RabbitListener(queues = "fanout_queue1")
    public void psubConsumerEmail2(Message message) {
        byte[] body = message.getBody();
        String s = new String(body);
        System.out.println("配置类=的邮箱业务接收到消息:" + s);
    }

    @RabbitListener(queues = "fanout_queue2")
    public void psubConsumerSms2(Message message) {
        byte[] body = message.getBody();
        String s = new String(body);
        System.out.println("配置类=的短息业务接收到消息:" + s);
    }
然后重新启动应用,发现结果如下:

5.基于注解的方式构建
在RabbitMqService类里面配置交换器和队列
 /* 3. 基于注解创建组件*/
    @RabbitListener(bindings = @QueueBinding(value = @Queue("fanout_queue3"), exchange = @Exchange(value = "fanout_exchange3", type = "fanout")))
    public void psubConsumerEmailAno(Message message) {
        byte[] body = message.getBody();
        String s = new String(body);
        System.out.println("注解==创建组件邮箱业务接收信息:" + s);

    }

    @RabbitListener(bindings = @QueueBinding(value = @Queue("fanout_queue4"), exchange = @Exchange(value = "fanout_exchange3", type = "fanout")))
    public void psubConsumerSmsAno(Message message) {
        byte[] body = message.getBody();
        String s = new String(body);
        System.out.println("注解==创建组件信息业务接收信息:" + s);
    }
在测试类里面添加测试数据user,把数据转移到fanout_exchange3交换器中。
//基于注解的方式创建测试数据
        User user3 = new User();
        user3.setName("codeL3");
        user3.setAge("2233");
          /* 基于注解 */
        rabbitTemplate.convertAndSend("fanout_exchange3", "", user3);
结果和上面一样。
6.routing模式
        routing模式,路由键不能为空的
  User user4 = new User();
        user4.setName("codeL4");
        user4.setAge("22334");

//        路由模式消费者
       rabbitTemplate.convertAndSend("routing_exchange1", "error_routing_key1", user4);
//
//
7.topics通配符模式
配置通配符模式 的交换器和队列和自定义的规则
  //    ==================================topics通配符模式
    @RabbitListener(bindings = @QueueBinding(value = @Queue("topic_queue_email"), exchange = @Exchange(value = "topic_exchange1", type = "topic"), key = "info.#.email.#"))

    public void topicConsumerEmail(String message) {
        System.out.println("topics=接收邮箱订阅需求处理信息:" + message);

    }

    @RabbitListener(bindings = @QueueBinding(value = @Queue("topic_queue_sms"), exchange = @Exchange(value = "topic_exchange1", type = "topic"), key = "info.#.sms.#"))

    public void topicConsumerSms(String message) {
        System.out.println("topics=接收到短信订阅需求处理信息:" + message);

    }
传递数据给指定的交换器和队列和生产者消息。
//        //        topics通配符模式
//        1.只发送邮件订阅用户信息
        rabbitTemplate.convertAndSend("topic_exchange1", "info.email", "topics send email message");
//        2.只是订阅了短信信息
        rabbitTemplate.convertAndSend("topic_exchange1", "info.sms", "topics send  sms message");

//        要注释掉上面两个,下面这个消信息才能成功输出
//          3.两者都订阅了
      rabbitTemplate.convertAndSend("topic_exchange1", "info.email.sms", "topics send email and sms message");

    }