k8s容器化部署及集群搭建笔记
kubeadm部署k8s
将此文章写给我最心爱的女孩
目录
- kubeadm部署k8s
-
- 1.部署准备工作
-
- 小知识
- 2.安装具体步骤
-
- 1.安装docker
- 2.配置国内镜像加速器
- 3.添加k8s的阿里云yum源
- 4.安装 kubeadm,kubelet 和 kubectl
- 5.查询是否安装成功
- 6.部署Kubernetes Master主节点
- 7.在Master上执行上一步提示的命令
- 8.将node节点添加到master中,在node机器中执行此命令即可【该命令是第6步中初始化节点时出现的】
- 9.部署网络插件 用于节点之间的项目通讯
- 至此部署完成!
- 3.常用命令
- 4.k8s部署容器化应用
-
- 安装Nginx
- 安装tomcat
- 容器化应用部署
- 容器化应用
-
- 部署Springboot应用流程
-
- 1.自定义jdk镜像
- 2.构建项目镜像
- 5.部署Dashbaord仪表盘
- 6.暴露应用
-
- 1.NodePort
- 2.三种端口说明
- nodePort
- targetPort
-
- port
- 3.Ingress
-
- 部署Ingress-nginx
- 7.部署SpringCloud项目
-
- 1.项目打包jar或者war 以及编写dockerfile文件
- 2.制作镜像
- 3.k8s部署镜像
- 4.在网关上部署Ingerss统一入口
- 8.k8s整体架构及核心组件
-
- 各个组件及其功能
- 1.master组件
- 2.node组件
- 3.kubernetes核心概念
- 4.controllers
- 9.k8s动态扩容
1.创建Master节点
kubeadm init
2.将node节点添加到Master集群中
kubeadm join <Master节点的IP和端口>
Kubernetes部署环境要求
(1)一台或多台机器,操作系统CentOS 7.x-86_x64
(2)硬件配置:内存2GB或2G+,CPU 2核或CPU 2核+;
(3)集群内各个机器之间能相互通信;
(4)集群内各个机器可以访问外网,需要拉取镜像;
(5)禁止swap分区;
1.部署准备工作
小知识
如果是使用vmware创建的镜像,ip可能会变化,因此需要设置静态ip,文件有则修改,无则添加!之后重启即可
# 修改ifcfg-ens33文件 vi /etc/sysconfig/network-scripts/ifcfg-ens33BOOTPROTO="static" # 设置静态地址 [设置dhcp吧,要不然没网QWQ] IPADDR="192.168.226.132" # 设置固定的ip地址
- 关闭防火墙
systemctl stop firewalld
systemctl disable firewalld
- 关闭selinux
sed -i 's/enforcing/disabled/' /etc/selinux/config  #永久
setenforce 0  #临时
- 关闭swap(k8s禁止虚拟内存以提高性能)
sed -ri 's/.*swap.*/#&/' /etc/fstab #永久
swapoff -a #临时
- 修改主机名
cat >> /etc/hosts << EOF
192.168.85.132 k8s-master
192.168.85.130 k8s-node1
192.168.85.133 k8s-node2
EOF
- 设置网桥参数
cat > /etc/sysctl.d/k8s.conf << EOF
net.bridge.bridge-nf-call-ip6tables = 1
net.bridge.bridge-nf-call-iptables = 1
EOF
sysctl --system  #生效
- 时间同步
yum install ntpdate -y	#若是没有这个工具的需要下载
ntpdate time.windows.com
2.安装具体步骤
所有服务器节点安装 Docker/kubeadm/kubelet/kubectl
Kubernetes 默认容器运行环境是Docker,因此首先需要安装Docker;
- 安装wget、vim
yum install wget -y
yum install vim -y
1.安装docker
更新docker的yum源
wget https://mirrors.aliyun.com/docker-ce/linux/centos/docker-ce.repo -O /etc/yum.repos.d/docker-ce.repo
查看docker版本
yum list docker-ce --showduplicates|sort -r
#显示版本
[root@localhost ~]# yum list docker-ce --showduplicates | sort -r
已加载插件:fastestmirror
已安装的软件包
可安装的软件包
 * updates: mirrors.huaweicloud.com
Loading mirror speeds from cached hostfile
 * extras: mirrors.nju.edu.cn
docker-ce.x86_64            3:20.10.9-3.el7                    docker-ce-stable
docker-ce.x86_64            3:20.10.9-3.el7                    @docker-ce-stable
docker-ce.x86_64            3:20.10.8-3.el7                    docker-ce-stable
docker-ce.x86_64            3:20.10.7-3.el7                    docker-ce-stable
docker-ce.x86_64            3:20.10.6-3.el7                    docker-ce-stable
# 复制中间就可以了:3:20.10.9-3.el7  即 20.10.9
安装指定版本的docker
yum install docker-ce-20.10.9 -y
2.配置国内镜像加速器
sudo vi /etc/docker/daemon.json
{
      "registry-mirrors" : ["https://q5bf287q.mirror.aliyuncs.com", "https://registry.docker-cn.com","http://hub-mirror.c.163.com"],
 	 "exec-opts": ["native.cgroupdriver=systemd"]
}
自动启动docker
systemctl enable docker.service
3.添加k8s的阿里云yum源
cat > /etc/yum.repos.d/kubernetes.repo << EOF
[kubernetes]
name=Kubernetes
baseurl=https://mirrors.aliyun.com/kubernetes/yum/repos/kubernetes-el7-x86_64
enabled=1
gpgcheck=0
repo_gpgcheck=0
gpgkey=https://mirrors.aliyun.com/kubernetes/yum/doc/yum-key.gpg https://mirrors.aliyun.com/kubernetes/yum/doc/rpm-package-key.gpg
EOF
4.安装 kubeadm,kubelet 和 kubectl
yum install kubelet-1.23.6 kubeadm-1.23.6 kubectl-1.23.6 -y
卸载k8s
kubeadm reset -f
yum remove -y kubelet-1.26.0 kubeadm-1.26.0 kubectl-1.26.0
rm -rf /etc/cni /etc/kubernetes /var/lib/dockershim /var/lib/etcd /var/lib/kubelet /var/run/kubernetes ~/.kube/*
自动启动
systemctl enable kubelet.service
5.查询是否安装成功
yum list installed | grep kubelet
yum list installed | grep kubeadm
yum list installed | grep kubectl
Kubelet:运行在cluster所有节点上,负责启动POD和容器;
Kubeadm:用于初始化cluster的一个工具;
Kubectl:kubectl是kubenetes命令行工具,通过kubectl可以部署和管理应用,查看各种资源,创建,删除和更新组件
6.部署Kubernetes Master主节点
# kubeadm init --apiserver-advertise-address=192.168.85.129 --image-repository registry.aliyuncs.com/google_containers --kubernetes-version v1.26.0 --service-cidr=10.96.0.0/12 --pod-network-cidr=10.244.0.0/16 # 版本太高,不适合docker了

kubeadm init --apiserver-advertise-address=192.168.85.132 --image-repository registry.aliyuncs.com/google_containers --kubernetes-version v1.23.6 --service-cidr=10.96.0.0/16 --pod-network-cidr=10.244.0.0/16
安装成功:
[root@k8s-master system]# kubeadm init --apiserver-advertise-address=192.168.85.132 --image-repository registry.aliyuncs.com/google_containers --kubernetes-version v1.23.6 --service-cidr=10.96.0.0/16 --pod-network-cidr=10.244.0.0/16
[init] Using Kubernetes version: v1.23.6
[preflight] Running pre-flight checks
[preflight] Pulling images required for setting up a Kubernetes cluster
[preflight] This might take a minute or two, depending on the speed of your internet connection
[preflight] You can also perform this action in beforehand using 'kubeadm config images pull'
[certs] Using certificateDir folder "/etc/kubernetes/pki"
[certs] Generating "ca" certificate and key
[certs] Generating "apiserver" certificate and key
[certs] apiserver serving cert is signed for DNS names [k8s-master kubernetes kubernetes.default kubernetes.default.svc kubernetes.default.svc.cluster.local] and IPs [10.96.0.1 192.168.85.132]
[certs] Generating "apiserver-kubelet-client" certificate and key
[certs] Generating "front-proxy-ca" certificate and key
[certs] Generating "front-proxy-client" certificate and key
[certs] Generating "etcd/ca" certificate and key
[certs] Generating "etcd/server" certificate and key
[certs] etcd/server serving cert is signed for DNS names [k8s-master localhost] and IPs [192.168.85.132 127.0.0.1 ::1]
[certs] Generating "etcd/peer" certificate and key
[certs] etcd/peer serving cert is signed for DNS names [k8s-master localhost] and IPs [192.168.85.132 127.0.0.1 ::1]
[certs] Generating "etcd/healthcheck-client" certificate and key
[certs] Generating "apiserver-etcd-client" certificate and key
[certs] Generating "sa" key and public key
[kubeconfig] Using kubeconfig folder "/etc/kubernetes"
[kubeconfig] Writing "admin.conf" kubeconfig file
[kubeconfig] Writing "kubelet.conf" kubeconfig file
[kubeconfig] Writing "controller-manager.conf" kubeconfig file
[kubeconfig] Writing "scheduler.conf" kubeconfig file
[kubelet-start] Writing kubelet environment file with flags to file "/var/lib/kubelet/kubeadm-flags.env"
[kubelet-start] Writing kubelet configuration to file "/var/lib/kubelet/config.yaml"
[kubelet-start] Starting the kubelet
[control-plane] Using manifest folder "/etc/kubernetes/manifests"
[control-plane] Creating static Pod manifest for "kube-apiserver"
[control-plane] Creating static Pod manifest for "kube-controller-manager"
[control-plane] Creating static Pod manifest for "kube-scheduler"
[etcd] Creating static Pod manifest for local etcd in "/etc/kubernetes/manifests"
[wait-control-plane] Waiting for the kubelet to boot up the control plane as static Pods from directory "/etc/kubernetes/manifests". This can take up to 4m0s
[apiclient] All control plane components are healthy after 11.012407 seconds
[upload-config] Storing the configuration used in ConfigMap "kubeadm-config" in the "kube-system" Namespace
[kubelet] Creating a ConfigMap "kubelet-config-1.23" in namespace kube-system with the configuration for the kubelets in the cluster
NOTE: The "kubelet-config-1.23" naming of the kubelet ConfigMap is deprecated. Once the UnversionedKubeletConfigMap feature gate graduates to Beta the default name will become just "kubelet-config". Kubeadm upgrade will handle this transition transparently.
[upload-certs] Skipping phase. Please see --upload-certs
[mark-control-plane] Marking the node k8s-master as control-plane by adding the labels: [node-role.kubernetes.io/master(deprecated) node-role.kubernetes.io/control-plane node.kubernetes.io/exclude-from-external-load-balancers]
[mark-control-plane] Marking the node k8s-master as control-plane by adding the taints [node-role.kubernetes.io/master:NoSchedule]
[bootstrap-token] Using token: z7srgx.xy1cf18s9saqkiij
[bootstrap-token] Configuring bootstrap tokens, cluster-info ConfigMap, RBAC Roles
[bootstrap-token] configured RBAC rules to allow Node Bootstrap tokens to get nodes
[bootstrap-token] configured RBAC rules to allow Node Bootstrap tokens to post CSRs in order for nodes to get long term certificate credentials
[bootstrap-token] configured RBAC rules to allow the csrapprover controller automatically approve CSRs from a Node Bootstrap Token
[bootstrap-token] configured RBAC rules to allow certificate rotation for all node client certificates in the cluster
[bootstrap-token] Creating the "cluster-info" ConfigMap in the "kube-public" namespace
[kubelet-finalize] Updating "/etc/kubernetes/kubelet.conf" to point to a rotatable kubelet client certificate and key
[addons] Applied essential addon: CoreDNS
[addons] Applied essential addon: kube-proxy

Your Kubernetes control-plane has initialized successfully!

To start using your cluster, you need to run the following as a regular user:

  mkdir -p $HOME/.kube
  sudo cp -i /etc/kubernetes/admin.conf $HOME/.kube/config
  sudo chown $(id -u):$(id -g) $HOME/.kube/config
# 接下来要执行的命令
Alternatively, if you are the root user, you can run:

  export KUBECONFIG=/etc/kubernetes/admin.conf

You should now deploy a pod network to the cluster.
Run "kubectl apply -f [podnetwork].yaml" with one of the options listed at:
  https://kubernetes.io/docs/concepts/cluster-administration/addons/

Then you can join any number of worker nodes by running the following on each as root:
# 添加节点的方式
kubeadm join 192.168.85.132:6443 --token z7srgx.xy1cf18s9saqkiij \
	--discovery-token-ca-cert-hash sha256:69acc269317fe7baf0838909e1a4b9514dc73520d99c94af31941f53c261b58a
[root@k8s-master system]# docker images
REPOSITORY                                                        TAG       IMAGE ID       CREATED         SIZE
registry.aliyuncs.com/google_containers/kube-apiserver            v1.23.6   8fa62c12256d   8 months ago    135MB
registry.aliyuncs.com/google_containers/kube-controller-manager   v1.23.6   df7b72818ad2   8 months ago    125MB
registry.aliyuncs.com/google_containers/kube-scheduler            v1.23.6   595f327f224a   8 months ago    53.5MB
registry.aliyuncs.com/google_containers/kube-proxy                v1.23.6   4c0375452406   8 months ago    112MB
registry.aliyuncs.com/google_containers/etcd                      3.5.1-0   25f8c7f3da61   14 months ago   293MB
registry.aliyuncs.com/google_containers/coredns                   v1.8.6    a4ca41631cc7   15 months ago   46.8MB
registry.aliyuncs.com/google_containers/pause                     3.6       6270bb605e12   16 months ago   683kB
[root@k8s-master system]#
可能出现的错误:
kubelet版本过高,v1.24版本后kubernetes放弃docker了,根据上面安装1.23.6版本的
错误1:
[ERROR CRI]: container runtime is not running: output: E0104 17:29:26.251535    1676 remote_runtime.go:948] "Status from runtime service failed" err="rpc error: code = Unimplemented desc = unknown service runtime.v1alpha2.RuntimeService"
time="2023-01-04T17:29:26+08:00" level=fatal msg="getting status of runtime: rpc error: code = Unimplemented desc = unknown service runtime.v1alpha2.RuntimeService"
, error: exit status 1
解决方案:
rm /etc/containerd/config.toml
systemctl restart containerd
kubeadm init	#重新部署节点
出错之后,运行
kubeadm reset然后再次kubeadm init。kubeadm reset错误2:
[kubelet-check] The HTTP call equal to 'curl -sSL http://localhost:10248/healthz' failed with error: Get "http://localhost:10248/healthz": dial tcp [::1]:10248: connect: connection refused.
[kubelet-check] It seems like the kubelet isn't running or healthy.
[kubelet-check] The HTTP call equal to 'curl -sSL http://localhost:10248/healthz' failed with error: Get "http://localhost:10248/healthz": dial tcp [::1]:10248: connect: connection refused.
[kubelet-check] It seems like the kubelet isn't running or healthy.
[kubelet-check] The HTTP call equal to 'curl -sSL http://localhost:10248/healthz' failed with error: Get "http://localhost:10248/healthz": dial tcp [::1]:10248: connect: connection refused.
[kubelet-check] It seems like the kubelet isn't running or healthy.
[kubelet-check] The HTTP call equal to 'curl -sSL http://localhost:10248/healthz' failed with error: Get "http://localhost:10248/healthz": dial tcp [::1]:10248: connect: connection refused.
[kubelet-check] It seems like the kubelet isn't running or healthy.
解决
#修改kubelet的启动配置文件 /usr/lib/systemd/system/kubelet.service.d/10-kubeadm.conf ,在ExecStart上添加
--feature-gates SupportPodPidsLimit=false --feature-gates SupportNodePidsLimit=false
#修改后执行
systemctl daemon-reload && systemctl restart kubelet。
错误3:
[init] Using Kubernetes version: v1.26.0
[preflight] Running pre-flight checks
error execution phase preflight: [preflight] Some fatal errors occurred:
	[ERROR CRI]: container runtime is not running: output: E0105 14:58:45.055862    8435 remote_runtime.go:948] "Status from runtime service failed" err="rpc error: code = Unimplemented desc = unknown service runtime.v1alpha2.RuntimeService"
time="2023-01-05T14:58:45+08:00" level=fatal msg="getting status of runtime: rpc error: code = Unimplemented desc = unknown service runtime.v1alpha2.RuntimeService"
, error: exit status 1
[preflight] If you know what you are doing, you can make a check non-fatal with `--ignore-preflight-errors=...`
To see the stack trace of this error execute with --v=5 or higher
解决:
rm -rf /etc/containerd/config.toml
systemctl restart containerd
正常显示:
[init] Using Kubernetes version: v1.26.0
[preflight] Running pre-flight checks
[preflight] Pulling images required for setting up a Kubernetes cluster
[preflight] This might take a minute or two, depending on the speed of your internet connection
[preflight] You can also perform this action in beforehand using 'kubeadm config images pull'
7.在Master上执行上一步提示的命令
  mkdir -p $HOME/.kube
  sudo cp -i /etc/kubernetes/admin.conf $HOME/.kube/config
  sudo chown $(id -u):$(id -g) $HOME/.kube/config
查询节点命令
kubectl get nodes
显示:
[root@k8s-master system]# kubectl get nodes
NAME         STATUS     ROLES                  AGE     VERSION
k8s-master   NotReady   control-plane,master   9m37s   v1.23.6
8.将node节点添加到master中,在node机器中执行此命令即可【该命令是第6步中初始化节点时出现的】
kubeadm join 192.168.85.132:6443 --token z7srgx.xy1cf18s9saqkiij \
	--discovery-token-ca-cert-hash sha256:69acc269317fe7baf0838909e1a4b9514dc73520d99c94af31941f53c261b58a
运行结果:
[root@k8s-node1 ~]# kubeadm join 192.168.85.132:6443 --token z7srgx.xy1cf18s9saqkiij \
> --discovery-token-ca-cert-hash sha256:69acc269317fe7baf0838909e1a4b9514dc73520d99c94af31941f53c261b58a
[preflight] Running pre-flight checks
[preflight] Reading configuration from the cluster...
[preflight] FYI: You can look at this config file with 'kubectl -n kube-system get cm kubeadm-config -o yaml'
[kubelet-start] Writing kubelet configuration to file "/var/lib/kubelet/config.yaml"
[kubelet-start] Writing kubelet environment file with flags to file "/var/lib/kubelet/kubeadm-flags.env"
[kubelet-start] Starting the kubelet
[kubelet-start] Waiting for the kubelet to perform the TLS Bootstrap...

This node has joined the cluster:
* Certificate signing request was sent to apiserver and a response was received.
* The Kubelet was informed of the new secure connection details.

Run 'kubectl get nodes' on the control-plane to see this node join the cluster.
9.部署网络插件 用于节点之间的项目通讯
wget https://raw.githubusercontent.com/coreos/flannel/master/Documentation/kube-flannel.yml
有时候可能会下载失败
[root@k8s-master docker]# wget https://raw.githubusercontent.com/coreos/flannel/master/Documentation/kube-flannel.yml
--2023-01-05 16:28:08--  https://raw.githubusercontent.com/coreos/flannel/master/Documentation/kube-flannel.yml
正在解析主机 raw.githubusercontent.com (raw.githubusercontent.com)... 0.0.0.0, ::
正在连接 raw.githubusercontent.com (raw.githubusercontent.com)|0.0.0.0|:443... 失败:拒绝连接。
正在连接 raw.githubusercontent.com (raw.githubusercontent.com)|::|:443... 失败:拒绝连接。
就手动配置,直接打开连接复制就可以
kube-flannel.yml
---
apiVersion: policy/v1beta1
kind: PodSecurityPolicy
metadata:
  name: psp.flannel.unprivileged
  annotations:
    seccomp.security.alpha.kubernetes.io/allowedProfileNames: docker/default
    seccomp.security.alpha.kubernetes.io/defaultProfileName: docker/default
    apparmor.security.beta.kubernetes.io/allowedProfileNames: runtime/default
    apparmor.security.beta.kubernetes.io/defaultProfileName: runtime/default
spec:
  privileged: false
  volumes:
  - configMap
  - secret
  - emptyDir
  - hostPath
  allowedHostPaths:
  - pathPrefix: "/etc/cni/net.d"
  - pathPrefix: "/etc/kube-flannel"
  - pathPrefix: "/run/flannel"
  readOnlyRootFilesystem: false
  # Users and groups
  runAsUser:
    rule: RunAsAny
  supplementalGroups:
    rule: RunAsAny
  fsGroup:
    rule: RunAsAny
  # Privilege Escalation
  allowPrivilegeEscalation: false
  defaultAllowPrivilegeEscalation: false
  # Capabilities
  allowedCapabilities: ['NET_ADMIN', 'NET_RAW']
  defaultAddCapabilities: []
  requiredDropCapabilities: []
  # Host namespaces
  hostPID: false
  hostIPC: false
  hostNetwork: true
  hostPorts:
  - min: 0
    max: 65535
  # SELinux
  seLinux:
    # SELinux is unused in CaaSP
    rule: 'RunAsAny'
---
kind: ClusterRole
apiVersion: rbac.authorization.k8s.io/v1
metadata:
  name: flannel
rules:
- apiGroups: ['extensions']
  resources: ['podsecuritypolicies']
  verbs: ['use']
  resourceNames: ['psp.flannel.unprivileged']
- apiGroups:
  - ""
  resources:
  - pods
  verbs:
  - get
- apiGroups:
  - ""
  resources:
  - nodes
  verbs:
  - list
  - watch
- apiGroups:
  - ""
  resources:
  - nodes/status
  verbs:
  - patch
---
kind: ClusterRoleBinding
apiVersion: rbac.authorization.k8s.io/v1
metadata:
  name: flannel
roleRef:
  apiGroup: rbac.authorization.k8s.io
  kind: ClusterRole
  name: flannel
subjects:
- kind: ServiceAccount
  name: flannel
  namespace: kube-system
---
apiVersion: v1
kind: ServiceAccount
metadata:
  name: flannel
  namespace: kube-system
---
kind: ConfigMap
apiVersion: v1
metadata:
  name: kube-flannel-cfg
  namespace: kube-system
  labels:
    tier: node
    app: flannel
data:
  cni-conf.json: |
    {
      "name": "cbr0",
      "cniVersion": "0.3.1",
      "plugins": [
        {
          "type": "flannel",
          "delegate": {
            "hairpinMode": true,
            "isDefaultGateway": true
          }
        },
        {
          "type": "portmap",
          "capabilities": {
            "portMappings": true
          }
        }
      ]
    }
  net-conf.json: |
    {
      "Network": "10.244.0.0/16",
      "Backend": {
        "Type": "vxlan"
      }
    }
---
apiVersion: apps/v1
kind: DaemonSet
metadata:
  name: kube-flannel-ds
  namespace: kube-system
  labels:
    tier: node
    app: flannel
spec:
  selector:
    matchLabels:
      app: flannel
  template:
    metadata:
      labels:
        tier: node
        app: flannel
    spec:
      affinity:
        nodeAffinity:
          requiredDuringSchedulingIgnoredDuringExecution:
            nodeSelectorTerms:
            - matchExpressions:
              - key: kubernetes.io/os
                operator: In
                values:
                - linux
      hostNetwork: true
      priorityClassName: system-node-critical
      tolerations:
      - operator: Exists
        effect: NoSchedule
      serviceAccountName: flannel
      initContainers:
      - name: install-cni
        image: quay.io/coreos/flannel:v0.13.0
        command:
        - cp
        args:
        - -f
        - /etc/kube-flannel/cni-conf.json
        - /etc/cni/net.d/10-flannel.conflist
        volumeMounts:
        - name: cni
          mountPath: /etc/cni/net.d
        - name: flannel-cfg
          mountPath: /etc/kube-flannel/
      containers:
      - name: kube-flannel
        image: quay.io/coreos/flannel:v0.13.0
        command:
        - /opt/bin/flanneld
        args:
        - --ip-masq
        - --kube-subnet-mgr
        resources:
          requests:
            cpu: "100m"
            memory: "50Mi"
          limits:
            cpu: "100m"
            memory: "50Mi"
        securityContext:
          privileged: false
          capabilities:
            add: ["NET_ADMIN", "NET_RAW"]
        env:
        - name: POD_NAME
          valueFrom:
            fieldRef:
              fieldPath: metadata.name
        - name: POD_NAMESPACE
          valueFrom:
            fieldRef:
              fieldPath: metadata.namespace
        volumeMounts:
        - name: run
          mountPath: /run/flannel
        - name: flannel-cfg
          mountPath: /etc/kube-flannel/
      volumes:
      - name: run
        hostPath:
          path: /run/flannel
      - name: cni
        hostPath:
          path: /etc/cni/net.d
      - name: flannel-cfg
        configMap:
          name: kube-flannel-cfg
应用kube-flannel.yml文件
kubectl apply -f kube-flannel.yml
运行结果
[root@k8s-master k8s]# kubectl apply -f kube-flannel.yml
namespace/kube-flannel created
clusterrole.rbac.authorization.k8s.io/flannel configured
clusterrolebinding.rbac.authorization.k8s.io/flannel configured
serviceaccount/flannel created
configmap/kube-flannel-cfg created
daemonset.apps/kube-flannel-ds created
查看运行时的容器pod【一个pod里面可以运行多个docker容器】
kubectl get pods -n kube-system
启动可能需要等一会
# 成功之后
[root@k8s-master k8s]# kubectl get nodes
NAME         STATUS   ROLES                  AGE     VERSION
k8s-master   Ready    control-plane,master   4h56m   v1.23.6
k8s-node1    Ready    <none>                 4h34m   v1.23.6
k8s-node2    Ready    <none>                 4h27m   v1.23.6
至此部署完成!
3.常用命令
# 查看节点状态
kubectl get nodes
# 查看运行时容器pod (一个pod里面运行了多个docker容器)
kubectl get pods -n kube-system
# 查看参数
kubectl --help
# 查看控制器 知道有什么容器 【最外层是node节点,node里面是service,service里面是控制器,控制器里面有pod,pod里面有docker】
kubectl get deployment
# 查看服务
kubectl get service
# 删除控制器
kubectl delete deployment [pod名称]
# 删除pod
kubectl delete pod [pod Name]
# 查询命名空间
kubectl get namespace
4.k8s部署容器化应用
安装Nginx
# 拉取并启动镜像
kubectl create deployment nginx --image=nginx

kubectl expose deployment nginx --port=80 --type=NodePort
# 查看pod状态
kubectl get pod,svc
# 访问地址:http://NodeIP:Port
安装tomcat
kubectl create deployment tomcat --image=tomcat

kubectl expose deployment tomcat --port=8080 --type=NodePort

# 访问地址:http://NodeIP:Port
容器化应用部署
容器化应用
何为“容器化应用”?
通俗点来说,就是你把一个程序放在docker里部署,这个docker应用就是容器化应用;
比如:在docker里面部署一个springboot,这个docker+springboot一起就是一个容器化应用;
在Docker里面部署一个nginx,这个docker+nginx一起就是一个容器化应用;
在Docker里面部署一个应用怎么部?
简单来说就是 镜像 -> 启动镜像得到一个Docker容器;
在k8s里面部署一个应用怎么部?
SpringBoot程序–>打包jar包或war包–>通过Dockerfile文件生成docker镜像–>通过k8s部署这个镜像–>部署完毕;
步骤:
1、制作镜像;(自己编写Dockerfile文件制作,或者 从仓库pull镜像)
2、通过控制器管理pod(其实就是把镜像启动得到一个容器,容器在pod里)
3、暴露应用,以便外界可以访问;
例如部署Nginx
# 1.制作镜像(有官方现成的,所以无需制作)
# 2.管理pod【deployment控制器 nginx为pod的名字 --image指定镜像】
kubectl create deployment nginx --image=nginx
# 3.暴露
kubectl expose deployment nginx --port=80 --target-port=80 --type=NodePort
# 4.开始访问
部署Springboot应用流程
K8s部署微服务(springboot程序)
1、项目打包(jar、war)–>可以采用一些工具git、maven、jenkins
2、制作Dockerfile文件,生成镜像;
3、kubectl create deployment nginx --image= 你的镜像
4、你的springboot就部署好了,是以docker容器的方式运行在pod里面的;
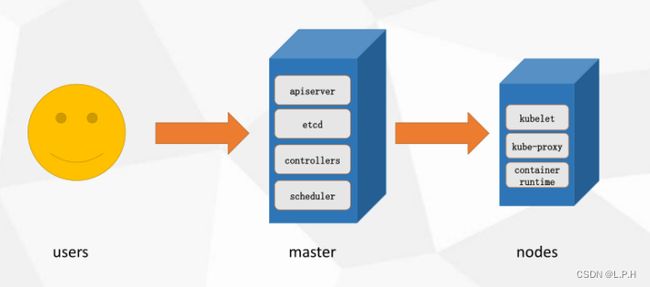
Mater控制Node --> service --> deployment(控制器) --> pod --> dockerl
1.自定义jdk镜像
Dockerfile:
FROM centos:latest
ADD jdk-19_linux-x64_bin.tar.gz /usr/local/java
ENV JAVA_HOME /usr/local/java/jdk19.0.1
ENV CLASSPATH $JAVA_HOME/lib/dt.jar:$JAVA_HOME/lib/tools.jar
ENV PATH $PATH:$JAVA_HOME/bin
CMD java -version
构建镜像:
docker build -t jdk19.0.1 .
2.构建项目镜像
Dockerfile
FROM jdk19.0.1
MAINTAINER cat
ADD 38-springboot-k8s-1.0.0.jar /opt
RUN chmod +x /opt/38-springboot-k8s-1.0.0.jar
CMD java -jar /opt/38-springboot-k8s-1.0.0.jar
构建镜像
docker build -t 38-springboot-k8s-1.0.0-jar .
空运行测试 尝试执行,但是没有真的运行,会产生一个deploy.yaml文件 [使用json亦可以]
# 创建控制器 名字为springboot-k8s
# 镜像使用 38-springboot-k8s-1.0.0-jar
# --dry-run 尝试运行,不会真正运行
# -o 输出为yaml文件 到deploy.yamle文件里面
kubectl create deployment springboot-k8s --image=38-springboot-k8s-1.0.0-jar --dry-run -o yaml

# kubectl create deployment springboot-k8s --image=38-springboot-k8s-1.0.0-jar --dry-run=client -o yaml > deploy.yaml
38-springboot-k8s-1.0.0.jar  deploy.yaml  Dockerfile
[root@k8s-master springboot-38]# cat deploy.yaml
apiVersion: apps/v1
kind: Deployment
metadata:
  creationTimestamp: null
  labels:
    app: springboot-k8s
  name: springboot-k8s
spec:
  replicas: 1
  selector:
    matchLabels:
      app: springboot-k8s
  strategy: {}
  template:
    metadata:
      creationTimestamp: null
      labels:
        app: springboot-k8s
    spec:
      containers:
      - image: 38-springboot-k8s-1.0.0-jar
        name: 38-springboot-k8s-1-0-0-jar-9dznz
        # 配置从本地拉取镜像 貌似会出错 还是先别配置了 建议使用 IfNotPresent
        imagePullPolicy: Never
        resources: {}
status: {}
通过yaml文件进行部署
kubectl apply -f deploy.yaml #(yaml是资源清单)
暴露服务端口
kubectl expose deployment springboot-k8s --port=8080 --type=NodePort
5.部署Dashbaord仪表盘
下载一个yaml文件
wget https://raw.githubusercontent.com/kubernetes/dashboard/v2.0.4/aio/deploy/recommended.yaml
修改端口dashboard.yaml

修改成为:30001为节点访问端口
spec:
type: NodePort
ports:
- port: 443
targetPort: 8443
nodePort: 30001
selector:
k8s-app: kubernetes-dashboard
然后部署该文件
kubectl apply -f bashboard.yaml
查看是否配置成功
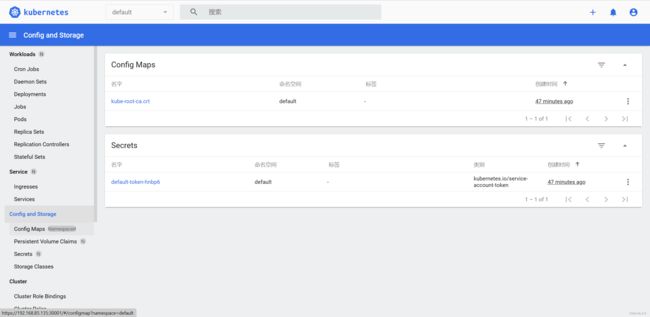
kubectl get pod -n kubernetes-dashboard
获取登录token
# 创建账号
kubectl create serviceaccount dashboard-admin -n kube-system
# 赋予权限
kubectl create clusterrolebinding dashboard-admin --clusterrole=cluster-admin --serviceaccount=kube-system:dashboard-admin
# 打印token
kubectl describe secrets -n kube-system $(kubectl -n kube-system get secret | awk '/dashboard-admin/{print $1}')
运行结果:
[root@k8s-master dashboard]# kubectl describe secrets -n kube-system $(kubectl -n kube-system get secret | awk '/dashboard-admin/{print $1}')
Name:         dashboard-admin-token-9wkww
Namespace:    kube-system
Labels:       <none>
Annotations:  kubernetes.io/service-account.name: dashboard-admin
              kubernetes.io/service-account.uid: e85fb578-e8c8-4244-96e4-63c9cea92bc5

Type:  kubernetes.io/service-account-token

Data
====
namespace:  11 bytes
token:      eyJhbGciOiJSUzI1NiIsImtpZCI6IjAzRkhzMmxjOGVKblZRSFU4RmkxXzAwMVVnX1MxeUthVnNSQWN5aWYycUkifQ.eyJpc3MiOiJrdWJlcm5ldGVzL3NlcnZpY2VhY2NvdW50Iiwia3ViZXJuZXRlcy5pby9zZXJ2aWNlYWNjb3VudC9uYW1lc3BhY2UiOiJrdWJlLXN5c3RlbSIsImt1YmVybmV0ZXMuaW8vc2VydmljZWFjY291bnQvc2VjcmV0Lm5hbWUiOiJkYXNoYm9hcmQtYWRtaW4tdG9rZW4tOXdrd3ciLCJrdWJlcm5ldGVzLmlvL3NlcnZpY2VhY2NvdW50L3NlcnZpY2UtYWNjb3VudC5uYW1lIjoiZGFzaGJvYXJkLWFkbWluIiwia3ViZXJuZXRlcy5pby9zZXJ2aWNlYWNjb3VudC9zZXJ2aWNlLWFjY291bnQudWlkIjoiZTg1ZmI1NzgtZThjOC00MjQ0LTk2ZTQtNjNjOWNlYTkyYmM1Iiwic3ViIjoic3lzdGVtOnNlcnZpY2VhY2NvdW50Omt1YmUtc3lzdGVtOmRhc2hib2FyZC1hZG1pbiJ9.JjIOsPY7PKWt6xqQuAoy24eNnl4U1QaiIvctdJXo37reHHUMnQUvK0_9Ka51h7CA9m5ZgJhggHbLjSw0RDBUtrVohEsFIOOOkD--y07MjF3Fvfhg3pM_Af8DCNQ2_ro2EWDGEgYI-1YfZMSQjCjZe8jH1mzoqz0Jn-vXFqgyt-KvAFwZAD3H7OqtXz6H6uYLlwPSTImJUFCuOjP6oQcnwNXJFPoeBRYz7xFEoITGMGXaxhlABzCBJfX8z4R6LlOM7C5O4UGK9spEQqaz6VY8M8LTxVvLLHnACDZrtD4vdBwqx3SRNwtmVRP5Ph3sUOqCAicy3cbQJMMaNKn2Rqf95Q
如果用谷歌浏览器访问的话,可能会出现私密连接无法访问,高级也不行
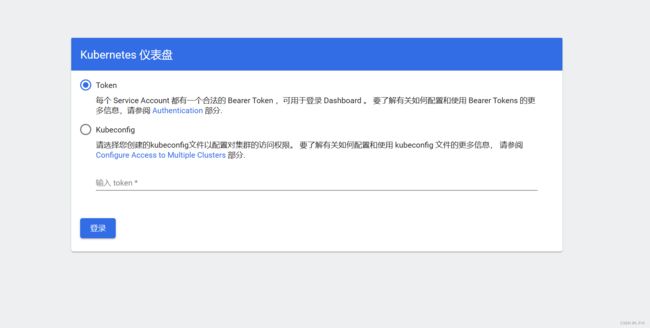
这时候点击页面任何一个位置,按下delete按键,然后键盘输入 thisisunsafe ,然后回车就可以了!
6.暴露应用
1.NodePort
NodePort服务是让外部请求直接访问服务的最原始方式,NodePort是在所有的节点(虚拟机)上开放指定的端口,所有发送到这个端口的请求都会直接转发到服务中的pod里;
nodeport.yaml格式
apiVersion: v1
kind: Service
metadata:
 name: my-nodeport-service
selector:
 app: my-appspec:
 # 指定类型
 type: NodePort
 ports:
 - name: http
   port: 80
   targetPort: 80
   # 指定端口 3w以上
   nodePort: 30008
   protocol: TCP
这种方式有一个“nodePort"的端口,能在节点上指定开放哪个端口,如果没有指定端口,它会选择一个随机端口,大多数时候应该让Kubernetes随机选择端口;
这种方式的不足:
1、一个端口只能供一个服务使用;
2、只能使用30000–32767之间的端口;
3、如果节点/虚拟机的IP地址发生变化,需要人工进行处理;
因此,在生产环境不推荐使用这种方式来直接发布服务,如果不要求运行的服务
2.三种端口说明
ports:
 - name: http
   port: 80
   targetPort: 80
   nodePort: 30008
   protocol: TCP
nodePort
外部机器(在windows浏览器)可以访问的端口;
比如一个Web应用需要被其他用户访问,那么需要配置type=NodePort,而且配置nodePort=30001,那么其他机器就可以通过浏览器访问scheme://node:30001访问到该服务;
targetPort
容器的端口,与制作容器时暴露的端口一致(Dockerfile中EXPOSE),例如docker.io官方的nginx暴露的是80端口;
port
Kubernetes集群中的各个服务之间访问的端口,虽然mysql容器暴露了3306端口,但外部机器不能访问到mysql服务,因为他没有配置NodePort类型,该3306端口是集群内其他容器需要通过3306端口访问该服务;
暴露命令
kubectl expose deployment springboot-k8s --port=8080 --target-port=8080 --type=NodePort
3.Ingress
Ingress 英文翻译为:入口、进入、进入权、进食,也就是入口,即外部请求进入k8s集群必经之口
虽然k8s集群内部署的pod、service都有自己的IP,但是却无法提供外网访问,以前可以通过监听NodePort的方式暴露服务,但是这种方式并不灵活,生产环境也不建议使用;
因此使用Ingress方式
Ingresss是k8s集群中的一个API资源对象,相当于一个集群网关,我们可以自定义路由规则来转发、管理、暴露服务(一组pod),比较灵活,生产环境建议使用这种方式;
Ingress不是kubernetes内置的(安装好k8s之后,并没有安装ingress),ingress需要单独安装,而且有多种类型Google Cloud Load Balancer,Nginx,Contour,Istio等等,我们这里选择官方维护的Ingress Nginx;
部署Ingress-nginx
- k8s部署nginx
kubectl create deployment nginx --image=nginx
- 暴露服务
kubectl expose deployment nginx --port=80 --target-port=80 --type=NodePort
- 部署Ingress nginx
ingress-nginx是使用NGINX作为反向代理和负载均衡器的Kubernetes的Ingress控制器;
下载文件并使用
官网地址:https://github.com/kubernetes/ingress-nginx
kubectl apply -f https://raw.githubusercontent.com/kubernetes/ingress-nginx/controller-v0.41.2/deploy/static/provider/baremetal/deploy.yaml

#最新
kubectl apply -f https://raw.githubusercontent.com/kubernetes/ingress-nginx/controller-v1.5.1/deploy/static/provider/baremetal/deploy.yaml

# 可以先打开网址,复制内容,然后创建ingress.yaml文件,然后再去部署
kubectl apply -f ingress.yaml
查看Ingress状态
kubectl get service -n ingress-nginx
kubectl get deploy -n ingress-nginx
kubectl get pods -n ingress-nginx
- 创建Ingress规则
创建规则文件
# ingress-nginx-rule.yaml
apiVersion: networking.k8s.io/v1
kind: Ingress
metadata:
  name: k8s-ingress
spec:
  rules:
  - host: www.abc.com
    http:
      paths:
      - pathType: Prefix
        path: /
        backend:
          service:
            name: nginx
            port:
              number: 80
应用规则文件
kubectl apply -f ingress-nginx-rule.yaml
可能会出现错误
Error from server (InternalError): error when creating "ingress-nginx-rule.yaml": Internal error occurred: failed calling webhook "validate.nginx.ingress.kubernetes.io": failed to call webhook: Post "https://ingress-nginx-controller-admission.ingress-nginx.svc:443/networking/v1/ingresses?timeout=10s": dial tcp 10.96.188.190:443: connect: connection refused
执行以下命令
kubectl delete -A ValidatingWebhookConfiguration ingress-nginx-admission
检查规则
kubectl get ing(ress)
7.部署SpringCloud项目
1.项目打包jar或者war 以及编写dockerfile文件
CMD java -jar /opt/0923-spring-cloud-alibaba-consumer-1.0.0.jar[root@k8s-master springCloud]# clear
[root@k8s-master springCloud]# ls
0923-spring-cloud-alibaba-consumer-1.0.0.jar  0923-spring-cloud-alibaba-provider-1.0.0.jar  Dockerfile-gateway
0923-spring-cloud-alibaba-gateway-1.0.0.jar   Dockerfile-consumer
2.制作镜像
docker build -t spring-cloud-alibaba-consumer -f Dockerfile-consumer .
docker build -t spring-cloud-alibaba-provider -f Dockerfile-provider .
docker build -t spring-cloud-alibaba-gateway -f Dockerfile-gateway .
3.k8s部署镜像
# 1.部署提供者
## 空运行生成yaml文件
kubectl create deployment spring-cloud-alibaba-provider --image=spring-cloud-alibaba-provider --dry-run -o yaml > provider.yaml
## 部署应用镜像
kubectl apply -f provider.yaml

# 2.部署消费者
kubectl create deployment spring-cloud-alibaba-consumer --image=spring-cloud-alibaba-consumer --dry-run -o yaml > consumer.yaml
## 应用
kubectl apply -f consumer.yaml
## 暴露端口
kubectl expose deployment spring-cloud-alibaba-consumer --port=9090 --target-port=9090 --type=NodePort

# 3.部署网关
kubectl create deployment spring-cloud-alibaba-gateway --image=spring-cloud-alibaba-gateway --dry-run -o yaml > gateway.yaml
## 应用
kubectl apply -f gateway.yaml
## 暴露端口
kubectl expose deployment spring-cloud-alibaba-gateway --port=80 --target-port=80 --type=NodePort
都需要改成从本地拉取
imagePullPolicy: Never
4.在网关上部署Ingerss统一入口
配置规则
# ingress-nginx-gateway-rule.yaml

apiVersion: networking.k8s.io/v1
kind: Ingress
metadata:
  name: k8s-ingress
spec:
  rules:
  - host: www.cloud.com
    http:
      paths:
      - pathType: Prefix
        path: /
        backend:
          service:
            name: spring-cloud-alibaba-gateway
            port:
              number: 80
应用规则 [见6-3步骤]
kubectl apply -f ingress-nginx-gateway-rule.yaml
8.k8s整体架构及核心组件
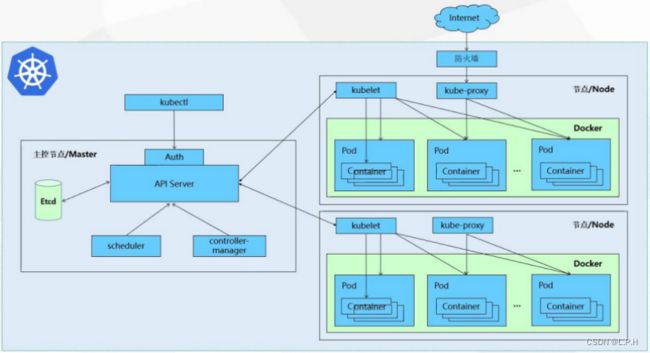
API server是所有请求的唯一入口;
api server管理所有的事务,并把信息记录到etcd数据库中,etcd有一个自动服务发现的特性机制,etcd会搭建有三个节点的集群,实现三副本;
scheduler 调度器用来调度资源,查看业务节点的资源情况,确定在哪个node上创建pod,把指令告知给api server;
控制管理器controller-manager管理pod;
pod可以分为有状态和无状态的pod,一个pod里最好只放一个容器;
api server把任务下发给业务节点的kubelet去执行;
客户访问通过kube-proxy去访问pod;
pod下面的不一定是docker,还有别的容器;
一般pod中只包含一个容器,除了一种情况除外,那就是elk,elk会在pod内多放一个logstash去收集日志;
各个组件及其功能
1.master组件
kube-apiserver
kubernetes api,集群的统一入口,各组件之间的协调者,以restful api提供接口服务,所有对象资源的增删改查和监听操作都交给apiserver处理后在提交给etcd存储记录;
kube-controller-manager
处理集群中常规的后台任务,一种资源对应一个控制器,controller-manager就是负责管理这些控制器的;
kube-scheduler
根据调度算法为新创建的pod选择一个node节点,可以任意部署,可以部署在同一个节点上,也可以部署在不同节点上;
etcd
分布式键值存储系统,用户保存集群状态数据,比如pod、service等对象信息;
2.node组件
kubelet
kubelet时master在node节点上的代理agent,管理本node运行容器的生命周期,比如创建容器、pod挂载数据卷、下载sercet、获取容器和节点状态等工作,kubelet将每个pod转换成一组容器;
kube-proxy
在node节点上实现pod的网络代理,维护网络规则和四层的负载均衡工作;
docker
容器引擎,运行容器;
3.kubernetes核心概念
pod
最小部署单元;
一组容器的集合;
一个pod中的容器共享网络命名空间;
pod是短暂的;
4.controllers
replicaset:确保预期的pod副本数量;
deployment:无状态应用部署,比如nginx、apache,一定程度上的增减不会影响客户体验;
statefulset:有状态应用部署,是独一无二型的,会影响到客户的体验;
daemonset:确保所有node运行同一个pod,确保pod在统一命名空间;
job:一次性任务;
cronjob:定时任务;
service:防止pod失联;定义一组pod的访问策略;确保了每个pod的独立性和安全性;
storage:[持久化存储] volumes;persistent volumes
pollcies策略:resource quotas
其他:
label:标签,附加到某个资源上,用户关联对象、查询和筛选;
namespaces:命名空间,将对象从逻辑上隔离;
annotations:注释;
Kubectl:k8s提供的终端控制命令;
Kubeadm:可以用来初始化或加入一个k8s集群;
9.k8s动态扩容
修改deploy.yaml文件
修改replicas参数
apiVersion: apps/v1
kind: Deployment
metadata:
  creationTimestamp: null
  labels:
    app: spring-cloud-alibaba-provider
  name: spring-cloud-alibaba-provider
spec:
# 扩容为三份
  replicas: 3
  selector:
    matchLabels:
      app: spring-cloud-alibaba-provider
  strategy: {}
  template:
    metadata:
      creationTimestamp: null
      labels:
        app: spring-cloud-alibaba-provider
    spec:
      containers:
      - image: spring-cloud-alibaba-provider
        name: spring-cloud-alibaba-provider
        imagePullPolicy: Never
        resources: {}
status: {}
之后使用运行命令即可
# 如果cu
kubectl apply -f ***.yaml


