Linux 安装 Redis7.x
Linux 安装 Redis7.x
-
- 下载redis7
- 检查linux版本
- 检查是否有 gcc
-
- 什么是 gcc
- 查看 gcc 是否有安装
- 安装 redis7
- 查看默认安装目录
- 启动服务
- 连接服务
- 服务关闭
- Redis的删除卸载
- Redis数据类型
- Redis事务
- Redis管道
- Redis Sub/Pub
- Redis 主从搭建
-
- 主从关系搭建
- 主从关系查看
- 主从命令查看
- 配置VS命令的区别
- 永不为奴
- 复制原理和工作流程
- Redis Sentinel哨兵搭建
-
- 新建 sentinel 配置
- 启动 sentinel 集群
- replid 和 replid2
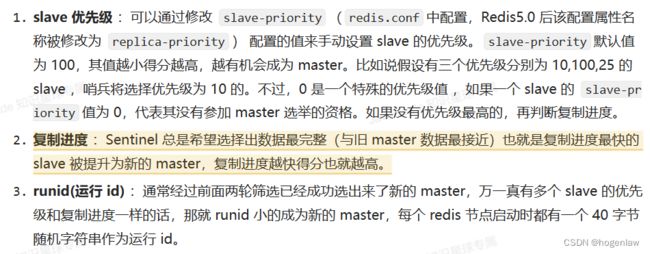
- 哨兵运行流程和选举原理
- Redis-Cluster 集群搭建
-
- 为什么需要 redis-cluster 集群
- Redis集群的数据分片
- 哈希槽
- 为什么redis集群的最大槽数是16384个?
- redis-cluster 集群环境搭建
- 往 Redis-cluster 集群插入数据
- redis 集群主从切换
- redis 主从调整
- 主从扩容
- 主从缩容
- SpringBoot 整合 Redis
下载redis7
下载地址:https://download.redis.io/releases/
检查linux版本
[root@localhost /]# getconf LONG_BIT
64
检查是否有 gcc
什么是 gcc

查看 gcc 是否有安装
[root@localhost /]# gcc -v
bash: gcc: command not found...
Install package 'gcc' to provide command 'gcc'? [N/y]
从上面可以看到,当前并没有安装 gcc 编译器,所以安装一下:
[root@localhost /]# yum -y install gcc-c++
安装完成后查看 gcc 版本
[root@localhost /]# gcc -v
Using built-in specs.
COLLECT_GCC=gcc
COLLECT_LTO_WRAPPER=/usr/libexec/gcc/x86_64-redhat-linux/8/lto-wrapper
OFFLOAD_TARGET_NAMES=nvptx-none
OFFLOAD_TARGET_DEFAULT=1
Target: x86_64-redhat-linux
...
Thread model: posix
gcc version 8.5.0 20210514 (Red Hat 8.5.0-4) (GCC)
安装 redis7
首先解压缩:tar -xvf redis-7.2.2.tar.gz
然后进入到 Redis7目录执行命令 make && make install
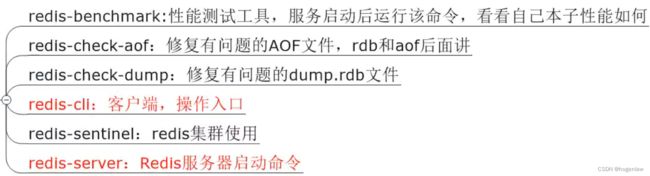
查看默认安装目录
注意,redis-7.2.2.tar.gz只是一个软件,安装后肯定在其它的目录,比如 windows平台的软件,默认安装目录就是 C:\Program Files
Linux下的 /usr/local 类似我们 windows 系统的 C:\Program Files
[root@localhost redis-7.2.2]# cd /usr/local/bin/
[root@localhost bin]# ll
total 38396
-rwxr-xr-x. 1 root root  9457984 Nov  2 16:35 redis-benchmark
lrwxrwxrwx. 1 root root       12 Nov  2 16:35 redis-check-aof -> redis-server
lrwxrwxrwx. 1 root root       12 Nov  2 16:35 redis-check-rdb -> redis-server
-rwxr-xr-x. 1 root root 10186232 Nov  2 16:35 redis-cli
lrwxrwxrwx. 1 root root       12 Nov  2 16:35 redis-sentinel -> redis-server
-rwxr-xr-x. 1 root root 19666304 Nov  2 16:35 redis-server
各个文件的作用如下
启动服务
启动 Redis服务的时候需要执行配置文件,为了不污染 Redis 的出厂默认配置,我们新建一个 myredis 文件夹并把 Redis 默认配置复制到此目录。
修改/myredis 目录下redis.conf 配置文件做初始化设置

ok,配置改好后,便可以执行redis-server ./redis.conf命令启动服务了
[root@localhost myredis]# redis-server ./redis.conf
[root@localhost myredis]# ps -ef|grep redis
root        2577    1811  0 17:24 ?        00:00:00 redis-server *:6379
root        2589    2477  0 17:24 pts/0    00:00:00 grep --color=auto redis
刚才已经说了,redis默认安装在了
/usr/local/bin目录下,也就是说随时可以使用这里面的命令
连接服务
使用redis-cli -a 123456 -p 6379 命令连接服务。
我们可以发个 ping 测试一下服务是否可用
[root@localhost myredis]# redis-cli -a 123456 -p 6379
Warning: Using a password with '-a' or '-u' option on the command line interface may not be safe.
127.0.0.1:6379> ping
PONG
注意,因为配置了密码,上面的命令需要加上参数 -a,后面的 -p 不写,默认就是6379,如果不加参数 -a,得分两步
[root@localhost myredis]# redis-cli
127.0.0.1:6379> ping
(error) NOAUTH Authentication required.
127.0.0.1:6379> auth 123456
OK
127.0.0.1:6379> ping
PONG
上面 还有一个警告"Warning: Using a password with ‘-a’ or ‘-u’ option on the command line interface may not be safe." 这个警告其实无所谓的,不影响使用,如果就是看着不爽咋办?
其实 warning 这串输出并不是普通输出,
shell 的标准输出包含两种:
1 (标准输出)
2 (标准错误) 我们的命令,即包含1也包含2,2即是我们想要去除的提示
解决办法将标准错误去除即可,追加2>/dev/null,将标准错误丢弃即可,就没有烦人的警告了
[root@localhost myredis]# redis-cli -a 123456 2>/dev/null
127.0.0.1:6379> ping
PONG
该操作本质是将警告重定向至linux的黑洞文件
这时再新开一个命令窗口,可以看到同时有 redis-server 和 redis-cli 两个服务
[root@localhost myredis]# ps -ef|grep redis
root        2577    1811  0 17:24 ?        00:00:01 redis-server *:6379
root        2604    2477  0 17:25 pts/0    00:00:00 redis-cli -a 123456 -p 6379
root        2663    2632  0 17:28 pts/1    00:00:00 grep --color=auto redis
如果不想看到 grep 的进程可以再过滤一次嘛
[root@localhost myredis]# ps -ef|grep redis|grep -v grep
root        2577    1811  0 17:24 ?        00:00:01 redis-server *:6379
root        2604    2477  0 17:25 pts/0    00:00:00 redis-cli -a 123456 -p 6379
服务关闭
单实例关闭:直接使用 SHUTDOWN 关闭,执行lsof -i:6379命令后发现没有该进程了
[root@localhost myredis]# redis-cli -a 123456 2>/dev/null
127.0.0.1:6379> ping
PONG
127.0.0.1:6379> shutdown
not connected> quit
[root@localhost myredis]# lsof -i:6379
[root@localhost myredis]#
多实例关闭:使用命令 redis-cli -a 123456 shutdown 远程关闭,假设有多台 redis实例,这个命令redis-cli -a 123456 -p 6379 6733 6233 shutdown就可以全部关闭
[root@localhost myredis]# redis-server ./redis.conf
[root@localhost myredis]# lsof -i:6379
COMMAND    PID USER   FD   TYPE DEVICE SIZE/OFF NODE NAME
redis-ser 4000 root    6u  IPv4  72922      0t0  TCP *:redis (LISTEN)
redis-ser 4000 root    7u  IPv6  72923      0t0  TCP *:redis (LISTEN)
[root@localhost myredis]# ps -ef|grep redis
root        4000    2826  0 18:39 ?        00:00:00 redis-server *:6379
root        4028    3308  0 18:39 pts/0    00:00:00 grep --color=auto redis
[root@localhost myredis]# redis-cli -a 123456 shutdown
Warning: Using a password with '-a' or '-u' option on the command line interface may not be safe.
[root@localhost myredis]# lsof -i:6379
[root@localhost myredis]# ps -ef|grep redis
root        4058    3308  0 18:40 pts/0    00:00:00 grep --color=auto redis
[root@localhost myredis]#
Redis的删除卸载
很简单,进入/usr/local/bin,找到 redis-*开头的文件,全部删了就好
[root@localhost myredis]# ls -l /usr/local/bin/redis-*
-rwxr-xr-x. 1 root root  9457984 Nov  2 16:35 /usr/local/bin/redis-benchmark
lrwxrwxrwx. 1 root root       12 Nov  2 16:35 /usr/local/bin/redis-check-aof -> redis-server
lrwxrwxrwx. 1 root root       12 Nov  2 16:35 /usr/local/bin/redis-check-rdb -> redis-server
-rwxr-xr-x. 1 root root 10186232 Nov  2 16:35 /usr/local/bin/redis-cli
lrwxrwxrwx. 1 root root       12 Nov  2 16:35 /usr/local/bin/redis-sentinel -> redis-server
-rwxr-xr-x. 1 root root 19666304 Nov  2 16:35 /usr/local/bin/redis-server
[root@localhost myredis]# rm -rf /usr/local/bin/redis-*
Redis数据类型
共有十大数据类型:
String、Hash、List、Set、Zset(sorted set)
HyperLoglog、GEO、bitmap、bitfield、stream
Redis事务
是什么?
可以一次执行多个命令,本质是一组命令的集合。一个事务中的所有命令都会被序列化,按顺序地串行化执行而不会被其它命令插入,不许加塞
有什么作用?
一个队列中,一次性、顺序性、排他性的执行一系列命令
Redis事务 VS 数据库事务

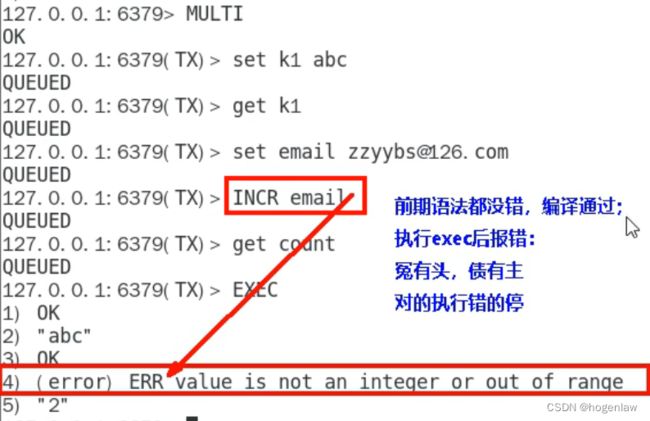
实操一下
正常执行一组命令的集合

某个命令敲错了,整组命令都 gameover…
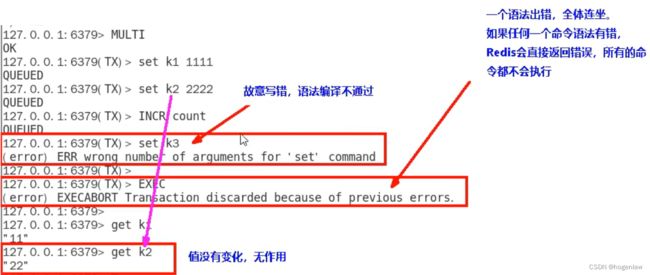
事务中的某个命令有错,不影响其它命令执行
Redis管道
问题由来
1、客户端向服务端发送命令分四步(发送命令一>命令排队一>命令执行–>返回结果),并监听Socket返回,通常以阻塞模式等待服务端响应
2、 服务端处理命令,并将结果返回给客户端。
上述两步称为:Rlound Trip Time(简称RTT,数据包往返于两端的时间)

![]()
解决思路
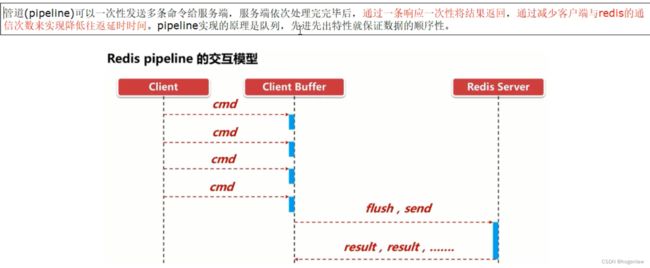
实操一下
如下,首先在cmd.txt文件预先定义了一组命令,涵盖String、Hash、List类型,使用管道可以一次性同时执行
[root@localhost myredis]# ll
total 116
-rw-r--r--. 1 root root    107 Nov  2 20:11 cmd.txt
-rw-r--r--. 1 root root     88 Nov  2 18:40 dump.rdb
-rw-r--r--. 1 root root 107510 Nov  2 17:06 redis.conf
[root@localhost myredis]# cat cmd.txt
set k100 v100
set k200 v200
hset k300 name hok
hset k300 age 20
hset k300 gender male
lpush list 1 2 3 4 5
[root@localhost myredis]# cat cmd.txt | redis-cli -a 123456 --pipe
Warning: Using a password with '-a' or '-u' option on the command line interface may not be safe.
All data transferred. Waiting for the last reply...
Last reply received from server.
errors: 0, replies: 6
如下可以看到,正常取值是没有问题的
127.0.0.1:6379> hgetall k300
1) "name"
2) "hok"
3) "age"
4) "20"
5) "gender"
6) "male"
127.0.0.1:6379> get k100
"v100"
127.0.0.1:6379> LRANGE list 0 -1
 1) "5"
 2) "4"
 3) "3"
 4) "2"
 5) "1"
当然 Redis也有提供原生 mset、mget命令 批量执行一组命令,但是只能限定同一数据类型,具体异同如下:

pipe 使用注意:![]()
Redis Sub/Pub
第一代:Sub/Pub
第二代:Stream
简单来说,redis想取代消息中间件的功能,但是实际项目中不大会使用这两个功能,因为专业的事交给专业的人来做嘛
Redis 主从搭建
主从关系搭建
进入 myredis 目录下,新建 7001 7002 7003 三个目录,准备以7001作为主节点,7002 7003为从节点,使用echo 7001 7002 7003 | xargs -t -n 1 cp ./redis.conf命令把 myredis 目录下的 redis.conf 拷贝到7001 7002 7003 三个目录下,当然你也可以一个一个来…
[root@localhost myredis]# ll
total 116
drwxr-xr-x. 2 root root      6 Nov  3 17:04 7001
drwxr-xr-x. 2 root root      6 Nov  3 17:04 7002
drwxr-xr-x. 2 root root      6 Nov  3 17:04 7003
-rw-r--r--. 1 root root 107510 Nov  2 17:06 redis.conf
[root@localhost myredis]# echo 7001 7002 7003 | xargs -t -n 1 cp ./redis.conf
cp ./redis.conf 7001
cp ./redis.conf 7002
cp ./redis.conf 7003
[root@localhost myredis]#
改动如下几个配置:
daemonize yes
下面这行注释掉,设置可以远程连接
#bind 127.0.0.1 -::1
保护模式设置关闭
protected-mode no
批量配置端口和指定当前工作目录,在 myredis 目录下执行
sed -i -e 's/dir .\//dir \/usr\/local\/myredis\/7001\//g' 7001/redis.conf
sed -i -e 's/dir .\//dir \/usr\/local\/myredis\/7002\//g' 7002/redis.conf
sed -i -e 's/dir .\//dir \/usr\/local\/myredis\/7003\//g' 7003/redis.conf
看一下pidfile配置(这里不用动,看看就行)
pidfile /var/run/redis_7003.pid
logfile日志,手动写吧…
logfile "/usr/local/myredis/7003/7003.log"
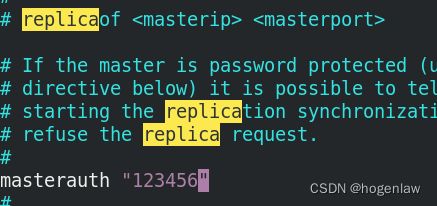
主节点设置密码
requirepass 123456
dbfilename 最好改个名字,方便排查
dbfilename dump7003.rdb
接下来这两个,从节点需要配置,主机不需要配置,这里以7001作为主节点,7002 7003为从节点
replicaof 192.168.133.128 7001
masterauth "123456"
主从关系查看
接下来启动,先 master 后 slave,可以看到初始时刻,没有任何 key
[root@localhost myredis]# redis-server 7001/redis.conf
[root@localhost myredis]# redis-cli -a 123456 -p 7001
Warning: Using a password with '-a' or '-u' option on the command line interface may not be safe.
127.0.0.1:7001> keys *
(empty array)
127.0.0.1:7001>
[root@localhost myredis]# redis-server 7002/redis.conf
[root@localhost myredis]# redis-cli -a 123456 -p 7002
Warning: Using a password with '-a' or '-u' option on the command line interface may not be safe.
127.0.0.1:7002> keys *
(empty array)
127.0.0.1:7002>
[root@localhost myredis]# redis-server 7003/redis.conf
[root@localhost myredis]# redis-cli -a 123456 -p 7003
Warning: Using a password with '-a' or '-u' option on the command line interface may not be safe.
127.0.0.1:7003> keys *
(empty array)
127.0.0.1:7003>
接着去看看主节点产生的日志,可以看到两台从节点已经成功同步了。注意要使用vim 7001.log命令,如果使用tail -f 命令看不全…

去从节点看日志,也是没问题的

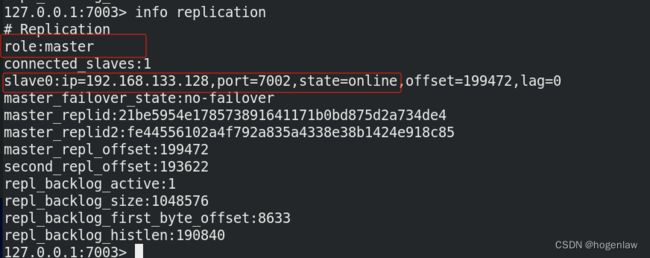
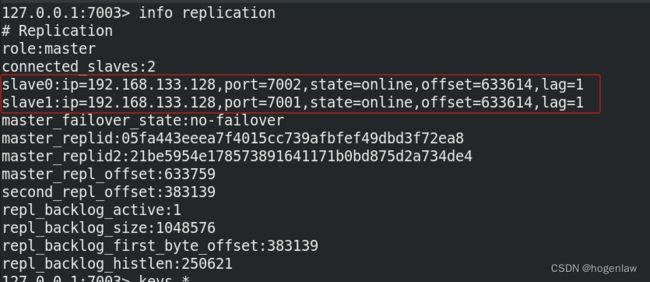
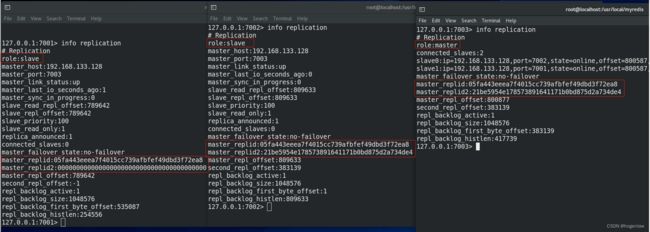
在主节点执行 info replication命令查看

在从节点执行 info replication命令查看

至此所有主从关系配置验证成功,没有问题
主从命令查看
接下来在主节点设置key,看从节点能不能获取到

由此可以验证,主节点可写可读,从节点可从主节点同步,并且可读
问题一:那从节点可以写吗?–> 亲自验证,从节点不可写

下面这个问题二:可以的

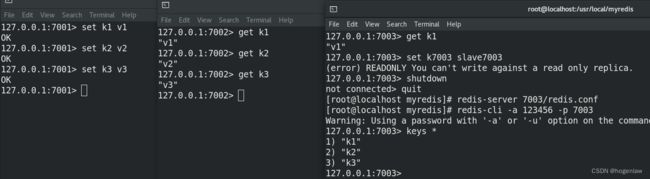
问题三:主机shutdown后情况如何? 从机是上位还是原地待命–>从节点数据可以正常使用,一直在等待主节点启动归来

配置VS命令的区别
之前我们在从节点的配置文件中用replicaof 192.168.133.128 7001指定了主节点的 ip 和 端口,这样配置好后,从节点是永久生效的,哪怕从节点挂了,重新启动,还是会有主从关系
如果不在配置文件中指定,而是在从节点启动后手动指定,那这个主从关系就是临时的
127.0.0.1:7003> slaveof 192.168.133.128 7001
永不为奴
slaveof no one命令使用

复制原理和工作流程
Redis各个版本做了一定优化:https://www.yuque.com/snailclimb/mf2z3k/ks9olb19hc9wse5k#4193d6d4
Redis Sentinel哨兵搭建
新建 sentinel 配置
在 myredis 目录下新建27001 27002 27003 三个文件夹
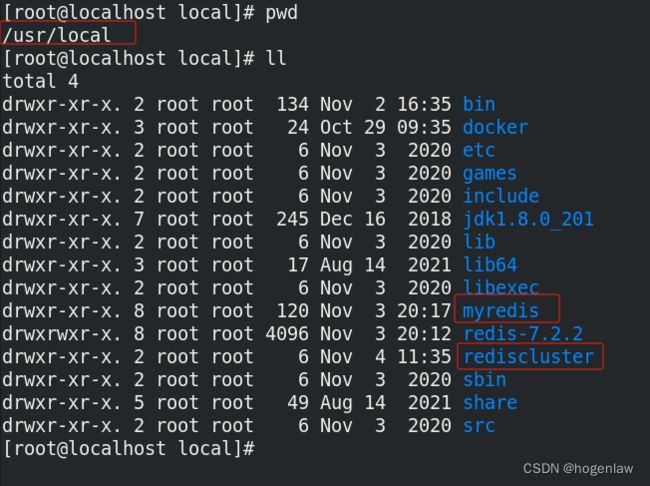
[root@localhost myredis]# pwd
/usr/local/myredis
[root@localhost myredis]# ll
total 112
drwxr-xr-x. 2 root root     52 Nov  3 20:36 27001
drwxr-xr-x. 2 root root     52 Nov  3 20:34 27002
drwxr-xr-x. 2 root root     52 Nov  3 20:34 27003
drwxr-xr-x. 2 root root     60 Nov  3 20:21 7001
drwxr-xr-x. 2 root root     60 Nov  3 19:45 7002
drwxr-xr-x. 2 root root     60 Nov  3 20:32 7003
-rw-r--r--. 1 root root 107510 Nov  2 17:06 redis.conf
-rw-r--r--. 1 root root    264 Nov  3 20:17 sentinel.conf
[root@localhost myredis]#
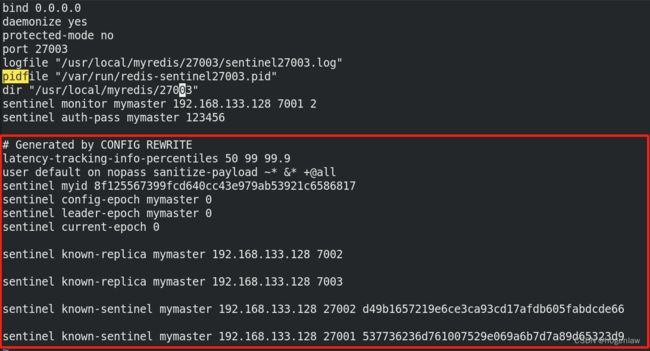
每个目录下新建 sentinel.conf 配置文件,写如下内容,主要是端口不一样
bind 0.0.0.0
daemonize yes
protected-mode no
port 27001
logfile "/usr/local/myredis/27001/sentinel27001.log"
pidfile "/var/run/redis-sentinel27001.pid"
dir "/usr/local/myredis/27001"
sentinel monitor mymaster 192.168.133.128 7001 2
sentinel auth-pass mymaster 123456
bind 0.0.0.0
daemonize yes
protected-mode no
port 27002
logfile "/usr/local/myredis/27002/sentinel27002.log"
pidfile "/var/run/redis-sentinel27002.pid"
dir "/usr/local/myredis/27002"
sentinel monitor mymaster 192.168.133.128 7001 2
sentinel auth-pass mymaster 123456
bind 0.0.0.0
daemonize yes
protected-mode no
port 27003
logfile "/usr/local/myredis/27003/sentinel27003.log"
pidfile "/var/run/redis-sentinel27003.pid"
dir "/usr/local/myredis/27003"
sentinel monitor mymaster 192.168.133.128 7001 2
sentinel auth-pass mymaster 123456
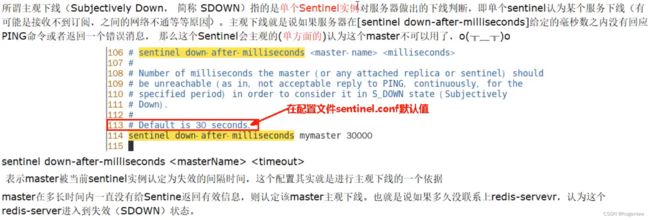
注意,之前搭建 Redis 集群的时候说过,7001是主,7002 7003是从,而且7001的配置文件没有配置 replicaof 和 masterauth,那现在搭建 redis-sentinel集群就需要补充了,主要是 masterauth 要配置密码,因为后面万一 7001 崩了,这个时候 redis-sentinel 肯定会在 7001 7002两台从节点之间选择一个成为主节点,后续 7001 恢复了后要从主节点同步数据,所以需要配置密码
启动 sentinel 集群
[root@localhost 27003]# redis-sentinel 27001/sentinel.conf --sentinel
[root@localhost 27003]# redis-sentinel 27002/sentinel.conf --sentinel
[root@localhost 27003]# redis-sentinel 27003/sentinel.conf --sentinel
[root@localhost myredis]# ps -ef|grep redis
root       11782    2826  0 18:45 ?        00:00:24 redis-server *:7002
root       11795   11735  0 18:45 pts/1    00:00:00 redis-cli -a 123456 -p 7002
root       13354    2826  0 20:31 ?        00:00:04 redis-server *:7003
root       13382   11798  0 20:32 pts/2    00:00:00 redis-cli -a 123456 -p 7003
root       13441    2826  0 20:33 ?        00:00:08 redis-sentinel 0.0.0.0:27001 [sentinel]
root       13453    2826  0 20:33 ?        00:00:08 redis-sentinel 0.0.0.0:27002 [sentinel]
root       13465    2826  0 20:33 ?        00:00:08 redis-sentinel 0.0.0.0:27003 [sentinel]
root       13927    3308  0 20:48 pts/0    00:00:00 grep --color=auto redis
启动成功,进入 27001 目录,查看 sentinel.conf ,会发现后面追加了一些配置
还记得吧,之前是7001主,7002 7003两个从节点,现在让7001下线,看 sentinel 是否会选出新的master节点,下图可以发现,7003变成了主节点,7002成为了从节点
ok,那现在 7001 重新恢复了,会变成两个master吗?显然不会,时代已经变了,转眼间,换了人间
而一旦 7001 变成了从节点,那就不能写了哦
127.0.0.1:7001> set k8 v8
(error) READONLY You can't write against a read only replica.
127.0.0.1:7001>
replid 和 replid2
接着上面进度,刚才看到,7003成为了主,7001 7002成为了从节点。
现在来看看 7001 7002 7003 三台节点的 info replication
● 对于 master 来说,replid 就是自己的复制id((redis实例都有,和runid没有直接关联,但和runid生成规则相同)。没有发生主从切换之前, replid2 为空。发生主从切换之后,新的 master的 replid2 是旧 master (前一个自己同步的 master) 的 replid,在主从角色切换的时候会用到。
● 对于 slave 来说, replid 保存的是自己当前正在同步的 master 的 replid。 replid2 保存的是旧 master 的 replid,在主从角色切换的时候会用到。
通过上面两点我们可以知道,为什么 7001 的replid2是空的,因为它原先是主节点,而7002 7003的 replid2不为空,replid2的值正是 7001 replid
哨兵运行流程和选举原理

![]()

那怎么选举的呢,在日志里可以直观的看到这个过程
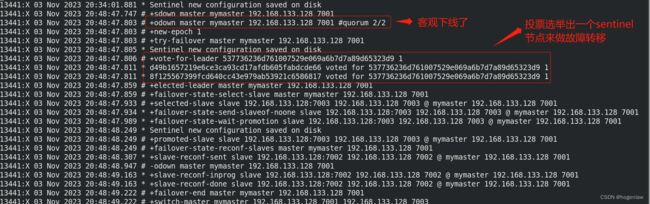
至于具体选举的策略,这就需要用到算法了

ok,现在哨兵 leader 已经选举出来了,现在启动故障切换流程并选出一个新 master,有如下步骤:

文字描述如下:
经过上面的步骤已经选出了要成为 master 的节点,sentinel leader会做如下操作:

Redis-Cluster 集群搭建
为什么需要 redis-cluster 集群

Redis集群的数据分片


哈希槽

为什么redis集群的最大槽数是16384个?
CRC16 算法产生的校验码有 16 位,理论上可以产生 65536 (216,0 ~65535) 个值,为什么 RedisCluster 的哈希槽偏偏选择的是 16384 (214) 个呢?
关于这点,有人在 github 问了作者,他是这么回复的


redis-cluster 集群环境搭建
上面redis主从环境和 redis-sentinel环境是在 myredis 目录下操作的,现在我们新建一个目录 rediscluster 用以搭建 redis-cluster 环境
这里准备使用 3 主 3 从,端口分别如下:
6381 主 6382 从
6383 主 6384 从
6385 主 6386 从
在 rediscluster 目录下新建如下文件
[root@localhost rediscluster]# ll
total 0
drwxr-xr-x. 2 root root 64 Nov  4 12:00 cluster6381_6382
drwxr-xr-x. 2 root root 64 Nov  4 12:04 cluster6383_6384
drwxr-xr-x. 2 root root 64 Nov  4 12:07 cluster6385_6386
[root@localhost rediscluster]# cd cluster6385_6386/
[root@localhost cluster6385_6386]#
[root@localhost cluster6385_6386]# ll
total 8
-rw-r--r--. 1 root root 430 Nov  4 12:05 rediscluster6385.conf
-rw-r--r--. 1 root root 429 Nov  4 12:07 rediscluster6386.conf
其中 rediscluster6385.conf 和 rediscluster6386.conf 内容分别如下
bind 0.0.0.0
daemonize yes
protected-mode no
port 6385
logfile "/usr/local/rediscluster/cluster6385_6386/cluster6385.log"
pidfile "/usr/local/rediscluster/cluster6385_6386/cluster6385.pid"
dir /usr/local/rediscluster/cluster6385_6386
dbfilename dump6385.rdb
appendonly yes
appendfilename "appendonly6385.aof"
requirepass 123456
masterauth 123456

cluster-enabled yes
cluster-config-file nodes-6385.conf
cluster-node-timeout 5000
bind 0.0.0.0
daemonize yes
protected-mode no
port 6386
logfile "/usr/local/rediscluster/cluster6385_6386/cluster6386.log"
pidfile "/usr/local/rediscluster/cluster6385_6386/cluster6386.pid"
dir /usr/local/rediscluster/cluster6385_6386
dbfilename dump6386.rdb
appendonly yes
appendfilename "appendonly6386.aof"
requirepass 123456
masterauth 123456

cluster-enabled yes
cluster-config-file nodes-6386.conf
cluster-node-timeout 5000
cluster6381_6382 和 cluster6383_6384 也是类似的,就不一一粘贴了
三个目录的配置都建好后,依次启动,如下,注意启动后进程带了[cluster]
[root@localhost rediscluster]# redis-server cluster6381_6382/rediscluster6381.conf
[root@localhost rediscluster]# redis-server cluster6381_6382/rediscluster6382.conf
全部启动好后效果如下:
[root@localhost rediscluster]# ps -ef|grep redis
root       18279   16391  0 12:13 ?        00:00:00 redis-server 0.0.0.0:6381 [cluster]
root       18291   16391  0 12:13 ?        00:00:00 redis-server 0.0.0.0:6382 [cluster]
root       18407   16391  0 12:15 ?        00:00:00 redis-server 0.0.0.0:6383 [cluster]
root       18419   16391  0 12:15 ?        00:00:00 redis-server 0.0.0.0:6384 [cluster]
root       18514   16391  0 12:16 ?        00:00:00 redis-server 0.0.0.0:6385 [cluster]
root       18526   16391  0 12:17 ?        00:00:00 redis-server 0.0.0.0:6386 [cluster]
root       18562   16905  0 12:17 pts/0    00:00:00 grep --color=auto redis
[root@localhost rediscluster]#
接下来需要通过 redis-cli 命令为 6 台机器构建集群关系,其中--cluster-replicas 1 表示为每个 master创建一个 slave 节点
[root@localhost rediscluster]# redis-cli -a 123456 --cluster create --cluster-replicas 1 192.168.133.128:6381 192.168.133.128:6382 192.168.133.128:6383 192.168.133.128:6384 192.168.133.128:6385 192.168.133.128:6386
Warning: Using a password with '-a' or '-u' option on the command line interface may not be safe.
>>> Performing hash slots allocation on 6 nodes...
Master[0] -> Slots 0 - 5460
Master[1] -> Slots 5461 - 10922
Master[2] -> Slots 10923 - 16383
Adding replica 192.168.133.128:6385 to 192.168.133.128:6381
Adding replica 192.168.133.128:6386 to 192.168.133.128:6382
Adding replica 192.168.133.128:6384 to 192.168.133.128:6383
>>> Trying to optimize slaves allocation for anti-affinity
[WARNING] Some slaves are in the same host as their master
M: f13e1eddec988a7332d09bf7e3b7ba6d7d4b25eb 192.168.133.128:6381
   slots:[0-5460] (5461 slots) master
M: 79ea6c1096ae7fcc0e461b54fb77e3b18973db2b 192.168.133.128:6382
   slots:[5461-10922] (5462 slots) master
M: 311f11831b80b9ddc34cc1e9adc6a7bee5c68b31 192.168.133.128:6383
   slots:[10923-16383] (5461 slots) master
S: d38ed488ec9e69437f1af8c9431f523c06677cc1 192.168.133.128:6384
   replicates f13e1eddec988a7332d09bf7e3b7ba6d7d4b25eb
S: 70f412af3f1a30cf6f9ce35a4ee2b5e67c076c54 192.168.133.128:6385
   replicates 79ea6c1096ae7fcc0e461b54fb77e3b18973db2b
S: 4f5f4a02d365f20a571408ad33d3945e5a129679 192.168.133.128:6386
   replicates 311f11831b80b9ddc34cc1e9adc6a7bee5c68b31
Can I set the above configuration? (type 'yes' to accept): yes
>>> Nodes configuration updated
>>> Assign a different config epoch to each node
>>> Sending CLUSTER MEET messages to join the cluster
Waiting for the cluster to join
.
>>> Performing Cluster Check (using node 192.168.133.128:6381)
M: f13e1eddec988a7332d09bf7e3b7ba6d7d4b25eb 192.168.133.128:6381
   slots:[0-5460] (5461 slots) master
   1 additional replica(s)
S: 70f412af3f1a30cf6f9ce35a4ee2b5e67c076c54 192.168.133.128:6385
   slots: (0 slots) slave
   replicates f13e1eddec988a7332d09bf7e3b7ba6d7d4b25eb
M: 79ea6c1096ae7fcc0e461b54fb77e3b18973db2b 192.168.133.128:6382
   slots:[5461-10922] (5462 slots) master
   1 additional replica(s)
M: 311f11831b80b9ddc34cc1e9adc6a7bee5c68b31 192.168.133.128:6383
   slots:[10923-16383] (5461 slots) master
   1 additional replica(s)
S: 4f5f4a02d365f20a571408ad33d3945e5a129679 192.168.133.128:6386
   slots: (0 slots) slave
   replicates 79ea6c1096ae7fcc0e461b54fb77e3b18973db2b
S: d38ed488ec9e69437f1af8c9431f523c06677cc1 192.168.133.128:6384
   slots: (0 slots) slave
   replicates 311f11831b80b9ddc34cc1e9adc6a7bee5c68b31
[OK] All nodes agree about slots configuration.
>>> Check for open slots...
>>> Check slots coverage...
[OK] All 16384 slots covered.
上面输出的信息表示已经创建成功了,也可以进入到目录,创建成功一定会生成 nodes-6381.conf 和 nodes-6382.conf 两个文件
[root@localhost cluster6381_6382]# ll
total 32
drwxr-xr-x. 2 root root  224 Nov  4 12:13 appendonlydir
-rw-r--r--. 1 root root 2866 Nov  4 12:26 cluster6381.log
-rw-r--r--. 1 root root    6 Nov  4 12:13 cluster6381.pid
-rw-r--r--. 1 root root 2866 Nov  4 12:26 cluster6382.log
-rw-r--r--. 1 root root    6 Nov  4 12:13 cluster6382.pid
-rw-r--r--. 1 root root 1201 Nov  4 12:26 nodes-6381.conf
-rw-r--r--. 1 root root 1189 Nov  4 12:26 nodes-6382.conf
-rw-r--r--. 1 root root  429 Nov  4 12:12 rediscluster6381.conf
-rw-r--r--. 1 root root  430 Nov  4 12:13 rediscluster6382.conf
接下来验证一下 redis-cluster 状态,从下面这张图可以看到,我们之前设计的是
6381 主 6382 从
6383 主 6384 从
6385 主 6386 从
但是从 info replication命令执行结果看,不是这样分配的,那我们以实际真实分配的为准

我们还可以用CLUSTER NODES来查看集群节点之间的关系
127.0.0.1:6381> CLUSTER NODES
70f412af3f1a30cf6f9ce35a4ee2b5e67c076c54 192.168.133.128:6385@16385 slave f13e1eddec988a7332d09bf7e3b7ba6d7d4b25eb 0 1699072635747 1 connected
79ea6c1096ae7fcc0e461b54fb77e3b18973db2b 192.168.133.128:6382@16382 master - 0 1699072635000 2 connected 5461-10922
311f11831b80b9ddc34cc1e9adc6a7bee5c68b31 192.168.133.128:6383@16383 master - 0 1699072634521 3 connected 10923-16383
f13e1eddec988a7332d09bf7e3b7ba6d7d4b25eb 192.168.133.128:6381@16381 myself,master - 0 1699072634000 1 connected 0-5460
4f5f4a02d365f20a571408ad33d3945e5a129679 192.168.133.128:6386@16386 slave 79ea6c1096ae7fcc0e461b54fb77e3b18973db2b 0 1699072635540 2 connected
d38ed488ec9e69437f1af8c9431f523c06677cc1 192.168.133.128:6384@16384 slave 311f11831b80b9ddc34cc1e9adc6a7bee5c68b31 0 1699072634000 3 connected
127.0.0.1:6381>
往 Redis-cluster 集群插入数据
直接向下面这样是不行的,n你会发现 k1 不行,k2 可以,因为涉及到哈希槽的路由问题,提示我们应该去 6383 这台节点插入
127.0.0.1:6381> set k1 v1
(error) MOVED 12706 192.168.133.128:6383
127.0.0.1:6381> set k2 v2
OK
127.0.0.1:6381> keys *
1) "k2"
127.0.0.1:6381>
那总不能为了写一个 k1 专门连接一下 6383 节点,这不是太麻烦了吗,莫慌,按如下操作:
[root@localhost rediscluster]# redis-cli -a 123456 -p 6381 -c
Warning: Using a password with '-a' or '-u' option on the command line interface may not be safe.
127.0.0.1:6381> set k1 v1
-> Redirected to slot [12706] located at 192.168.133.128:6383
OK
192.168.133.128:6383>
如何查看某个 key 在哪个槽位呢?cluster keyslot
192.168.133.128:6383> cluster keyslot k1
(integer) 12706
192.168.133.128:6383>
mset、mget 失效问题

redis 集群主从切换
从CLUSTER NODES这个执行结果来看,真实的主从关系是
6381主–> 6385 从
6383主–> 6384 从
6382主–> 6386 从

那我们来验证一下,万一 6381挂了,对应的6385这台从节点会切换为主吗?
127.0.0.1:6381> cluster nodes
70f412af3f1a30cf6f9ce35a4ee2b5e67c076c54 192.168.133.128:6385@16385 slave f13e1eddec988a7332d09bf7e3b7ba6d7d4b25eb 0 1699076544000 1 connected
79ea6c1096ae7fcc0e461b54fb77e3b18973db2b 192.168.133.128:6382@16382 master - 0 1699076544414 2 connected 5461-10922
311f11831b80b9ddc34cc1e9adc6a7bee5c68b31 192.168.133.128:6383@16383 master - 0 1699076545441 3 connected 10923-16383
f13e1eddec988a7332d09bf7e3b7ba6d7d4b25eb 192.168.133.128:6381@16381 myself,master - 0 1699076544000 1 connected 0-5460
4f5f4a02d365f20a571408ad33d3945e5a129679 192.168.133.128:6386@16386 slave 79ea6c1096ae7fcc0e461b54fb77e3b18973db2b 0 1699076544000 2 connected
d38ed488ec9e69437f1af8c9431f523c06677cc1 192.168.133.128:6384@16384 slave 311f11831b80b9ddc34cc1e9adc6a7bee5c68b31 0 1699076544000 3 connected
127.0.0.1:6381> shutdown
not connected> quit
[root@localhost rediscluster]# redis-cli -a 123456 -p 6385 -c
Warning: Using a password with '-a' or '-u' option on the command line interface may not be safe.
127.0.0.1:6385> cluster nodes
79ea6c1096ae7fcc0e461b54fb77e3b18973db2b 192.168.133.128:6382@16382 master - 0 1699076576504 2 connected 5461-10922
f13e1eddec988a7332d09bf7e3b7ba6d7d4b25eb 192.168.133.128:6381@16381 master,fail - 1699076559553 1699076557000 1 disconnected
d38ed488ec9e69437f1af8c9431f523c06677cc1 192.168.133.128:6384@16384 slave 311f11831b80b9ddc34cc1e9adc6a7bee5c68b31 0 1699076577013 3 connected
70f412af3f1a30cf6f9ce35a4ee2b5e67c076c54 192.168.133.128:6385@16385 myself,master - 0 1699076575000 7 connected 0-5460
311f11831b80b9ddc34cc1e9adc6a7bee5c68b31 192.168.133.128:6383@16383 master - 0 1699076576000 3 connected 10923-16383
4f5f4a02d365f20a571408ad33d3945e5a129679 192.168.133.128:6386@16386 slave 79ea6c1096ae7fcc0e461b54fb77e3b18973db2b 0 1699076575000 2 connected
127.0.0.1:6385> info replication
# Replication
role:master
connected_slaves:0
master_failover_state:no-failover
master_replid:86a32dee7a7ac3e209dfe1203f510130113b864c
master_replid2:868d3677b47c561e2a5231c75cc77017421c3e52
master_repl_offset:6311
second_repl_offset:6312
repl_backlog_active:1
repl_backlog_size:1048576
repl_backlog_first_byte_offset:15
repl_backlog_histlen:6297
从上面结果可以看到,6381 挂了,6385 会上位成为主节点
如果 6381 恢复了,会以从节点的身份回归
[root@localhost rediscluster]# redis-server cluster6381_6382/rediscluster6381.conf
[root@localhost rediscluster]# redis-cli -a 123456 -p 6381 -c
Warning: Using a password with '-a' or '-u' option on the command line interface may not be safe.
127.0.0.1:6381> info replication
# Replication
role:slave
master_host:192.168.133.128
master_port:6385
master_link_status:up
master_last_io_seconds_ago:4
master_sync_in_progress:0
slave_read_repl_offset:6339
slave_repl_offset:6339
slave_priority:100
slave_read_only:1
replica_announced:1
connected_slaves:0
master_failover_state:no-failover
master_replid:86a32dee7a7ac3e209dfe1203f510130113b864c
master_replid2:0000000000000000000000000000000000000000
master_repl_offset:6339
second_repl_offset:-1
repl_backlog_active:1
repl_backlog_size:1048576
repl_backlog_first_byte_offset:6326
repl_backlog_histlen:14
redis 主从调整
接着上面,6381挂了后,从节点6385成为了 master,现在6381恢复了,我还想恢复以前的从属关系,6381主–> 6385 从,应该怎么整呢?
很简单,执行CLUSTER FAILOVER命令即可

主从扩容

[root@localhost rediscluster]# ll
total 0
drwxr-xr-x. 3 root root 243 Nov  4 13:53 cluster6381_6382
drwxr-xr-x. 3 root root 263 Nov  4 13:53 cluster6383_6384
drwxr-xr-x. 3 root root 263 Nov  4 13:53 cluster6385_6386
drwxr-xr-x. 2 root root  35 Nov  4 14:00 cluster6387_6388
[root@localhost rediscluster]# redis-server cluster6387_6388/rediscluster6387.conf
[root@localhost rediscluster]# redis-cli -a 123456 --cluster add-node 192.168.133.128:6387 192.168.133.128:6381
Warning: Using a password with '-a' or '-u' option on the command line interface may not be safe.
>>> Adding node 192.168.133.128:6387 to cluster 192.168.133.128:6381
>>> Performing Cluster Check (using node 192.168.133.128:6381)
M: f13e1eddec988a7332d09bf7e3b7ba6d7d4b25eb 192.168.133.128:6381
   slots:[0-5460] (5461 slots) master
   1 additional replica(s)
M: 311f11831b80b9ddc34cc1e9adc6a7bee5c68b31 192.168.133.128:6383
   slots:[10923-16383] (5461 slots) master
   1 additional replica(s)
M: 79ea6c1096ae7fcc0e461b54fb77e3b18973db2b 192.168.133.128:6382
   slots:[5461-10922] (5462 slots) master
   1 additional replica(s)
S: 4f5f4a02d365f20a571408ad33d3945e5a129679 192.168.133.128:6386
   slots: (0 slots) slave
   replicates 79ea6c1096ae7fcc0e461b54fb77e3b18973db2b
S: 70f412af3f1a30cf6f9ce35a4ee2b5e67c076c54 192.168.133.128:6385
   slots: (0 slots) slave
   replicates f13e1eddec988a7332d09bf7e3b7ba6d7d4b25eb
S: d38ed488ec9e69437f1af8c9431f523c06677cc1 192.168.133.128:6384
   slots: (0 slots) slave
   replicates 311f11831b80b9ddc34cc1e9adc6a7bee5c68b31
[OK] All nodes agree about slots configuration.
>>> Check for open slots...
>>> Check slots coverage...
[OK] All 16384 slots covered.
>>> Getting functions from cluster
>>> Send FUNCTION LIST to 192.168.133.128:6387 to verify there is no functions in it
>>> Send FUNCTION RESTORE to 192.168.133.128:6387
>>> Send CLUSTER MEET to node 192.168.133.128:6387 to make it join the cluster.
[OK] New node added correctly.
[root@localhost rediscluster]# redis-cli -a 123456 --cluster check 192.168.133.128:6381
Warning: Using a password with '-a' or '-u' option on the command line interface may not be safe.
192.168.133.128:6381 (f13e1edd...) -> 1 keys | 5461 slots | 1 slaves.
192.168.133.128:6383 (311f1183...) -> 1 keys | 5461 slots | 1 slaves.
192.168.133.128:6382 (79ea6c10...) -> 0 keys | 5462 slots | 1 slaves.
192.168.133.128:6387 (7223a26b...) -> 0 keys | 0 slots | 0 slaves.
[OK] 2 keys in 4 masters.
0.00 keys per slot on average.
>>> Performing Cluster Check (using node 192.168.133.128:6381)
M: f13e1eddec988a7332d09bf7e3b7ba6d7d4b25eb 192.168.133.128:6381
   slots:[0-5460] (5461 slots) master
   1 additional replica(s)
M: 311f11831b80b9ddc34cc1e9adc6a7bee5c68b31 192.168.133.128:6383
   slots:[10923-16383] (5461 slots) master
   1 additional replica(s)
M: 79ea6c1096ae7fcc0e461b54fb77e3b18973db2b 192.168.133.128:6382
   slots:[5461-10922] (5462 slots) master
   1 additional replica(s)
S: 4f5f4a02d365f20a571408ad33d3945e5a129679 192.168.133.128:6386
   slots: (0 slots) slave
   replicates 79ea6c1096ae7fcc0e461b54fb77e3b18973db2b
S: 70f412af3f1a30cf6f9ce35a4ee2b5e67c076c54 192.168.133.128:6385
   slots: (0 slots) slave
   replicates f13e1eddec988a7332d09bf7e3b7ba6d7d4b25eb
S: d38ed488ec9e69437f1af8c9431f523c06677cc1 192.168.133.128:6384
   slots: (0 slots) slave
   replicates 311f11831b80b9ddc34cc1e9adc6a7bee5c68b31
M: 7223a26be4a09d734c74ba584a441f3e1a7d1425 192.168.133.128:6387
   slots: (0 slots) master
[OK] All nodes agree about slots configuration.
>>> Check for open slots...
>>> Check slots coverage...
[OK] All 16384 slots covered.
从上面结果可以看出,6387 已经加入到了集群,但是槽位是空的,那现在就要重新分配下槽位,其它三个主节点都匀一点过来
[root@localhost rediscluster]# redis-cli -a 123456 --cluster reshard 192.168.133.128:6381
Warning: Using a password with '-a' or '-u' option on the command line interface may not be safe.
>>> Performing Cluster Check (using node 192.168.133.128:6381)
M: f13e1eddec988a7332d09bf7e3b7ba6d7d4b25eb 192.168.133.128:6381
   slots:[0-5460] (5461 slots) master
   1 additional replica(s)
M: 311f11831b80b9ddc34cc1e9adc6a7bee5c68b31 192.168.133.128:6383
   slots:[10923-16383] (5461 slots) master
   1 additional replica(s)
M: 79ea6c1096ae7fcc0e461b54fb77e3b18973db2b 192.168.133.128:6382
   slots:[5461-10922] (5462 slots) master
   1 additional replica(s)
S: 4f5f4a02d365f20a571408ad33d3945e5a129679 192.168.133.128:6386
   slots: (0 slots) slave
   replicates 79ea6c1096ae7fcc0e461b54fb77e3b18973db2b
S: 70f412af3f1a30cf6f9ce35a4ee2b5e67c076c54 192.168.133.128:6385
   slots: (0 slots) slave
   replicates f13e1eddec988a7332d09bf7e3b7ba6d7d4b25eb
S: d38ed488ec9e69437f1af8c9431f523c06677cc1 192.168.133.128:6384
   slots: (0 slots) slave
   replicates 311f11831b80b9ddc34cc1e9adc6a7bee5c68b31
M: 7223a26be4a09d734c74ba584a441f3e1a7d1425 192.168.133.128:6387
   slots: (0 slots) master
[OK] All nodes agree about slots configuration.
>>> Check for open slots...
>>> Check slots coverage...
[OK] All 16384 slots covered.
How many slots do you want to move (from 1 to 16384)? 4096
What is the receiving node ID? 7223a26be4a09d734c74ba584a441f3e1a7d1425
Please enter all the source node IDs.
  Type 'all' to use all the nodes as source nodes for the hash slots.
  Type 'done' once you entered all the source nodes IDs.
Source node #1: all
....这后续的输出就不粘贴了
分配完后再用命令redis-cli -a 123456 --cluster check 192.168.133.128:6381检查一下
[root@localhost rediscluster]# redis-cli -a 123456 --cluster check 192.168.133.128:6381
Warning: Using a password with '-a' or '-u' option on the command line interface may not be safe.
192.168.133.128:6381 (f13e1edd...) -> 0 keys | 4096 slots | 1 slaves.
192.168.133.128:6383 (311f1183...) -> 1 keys | 4096 slots | 1 slaves.
192.168.133.128:6382 (79ea6c10...) -> 0 keys | 4096 slots | 1 slaves.
192.168.133.128:6387 (7223a26b...) -> 1 keys | 4096 slots | 0 slaves.
[OK] 2 keys in 4 masters.
0.00 keys per slot on average.
>>> Performing Cluster Check (using node 192.168.133.128:6381)
M: f13e1eddec988a7332d09bf7e3b7ba6d7d4b25eb 192.168.133.128:6381
   slots:[1365-5460] (4096 slots) master
   1 additional replica(s)
M: 311f11831b80b9ddc34cc1e9adc6a7bee5c68b31 192.168.133.128:6383
   slots:[12288-16383] (4096 slots) master
   1 additional replica(s)
M: 79ea6c1096ae7fcc0e461b54fb77e3b18973db2b 192.168.133.128:6382
   slots:[6827-10922] (4096 slots) master
   1 additional replica(s)
S: 4f5f4a02d365f20a571408ad33d3945e5a129679 192.168.133.128:6386
   slots: (0 slots) slave
   replicates 79ea6c1096ae7fcc0e461b54fb77e3b18973db2b
S: 70f412af3f1a30cf6f9ce35a4ee2b5e67c076c54 192.168.133.128:6385
   slots: (0 slots) slave
   replicates f13e1eddec988a7332d09bf7e3b7ba6d7d4b25eb
S: d38ed488ec9e69437f1af8c9431f523c06677cc1 192.168.133.128:6384
   slots: (0 slots) slave
   replicates 311f11831b80b9ddc34cc1e9adc6a7bee5c68b31
M: 7223a26be4a09d734c74ba584a441f3e1a7d1425 192.168.133.128:6387
   slots:[0-1364],[5461-6826],[10923-12287] (4096 slots) master
[OK] All nodes agree about slots configuration.
>>> Check for open slots...
>>> Check slots coverage...
[OK] All 16384 slots covered.
仔细看看上面 6387的槽位分布,为什么是 3 段呢?
![]()
为新增的 6387 节点挂载一个从节点

主从缩容
上面不是加了 6387 节点并分配了槽位吗,那现在要把这台节点下线,要怎么整?如果 6387 有一从节点 6388,直接使用下面命令删除即可
redis-cli -a 123456 --cluster del-node 192.168.133.128:6388 <6388节点实例编号>
但是 6387 是主节点,分配了槽位,不能直接删,会报错
[root@localhost rediscluster]# redis-cli -a 123456 --cluster del-node 192.168.133.128:6387 7223a26be4a09d734c74ba584a441f3e1a7d1425
Warning: Using a password with '-a' or '-u' option on the command line interface may not be safe.
>>> Removing node 7223a26be4a09d734c74ba584a441f3e1a7d1425 from cluster 192.168.133.128:6387
[ERR] Node 192.168.133.128:6387 is not empty! Reshard data away and try again.
得先把槽位清空,重新分配,这里我们把清出来的槽位给 6381
[root@localhost rediscluster]# redis-cli -a 123456 --cluster reshard 192.168.133.128:6381
Warning: Using a password with '-a' or '-u' option on the command line interface may not be safe.
>>> Performing Cluster Check (using node 192.168.133.128:6381)
M: f13e1eddec988a7332d09bf7e3b7ba6d7d4b25eb 192.168.133.128:6381
   slots:[1365-5460] (4096 slots) master
   1 additional replica(s)
M: 311f11831b80b9ddc34cc1e9adc6a7bee5c68b31 192.168.133.128:6383
   slots:[12288-16383] (4096 slots) master
   1 additional replica(s)
M: 79ea6c1096ae7fcc0e461b54fb77e3b18973db2b 192.168.133.128:6382
   slots:[6827-10922] (4096 slots) master
   1 additional replica(s)
S: 4f5f4a02d365f20a571408ad33d3945e5a129679 192.168.133.128:6386
   slots: (0 slots) slave
   replicates 79ea6c1096ae7fcc0e461b54fb77e3b18973db2b
S: 70f412af3f1a30cf6f9ce35a4ee2b5e67c076c54 192.168.133.128:6385
   slots: (0 slots) slave
   replicates f13e1eddec988a7332d09bf7e3b7ba6d7d4b25eb
S: d38ed488ec9e69437f1af8c9431f523c06677cc1 192.168.133.128:6384
   slots: (0 slots) slave
   replicates 311f11831b80b9ddc34cc1e9adc6a7bee5c68b31
M: 7223a26be4a09d734c74ba584a441f3e1a7d1425 192.168.133.128:6387
   slots:[0-1364],[5461-6826],[10923-12287] (4096 slots) master
[OK] All nodes agree about slots configuration.
>>> Check for open slots...
>>> Check slots coverage...
[OK] All 16384 slots covered.
How many slots do you want to move (from 1 to 16384)? 4096
What is the receiving node ID? f13e1eddec988a7332d09bf7e3b7ba6d7d4b25eb (6381节点id)
Please enter all the source node IDs.
  Type 'all' to use all the nodes as source nodes for the hash slots.
  Type 'done' once you entered all the source nodes IDs.
Source node #1: 7223a26be4a09d734c74ba584a441f3e1a7d1425 (6387节点id)
Source node #2: done
....剩下来的就不粘贴了。。
再次检查下集群情况:会发现 6381 有两个 slave,6387 的slot是空的了
[root@localhost rediscluster]# redis-cli -a 123456 --cluster check 192.168.133.128:6381
Warning: Using a password with '-a' or '-u' option on the command line interface may not be safe.
192.168.133.128:6381 (f13e1edd...) -> 1 keys | 8192 slots | 2 slaves.
192.168.133.128:6383 (311f1183...) -> 1 keys | 4096 slots | 1 slaves.
192.168.133.128:6382 (79ea6c10...) -> 0 keys | 4096 slots | 1 slaves.
[OK] 2 keys in 3 masters.
0.00 keys per slot on average.
>>> Performing Cluster Check (using node 192.168.133.128:6381)
M: f13e1eddec988a7332d09bf7e3b7ba6d7d4b25eb 192.168.133.128:6381
   slots:[0-6826],[10923-12287] (8192 slots) master
   2 additional replica(s)
M: 311f11831b80b9ddc34cc1e9adc6a7bee5c68b31 192.168.133.128:6383
   slots:[12288-16383] (4096 slots) master
   1 additional replica(s)
M: 79ea6c1096ae7fcc0e461b54fb77e3b18973db2b 192.168.133.128:6382
   slots:[6827-10922] (4096 slots) master
   1 additional replica(s)
S: 4f5f4a02d365f20a571408ad33d3945e5a129679 192.168.133.128:6386
   slots: (0 slots) slave
   replicates 79ea6c1096ae7fcc0e461b54fb77e3b18973db2b
S: 70f412af3f1a30cf6f9ce35a4ee2b5e67c076c54 192.168.133.128:6385
   slots: (0 slots) slave
   replicates f13e1eddec988a7332d09bf7e3b7ba6d7d4b25eb
S: d38ed488ec9e69437f1af8c9431f523c06677cc1 192.168.133.128:6384
   slots: (0 slots) slave
   replicates 311f11831b80b9ddc34cc1e9adc6a7bee5c68b31
S: 7223a26be4a09d734c74ba584a441f3e1a7d1425 192.168.133.128:6387
   slots: (0 slots) slave
   replicates f13e1eddec988a7332d09bf7e3b7ba6d7d4b25eb
[OK] All nodes agree about slots configuration.
>>> Check for open slots...
>>> Check slots coverage...
[OK] All 16384 slots covered.
最后,再来删除 6387,完美!
[root@localhost rediscluster]# redis-cli -a 123456 --cluster del-node 192.168.133.128:6387 7223a26be4a09d734c74ba584a441f3e1a7d1425
Warning: Using a password with '-a' or '-u' option on the command line interface may not be safe.
>>> Removing node 7223a26be4a09d734c74ba584a441f3e1a7d1425 from cluster 192.168.133.128:6387
>>> Sending CLUSTER FORGET messages to the cluster...
>>> Sending CLUSTER RESET SOFT to the deleted node.
[root@localhost rediscluster]#
集群是否完整才能对外提供服务?


SpringBoot 整合 Redis
直接看视频吧:https://www.bilibili.com/video/BV13R4y1v7sP?p=98&spm_id_from=pageDriver&vd_source=c3fc4867486b99c0b85501121f575279