Springboot系列-@ControllerAdvice使用
Springboot系列-@ControllerAdvice使用
前言:在SpringMVC中对于@ControllerAdvice这个注解,我们比较熟知的用法是结合@ExceptionHandler用于全局异常的处理,在springboot中@ControllerAdvice 也有广泛的使用场景
很多学过springboot的人可能都没有听说过这个注解,实际上,这是一个非常有用的注解,此注解其实是一个增强的 Controller;使用这个 Controller ,可实现三个方面的功能,因为这是SpringMVC提供的功能,所以可以在springboot中直接使用:
- 全局异常处理 (@ExceptionHandler)
- 全局数据绑定 (@InitBinder)
- 全局数据预处理 (@ModelAttribute)
1.全局异常处理
使用 @ControllerAdvice 实现全局异常处理,只需要定义类,添加该注解即可定义方式如下:
@ControllerAdvice
public class GlobalExceptionHandler {
    @ExceptionHandler(Exception.class)
    public ModelAndView customException(Exception e){
        ModelAndView mv = new ModelAndView();
        mv.addObject("message",e.getMessage());
        mv.setViewName("error");
        return mv;
    }
}
在该类中可以定义多个异常处理方法,不同方法处理不同的异常,例如空指针、数据越界、非法参数异常等;@ExceptionHandler 注解用来指明异常的处理类型,即如果这里指定为 NullpointerException,则数组越界异常就不会进到这个方法中来…
说道全局异常处理,我们再来说下在springboot中的全局异常处理,我们可以使用上述的注解@ControllerAdvice,同时也可以自定义异常处理方案,比如我们的异常页面如下:

从以上异常页面可以看出,开发者没有提供一个/error路径,所以才显示此页面,那么在springboot中如何自定义error页面呢?总的来说可以分为定义静态页面和动态页面两种:
静态异常页面
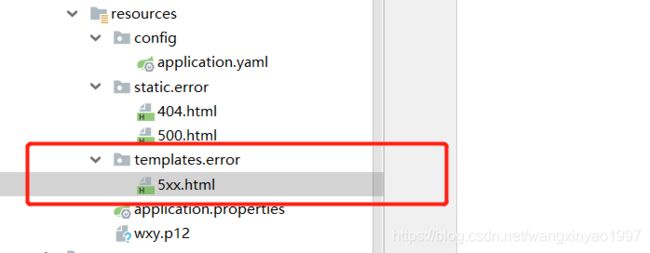
自定义静态异常页面也分为两种,第一种使用HTTP响应码来命名页面如404.html,405.html ; 还有一种是直接定义一个 4xx.html来表示400-499的状态都显示这个页面。默认是在 classpath:/static/error/ 路径下定义相关页面:
启动项目,如果项目抛出 500 请求错误,就会自动展示 500.html 这个页面, 404 就会展示 404.html 页面。如果异常展示页面既存在 5xx.html,也存在 500.html ,如果发生500异常时,优先展示 500.html 页面
动态异常页面
动态异常页面定义方式和静态基本一致,可使用页面模板如 jsp、freemarker、thymeleaf等,动态异常页面,也支持 404.html 或者 4xx.html ,但是一般来说,由于动态异常页面可以直接展示异常详细信息,所以直接定义 4xx.html或者 5xx.html 即可。
页面定义如下:
5xx.html内容如下:
    5XX


            path


            error


            message


            timestamp


            status
在此访问localhost:8080/hello错误异常请求,展示如下:
如果动态页面和静态页面同时定义了异常处理页面,例如 classpath:/static/error/404.html 和 classpath:/templates/error/404.html 同时存在时,默认使用动态页面,即错误查找流程应为:发生了 500 错误–>查找动态 500.html 页面–>查找静态 500.html --> 查找动态 5xx.html–>查找静态 5xx.html
自定义异常数据
默认情况下,在springboot中,所有异常数据就是上图所展示五条数据,可以在org.springframework.boot.web.reactive.error.DefaultErrorAttributes 类中查看:
@Override
public Map getErrorAttributes(ServerRequest request,
                boolean includeStackTrace) {
        Map errorAttributes = new LinkedHashMap<>();
        errorAttributes.put("timestamp", new Date());
        errorAttributes.put("path", request.path());
        Throwable error = getError(request);
        HttpStatus errorStatus = determineHttpStatus(error);
        errorAttributes.put("status", errorStatus.value());
        errorAttributes.put("error", errorStatus.getReasonPhrase());
        errorAttributes.put("message", determineMessage(error));
        handleException(errorAttributes, determineException(error), includeStackTrace);
        return errorAttributes;
}
以上在开发者没有自定义的情况下默认展示的错误异常处理数据,那么开发者自定义ErrorAttributes也有两种方式:
- 直接实现 ErrorAttributes接口
- 继承 DefaultErrorAttributes(推荐),因为 DefaultErrorAttributes 中对异常数据的处理已经完成,可以直接使用
具体定义如下:
@Component
public class MyErrorAttributes extends DefaultErrorAttributes {
    @Override
    public Map getErrorAttributes(WebRequest webRequest, boolean includeStackTrace) {
        Map map = super.getErrorAttributes(webRequest, includeStackTrace);
        if((Integer) map.get("status")==500){
            map.put("msg","服务器内部错误");
        }
        return map;
    }
}
定义好的 ErrorAttributes 要注册成一个 Bean ,Spring Boot 就不会使用默认的 DefaultErrorAttributes 了,运行结果如下:
2.全局数据绑定
全局数据绑定功能可以用来做一些初始化的数据操作,可以将一些公共数据定义在添加了 @ControllerAdvice 注解的类中,从而在每一个 Controller 的接口中,就都能够访问导致这些数据,定义如下:
@ControllerAdvice
public class GlobalExceptionHandler1{
    @ModelAttribute(name = "wxy")
    public Map data(){
        HashMap map = new HashMap<>();
        map.put("age", 18);
        map.put("sex", "男");
        return map;
    }
}
使用 @ModelAttribute 注解标记该方法的返回数据是一个全局数据,默认情况下全局数据的 key 就是返回的变量名,value 就是方法返回值,开发者可以通过 @ModelAttribute 注解的 name 属性去重新指定 key
定义完成后,在任何一个Controller 的接口中,都可以获取到这里定义的数据:
@RestController
public class StartController {
    @GetMapping("/share")
    public void hello(Model model) {
        Map map = model.asMap();
        System.out.println(map);
    }
}
![]()
3.全局数据预处理
先定义两个实体类
public class Book {
    private String name;
    private Double price;
}


public class Author {
    private String name;
    private Integer age;

}
定义一个数据添加接口
@PostMapping("/book")
public void addBook(Book book, Author author) {
    System.out.println(book);
    System.out.println(author);
}
此时添加操作就出现一个小问题,因为两个实体类都有一个 name 属性,从前端传递时 ,无法区分;此时就需要通过 @ControllerAdvice 的全局数据预处理来解决这个问题,解决如下:
1.接口变量取别名
@PostMapping("/book")
public void addBook(@ModelAttribute("b") Book book ,@ModelAttribute("a") Author author) {
    System.out.println(book);
    System.out.println(author);
}
2.进行请求数据预处理,在 @ControllerAdvice 标记的类中添加如下代码
@InitBinder("b")
public void b(WebDataBinder binder) {
    binder.setFieldDefaultPrefix("b.");
}
@InitBinder("a")
public void a(WebDataBinder binder) {
    binder.setFieldDefaultPrefix("a.");
}
@InitBinder(“b”) 注解表示该方法用来处理和Book和相关的参数,在方法中,给参数添加一个 b 前缀,即请求参数要有b前缀
3.发送请求,请求发送时,通过给不同对象的参数添加不同的前缀,可以实现参数的区分.
结语:以上就是关于在Springboot中@ControllerAdvice的几种用法以及在springboot中如何进行全局异常处理的操作


