从零开始搭建微服务:微服务间调用
微服务之间调用可通过Spring Cloud Feign来完成,Spring Cloud Feign内部整合了Spring Cloud Ribbon和Spring Cloud Hystrix,所以它具有客户端负载均衡和服务容错的功能。
Feign微服务间调用
以演示elsa-server-demo内部调用elsa-server-system提供的REST服务为例讲解。
被调用端测试接口
我们在elsa-server-system模块的TestController里新增一个方法,供elsa-server-demo远程调用演示:
@RestController
public class TestController {

    @GetMapping("hello")
    public String hello(String name) {
        return "hello" + name;
    }
    ......
}
调用端配置
引入Feign依赖
因为Feign在多个微服务系统里都需要用到,所以我们在他们共有的通用模块elsa-common的pom里引入Feign依赖:
<dependency>
    <groupId>org.springframework.cloudgroupId>
    <artifactId>spring-cloud-starter-openfeignartifactId>
dependency>
调用端入口类
在elsa-server-demo模块的入口类ElsaServerDemoApplication上使用@EnableFeignClients注解标注,开启Feign Client功能:
@EnableDiscoveryClient
@SpringBootApplication
@EnableGlobalMethodSecurity(prePostEnabled = true)	//表示开启Spring Cloud Security权限注解
@EnableElsaAuthExceptionHandler
@EnableFeignClients	//开启Feign Client功能
public class ElsaServerDemoApp{
    public static void main(String[] args) {
        SpringApplication.run(ElsaServerDemoApp.class, args);
    }
}
调用接口
要在elsa-server-demo模块里通过Feign调用elsa-server-system的/hello服务很简单,只需要定义一个Feign Client接口即可。在elsa-server-demo模块的com.elsa.server.demo路径下新建service包,在该包下新建IHelloService:
@FeignClient(value = ElsaServerConstant.ELSA_SERVER_SYSTEM, contextId = "helloServiceClient", fallbackFactory = HelloServiceFallback.class)
public interface IHelloService {
    @GetMapping("hello")
    String hello(@RequestParam("name") String name);
}
IHelloService上通过@FeignClient注解标注表明这是一个Feign Client,该注解的属性含义如下:
- value指定远程服务的名称,这个名称对应febs-server-system模块配置文件application.yml里spring.application.name的配置,即注册到Eureka里的服务名称;
- contextId指定这个Feign Client的别名,当我们定义了多个Feign
Client并且value值相同(即调用同一个服务)的时候,需要手动通过contextId设置别名,否则程序将抛出异常; - fallbackFactory指定了回退方法,当我们调用远程服务出现异常时,就会调用这个回退方法。fallback也可以指定回退方法,但fallbackFactory指定的回退方法里可以通过Throwable对象打印出异常日志,方便分析问题。
微服务名称常量类
上面代码中,我们使用到ElsaServerConstant微服务名称常量类。
因为可能在其他微服务里使用,我们在elsa-common模块下的com.elsa.common.entity目录下新建ElsaServerConstant:
public class ElsaServerConstant {
    public static final String ELSA_AUTH = "Elsa-Auth";
    public static final String ELSA_GATEWAY = "Elsa-Gateway";
    public static final String ELSA_REGISTER = "Elsa-Register";
    public static final String ELSA_SERVER_SYSTEM= "Elsa-Server-System";
    public static final String ELSA_SERVER_DEMO= "Elsa-Server-Demo";
}
HelloServiceFallback异常回调类
在IHelloService接口里指定了fallbackFactory异常回调类,当调用远程服务出现异常时,就会调用这个类里的回退方法。
@Component
public class HelloServiceFallback implements FallbackFactory<IHelloService> {
	private Logger log = LoggerFactory.getLogger(this.getClass());
	@Override
    public IHelloService create(Throwable throwable) {
		//函数式编程Lambda表达式方式
        return name -> {
            log.error("调用elsa-server-system服务出错", throwable);
            return "调用出错";
        };
    }
}
application.yml配置
要让Feign的回退生效,需要在配置文件application.yml里添加如下配置:
feign:
  hystrix:
    enabled: true
因为Feign的回退功能是基于Hystrix实现的,所以需要开启它。
调用接口测试类DemoController
使用Feign Client很简单,主要注入IHelloService,然后通过实例.方法名即可调用。
@RestController
public class DemoController {

    @Autowired
    private IHelloService helloService;
    //Feign调用测试
    @GetMapping("hello")
    public String hello(String name){
        return this.helloService.hello(name);
    }
    ......
}
配置到这里,如果没有认证授权,微服务之间就可以直接调用了,但是,因为服务被调用需要请求令牌才可以正常调用,否则会抛异常,有兴趣的可以演示下。
为了解决这个问题,就需要在服务间调用时将请求令牌一起携带过去。
解决服务间请求头无令牌问题
要解决上面的问题也很简单,只需要拦截Feign请求,手动往请求头上加入令牌即可。
在elsa-common模块的com.elsa.common.configure路径下新建ElsaOAuth2FeignConfigure配置类,在该配置类里注册一个Feign请求拦截器:
public class ElsaOAuth2FeignConfigure {
	@Bean
	public RequestInterceptor oauth2FeignRequestInterceptor() {
		return requestTemplate -> {
			Object details = SecurityContextHolder.getContext().getAuthentication().getDetails();
			if (details instanceof OAuth2AuthenticationDetails) {
				String authorizationToken = ((OAuth2AuthenticationDetails) details).getTokenValue();
				requestTemplate.header(HttpHeaders.AUTHORIZATION, "bearer " + authorizationToken);
			}
		};
	}
}
上面代码中,我们通过SecurityContextHolder从请求上下文中获取了OAuth2AuthenticationDetails类型对象,并通过该对象获取到了请求令牌,然后在请求模板对象requestTemplate的头部手动将令牌添加上去。
此外,因为上面我们在elsa-server-demo的配置文件里添加了feign.hystrix.enabled:true开启了hystrix熔断机制,要让上面的请求拦截器能够顺利获取到令牌,还需要在elsa-server-demo的配置文件里添加如下配置:
hystrix:
  shareSecurityContext: true
hystrix.shareSecurityContext=true配置把SecurityContext对象从你当前主线程传输到Hystrix线程。
这段配置需要Hystrix依赖,我们在elsa-common的pom里添加该依赖:
<dependency>
    <groupId>org.springframework.cloudgroupId>
    <artifactId>spring-cloud-starter-netflix-hystrixartifactId>
dependency>
接着定义一个@Enable类型注解,让该配置类ElsaOAuth2FeignConfigure生效。在elsa-common模块的com.elsa.common.annotation路径下新建@EnableElsaOauth2FeignClient注解,在该注解里引入ElsaOAuth2FeignConfigure配置类:
@Target({ElementType.TYPE})
@Retention(RetentionPolicy.RUNTIME)
@Documented
@Import(ElsaOAuth2FeignConfigure.class)
public @interface EnableElsaOauth2FeignClient {

}
在elsa-server-demo模块的入口类上使用@EnableElsaOauth2FeignClient注解标注,然后重启elsa-server-demo模块。再次使用PostMan发送 localhost:8301/test/hello GET请求:
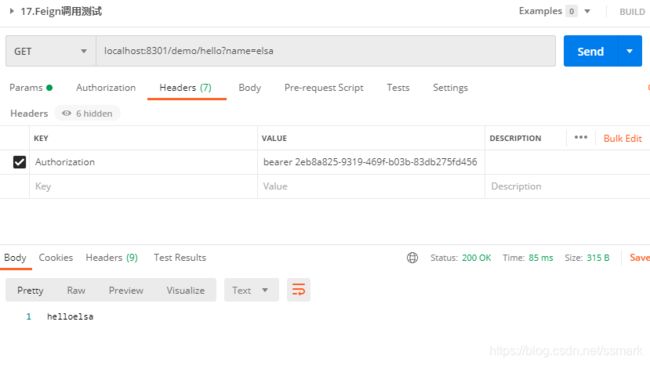
可以看到,elsa-server-demo服务调用elsa-server-system服务已经成功。
源码下载
源码地址:微服务间调用