springboot集成MySQL怎么换_SpringBoot集成Mybatis的实现步骤
通过 SpringBoot +MyBatis 实现对数据库学生表的查询操作
一、实现步骤
新建一个09-springboot-web-mybatis项目,方式和之前一样,基于springboot的
1. 准备数据库
新建一个数据库springboot,指定字符编码集utf-8,并创建数据表
表名为:t_student,并插入几条数据
2. 在pom.xml 中添加相关 jar 依赖
org.mybatis.spring.boot
mybatis-spring-boot-starter
2.0.0
mysql
mysql-connector-java
5.1.9
3. 在Springboot的核心配置文件 application.properties 中配置数据源
注意mysql的版本差别
#配置内嵌 Tomcat 端口号
server.port=9090
#配置项目上下文根
server.servlet.context-path=/09-springboot-web-mybatis
#配置数据库的连接信息
#注意这里的驱动类有变化,这是mysql8.0
#spring.datasource.driver-class-name=com.mysql.cj.jdbc.Driver
#spring.datasource.url=jdbc:mysql://localhost:3306/springboot?useUnicode=true&characterEncoding=UTF-8&useJDBCCompliantTimezoneShift=true&useLegacyDatetimeCode=false&serverTimezone=GMT%2B8
#我用的mysql5.7
spring.datasource.driver-class-name=com.mysql.jdbc.Driver
spring.datasource.url=jdbc:mysql://localhost:3306/springboot
spring.datasource.username=root
spring.datasource.password=123456
4. 开发代码
1. 使用 Mybatis 反向工程生成接口、映射文件以及实体 bean,具体看下面的介绍
2. 在 service 包下创建 service 接口并编写代码
package com.md.springboot.service;
import com.md.springboot.model.Student;
/**
* @author MD
* @create 2020-08-21 9:42
*/
public interface StudentService {
/**
* 根据学生id查询学生信息
* @param id
* @return
*/
Student queryStudentById(Integer id);
}
3. 在 service.impl 包下创建 service 接口并编写代码
package com.md.springboot.service.impl;
import com.md.springboot.mapper.StudentMapper;
import com.md.springboot.model.Student;
import com.md.springboot.service.StudentService;
/**
* @author MD
* @create 2020-08-21 9:43
*/
@Service
public class StudentServiceImpl implements StudentService {
@Autowired
private StudentMapper studentMapper;
@Override
public Student queryStudentById(Integer id) {
return studentMapper.selectByPrimaryKey(id);
}
}
4. 在 web 包下创建 StudentController 并编写代码
package com.md.springboot.web;
import com.md.springboot.model.Student;
import com.md.springboot.service.StudentService;
import org.springframework.beans.factory.annotation.Autowired;
import org.springframework.stereotype.Controller;
import org.springframework.web.bind.annotation.RequestMapping;
import org.springframework.web.bind.annotation.ResponseBody;
/**
* @author MD
* @create 2020-08-21 9:40
*/
@Controller
public class StudentController {
@Autowired
private StudentService studentService;
@RequestMapping(value = "/student")
@ResponseBody
public Object student(){
Student student = studentService.queryStudentById(3);
return student;
}
}
5. 在 Mybatis 反向工程生成的 StudentMapper 接口上加一个 Mapper 注解
@Mapper 作用:mybatis 自动扫描数据持久层的映射文件及 DAO 接口的关系
// 扫描dao接口到spring容器
@Mapper
public interface StudentMapper {
int deleteByPrimaryKey(Integer id);
int insert(Student record);
int insertSelective(Student record);
Student selectByPrimaryKey(Integer id);
int updateByPrimaryKeySelective(Student record);
int updateByPrimaryKey(Student record);
}
6. 注意:默认情况下,Mybatis 的 xml 映射文件不会编译到 target 的 class 目录下,所
以我们需要在 pom.xml 文件中配置 resource
src/main/java
**/*.xml
5. 启动
二、DAO 其它开发方式
1. 在运行的主类上添加注解包扫描
@MapperScan("com.md.springboot.mapper")
此时就可以注释掉 StudentMapper 接口上的@Mapper 注解
//@Mapper
public interface StudentMapper {
在运行主类 Application 上加@MapperScan("com.md.springboot.mapper")
@SpringBootApplication
//Mybatis 提供的注解:扫描数据持久层的 mapper 映谢配置文件,DAO 接口上就不用加@Mapper
@MapperScan("com.md.springboot.mapper")
public class Application {
2. 将接口和映射文件分开
因为 SpringBoot 不能自动编译接口映射的 xml 文件,还需要手动在 pom 文件中指定,
还可以直接将映射文件直接放到 resources 目录下,这样就不用手动在pom文件中指定了
在 resources 目录下新建目录 mapper 存放映射文件,将 StudentMapper.xml 文件移到 resources/mapper 目录下
在 application.properties 配置文件中指定映射文件的位置,这个配置只有接口和映射文件不在同一个包的情况下,才需要指定
# 指定 Mybatis 映射文件的路径
mybatis.mapper-locations=classpath:mapper/*.xml
三、Spring Boot 事务支持
Spring Boot 使用事务非常简单,底层依然采用的是 Spring 本身提供的事务管理
在入口类中使用注解 @EnableTransactionManagement 开启事务支持
在访问数据库的 Service 方法上添加注解 @Transactional 即可
1. 在 StudentService 接口中添加更新学生方法
/**
* 根据学生的id更新学生信息
* @param student
* @return
*/
int modifyStudentById(Student student);
2. 在 StudentServiceImpl 接口实现类
对更新学生方法进行实现,并构建一个异常,同时在该方法上加@Transactional 注解
@Override
@Transactional // 添加这个注解说明该方法添加了事务管理
public int modifyStudentById(Student student) {
int updateCount = studentMapper.updateByPrimaryKeySelective(student);
System.out.println("更新结果:"+updateCount);
// 用于测试事务是否有效
int a = 10 / 0;
return updateCount;
}
3. 在StudentController 中添加更新学生的方法
@RequestMapping(value = "/modify")
@ResponseBody
public Object modifyStudent(){
int count = 0;
try {
Student student = new Student();
student.setId(1);
student.setName("tim");
student.setAge(30);
count = studentService.modifyStudentById(student);
} catch (Exception e) {
e.printStackTrace();
return "fail";
}
return count;
}
4. 在Application 类
@EnableTransactionManagement 可选,但是 业务方法上 必须添加@Transactional 事务才生效
@SpringBootApplication
@MapperScan("com.md.springboot.mapper")
@EnableTransactionManagement //开启事务支持(可选项,但@Transactional 必须添加)
public class Application {
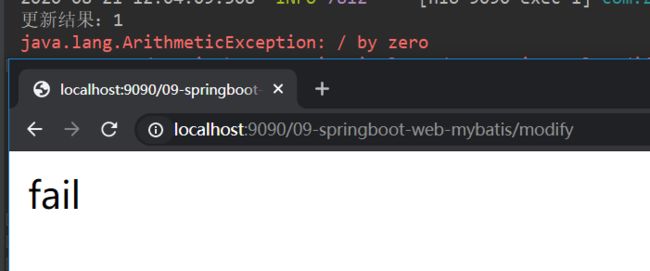
5. 启动
此时就生效了,数据库没有任何改变
6. 去掉注解
注释掉 StudentServiceImpl 上的@Transactional 测试
数据库的数据被更新
四、SpringBoot 工程下使用 Mybatis 反向工程
1. 拷贝 Mybatis 反向工程配置文件到项目的根目录下
2. 根据项目及表的情况,修改 GeneratorMapper.xml 配置如果使用 高版本 , 驱动类变为:com.mysql.cj.jdbc.Driverurl 后面应该加属性 nullCatalogMeansCurrent=true ,否则生成有问题
当前版本 MySQL 数据库为 5.7
主要根据注释来修改自己的内容
/p>
PUBLIC "-//mybatis.org//DTD MyBatis Generator Configuration 1.0//EN"
"http://mybatis.org/dtd/mybatis-generator-config_1_0.dtd">
connectionURL="jdbc:mysql://localhost:3306/springboot"
userId="root"
password="123456">
targetProject="src/main/java">
targetProject="src/main/java">
targetPackage="com.md.springboot.mapper" targetProject="src/main/java">
enableCountByExample="false"
enableUpdateByExample="false"
enableDeleteByExample="false"
enableSelectByExample="false"
selectByExampleQueryId="false"/>
此时会报错,如下
这个时候可以不用理会,项目也是会正常运行的,当然也可以这样
添加之后就不会报红了
3. 在pom.xml 文件中添加 mysql 反向工程依赖
org.mybatis.generator
mybatis-generator-maven-plugin
1.3.6
GeneratorMapper.xml
true
true
4. 双击生成相关文件
5. 生成的文件
自动生成model/Student、实体类
以及StudentMapper,接口
StudentMapper.xml 具体对数据库的操作
这样方便我们使用,具体的下面详细介绍,注意看注释
Student
package com.md.springboot.model;
public class Student {
private Integer id;
private String name;
private Integer age;
public Integer getId() {
return id;
}
public void setId(Integer id) {
this.id = id;
}
public String getName() {
return name;
}
public void setName(String name) {
this.name = name;
}
public Integer getAge() {
return age;
}
public void setAge(Integer age) {
this.age = age;
}
}
StudentMapper
package com.md.springboot.mapper;
import com.md.springboot.model.Student;
public interface StudentMapper {
int deleteByPrimaryKey(Integer id);
int insert(Student record);
int insertSelective(Student record);
Student selectByPrimaryKey(Integer id);
int updateByPrimaryKeySelective(Student record);
int updateByPrimaryKey(Student record);
}
StudentMapper.xml
id, name, age
select
from t_student
where id = #{id,jdbcType=INTEGER}
delete from t_student
where id = #{id,jdbcType=INTEGER}
insert into t_student (id, name, age
)
values (#{id,jdbcType=INTEGER}, #{name,jdbcType=VARCHAR}, #{age,jdbcType=INTEGER}
)
insert into t_student
id,
name,
age,
#{id,jdbcType=INTEGER},
#{name,jdbcType=VARCHAR},
#{age,jdbcType=INTEGER},
update t_student
name = #{name,jdbcType=VARCHAR},
age = #{age,jdbcType=INTEGER},
where id = #{id,jdbcType=INTEGER}
update t_student
set name = #{name,jdbcType=VARCHAR},
age = #{age,jdbcType=INTEGER}
where id = #{id,jdbcType=INTEGER}
到此这篇关于SpringBoot集成Mybatis的实现步骤的文章就介绍到这了,更多相关SpringBoot集成Mybatis内容请搜索脚本之家以前的文章或继续浏览下面的相关文章希望大家以后多多支持脚本之家!


