29 获取ApplicationContext
1 获取ApplicationContext
Spring工厂的直接获取(两种方式 1 和 2 )
1 //applicationContext.xml 在WEB-INF下
ApplicationContext ac = new FileSystemXmlApplicationContext("applicationContext.xml");
2 //applicationContext.xml 在 src下
ApplicationContext ac = new ClassPathXmlApplicationContext("applicationContext.xml");
3 //其他方式
ApplicationContext ac = WebApplicationContextUtils.getWebApplicationContext(servletContext);
//容器中获得
ApplicationContext ac = WebApplicationContextUtils.getWebApplicationContext(servletContext);
//文件存放绝对路径
ApplicationContext ac = new FileSystemXmlApplicationContext("applicationContext.xml");
//工程的classpath;
//ApplicationContext ac = new FileSystemXmlApplicationContext("applicationContext.xml");
ApplicationContext ac = new ClassPathXmlApplicationContext("applicationContext.xml");
如何选择:
如果applicationContext.xml 在 src下, ClassPathXmlApplication读取
如果applicationContext.xml 在WEB-INF下,FileSystemXmlApplicationContext读取
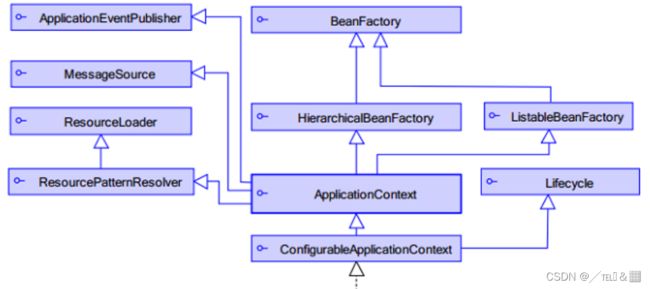
ApplicationContext直译为应用上下文,是用来加载Spring框架配置文件,来构建Spring的工厂对象,它也称之为Spring容器的上下文对象,也称之为Spring的容器。
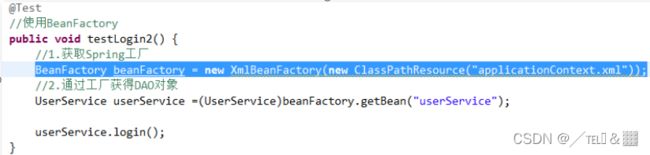
ApplicationContext 只是BeanFactory(Bean工厂,Bean就是一个java对象) 一个子接口:
 为什么不直接使用顶层接口对象来操作呢?
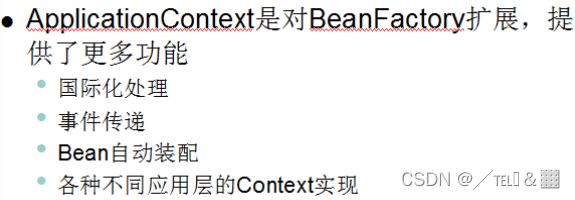
ApplicationContext 更加强大, 所以现在开发基本没人使用BeanFactory。
提示:后面还有个FactoryBean,注意区别。
2 bean获取的两种方式(还有其他方式)
常用根据名称获取(id/name)

3 IoC容器装配Bean_基于XML配置方式
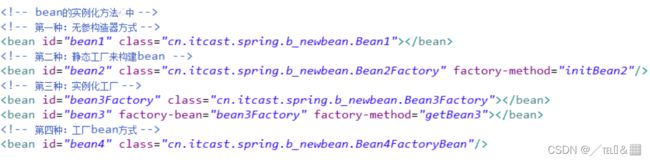
实例化Bean的四种方式 (了解)
第一种 无参数构造器 (最常用)
//bean的对象就是普通的pojo
public class Bean1 {
	//无参构造方式来实例化bean对象

	//如果覆盖了无参构造,那么默认情况下会报错
	private String name;
	/*public Bean1(String name) {
		this.name = name;
	}*/
}
对应的applicationContext.xml
第二种 静态工厂方法
//bean的对象就是普通的pojo
public class Bean2 {

        ...
        ...
        ...

}
//静态工厂:提供了一个静态方法来实例化bean
public class Bean2Factory {
//该静态方法,用来获取bean2的对象
public static Bean2 getBean2(){
//定制自己的工厂:你可以在初始化这个bean的时候,做一些其他的事情(初始化数据库连接、初始化一些依赖的东西)-更灵活
return new Bean2();
}
}对应的applicationContext.xml
第三种 实例工厂方法
//bean的对象就是普通的pojo
public class Bean3 {

        ...
        ...
        ...

}
//实例工厂,编写一个普通方法用来初始化bean对象
public class Bean3Factory {
public Bean3 getBean3(){
//定制工厂:初始化一些数据等
//这里可以在new Bean3之前做很多逻辑判断
//比如判断new 哪个子对象
return new Bean3();
}
}对应的applicationContext.xml
第四种:FactoryBean方式。(源码底层用的多)
//bean的对象就是普通的pojo
public class Bean4 {

        ...
        ...
        ...

}
//工厂bean的方式实例化bean,泛型就是要实例化的对象类型
public class Bean4FactoryBean implements FactoryBean{
@Override
//获取实例化对象,配置bean,得到的对象就从这里来的
public Bean4 getObject() throws Exception {
//初始化一些其他数据
return new Bean4();//返回了具体的bean对象
}
@Override
public Class getObjectType() {
return null;
}
@Override
public boolean isSingleton() {
return false;
}
} 对应的applicationContext.xml
小总结:
完整applicationContext.xml
			凯迪拉克


				qqq
				www


				1
				2


				value1
				value2
【面试题】 BeanFactory和FactoryBean的区别?
BeanFactory:是一个工厂(其实是构建了一个spring上下文的环境,容器),用来管理和获取很多Bean对象,
FactoryBean:是一个Bean生成工具,是用来获取一种类型对象的Bean,它是构造Bean实例的一种方式。
4 Bean的作用域
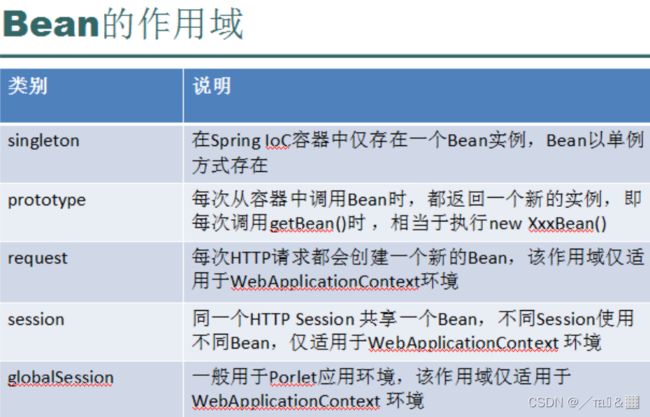
项目开发中通常会使用:singleton 单例、 prototype多例
Singleton: 在一个spring容器中,对象只有一个实例。(默认值)
Prototype: 在一个spring容器中,存在多个实例,每次getBean 返回一个新的实例。
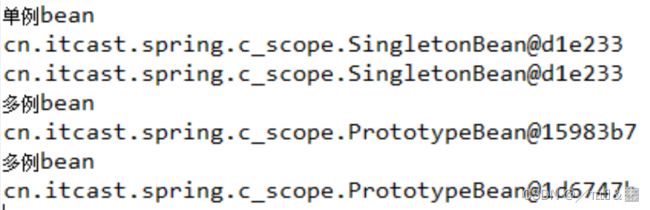
//单例Bean
public class SingletonBean {
	//在默认的构造器中打打印一句
	public SingletonBean() {
		System.out.println("初始化了SingletonBean");
	}
}
//多例Bean
public class PrototypeBean {
public PrototypeBean() {
System.out.println("初始化了PrototypeBean");
}
} @Test
public void test(){
//得到工厂
ApplicationContext applicationContext = new ClassPathXmlApplicationContext("applicationContext.xml");
//得到bean
//单例
//单例的情况下,在容器初始化的时候,bean就已经被初始化了
SingletonBean singletonBean=(SingletonBean) applicationContext.getBean("singletonBean");
System.out.println(singletonBean);
SingletonBean singletonBean2=(SingletonBean) applicationContext.getBean("singletonBean");
System.out.println(singletonBean2);
// 补充:根据类型来获取bean如果类型相同,那么就无法获取这个bean
SingletonBean singletonBean3=(SingletonBean) applicationContext.getBean(SingletonBean.class);
System.out.println(singletonBean3);
//多例
//在多例的情况下,容器初始化的时候,不初始化bean,只有在getBean(获取的)的时候才初始化该bean,而且每次getbean都会初始化一个不同的bean对象
PrototypeBean prototypeBean=(PrototypeBean) applicationContext.getBean("prototypeBean");
System.out.println(prototypeBean);
PrototypeBean prototypeBean2=(PrototypeBean) applicationContext.getBean("prototypeBean");
System.out.println(prototypeBean2);
}测试结果:
【注意】
单例是默认值,如果需要单例对象,则不需要配置scope。
@Scope("prototype")
关于@Scope注解的用法:
Controller 是单例还是多例?怎么保证并发的安全_╱℡❄&▓的博客-CSDN博客
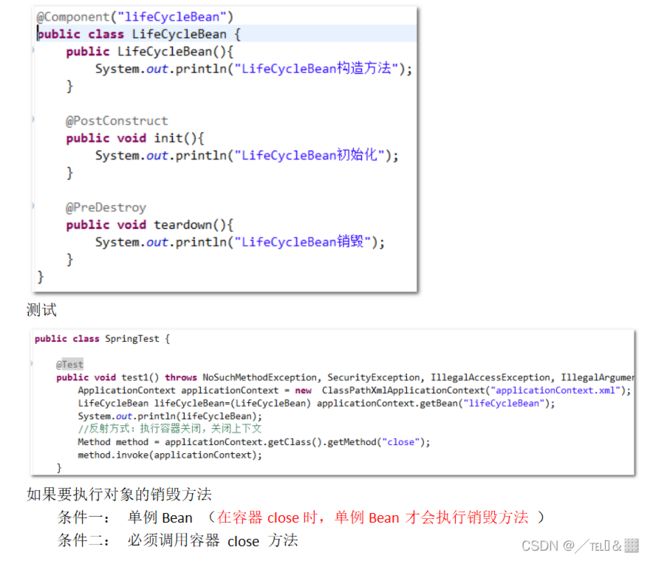
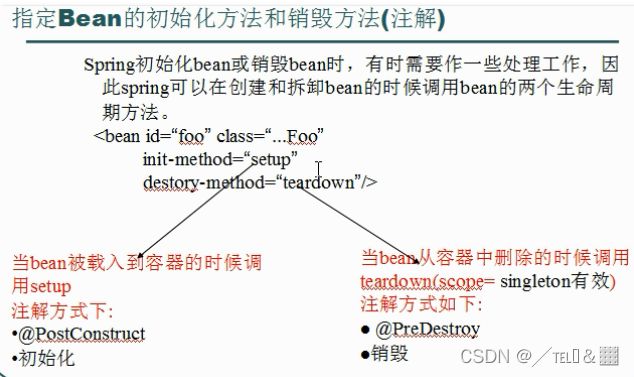
5 在xml配置Bean的初始化和销毁方法
通过 init-method属性 指定初始化的方法
通过 destroy-method属性 指定销毁对象的方法
//声明周期测试
public class LifeRecycleBean {
//
public LifeRecycleBean() {
System.out.println("LifeRecycleBean构造方法");
}
//
public void initBean(){
System.out.println("LifeRecycleBean初始化");
}
//
public void destroyBean(){
System.out.println("LifeRecycleBean销毁");
}
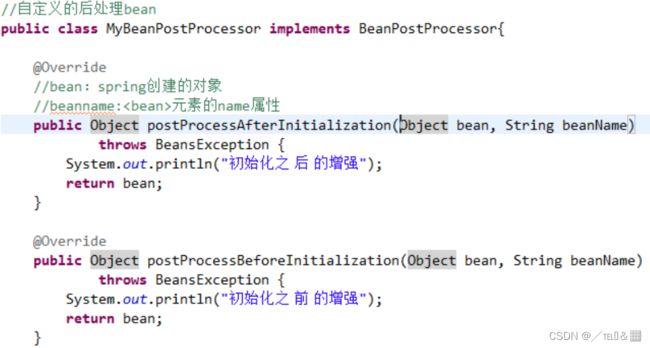
}package cn.itcast.spring.d_liferecycle;
import org.springframework.beans.BeansException;
import org.springframework.beans.factory.config.BeanPostProcessor;
public class MyBeanPostProcessor implements BeanPostProcessor{
@Override
public Object postProcessBeforeInitialization(Object bean, String beanName)
throws BeansException {
if(beanName.equals("lifeRecycleBean")){
System.out.println("");
}
return bean;//
//return null;//
}
@Override
//
public Object postProcessAfterInitialization(Object bean, String beanName)
throws BeansException {
System.out.println("");
return bean;
}
}
配置: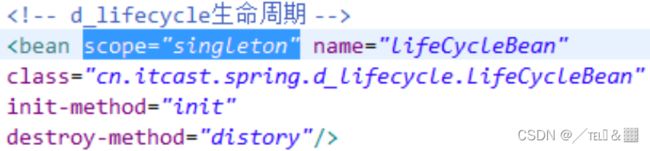
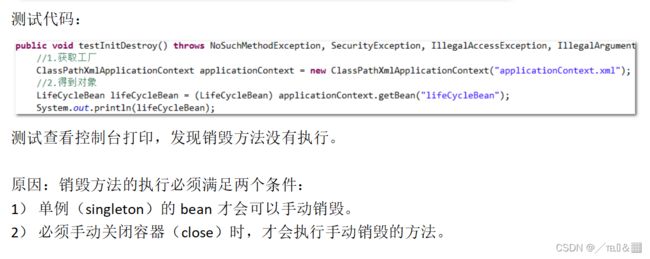
正确的测试代码:
    @Test
	public void test(){
		//Sping工厂、spring上下文、spring容器
		ApplicationContext applicationContext = new ClassPathXmlApplicationContext("applicationContext.xml");
		//bean在初始化之后(先调用构造),才调用init方法
		//构造方法和init方法一般用来初始化一些属性、需要提前准备的数据等
		LifeRecycleBean lifeRecycleBean=(LifeRecycleBean) applicationContext.getBean("lifeRecycleBean");
		System.out.println(lifeRecycleBean);

		// 为什么没有销毁方法?原因是:调试结束时,自动强行关闭jdk,容器根本来不及自己关闭,被jdk自动GC
		//
		// 如果想看这个方法,需要手动关闭spring容器
		//
		//如果是多例,则默认情况下无法调用销毁方法,多例没有强制销毁。
		((ClassPathXmlApplicationContext)applicationContext).close();
	}
6 后处理Bean(BeanPostProcessor接口)
后处理Bean也称之为Bean的后处理器,作用是:在Bean初始化前后,对Bean对象进行增强的。它既可以增强一个指定的Bean,也可以增强所有的Bean,底层很多功能(如AOP等)的实现都是基于它的,Spring可以在容器中直接识别调用。
![]()
执行任意bean操作的测试,控制台输出: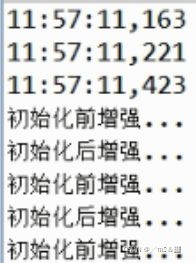
BeanPostProcessor接口,提供增强途径,在不修改原来代码情况下,增添新的功能!
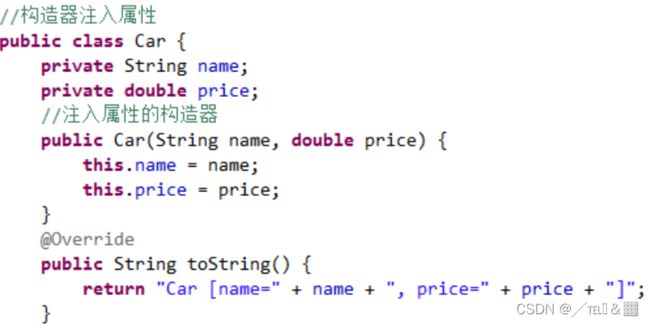
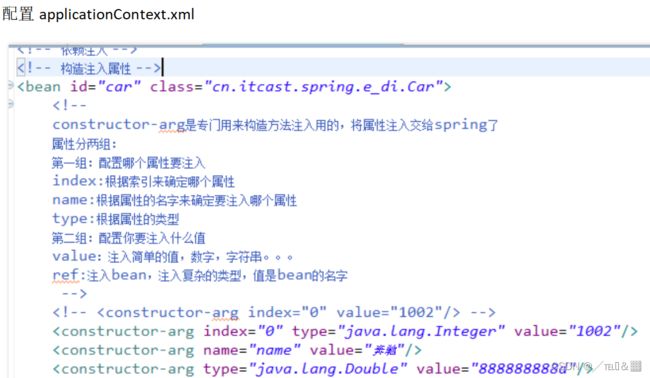
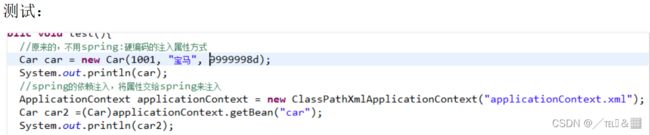
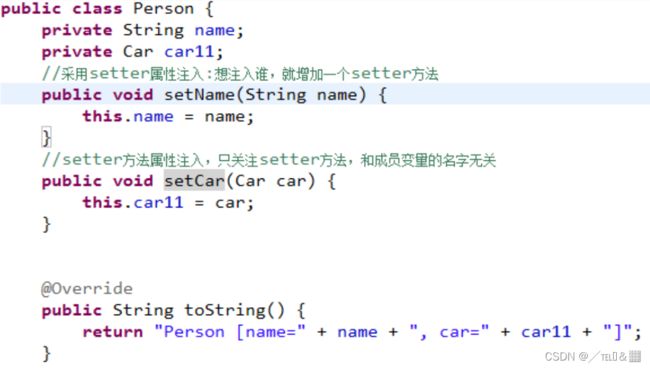
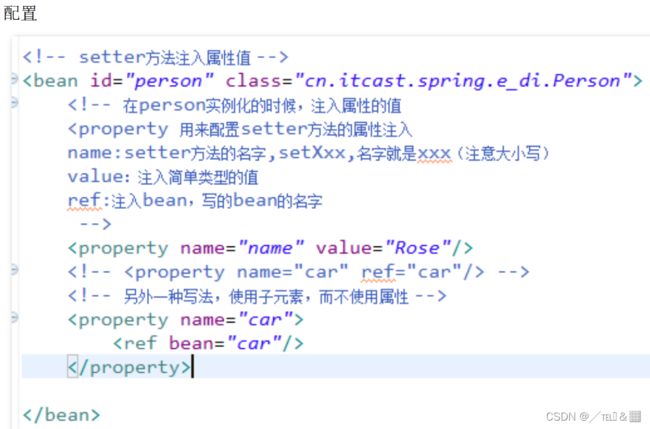
7 Bean属性的依赖注入
什么是Bean属性的注入?就是对一个对象的属性赋值。有三种方式:
- 第一种:构造器参数注入
- 第二种:setter方法属性注入(setter方法的规范-JavaBean规范)
- 第三种:接口注入
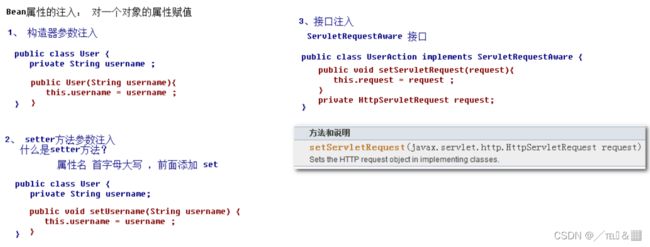
Spring 框架规范中通过配置文件配置的方式,只支持构造器参数注入和setter方法属性注入,不支持接口注入 !
构造器参数注入属性值
setter方法属性注入 property
两步:在类中加入setter方法,在配置文件中使用property

p名称空间的使用
什么是名称空间?
作用:Schema区分同名元素。(有点类似于java的包)
![]()
回顾:Xmlns没有前缀是默认的名称空间。
为简化XML文件的配置,Spring2.5版本开始引入了一个新的p名称空间。简单的说,它的作用是为了简化setter方法属性依赖注入配置的,它不是真正的名称空间。
它的使用方法:
![]()
1) 引入p名称空间
2) 将
![]() 配置时不需要
配置时不需要
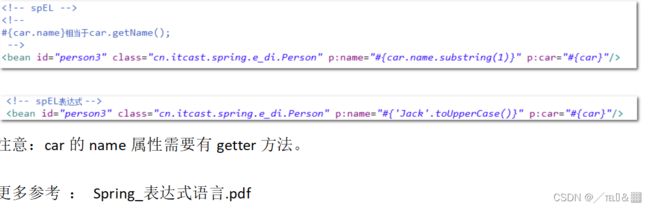
spEL表达式的使用
spEL(Spring Expression Language)是一种表达式语言,它是spring3.x版本的新特性。
它的作用是:支持在运行时操作和查询对象,其语法类似统一的EL语言,但是SpEL提供了额外的功能,功能更强大。
语法: #{…} , 引用另一个Bean 、属性、 方法
SpEL表达式的使用功能比较多,Bean操作相关的通常有:
- #{beanid} 引用Bean(具体对象)
- #{beanId.属性} 引用Bean的属性
- #{beanId.方法(参数)} 调用Bean的方法
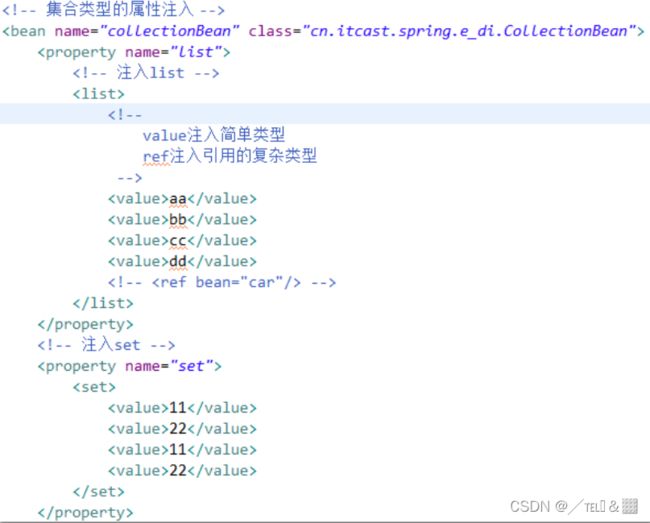
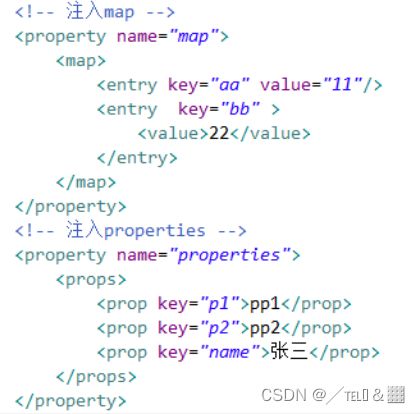
集合类型属性注入
作用:主要用于框架整合配置
Spring为集合提供了对应的标签:
注入 list元素

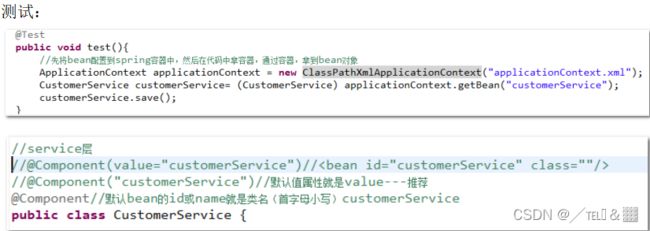
7 IoC容器装配Bean_基于注解配置方式
Bean的定义(注册) -- 扫描机制
新建web项目:spring3_day1_annotation
第一步:导入jar包,log4j.properties,applicationContext.xml
Spring XML开发和注解开发 导入jar包是相同的
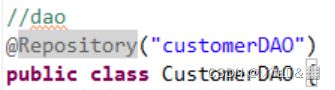
第二步: 编写Service和DAO 的注册
xml做法 :
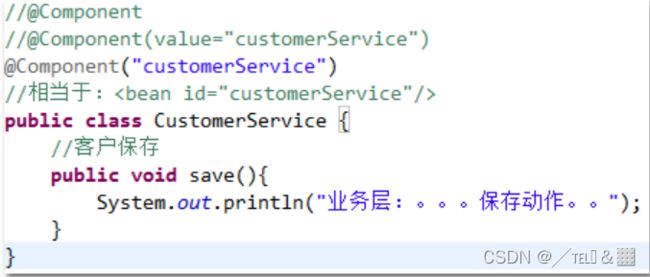
注解做法 : spring2.5引入 @Component 注解
第三步: 配置注解Bean的扫描。配置的示例如下:
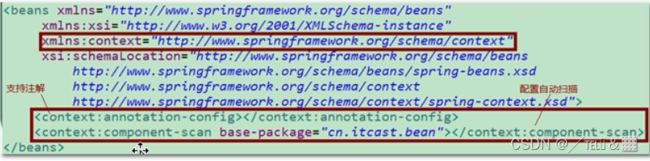
引入context 名称空间 :
【注意】Spring的所有名称空间都需要基于Beans的名称空间。
引入后:
| <beans xmlns="http://www.springframework.org/schema/beans" xmlns:xsi="http://www.w3.org/2001/XMLSchema-instance" xmlns:context="http://www.springframework.org/schema/context" xsi:schemaLocation=" http://www.springframework.org/schema/beans http://www.springframework.org/schema/beans/spring-beans.xsd http://www.springframework.org/schema/context http://www.springframework.org/schema/context/spring-context.xsd"> |
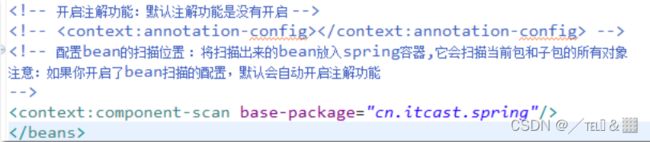
核心配置文件中开启注解功能和配置扫描注解Bean的位置
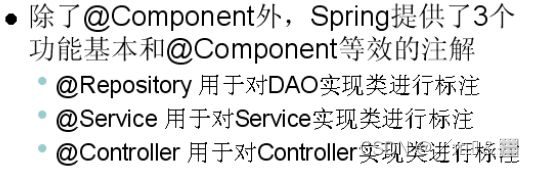
实际开发中,使用的是@Component三个衍生注解(“子注解”)
子注解的作用:有分层的意义(分层注解)。

Bean属性的依赖注入
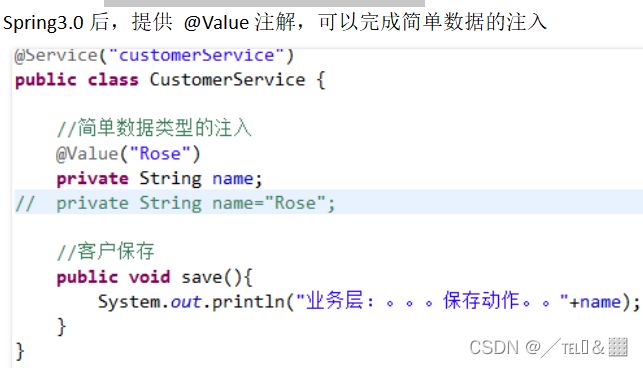
简单数据类型依赖注入
复杂类型数据依赖注入
注解实现属性依赖注入,将注解加在setXxx方法上 或者 属性定义上 !(任选其一,省代码了)
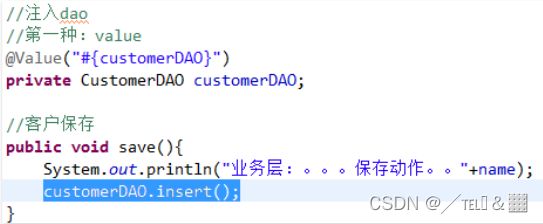
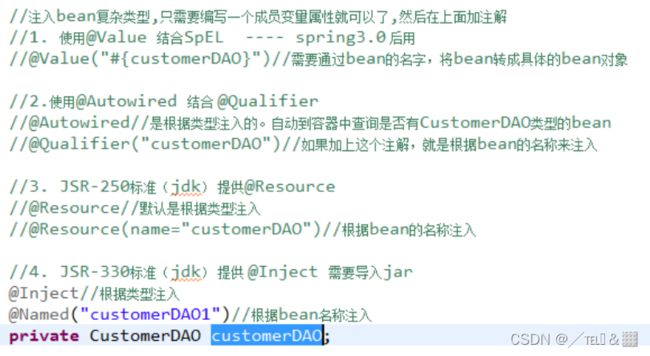
第一种: 使用@Value 结合SpEL ---- spring3.0 后用
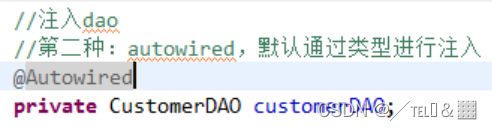
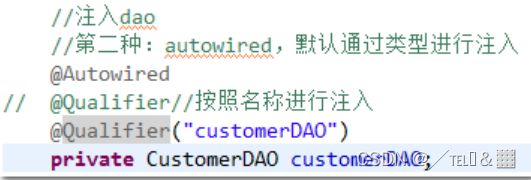
第二种:使用@Autowired 结合 @Qualifier
单独使用@Autowired 按照类型注入
使用@Autowired + @ Qualifier 按照名称注入
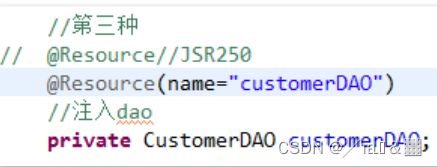
第三种: JSR-250标准(jdk) 提供@Resource
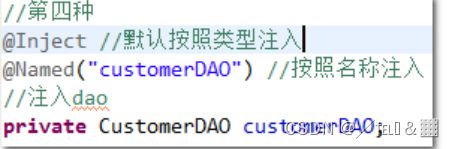
第四种: JSR-330标准(jdk) 提供 @Inject (麻烦点)
需要先导入 javax.inject 的 jar
按照类型注入
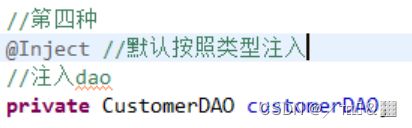
按照名称注入
Bean的初始化和销毁
使用 @PostConstruct 注解, 标明初始化方法 ---相当于 init-method 指定初始化方法
使用 @PreDestroy 注解, 标明销毁方法 ----相当于 destroy-method 指定对象销毁方法