C++ qml 混合编程:QAbstractTableModel类的使用
平台:ubuntu16.04 x64和arm imx6d
Qt版本:5.6.2
背景: 最近开始常识使用qt quick开发项目,其界面开发能力没得说,非常强大。但开始后台业务开发的时候发现有些复杂结构的数据的传递时常困扰我。这次想实现c++代码完成数据的增删改查,qml界面TableView组件绑定model,自动更新c++代码处理后的model结果。通过继承QAbstractTableModel类来实现。中间查看了一些文章,发现可以实现model内容显示在TableView上,但是后台更新之后前端没有自动更新。研究了发现原来是更新方法忘了触发beginInsertRows和endInsertRows信号。下面贴一下主要过程和源码,数据库访问相关的都省略了,这篇主要就像记录一下QAbstractTableModel类的使用。
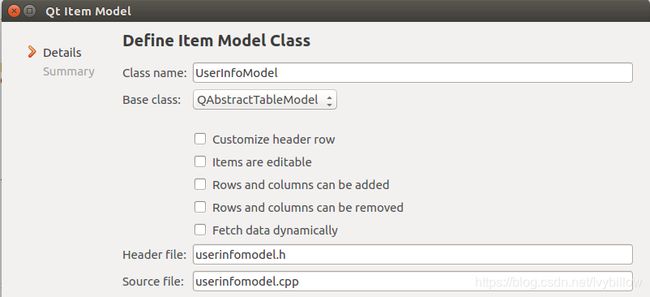
1、 在qt quick项目中新建一个Qt Item Model类,新建向导里面有现成的模板,直接选择,填写自己的类名,基类选QAbstractTableModel,下面的方法我这边都不勾选,具体可以按自己需求勾选,然后下一步直到完成添加;

2 按模板IDE自己生成了类文件,下面先贴源码。rowCount,columnCount,data,roleNames是父类的虚方法,必须要自己重写,insertUserInfo方法是我自己加的,用于表示model更新的操作,这里是添加,删改都类似,就不重复写了,只要别忘了触发beginInsertRows和endInsertRows信号就行,不然model内容更新了,前端表格组件里的内容是不会自动更新的。
userinfomodel.h
#ifndef USERINFOMODEL_H
#define USERINFOMODEL_H
#include userinfomodel.cpp
#include "userinfomodel.h"

UserInfoModel::UserInfoModel(QObject *parent)
    : QAbstractTableModel(parent)
{
}

int UserInfoModel::rowCount(const QModelIndex &parent) const
{
    return userList.count();
}

int UserInfoModel::columnCount(const QModelIndex &parent) const
{
    return userList.at(0).size();
}

QVariant UserInfoModel::data(const QModelIndex &index, int role) const
{
    // FIXME: Implement me!
    QHash<int, QByteArray> temp=roleNames();
    QString key =  temp.value(role);
    return userList[index.row()].value(key);
}

QHash<int, QByteArray> ::roleNames() const
{
    QHash<int, QByteArray> roles;
    QMetaEnum metaEnum = QMetaEnum::fromType<DataRoles>();
    for (int i=0; i<metaEnum.keyCount(); ++i)
    {
        roles[metaEnum.value(i)]=QByteArray(metaEnum.key(i));
    }
    return roles;
}

void UserInfoModel::insertUserInfo(QString userID, QString userName)
{
    emit beginInsertRows(QModelIndex(),userList.count(),userList.count());
    QMap<QString,QVariant> mapTemp;
    mapTemp.insert("userID",userID);
    mapTemp.insert("userName",userName);
    userList.push_back(mapTemp);
    emit endInsertRows();
}
这样这个model就写好了。QList
QHash<int, QByteArray> UserInfoModel::roleNames() const
{
    QHash<int, QByteArray> roles;
    QMetaEnum metaColor = QMetaEnum::fromType<DataRoles>();
    for (int i=0; i<metaColor.keyCount(); ++i)
    {
        roles[metaColor.value(i)]=QByteArray(metaColor.key(i));
    }
    return roles;
}
3、 剩下来的事情就简单了,在main.cpp里面注册以下这个类
main.cpp
#include 4、 在qml界面导入,然后就可以当成正常的qml组件用了
main.qml
import QtQuick 2.6
import QtQuick.Window 2.2
import QtQuick.Layouts 1.2
import QtQuick.Controls 1.4
import QtQuick.Controls.Styles 1.2
import UserInfoModel 1.0

Window {
    id:gridArea
    //anchors.centerIn: parent
    width: 1050;
    height: 457
    visible: true

    UserInfoModel{
        id:datamodel
    }
    TableView{
        id :tableView
        height: 409
        anchors.right: parent.right
        anchors.rightMargin: 0
        anchors.left: parent.left
        anchors.leftMargin: 0
        anchors.top: parent.top
        anchors.topMargin: 0
        frameVisible: false

        TableViewColumn {
            role: "userID"
            title: "ID"
            width: 80
        }
        TableViewColumn {
            role: "userName"
            title: "姓名"
            width: 80
        }

        model: datamodel

        //自定义表头代理
        headerDelegate:
            Rectangle{
            //width: 100;
            height: 20
            Text
            {
                anchors.verticalCenter: parent.verticalCenter
                anchors.horizontalCenter: parent.horizontalCenter
                text: styleData.value
                font.pixelSize: 16
                color: "#666666"
            }
        }
        itemDelegate:
            Item{


            Text {
                anchors.verticalCenter: parent.verticalCenter
                anchors.horizontalCenter: parent.horizontalCenter
                horizontalAlignment: Text.AlignHCenter
                color : "#333333"
                text: styleData.value
                font.pixelSize: 18
                elide: styleData.elideMode;
                width: parent.width

            }
        }


        focus:true
    }

    Button {
        id: button1
        x: 950
        y: 424
        text: qsTr("Button")
    }

    Connections {
        target: button1
        onClicked: {
            datamodel.insertUserInfo("002","张三");
        }
    }
}
5、 下图是最终效果,点击按钮,会添加002,张三,执行完datamodel.insertUserInfo(“002”,“张三”);之后,表格上也就自动更新好了。

结尾: 才开始使用qt quick开发项目,界面效果开发确实灵活,但资料相比传统qt是少了不少,只能靠自带文档。如果有疑问、错误或者更好地方法,可以留言一起沟通。