xxl-job项目集成实战,全自动项目集成,可以直接使用到项目中
如果你看官方文档,在研究透,至少也得几天时间,如果你直接看我的文档,快速用到项目中,也就10分钟就搞好了。
xxl-job功能确实很强大,而且使用的人比较多,既然在使用xxl-job,那肯定是基于定时任务比较多,不方便管理,才使用它,让定时任务成为一个独立的服务,其它任务可以快速的使用。
但xxl-job也有自己的问题,问题如下:
1、配置执行器、配置任务,只能在管理界面去操作;也就是说,我如果要使用xxl-job,我代码写好了,还需要手动去xxl-job-admin管理页面手动去配置执行器、配置任务,而且官方文档也没有说通过代码接口的方式创建执行器及任务,这就非常不爽了,我们既然在使用你,那说明我们的定时任务非常多,想快速的集成进来,通过代码自动创建执行器和任务,不要手动去配置。
所以基于上面原因,在实际项目上的使用,本文件就要解决上面的问题,通过代码全自动集成到项目中
在介绍之前,先简单讲一下xxl-job的原理,不是官方一大堆文字,这里说的都是直白话,方便你快速明白如何使用;
1、有两个系统,任务调度中心(xxl-job官方提供)、业务系统(您自己的)
2、使用xxl-job分4步:
(1)在任务调度中心创建执行器(说直白点,就是业务系统在任务调度中心进行一个注册,类似于注册中心)
(2)在任务调度中心创建任务(这个任务,主要是根据cron表达式,定时来调用你的业务系统)
(3)业务系统写代码,先注册,后通过@XxlJob来实现定时任务的具体逻辑,后面会详讲
(4)在任务调度中心启动任务
本文所涉及到的代码会放在文章最后面,欢迎下载;压缩包中有两个工程,分别为xxl-job-admin(官方任务调度中心)、xxl-job-soft(你自已的业务系统),所以本文先介绍启动xxl-job-admin,再介绍xxl-job-soft代码集成,本文xxl-job版本号为:2.4.0
一、xxl-job-admin任务调度中心的环境搭建
1、在xxl-job-admin工程里有一个doc的文件夹,里面有一个tables_xxl_job.sql的数据库脚本文件,直接在mysql数据库上执行,执行完就会创建一个xxl-job的数据库
2、idea打开xxl-job-admin工程,修改application.properties里面的数据库配置,如下:
### web
server.port=8080
server.servlet.context-path=/xxl-job-admin

### actuator
management.server.servlet.context-path=/actuator
management.health.mail.enabled=false

### resources
spring.mvc.servlet.load-on-startup=0
spring.mvc.static-path-pattern=/static/**
spring.resources.static-locations=classpath:/static/

### freemarker
spring.freemarker.templateLoaderPath=classpath:/templates/
spring.freemarker.suffix=.ftl
spring.freemarker.charset=UTF-8
spring.freemarker.request-context-attribute=request
spring.freemarker.settings.number_format=0.##########

### mybatis
mybatis.mapper-locations=classpath:/mybatis-mapper/*Mapper.xml
#mybatis.type-aliases-package=com.xxl.job.admin.core.model

### xxl-job, datasource
spring.datasource.url=jdbc:mysql://192.168.137.202:3306/xxl_job?useUnicode=true&characterEncoding=UTF-8&autoReconnect=true&serverTimezone=Asia/Shanghai
spring.datasource.username=root
spring.datasource.password=123456
spring.datasource.driver-class-name=com.mysql.cj.jdbc.Driver

### datasource-pool
spring.datasource.type=com.zaxxer.hikari.HikariDataSource
spring.datasource.hikari.minimum-idle=10
spring.datasource.hikari.maximum-pool-size=30
spring.datasource.hikari.auto-commit=true
spring.datasource.hikari.idle-timeout=30000
spring.datasource.hikari.pool-name=HikariCP
spring.datasource.hikari.max-lifetime=900000
spring.datasource.hikari.connection-timeout=10000
spring.datasource.hikari.connection-test-query=SELECT 1
spring.datasource.hikari.validation-timeout=1000

### xxl-job, email
spring.mail.host=smtp.qq.com
spring.mail.port=25
[email protected]
[email protected]
spring.mail.password=xxx
spring.mail.properties.mail.smtp.auth=true
spring.mail.properties.mail.smtp.starttls.enable=true
spring.mail.properties.mail.smtp.starttls.required=true
spring.mail.properties.mail.smtp.socketFactory.class=javax.net.ssl.SSLSocketFactory

### xxl-job, access token
xxl.job.accessToken=default_token

### xxl-job, i18n (default is zh_CN, and you can choose "zh_CN", "zh_TC" and "en")
xxl.job.i18n=zh_CN

## xxl-job, triggerpool max size
xxl.job.triggerpool.fast.max=200
xxl.job.triggerpool.slow.max=100

### xxl-job, log retention days
xxl.job.logretentiondays=30
3、运行XxlJobAdminApplication.java,服务就启动了,在页面访问:http://localhost:8080/xxl-job-admin
默认用户名为admin,密码为123456
二、xxl-job-soft工程的使用,代码集成xxl-job
说明:xxl-job-soft中的TaskController,里面方法,使用了Map,这是硬编码,实际项目上不要这样用,这只是为了方便看到向xxl-job-admin请求传参,创建执行器和任务等的方便,你主要是要关心创建执行器后返回的executorId(执行器id)和创建任务返回的taskId(任务id),这两个id需要您存储到你的业务数据库,方便后面,比如启动任务、停止任务、删除任务等等使用;
代码集成也和上面说的原理一样,分4步,分别为:
第一步:创建执行器
第二步:创建任务
第三步,业务执行代码和注册
第四步:启动任务
服务启动,运行XxlJobExecutorApplication.java,打开页面
http://localhost:8081/ck/swagger-ui.html
controller代码
@RestController
@RequestMapping("/task")
@Api(tags = "TaskController", description = "任务管理")
public class TaskController {

    @Value("${xxl.job.executor.appname}")
    private String appname;
    @Autowired
    private XxlJobClient xxlJobClient;

    @GetMapping("/createExecutor")
    @ApiOperation("第一步:创建执行器")
    public String createExecutor(String title) {
        Map map = new HashMap<>();
        map.put("title",title);
        map.put("appname",appname);
        map.put("addressType",0);
        String info = xxlJobClient.xxlJobPost(Constants.XXL_JOB_URL.EXECUTOR_CREATE,map);//返回执行器id,删除执行器时,要用此id,根据你的业务保存在业务库
        String executorId = xxlJobClient.getContent(info);
        System.out.println("执行器Id:"+executorId);
        return "执行器Id:"+executorId;
    }

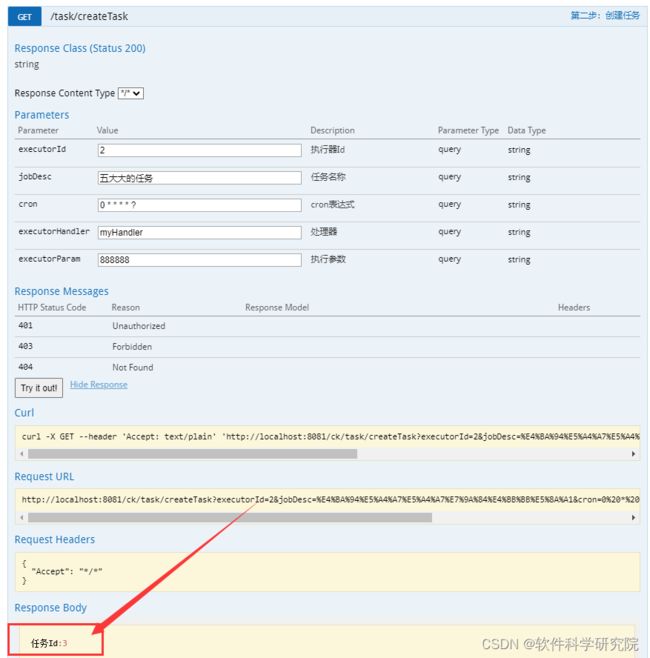
    @GetMapping("/createTask")
    @ApiOperation("第二步:创建任务")
    public String createTask(@ApiParam(value = "执行器Id")@RequestParam String executorId,
                             @ApiParam(value = "任务名称")@RequestParam String jobDesc,
                             @ApiParam(value = "cron表达式")@RequestParam(defaultValue ="0 * * * * ?" ) String cron,
                             @ApiParam(value = "处理器")@RequestParam(defaultValue ="myHandler" )String executorHandler,
                             @ApiParam(value = "执行参数")@RequestParam String executorParam) {
        Map map = new HashMap<>();
        map.put("jobGroup",executorId);//第一步,创建执行器返回的executorId
        map.put("jobDesc",jobDesc);//任务名称
        map.put("scheduleConf",cron);//0 * * * * ? 每分钟执行一次,自定义
        map.put("cronGen_display",cron);
        map.put("executorHandler",executorHandler);//在第三步,通过 @XxlJob("myHandler")注册的处理器,此处传myHandler,根据自己需要换名称
        map.put("executorParam",executorParam);//此时传的什么值,在第三步,执行时,可以原样获取,获取代码 String param = XxlJobHelper.getJobParam();
        map.put("author","admin");//默认值
        map.put("glueType","BEAN");//默认值
        map.put("scheduleType","CRON");//默认值
        map.put("executorRouteStrategy","FIRST");//默认值
        map.put("misfireStrategy","DO_NOTHING");//默认值
        map.put("executorBlockStrategy","SERIAL_EXECUTION");//默认值
        map.put("executorTimeout","0");//默认值
        map.put("executorFailRetryCount","0");//默认值
        String info = xxlJobClient.xxlJobPost(Constants.XXL_JOB_URL.TASK_CREATE,map);//返回任务id,删除执行器时,要用此id,根据你的业务保存在业务库
        String taskId = xxlJobClient.getContent(info);
        System.out.println("任务Id:"+taskId);
        return "任务Id:"+taskId;
    }

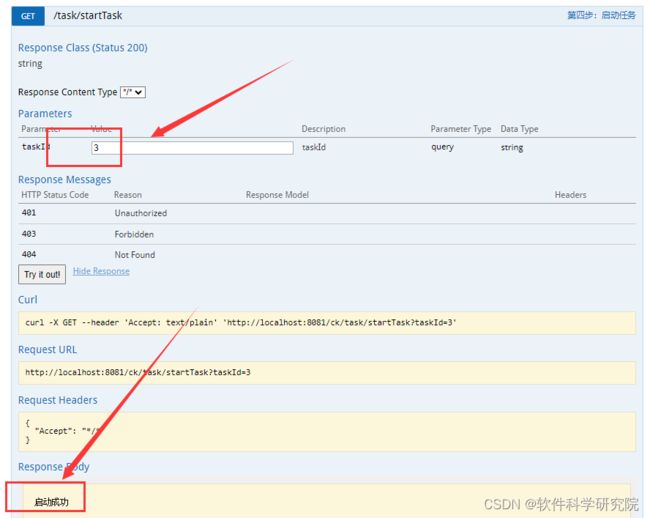
    @GetMapping("/startTask")
    @ApiOperation("第四步:启动任务")
    public String startTask(String taskId) {
        Map map = new HashMap<>();
        map.put("id",taskId);//第二步,创建任务返回的taskId
        xxlJobClient.xxlJobPost(Constants.XXL_JOB_URL.TASK_START,map);
        return "启动成功";
    }

    @GetMapping("/stoptTask")
    @ApiOperation("停止任务")
    public String stoptTask(String taskId) {
        Map map = new HashMap<>();
        map.put("id",taskId);//第二步,创建任务返回的taskId
        xxlJobClient.xxlJobPost(Constants.XXL_JOB_URL.TASK_STOP,map);
        return "停止成功";
    }

    @GetMapping("/deleteTask")
    @ApiOperation("删除任务")
    public String deleteTask(String taskId) {
        Map map = new HashMap<>();
        map.put("id",taskId);//第二步,创建任务返回的taskId
        xxlJobClient.xxlJobPost(Constants.XXL_JOB_URL.TASK_DELETE,map);
        return "停止成功";
    }

    @GetMapping("/deleteExecutor")
    @ApiOperation("删除执行器")
    public String deleteExecutor(String executorId) {
        Map map = new HashMap<>();
        map.put("id",executorId);//第二步,创建任务返回的taskId
        xxlJobClient.xxlJobPost(Constants.XXL_JOB_URL.EXECUTOR_DELETE,map);
        return "停止成功";
    }
}
执行器注册代码
@Bean
    public XxlJobSpringExecutor xxlJobExecutor() {
        logger.info(">>>>>>>>>>> xxl-job config init.");
        XxlJobSpringExecutor xxlJobSpringExecutor = new XxlJobSpringExecutor();
        xxlJobSpringExecutor.setAdminAddresses(adminAddresses);
        xxlJobSpringExecutor.setAppname(appname);
        xxlJobSpringExecutor.setAddress(address);
        xxlJobSpringExecutor.setIp(ip);
        xxlJobSpringExecutor.setPort(port);
        xxlJobSpringExecutor.setAccessToken(accessToken);
        xxlJobSpringExecutor.setLogPath(logPath);
        xxlJobSpringExecutor.setLogRetentionDays(logRetentionDays);
        return xxlJobSpringExecutor;
    }
定时任务具体的业务代码
//第三步,业务执行代码
    @XxlJob("myHandler")
    public void demoJobHandler() throws Exception {
        XxlJobHelper.log("XXL-JOB, Hello World.");
        String param = XxlJobHelper.getJobParam();
        String msg ="收到第二步创建任务时executorParam的参数:"+param+"  当前任务执行结束";
        XxlJobHelper.log(msg);
        System.out.println(msg);
    }
三,测试使用,在swagger中操作
第一步:创建执行器,记住执行器Id返回为2,具体返回多少,根据你自己的执行结果:
在任务调度中心,也可以看到执行器了

第二步:创建任务,任务id为3,并在任务调度中心,查看任务状态是停止状态
上面代码已列出
第四步:启动任务
第五步:在业务系统,查看任务是否执行,查看已运行
四、代码下载地址:
链接:https://pan.baidu.com/s/1bk9bTNxX0YWJkJcqQ2GMUA?pwd=zzwk
提取码:zzwk


