Windows 7 下搭建C语言单元测试框架 Cmocka
Cygwin 简介
首先在 Windows 7 下安装 Cygwin (一个 Windows 环境下的 Linux 仿真操作系统),
然后,接下来所有的操作就跟 Linux 环境下的操作是一模一样的了。
Cygwin 官网 是这么自我介绍的:
1、Cygwin是什么?
…is it?
Cygwin is:
a large collection of GNU and Open Source tools which provide functionality similar to a Linux distribution on Windows.
a DLL (cygwin1.dll) which provides substantial POSIX API functionality.
2、Cygwin不是什么?
…isn’t it?
Cygwin is not:
a way to run native Linux apps on Windows. You must rebuild your application from source if you want it to run on Windows.
a way to magically make native Windows apps aware of UNIX® functionality like signals, ptys, etc. Again, you need to build your apps from source if you want to take advantage of Cygwin functionality.
Cmocka 简介
Cmocka 是一个 C 语言的单元测试框架,其本身也是用 C 语言编写的。
Cmocka 的前身是 Google 的 C 语言单元测试框架 cmockery。
Cmocka 官网 是这么自我介绍的:
cmocka is …
an elegant unit testing framework for C with support for mock objects. It only requires the standard C library, works on a range of computing platforms (including embedded) and with different compilers.
启动 Cygwin 命令行终端
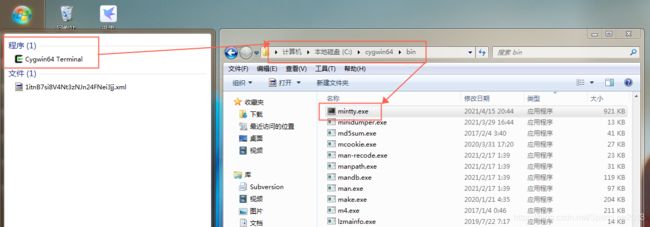
如果想要获得跟 Linux 环境下相同的操作体验,比如,执行只有在 Linux 环境下才有的 gcc 编译命令, ps 进程查看命令,等。那就启动并进入 Cygwin 命令行终端就是了,如下图所示:


在 Cygwin 中下载+编译+安装 Cmocka
接下来所有的操作命令,以及文件安装位置都与 Linux 环境下是一模一样的,毕竟 Cygwin 本身就是一个仿真 Linux 操作系统嘛。
1、下载
首先从 Cmocka 官网下载 Cmocka 源码:
$ wget https://cmocka.org/files/1.1/cmocka-1.1.5.tar.xz
2、解压
$ xz -d cmocka-1.1.5.tar.xz
$ tar xvf cmocka-1.1.5.tar
3、进入源码目录,查看安装说明文档
$ cd cmocka-1.1.5
$ cat README.md
$ cat INSTALL.md
4、创建构建专用目录
$ mkdir build
$ cd build
5、编译与安装
$ cmake -DCMAKE_INSTALL_PREFIX=/usr -DCMAKE_BUILD_TYPE=Debug ..
$ make
$ make install
Cygwin 下 make install 安装成功的输出结果示例:
Install the project...
-- Install configuration: "Debug"
-- Installing: /usr/lib/pkgconfig/cmocka.pc
-- Installing: /usr/lib/cmake/cmocka/cmocka-config.cmake
-- Installing: /usr/lib/cmake/cmocka/cmocka-config-version.cmake
-- Installing: /usr/include/cmocka.h
-- Installing: /usr/include/cmocka_pbc.h
-- Installing: /usr/lib/libcmocka.dll.a
-- Installing: /usr/bin/cygcmocka-0.dll
1、头文件安装在 /usr/include/ 目录下
2、动态链接库安装在 /usr/lib/ 目录下
gcc 编译时,从何处搜索依赖的头文件与要链接的库文件:
注:根据 gcc 的官方文档描述,gcc 编译器默认就是从 /usr/include 目录下搜索头文件,从 /usr/lib 目录下搜索库文件。
gcc 官方文档原文:
–sysroot=dir
Use dir as the logical root directory for headers and libraries. For example, if the compiler normally searches for headers in /usr/include and libraries in /usr/lib, it instead searches dir/usr/include and dir/usr/lib.
运行 cmocka 自带的示例测试用例集
$ cd ../example/
$ gcc -o simple_test simple_test.c -lcmocka

$ ./simple_test
[==========] Running 1 test(s).
[ RUN      ] null_test_success
[       OK ] null_test_success
[==========] 1 test(s) run.
[  PASSED  ] 1 test(s).
-l 选项的作用:
根据 gcc 的官方文档描述, 在 gcc 链接阶段,通过搜索字符串“cmocka”来定位并链接 cmocka 类库文件。
gcc 官方文档原文:
-l library
Search the library named library when linking. (The second alternative with the library as a separate argument is only for POSIX compliance and is not recommended.)
The -l option is passed directly to the linker by GCC. Refer to your linker documentation for exact details. The general description below applies to the GNU linker.
simple_test.c 示例测试文件完整代码:
#include 自已动手写点 C 语言单元测试
新建一个 my_first_cmocka_test.c 的单元测试文件,文件名根据实际需求命名,文件完整测试代码如下:
#include 编译 my_first_cmocka_test.c
$ gcc my_first_cmocka_test.c -lcmocka
运行测试
gcc 编译 c 源文件,可以通过 -o 选项指定二进制输出文件的名字,若不指定,则默认二进制输出文件为 a.exe,在真实的 linux 环境下,默认二进制输出文件名为 a.out
$ ./a.exe

[==========] Running 2 test(s).
[ RUN      ] test_true
[       OK ] test_true
[ RUN      ] test_string_not_equal
[       OK ] test_string_not_equal
[==========] 2 test(s) run.
[  PASSED  ] 2 test(s).