微服务SpringCloud Alibaba ------(十一)SkyWalking
文章目录
- 1. 链路追踪介绍
- 2. SkyWalking是什么
- 3. 服务端搭建
-
- 3.1. 修改UI端口
- 3.2. 启动
- 3.3 微服务接入SkyWalking
-
- 3.3.1 idea中接入
- 4. Mysql持久化数据
-
- 4.1. 添加jar包
- 4.2. 修改配置文件
- 4.3. 新建数据库
- 4.4. 启动效果
- 5. 自定义SkyWalking链路追踪
-
- 5.1. 添加依赖
- 5.2. 添加注解
- 6. 日志
-
- 6.1. 本地日志打印追踪id
-
- 6.1.1. 添加依赖
- 6.1.2. resource下添加logback-spring.xml配置文件
- 6.2. 日志上报
- 6.3. 整合后
- 7.1. 告警规则
- 7.2. Webhook(网络钩子)
- 7.3. 邮件告警功能实践
- 7.4. 测试告警功能
- 6. 代码
1. 链路追踪介绍
对于一个大型的几十个、上百个微服务构成的微服务架构系统,经常会遇到以下问题:
- 如何串联整个调用链路,快递定位问题?
- 如何缕清各个微服务之间的依赖关系?
- 如何进行各个微服务接口的性能分析?
- 如何跟踪整个业务流程调用处理顺序?
2. SkyWalking是什么
skywalking又是一个优秀的国产开源框架,2015年由个人吴晟(华为开发者)开源 , 2017年加入Apache孵化器。
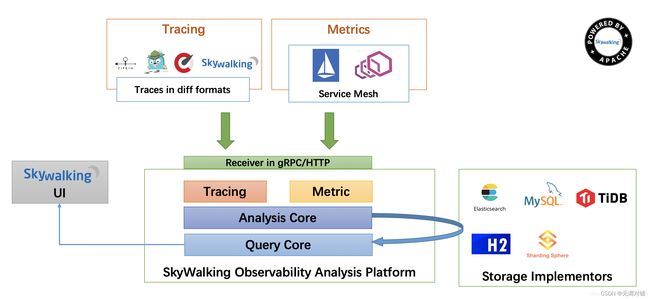
skywalking是分布式系统的应用程序性能监视工具,专为微服务、云原生架构和基于容器(Docker、K8s、Mesos)架构而设计。SkyWalking 是观察性分析平台和应用性能管理系统。提供分布式追踪、服务网格遥测分析、度量聚合和可视化一体化解决方案(官网介绍)。它是一款优秀的APM(Application Performance Management)工具。
官网:https://skywalking.apache.org/
下载地址:https://skywalking.apache.org/downloads/
文档:https://skywalking.apache.org/docs/
中文文档:https://skyapm.github.io/document-cn-translation-of-skywalking/
3. 服务端搭建
下载地址:https://archive.apache.org/dist/skywalking/8.5.0/apache-skywalking-apm-es7-8.5.0.tar.gz
本次使用的是8.5.0版本
3.1. 修改UI端口
默认使用8080端口
修改端口文件路径:apache-skywalking-apm-bin\webapp\webapp.yml
server:
  port: 8080 # 改这里

collector:
  path: /graphql
  ribbon:
    ReadTimeout: 10000
    # Point to all backend's restHost:restPort, split by ,
    listOfServers: 127.0.0.1:12800
3.2. 启动
windows下双击 apache-skywalking-apm-bin\bin\startup.bat
执行startup.bat之后会启动如下两个服务:
(1)Skywalking-Collector:追踪信息收集器,通过 gRPC/Http 收集客户端的采集信息 ,Http默认端口 12800,gRPC默认端口 11800。
(2)Skywalking-Webapp:管理平台页面 默认端口 8080,登录信息 admin/admin
3.3 微服务接入SkyWalking
3.3.1 idea中接入
-javaagent:D:/apache-skywalking-apm-bin-es7/agent/skywalking-agent.jar
-DSW_AGENT_NAME=api-gateway
-DSW_AGENT_COLLECTOR_BACKEND_SERVICES=127.0.0.1:11800
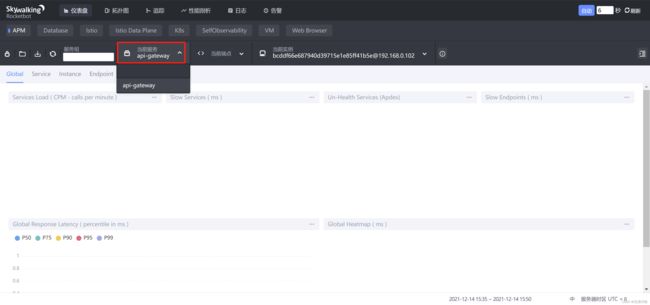
注意:此时可能跟踪链路不显示gateway
D:\apache-skywalking-apm-bin-es7\agent\optional-plugins\apm-spring-cloud-gateway-2.1.x-plugin-8.5.0.jar将这个jar包放入D:\apache-skywalking-apm-bin-es7\agent\plugins路径下
4. Mysql持久化数据
4.1. 添加jar包
从maven仓库中找到mysql-connector-java-8.0.21.jar放入D:\apache-skywalking-apm-bin-es7\oap-libs
4.2. 修改配置文件
路径D:\apache-skywalking-apm-bin-es7\config\application.yml
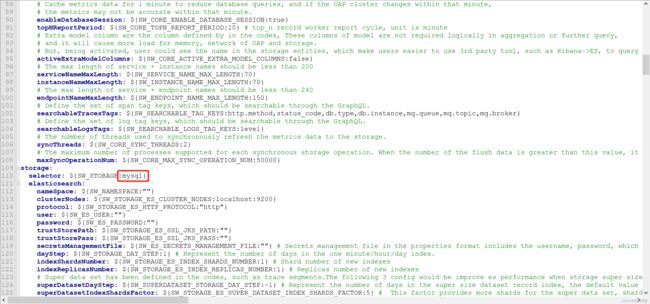
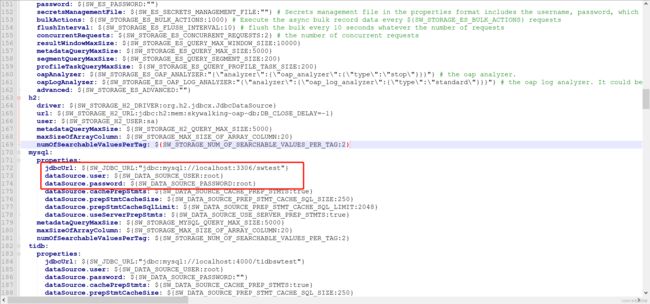
4.3. 新建数据库
根据配置文件中新建数据库
注意:如果启动服务时报以下错误,在4.2数据库地址中添加参数:?serverTimezone=GMT%2B8
java.sql.SQLException: The server time zone value '?й???????' is unrecognized or represents more than one time zone. You must configure either the server or JDBC driver (via the 'serverTimezone' configuration property) to use a more specifc time zone value if you want to utilize time zone support.
4.4. 启动效果
5. 自定义SkyWalking链路追踪
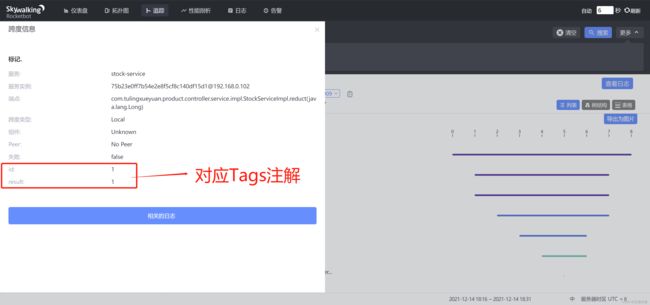
如果我们希望对项目中的业务方法实现链路追踪(如:service层、入参、返回值追踪),方便我们排查问题,可以使用如下方法
5.1. 添加依赖
<dependency>
    <groupId>org.apache.skywalkinggroupId>
    <artifactId>apm-toolkit-traceartifactId>

    <version>8.5.0version>
dependency>
5.2. 添加注解
在需要链路追踪的方法上添加注解,以下是一个演示
import com.tulingxueyuan.product.controller.service.IStockService;
import org.apache.skywalking.apm.toolkit.trace.Tag;
import org.apache.skywalking.apm.toolkit.trace.Tags;
import org.apache.skywalking.apm.toolkit.trace.Trace;
import org.springframework.stereotype.Service;

/**
 * @ClassName StockServiceImpl
 * @Description TODO
 * @Author Xxx
 * @Date 2021/12/14 18:20
 * @Version 1.0
 */
@Service
public class StockServiceImpl implements IStockService {

    @Trace // skywalking自定义链路追踪注解
    @Tags({
            @Tag(key = "result", value = "returnedObj"), //  skywalking自定义链路追踪记录返回值,returnedObj值是固定的
            @Tag(key = "id", value = "arg[0]") //  skywalking自定义链路追踪记录入参,arg[X]对应入参下标
    })
    public int reduct(Long id) {
        return 1;
    }
}
6. 日志
- logback:https://skywalking.apache.org/docs/main/v8.5.0/en/setup/service-agent/java-agent/application-toolkit-logback-1.x/
- log4j2:https://skywalking.apache.org/docs/main/v8.5.0/en/setup/service-agent/java-agent/application-toolkit-log4j-2.x/
- log4j:https://skywalking.apache.org/docs/main/v8.5.0/en/setup/service-agent/java-agent/application-toolkit-log4j-1.x/
6.1. 本地日志打印追踪id
6.1.1. 添加依赖
<dependency>
    <groupId>org.apache.skywalkinggroupId>
    <artifactId>apm-toolkit-logback-1.xartifactId>
    <version>8.5.0version>
dependency>
6.1.2. resource下添加logback-spring.xml配置文件
<configuration>

    <include resource="org/springframework/boot/logging/logback/defaults.xml"/>

    <appender name="console" class="ch.qos.logback.core.ConsoleAppender">

        <encoder class="ch.qos.logback.core.encoder.LayoutWrappingEncoder">
            <layout class="org.apache.skywalking.apm.toolkit.log.logback.v1.x.mdc.TraceIdMDCPatternLogbackLayout">

                <pattern>[%X{tid}] ${CONSOLE_LOG_PATTERN:-%clr(%d{${LOG_DATEFORMAT_PATTERN:-yyyy-MM-dd HH:mm:ss.SSS}}){faint} %clr(${LOG_LEVEL_PATTERN:-%5p}) %clr(${PID:- }){magenta} %clr(---){faint} %clr([%15.15t]){faint} %clr(%-40.40logger{39}){cyan} %clr(:){faint} %m%n${LOG_EXCEPTION_CONVERSION_WORD:-%wEx}}pattern>
            layout>
        encoder>
    appender>


    <root level="INFO">

        <appender-ref ref="console"/>
    root>
configuration>
6.2. 日志上报
日志上报后可以在ui中直接查询
logback-spring.xml中添加
    <appender name="grpc-log" class="org.apache.skywalking.apm.toolkit.log.logback.v1.x.log.GRPCLogClientAppender">
        <encoder class="ch.qos.logback.core.encoder.LayoutWrappingEncoder">
            <layout class="org.apache.skywalking.apm.toolkit.log.logback.v1.x.mdc.TraceIdMDCPatternLogbackLayout">
                <Pattern>%d{yyyy-MM-dd HH:mm:ss.SSS} [%X{tid}] [%thread] %-5level %logger{36} -%msg%nPattern>
            layout>
        encoder>
    appender>

    <root level="INFO">

        <appender-ref ref="grpc-log"/>
    root>
注意:agent和oap在不同服务器上时,需配置agent/config/agent.config配置文件,在文件末尾添加如下配置信息,注意skywalking的log通信用的grpc
# 假如Skywalking没有部署在本地,那么需要做如下配置
# 指定要向其报告日志数据的grpc服务器的主机。 默认值:127.0.0.1
plugin.toolkit.log.grpc.reporter.server_host=${SW_GRPC_LOG_SERVER_HOST:127.0.0.1}
# 指定要向其报告日志数据的grpc服务器的端口。 默认值:11800
plugin.toolkit.log.grpc.reporter.server_port=${SW_GRPC_LOG_SERVER_PORT:11800}
# 指定grpc客户端要报告的日志数据的最大大小。 默认值:10485760
plugin.toolkit.log.grpc.reporter.max_message_size=${SW_GRPC_LOG_MAX_MESSAGE_SIZE:10485760}
# 客户端向上游发送的数据将超时多少多长时间,单位:秒。 默认值:30
plugin.toolkit.log.grpc.reporter.upstream_timeout=${SW_GRPC_LOG_GRPC_UPSTREAM_TIMEOUT:30}
效果
6.3. 整合后
<configuration>

    <include resource="org/springframework/boot/logging/logback/defaults.xml"/>

    <appender name="console" class="ch.qos.logback.core.ConsoleAppender">

        <encoder class="ch.qos.logback.core.encoder.LayoutWrappingEncoder">
            <layout class="org.apache.skywalking.apm.toolkit.log.logback.v1.x.mdc.TraceIdMDCPatternLogbackLayout">

                <pattern>[%X{tid}] ${CONSOLE_LOG_PATTERN:-%clr(%d{${LOG_DATEFORMAT_PATTERN:-yyyy-MM-dd HH:mm:ss.SSS}}){faint} %clr(${LOG_LEVEL_PATTERN:-%5p}) %clr(${PID:- }){magenta} %clr(---){faint} %clr([%15.15t]){faint} %clr(%-40.40logger{39}){cyan} %clr(:){faint} %m%n${LOG_EXCEPTION_CONVERSION_WORD:-%wEx}}pattern>
            layout>
        encoder>
    appender>


    <appender name="grpc-log" class="org.apache.skywalking.apm.toolkit.log.logback.v1.x.log.GRPCLogClientAppender">
        <encoder class="ch.qos.logback.core.encoder.LayoutWrappingEncoder">
            <layout class="org.apache.skywalking.apm.toolkit.log.logback.v1.x.mdc.TraceIdMDCPatternLogbackLayout">
                <Pattern>%d{yyyy-MM-dd HH:mm:ss.SSS} [%X{tid}] [%thread] %-5level %logger{36} -%msg%nPattern>
            layout>
        encoder>
    appender>


    <root level="INFO">

        <appender-ref ref="console"/>

        <appender-ref ref="grpc-log"/>
    root>
configuration>
7. SkyWalking 告警功能
SkyWalking 告警功能是在6.x版本新增的,其核心由一组规则驱动,这些规则定义在config/alarm-settings.yml文件中。 告警规则的定义分为两部分:
- 告警规则:它们定义了应该如何触发度量警报,应该考虑什么条件。
- Webhook(网络钩子):定义当警告触发时,哪些服务终端需要被告知
7.1. 告警规则
参考:https://github.com/apache/skywalking/blob/website-docs/8.5.0/docs/en/setup/backend/backend-alarm.md#alarm
SkyWalking 的发行版都会默认提供config/alarm-settings.yml文件,里面预先定义了一些常用的告警规则。如下:
- 过去3分钟内服务平均响应时间超过1秒
- 服务成功率在过去2分钟内低于80%
- 服务90%响应时间在过去3分钟内低于1000毫秒
- 服务实例在过去2分钟内的平均响应时间超过1秒
- 端点平均响应时间过去2分钟超过1秒
这些预定义的告警规则,打开config/alarm-settings.yml文件即可看到。其具体内容如下:
rules:
  # Rule unique name, must be ended with `_rule`.
  service_resp_time_rule:
    metrics-name: service_resp_time
    op: ">"
    threshold: 1000
    period: 10
    count: 3
    silence-period: 5
    message: Response time of service {name} is more than 1000ms in 3 minutes of last 10 minutes.
  service_sla_rule:
    # Metrics value need to be long, double or int
    metrics-name: service_sla
    op: "<"
    threshold: 8000
    # The length of time to evaluate the metrics
    period: 10
    # How many times after the metrics match the condition, will trigger alarm
    count: 2
    # How many times of checks, the alarm keeps silence after alarm triggered, default as same as period.
    silence-period: 3
    message: Successful rate of service {name} is lower than 80% in 2 minutes of last 10 minutes
  service_p90_sla_rule:
    # Metrics value need to be long, double or int
    metrics-name: service_p90
    op: ">"
    threshold: 1000
    period: 10
    count: 3
    silence-period: 5
    message: 90% response time of service {name} is more than 1000ms in 3 minutes of last 10 minutes
  service_instance_resp_time_rule:
    metrics-name: service_instance_resp_time
    op: ">"
    threshold: 1000
    period: 10
    count: 2
    silence-period: 5
    message: Response time of service instance {name} is more than 1000ms in 2 minutes of last 10 minutes
除此之外,官方还提供了一个config/alarm-settings-sample.yml文件,该文件是一个告警规则的示例文件,里面展示了目前支持的所有告警规则配置项:
# Sample alarm rules.
rules:
  # Rule unique name, must be ended with `_rule`.
  endpoint_percent_rule:
    # Metrics value need to be long, double or int
    metrics-name: endpoint_percent
    threshold: 75
    op: "<"
    # The length of time to evaluate the metrics
    period: 10
    # How many times after the metrics match the condition, will trigger alarm
    count: 3
    # How many times of checks, the alarm keeps silence after alarm triggered, default as same as period.
    silence-period: 10
    message: Successful rate of endpoint {name} is lower than 75%
  service_percent_rule:
    metrics-name: service_percent
    # [Optional] Default, match all services in this metrics
    include-names:
      - service_a
      - service_b
    exclude-names:
      - service_c
    threshold: 85
    op: "<"
    period: 10
    count: 4
告警规则配置项的说明:
- Rule name:规则名称,也是在告警信息中显示的唯一名称。必须以
_rule结尾,前缀可自定义 - Metrics name:度量名称,取值为oal脚本中的度量名,目前只支持
long、double和int类型。详见Official OAL script - Include names:该规则作用于哪些实体名称,比如服务名,终端名(可选,默认为全部)
- Exclude names:该规则作不用于哪些实体名称,比如服务名,终端名(可选,默认为空)
- Threshold:阈值
- OP: 操作符,目前支持
>、<、= - Period:多久告警规则需要被核实一下。这是一个时间窗口,与后端部署环境时间相匹配
- Count:在一个Period窗口中,如果values超过Threshold值(按op),达到Count值,需要发送警报
- Silence period:在时间N中触发报警后,在TN -> TN + period这个阶段不告警。 默认情况下,它和Period一样,这意味着相同的告警(在同一个Metrics name拥有相同的Id)在同一个Period内只会触发一次
- message:告警消息
7.2. Webhook(网络钩子)
参考:https://github.com/apache/skywalking/blob/website-docs/8.5.0/docs/en/setup/backend/backend-alarm.md#webhook
Webhook可以简单理解为是一种Web层面的回调机制,通常由一些事件触发,与代码中的事件回调类似,只不过是Web层面的。由于是Web层面的,所以当事件发生时,回调的不再是代码中的方法或函数,而是服务接口。例如,在告警这个场景,告警就是一个事件。当该事件发生时,SkyWalking就会主动去调用一个配置好的接口,该接口就是所谓的Webhook。
SkyWalking的告警消息会通过 HTTP 请求进行发送,请求方法为 POST,Content-Type 为 application/json,其JSON 数据实基于List进行序列化的。JSON数据示例:
[{
    "scopeId": 1,
    "scope": "SERVICE",
    "name": "serviceA",
    "id0": 12,
    "id1": 0,
    "ruleName": "service_resp_time_rule",
    "alarmMessage": "alarmMessage xxxx",
    "startTime": 1560524171000
}, {
    "scopeId": 1,
    "scope": "SERVICE",
    "name": "serviceB",
    "id0": 23,
    "id1": 0,
    "ruleName": "service_resp_time_rule",
    "alarmMessage": "alarmMessage yyy",
    "startTime": 1560524171000
}]
字段说明:
- scopeId、scope:所有可用的 Scope 详见
org.apache.skywalking.oap.server.core.source.DefaultScopeDefine - name:目标 Scope 的实体名称
- id0:Scope 实体的 ID
- id1:保留字段,目前暂未使用
- ruleName:告警规则名称
- alarmMessage:告警消息内容
- startTime:告警时间,格式为时间戳
7.3. 邮件告警功能实践
根据以上两个小节的介绍,可以得知:SkyWalking是不支持直接向邮箱、短信等服务发送告警信息的,SkyWalking只会在发生告警时将告警信息发送至配置好的Webhook接口。
但我们总不能人工盯着该接口的日志信息来得知服务是否发生了告警,因此我们需要在该接口里实现发送邮件或短信等功能,从而达到个性化的告警通知。
接下来开始动手实践,这里基于Spring Boot进行实现。首先是添加依赖:
<dependency>
    <groupId>org.springframework.bootgroupId>
    <artifactId>spring-boot-starter-mailartifactId>
dependency>
配置邮箱服务:
server:
  port: 9134

#邮箱配置
spring:
  mail:
    host: smtp.qq.com
    #发送者邮箱账号
    username: 你的邮箱@xx.com
    #发送者密钥
    password: 你的邮箱服务密钥
    default-encoding: utf-8
    port: 465   #端口号465或587
    protocol: smtp
    properties:
      mail:
        debug:
          false
        smtp:
          socketFactory:
            class: javax.net.ssl.SSLSocketFactory
根据SkyWalking发送的JSON数据定义一个DTO,用于接口接收数据:
@Setter
@Getter
public class SwAlarmDTO {
    private int scopeId;
    private String scope;
    private String name;
    private String id0;
    private String id1;
    private String ruleName;
    private String alarmMessage;
    private long startTime;
    private transient boolean onlyAsCondition;
}
接着定义一个接口,实现接收SkyWalking的告警通知,并将数据发送至邮箱:
import com.tuling.alarm.domain.SwAlarmDTO;
import lombok.RequiredArgsConstructor;
import lombok.extern.slf4j.Slf4j;
import org.springframework.beans.factory.annotation.Value;
import org.springframework.mail.SimpleMailMessage;
import org.springframework.mail.javamail.JavaMailSender;
import org.springframework.web.bind.annotation.PostMapping;
import org.springframework.web.bind.annotation.RequestBody;
import org.springframework.web.bind.annotation.RequestMapping;
import org.springframework.web.bind.annotation.RestController;

import java.util.List;

/**
 * @Author Xxx
 * @Date 2021/12/14 23:31
 * @Version 1.0
 */
@Slf4j
@RequiredArgsConstructor
@RestController
@RequestMapping("/alarm")
public class AlarmController {

    private final JavaMailSender sender;

    @Value("${spring.mail.username}")
    private String from;

    @PostMapping("/receive")
    public void receive(@RequestBody List<SwAlarmDTO> alarmList){
        alarmList.forEach(alarm -> log.info(alarm.toString()));

        SimpleMailMessage message = new SimpleMailMessage();
        // 发送者邮箱
        message.setFrom(from);
        // 接收者邮箱
        message.setTo(from);
        // 主题
        message.setSubject("告警邮件");
        String content = getContent(alarmList);
        // 邮件内容
        message.setText(content);
        sender.send(message);
        log.info("告警邮件已发送...");
    }

    private String getContent(List<SwAlarmDTO> alarmList) {
        StringBuilder sb = new StringBuilder();
        for (SwAlarmDTO dto : alarmList) {
            sb.append("scopeId: ").append(dto.getScopeId())
                    .append("\nscope: ").append(dto.getScope())
                    .append("\n目标 Scope 的实体名称: ").append(dto.getName())
                    .append("\nScope 实体的 ID: ").append(dto.getId0())
                    .append("\nid1: ").append(dto.getId1())
                    .append("\n告警规则名称: ").append(dto.getRuleName())
                    .append("\n告警消息内容: ").append(dto.getAlarmMessage())
                    .append("\n告警时间: ").append(dto.getStartTime())
                    .append("\n\n---------------\n\n");
        }

        return sb.toString();
    }

}
最后将该接口配置到SkyWalking中,Webhook的配置位于config/alarm-sett ings.yml文件的末尾,格式为http://{ip}:{port}/{uri}。如下示例:
[root@ip-236-048 skywalking]# vim config/alarm-settings.yml
webhooks:
  - http://127.0.0.1:8088/alarm/receive
7.4. 测试告警功能
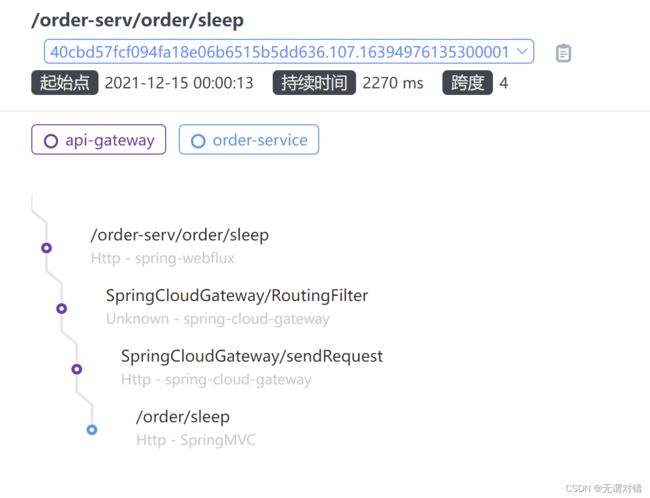
完成告警接口的开发及配置后,我们来进行一个简单的测试。这里有一条调用链路如下:
我在/sleep接口中增加了一行会线程休眠的代码,故意增加该接口响应时间:
// 用于测试skywalking告警
@RequestMapping("/sleep")
public String sleep() throws InterruptedException {
    TimeUnit.SECONDS.sleep(2);
    return "ok";
}
接下来通过gateway访问该接口,等待约两分钟后,邮箱收到了信息:
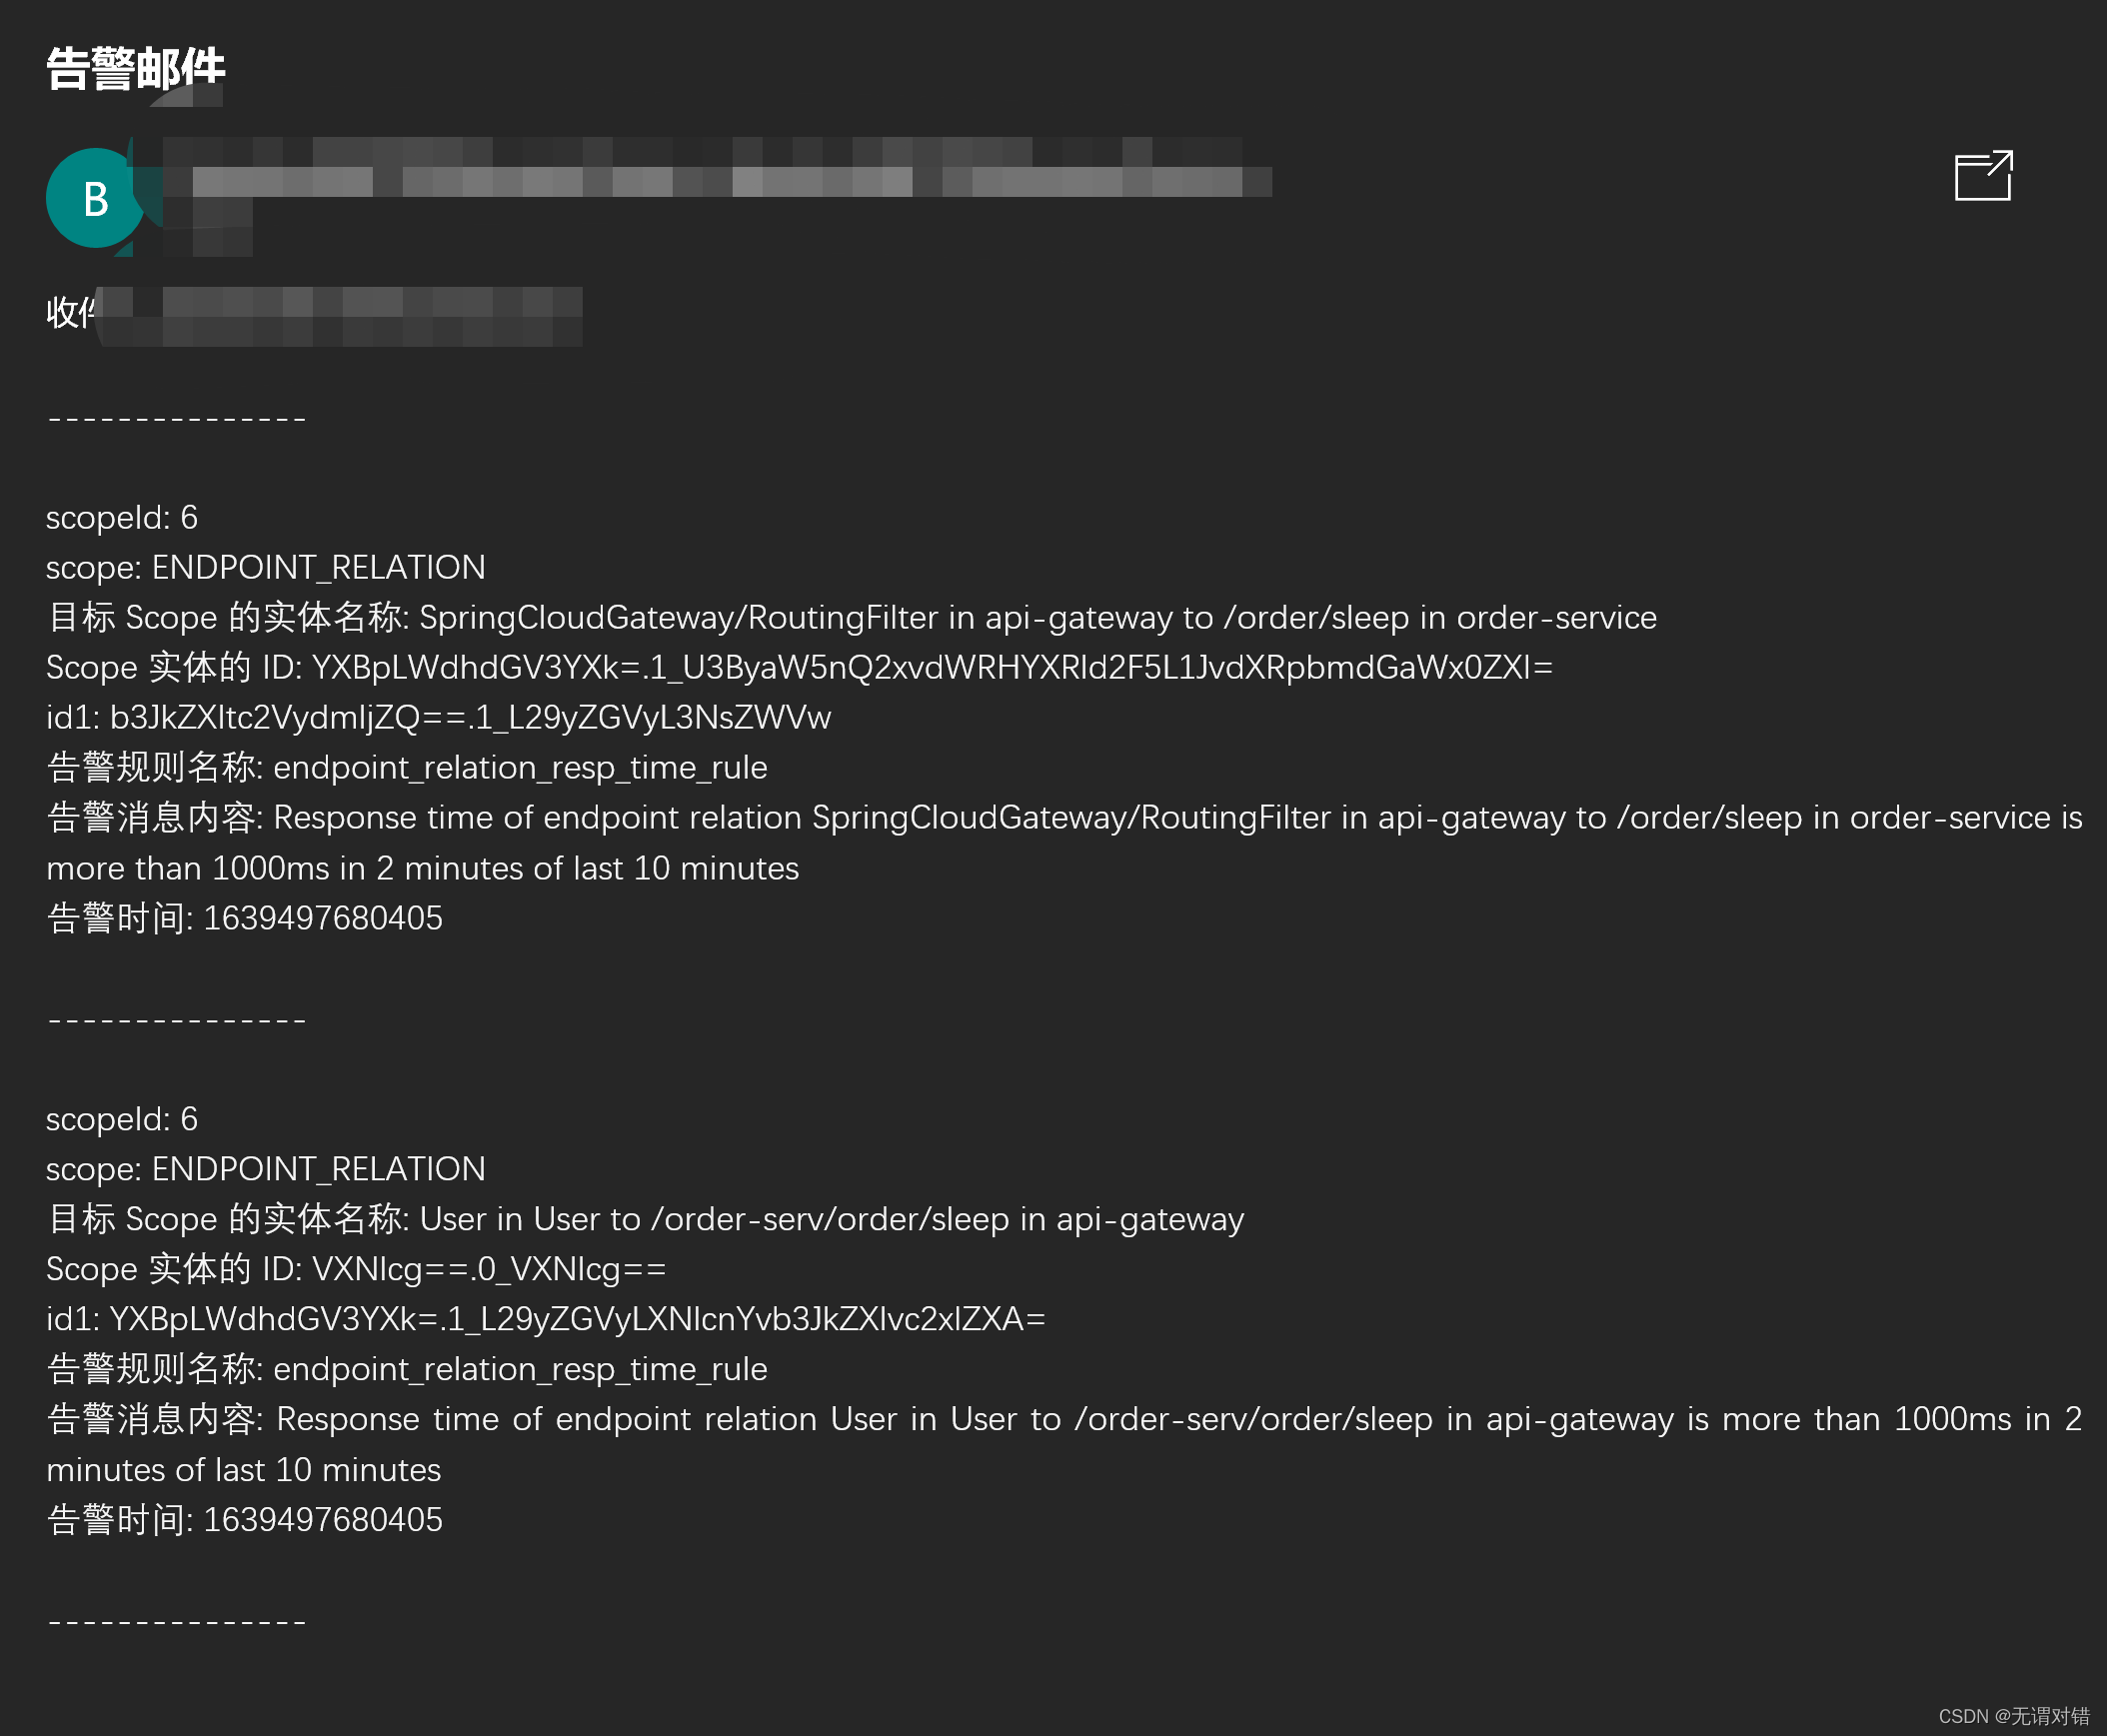此时,邮箱正常收到了告警邮件:
6. 代码
https://download.csdn.net/download/qq_42017523/63458748
