ElasticSearch学习使用(含ELK)
ElasticSearch学习使用
- 一、基础概念
- 二、安装使用
- 三、其他概念
- 四、 分词(ik分词器)的使用
- 五、Springboot项目使用
-
- 1、原生驱动操作es,灵活操作es语句
- 2、spring-boot-starter-data-elasticsearch使用,规范es增删改查接口
- 六、
- 十三、ES常用查询语句总结
- 十四、ELK环境搭建
-
- ①、logstash采集日志
-
- 案例一:采集tomcat或springboot工程log
- 案例二:采集nginx日志
- 案例三:采集自定义json文件
- ②、metricbeat监控服务器,采集服务器数据
- ③启动elasticsearch-head,访问http://localhost:8080/elasticsearch-head/
- ④启动elasticsearch-curator,管理es索引,清理es过期数据
- 十五、logstash采集数据延迟八小时
一、基础概念
ES的每个版本差别很大,在ES7之前,使用的是下面的架构:
跟mysql相比,索引=库名、类型=表名、文档=数据

ES7版本之后

二、安装使用
-
安装ElasticSearch和可视化界面kibana。
Windows开箱即用,增删改查皆为restful接口

如果需要用真实IP而不仅仅是localhost连接ES,则需要修改一下config下的elasticsearch.yml内容

如果要给es加密码,参考设置elasticsearch 7.x用户名和密码 -
安装成功后直接启动,访问http://localhost:9200和http://localhost:5601,分别出现以下界面表示成功


-
利用postman测试添加数据
- 添加使用post和put(一定要带ID)请求都可以,es6版本格式为
http://localhost:9200/索引/类型/(可选参数文档ID),参数为文档(跟mysql相比索引=库名、类型=表名、文档=数据)

- 测试查询
- 根据ID查询某一条:格式为http://localhost:9200/索引/类型/ID

- 根据条件检索 customer/_search?q=*&sort=age:asc,其他API参照
https://www.elastic.co/guide/en/elasticsearch/reference/current/getting-started.html#qs-search-data
- 测试更新

- 删除(不可删除类型,就像MySQL只能删除库和数据,不能删除表一样)

- 批量插入,bulk批量API
格式为http://localhost:9200/索引/类型/_bulk

用kibanad的dev tools测试批量插入

三、其他概念
- 创建映射

- 更新映射。要求更新映射后数据不变,比如修改某个映射从integer改成text
(1)先新建新的索引

(2)再查看原映射关系,Ctrl+C\V粘贴映射关系,没有直接更新映射还保持数据的方法

(3)迁移数据命令
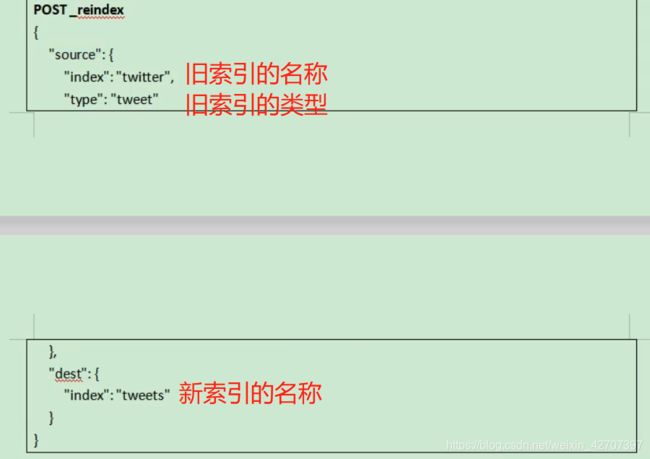
四、 分词(ik分词器)的使用
(1)下载跟据es版本下载对应ik并解压到如下目录下

(2)下载并启动nginx,在nginx下建自定义分词文件,目录如下

访问地址http://localhost/ElasticSearch/fenci.txt能看到数据
(3)在分词器插件里修改配置


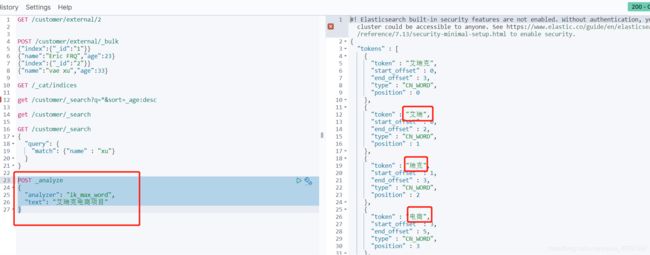
(4)重启es,再次请求
POST _analyze
{
  "analyzer": "ik_max_word",
  "text": "艾瑞克电商项目"
}
五、Springboot项目使用
1、原生驱动操作es,灵活操作es语句
- 引入依赖
<dependency>
    <groupId>org.elasticsearch.clientgroupId>
    <artifactId>elasticsearch-rest-high-level-clientartifactId>
    <version>7.13.4version>
dependency>
- 新建config包下的ElasticSearchconfig,编写配置,给spring容器中注入一个RestHighLevelClient,具体代码内容如下
更多解释参考官方文档
import org.apache.http.HttpHost;
import org.elasticsearch.client.RestClient;
import org.elasticsearch.client.RestHighLevelClient;
import org.springframework.context.annotation.Bean;
import org.springframework.context.annotation.Configuration;

@Configuration
public class ElasticSearchConfig {

    @Bean
    RestHighLevelClient esRestClient(){
        RestHighLevelClient client = new RestHighLevelClient(
                RestClient.builder(
                        new HttpHost("localhost", 9200, "http"),
                        new HttpHost("localhost", 9201, "http")));
        return client;
    }
}
如果需要安全验证,在每次请求时都带上请求头,就在上面的配置类里加上
,更多内容参考官方文档
import org.apache.http.HttpHost;
import org.elasticsearch.client.RequestOptions;
import org.elasticsearch.client.RestClient;
import org.elasticsearch.client.RestHighLevelClient;
import org.springframework.context.annotation.Bean;
import org.springframework.context.annotation.Configuration;

@Configuration
public class GulimallElasticSearchConfig {

    @Bean
    RestHighLevelClient esRestClient(){
        RestHighLevelClient client = new RestHighLevelClient(
                RestClient.builder(
                        new HttpHost("localhost", 9200, "http"),
                        new HttpHost("localhost", 9201, "http")));
        return client;
    }

    public static final RequestOptions COMMON_OPTIONS;
    static {
        RequestOptions.Builder builder = RequestOptions.DEFAULT.toBuilder();
//        builder.addHeader("Authorization", "Bearer " + TOKEN);
//        builder.setHttpAsyncResponseConsumerFactory(
//                new HttpAsyncResponseConsumerFactory
//                        .HeapBufferedResponseConsumerFactory(30 * 1024 * 1024 * 1024));
        COMMON_OPTIONS = builder.build();
    }
}
- 测试使用
(1)测试添加。更多内容参考官方文档
@Test
    void test() throws IOException {

        IndexRequest indexRequest=new IndexRequest("user");
        indexRequest.id("1");
        String jsonStr="{\"name\":\"Eric FRQ\",\"age\":23}";
        indexRequest.source(jsonStr, XContentType.JSON);
        IndexResponse index = client.index(indexRequest, GulimallElasticSearchConfig.COMMON_OPTIONS);
        System.out.println(index);
    }
(2)测试批量添加。更多内容参考官方文档
    @Test
    void testBulkAdd() throws IOException {
        BulkRequest request = new BulkRequest();
        request.add(new IndexRequest("user").id("2")
                .source("{\"name\":\"Stefan Zhou\",\"age\":53}",XContentType.JSON));
        request.add(new IndexRequest("user").id("3")
                .source("{\"name\":\"Bulus Li\",\"age\":63}",XContentType.JSON));
        request.add(new IndexRequest("user").id("4")
                .source("{\"name\":\"Jack Chen\",\"age\":55}",XContentType.JSON));
        client.bulk(request, GulimallElasticSearchConfig.COMMON_OPTIONS);
    }
(3)测试检索。更多内容参考官方文档
 @Test
    void testSearch() throws IOException {
        SearchRequest searchRequest = new SearchRequest();
        //索引
        searchRequest.indices("user");
        SearchSourceBuilder searchSourceBuilder = new SearchSourceBuilder();
        //searchSourceBuilder.query(QueryBuilders.matchQuery("name","Eric"));
        //按照年龄聚合
        TermsAggregationBuilder size = AggregationBuilders.terms("aggAgg").field("age").size(3);
        searchSourceBuilder.aggregation(size);
        //按照年龄平均值聚合
        AvgAggregationBuilder field = AggregationBuilders.avg("balanceAvg").field("age");
        searchSourceBuilder.aggregation(field);

        searchRequest.source(searchSourceBuilder);
        SearchResponse search = client.search(searchRequest, GulimallElasticSearchConfig.COMMON_OPTIONS);
        System.out.println(search.toString());
    }
(4)一个复杂查询的案例:
2、spring-boot-starter-data-elasticsearch使用,规范es增删改查接口
1、引入依赖
        <dependency>
            <groupId>org.springframework.bootgroupId>
            <artifactId>spring-boot-starter-data-elasticsearchartifactId>
        dependency>
2、application文件加上配置
spring.elasticsearch.rest.uris=http://localhost:9200
spring.elasticsearch.rest.username=admin
spring.elasticsearch.rest.password=123456
3、实体类加上@Document(indexName = "location", type = "geo_point"),其中indexName为索引名称,type为映射类型,如果有空间数据geo_point的话,需要声明为GeoPoint类并且加上注解 @GeoPointField
package com.domain.module.geocode.geosearch.entity;

import org.springframework.data.elasticsearch.annotations.Document;
import org.springframework.data.elasticsearch.annotations.GeoPointField;
import org.springframework.data.elasticsearch.core.geo.GeoPoint;

import javax.persistence.Entity;
import javax.persistence.Table;

/**
 * @ClassName: ModelEntity
 * @描述: shp存es
 * @author: Eric
 * @date: 2021年10月9日
 */
@Document(indexName = "location", type = "geo_point")
public class ShpEntity {

    @GeoPointField
    private GeoPoint location;

    private String text;
    private String id;

    public GeoPoint getLocation() {
        return location;
    }

    public void setLocation(GeoPoint location) {
        this.location = location;
    }

    public String getText() {
        return text;
    }

    public void setText(String text) {
        this.text = text;
    }

    public String getId() {
        return id;
    }

    public void setId(String id) {
        this.id = id;
    }
}
4、Dao层继承ElasticsearchRepository
package com.domain.module.geocode.geosearch.dao;

import com.domain.framework.dao.BaseDao;
import com.domain.module.geocode.geosearch.entity.ShpEntity;
import org.springframework.data.elasticsearch.repository.ElasticsearchRepository;
/**
 * @author: Eric
 * @date: 2021年11月4日
 */
public interface ShpDao extends ElasticsearchRepository<ShpEntity, String> {

    //自定义查询语句
    @Query("{\"bool\" : {\"must\" : {\"field\" : {\"firstCode.keyword\" : \"?\"}}}}")
    Page<DocBean> findByFirstCode(String firstCode, Pageable pageable);

    @Query("{\"bool\" : {\"must\" : {\"field\" : {\"secordCode.keyword\" : \"?\"}}}}")
    Page<DocBean> findBySecordCode(String secordCode, Pageable pageable);
}
5、service层使用
    @Autowired
    ShpDao shpDao;
    //这里基本的增删改查和jpa、mybaitisplus都一样
    shpDao.saveAll(list);
六、
十三、ES常用查询语句总结
- 查看所有索引:
GET /_cat/indices - 创建索引tomcat-logstash:
put tomcat-logstash - 查询某索引元数据、数据类型:
get tomcat-logstash - 删除某索引:
DELETE springboot-logstash-2021.09.22 - 查询某索引存入的数据:
get /tomcat-logstash/_search - es开启可动态创建索引
PUT /_cluster/settings
{
    "persistent" : {
        "action": {
          "auto_create_index": "true"
        }
    }
}
7.聚合查询text类型字段时候,不支持text做为查询字段,需要将类型设置下
比如username字段,也可以直接将查询的字段加上.keyword关键字
#方案一:设置此字段可以聚合查询再做普通查询
# 设置
PUT /action-log-*/_mapping
{
  "properties": {
    "username": {
      "type": "text",
      "fielddata": true
    }
  }
}
# 查询
POST action-log-*/_search
{
  "aggs": {
    "username": {
      "terms": {
        "field": "username"
      }
    }
  }
}
#方案二:直接在查询字段上加上.keyword关键字
POST action-log-*/_search
{
  "aggs": {
    "username_agg": {
      "terms": {
        "field": "username.keyword",
        "order": {
          "_key": "desc"//跟据key值倒序
        },
        "size": 10//分组后查询十条
      }
    }
  }
}
8.嵌套多聚合查询,实现按照日期date字段分组,并在分组后的数据基础上对耗时time字段再次进行分组,最后显示分组后的日期date、出现的次数、第二次分组的耗时time字段和出现的次数
POST action-log-*/_search
{
  "aggs": {
    "date_agg": {
      "terms": {
        "field": "date.keyword",
        "order": {
          "_key": "desc"
        }
      },
      "aggs": {
        "time_agg": {
          "terms": {
            "field": "time.keyword"
          }
        }
      }
    }
  }
}
//======执行结果如下=========
{
    "aggregations": {
        "date_agg": {
            "doc_count_error_upper_bound": 0,
            "sum_other_doc_count": 0,
            "buckets": [
                {
                    "key": "2022-05-12",
                    "doc_count": 8,
                    "time_agg": {
                        "doc_count_error_upper_bound": 0,
                        "sum_other_doc_count": 0,
                        "buckets": [
                            {
                                "key": "1",
                                "doc_count": 6
                            },
                            {
                                "key": "3",
                                "doc_count": 2
                            }
                        ]
                    }
                },
                {
                    "key": "2022-05-11",
                    "doc_count": 1,
                    "time_agg": {
                        "doc_count_error_upper_bound": 0,
                        "sum_other_doc_count": 0,
                        "buckets": [
                            {
                                "key": "1000",
                                "doc_count": 1
                            }
                        ]
                    }
                },
                {
                    "key": "2022-05-10",
                    "doc_count": 1,
                    "time_agg": {
                        "doc_count_error_upper_bound": 0,
                        "sum_other_doc_count": 0,
                        "buckets": [
                            {
                                "key": "999",
                                "doc_count": 1
                            }
                        ]
                    }
                }
            ]
        }
    }
}
- 复杂查询案例:
# 按时间范围查询
post tomcat-logstash/_search
{
  "query": {
    "bool": {
      "must": [
        {
          "range": {
            "@timestamp": {
              "gte": "2021-02-01 00:40:39",
              "lte": "2021-12-21 23:42:59",
              "format": "yyyy-MM-dd HH:mm:ss",
              "time_zone": "+08:00"
            }
          }
        }
      ]
    }
  },
  "size": 0,
  "aggs": {
    "groups": {
      "terms": {
        "field": "@timestamp",
        "size":3,
        "order" : {  "_count" : "desc" }
      }
    }
  }
}
# 按时间范围查询并将时间数据格式化yyyy-MM-dd HH:mm:ss
post /tomcat-logstash/_search
{
    "query": {
        "bool": {
            "must": [
                {
                    "range": {
                        "accessTime": {
                            "format": "yyyy-MM-dd HH:mm:ss"
                        }
                    }
                }
            ]
        }
    },
    "script_fields": {
        "@timestamp": {
            "script": {
                "lang": "painless",
                "inline": "doc['@timestamp'].value.toString('yyyy-MM-dd HH:mm:ss')"
            }
        }
    }
}
# 将存在metricset.name.actual.free的数据按时间倒序查询出来
post /metricbeat-*/_search
{
    "query": {
        "exists": {
            "field": "metricset.name.actual.free"
        }
    },
    "from": 1,
    "size": 2,
    "sort": [
        {
            "timestamp": {
                "order": "desc"
            }
        }
    ]
}
# 将"metricset.name"等于 "memory"的数据按时间倒序查出来
post /metricbeat-*/_search
{
    "query": {
        "match_phrase": {
            "metricset.name": "memory"
        }
    },
    "from": 1,
    "size": 1,
    "sort": [
        {
            "timestamp": {
                "order": "desc"
            }
        }
    ]
}
# 将"system.filesystem.mount_point"等于"C"
# 并且"system.filesystem.mount_point"等于"D"
# 并且"metricset.name"等于"filesystem"的数据查出五条来
post /metricbeat-*/_search
{
    "query": {
        "bool": {
            "should": [
                {
                    "match_phrase": {
                        "system.filesystem.mount_point": "C"
                    }
                },
                {
                    "match_phrase": {
                        "metricset.name": "filesystem"
                    }
                },
                {
                    "match_phrase": {
                        "system.filesystem.mount_point": "D"
                    }
                }
            ]
        }
    },
    "from": 1,
    "size": 5
}
# 在10条数据内,以system.filesystem.device_name.keyword分组
# 查询system.filesystem.total的数据
post /metricbeat-*/_search
{
    "size": 0,
    "query": {
        "match_phrase": {
            "metricset.name": "filesystem"
        }
    },
    "aggs": {
        "system.filesystem.device_name.keyword": {
            "terms": {
                "field": "system.filesystem.total",
                "size": 10,
                "order": {
                    "_count": "asc"
                }
            }
        }
    }
}
#跟据经纬度查名称
GET location/_search
{
  "query": {
    "bool": {
      "must": [
        {
          "match_all": {}
        }
      ],
      "filter": [
        {
          "geo_distance": {
            "distance": "1m",
            "location": {
              "lat": 31.33255,
              "lon": 118.89937
            }
          }
        }
      ]
    }
  }
}
#跟据多个经纬度查多个名称
GET location/_search
{
  "query": {
    "bool": {
      "should": [
        {
          "geo_distance": {
            "distance": "0.1m",
            "location": {
              "lat": "30.178091",
              "lon": "111.772789"
            }
          }
        },{
          "geo_distance": {
            "distance": "0.1m",
            "location": {
              "lat": "30.69611",
              "lon": "111.285332"
            }
          }
        }
      ]
    }
  }
}
#跟据矩形范围查范围内的点
POST /location/_search
{
  "query": {
    "geo_bounding_box": {
      "location": {
        "top_left": {
          "lat": 31.33255,
          "lon": 118.89937
        },
        "top_right":{
          "lat" : 31.228873,
         "lon" : 121.451312
        },
        "bottom_right": {
          "lat": 30.63613,
          "lon": 114.392626
        },
        "bottom_left": {
           "lat" : 31.174893,
            "lon" : 121.499176
        }
      }
    }
  },
  "from": 0,
  "size": 3
}
#跟据名称和经纬度共同筛选地点
POST location/_search
{
  "query": {
    "bool": {
      "should": [
        {
          "match_phras": { "text": "南京"}
        }
      ],
      "filter": [
        {
          "geo_distance": {
            "distance": "0.1m",
            "location": {
               "lat" : 32.092119,
            "lon" : 118.516568
            }
          }
        }
      ]
    }
  }
}
#跟据名称和经纬度范围共同筛选点
POST location/_search
{
  "query": {
    "bool": {
      "must": [
        {
          "match_phrase": {
            "text": "南京"
          }
        }
      ],
      "filter": [
        {
          "geo_bounding_box": {
            "location": {
              "top_left": {
                "lat": 31.33255,
                "lon": 118.89937
              },
              "top_right": {
                "lat": 31.228873,
                "lon": 121.451312
              },
              "bottom_right": {
                "lat": 30.63613,
                "lon": 114.392626
              },
              "bottom_left": {
                "lat": 31.174893,
                "lon": 121.499176
              }
            }
          }
        }
      ]
    }
  },
  "from": 0,
  "size": 3
}
#跟区域和经纬度范围共同筛选点并将最大数据量全部查询出来,而不是默认的10000
{
  "query": {
    "bool": {
      "should": [{
          "match_phrase": {
            "area": "高淳区"
          }
        }
      ],
      "filter": [
        {
          "geo_bounding_box": {
            "location": {
              "top_left": {
                "lat": 32.092119,
                "lon": 118.516568
              },
              "top_right": {
                "lat": 38.022301,
                "lon": 114.464499
              },
              "bottom_right": {
                "lat": 39.126758,
                "lon": 117.202227
              },
              "bottom_left": {
                "lat": 31.329422,
                "lon": 118.881401
              }
            }
          }
        }
      ]
    }
  },
  "from": 0,
  "size": 10,
"track_total_hits":true #去掉一万条的限制
}
# 跟据名称查经纬度
POST /location/_search
{
  "query": {
    "bool": {
      "should": [
        {
          "match_phrase": {
            "text": "高淳"
          }
        }
      ]
    }
  },
  "from": 0,
  "size": 30
}
# 跟据多个名称完全匹配查经纬度
post /location/_search
{
  "query": {
    "bool": {
      "must": [
        {
          "match_phrase": {
            "text": "蔡甸区奓山街"
          }
        },
        {
          "match_phrase": {
            "text": "黄陂"
          }
        }
      ]
    }
  },
  "from": 0,
  "size": 100
}
# 跟据多个名称模糊匹配查经纬度
post /location/_search
{
  "query": {
    "bool": {
      "should": [
        {
          "match_phrase": {
            "text": "蔡甸区奓山街"
          }
        },
        {
          "match_phrase": {
            "text": "黄陂"
          }
        }
      ]
    }
  },
  "from": 0,
  "size": 100
}
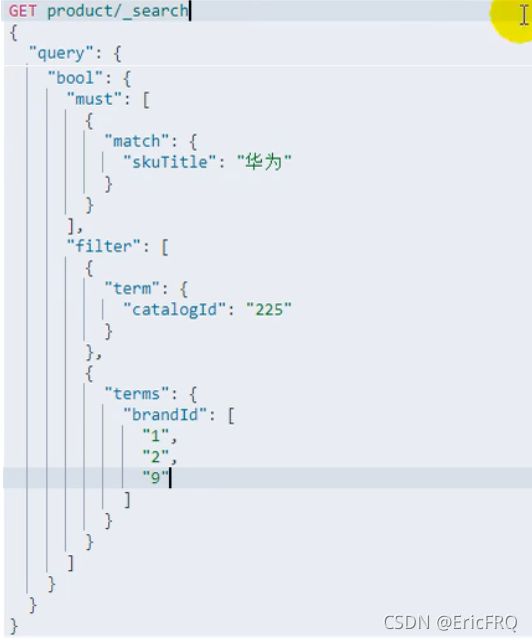
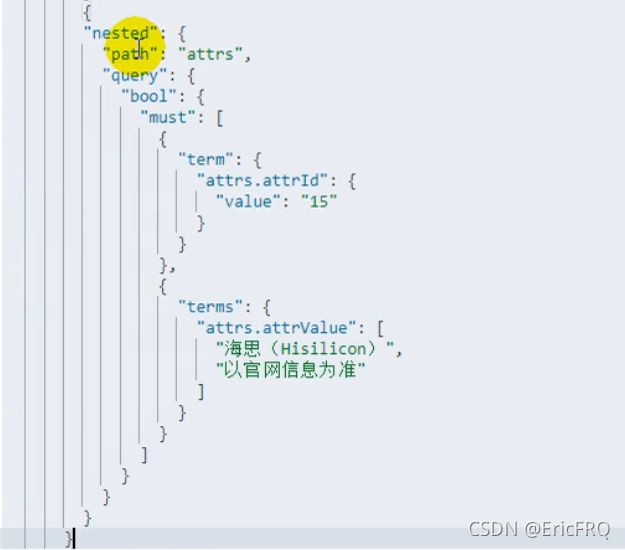
如果数据类型是nested,则直接检索是检索不出来的,需要使用nested包含
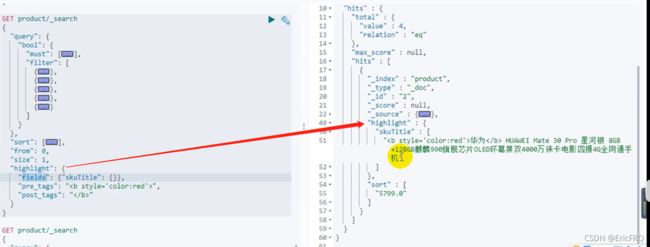
设置查询后must中匹配到的数据在另一个属性中高亮显示
聚合分析语句(分组查询)
十四、ELK环境搭建
①、logstash采集日志
案例一:采集tomcat或springboot工程log
1、官网下载、解压、使用。我这里使用的都是7.13.0版本。
1、elasticsearch(存放数据)、
2、metricbeat(监控服务器cpu、内存等)、
3、kibana(界面化工具,对es的操作等)、
4、Logstash(日志采集)、
5、elasticsearch-head(数据展示,比kibana更直观)
6、elasticsearch-curator(es数据索引管理工具,用于定期清理es索引数据等)
2、按序启动
1、es,在
ELK\elasticsearch-7.13.0\bin下双击elasticsearch.bat
2、kibana,在
\ELK\kibana-7.13.0-windows-x86_64\bin下双击kibana.bat
3、logstash,在
ELK\Logstash\bin下新建logstash.conf,粘贴如下内容。
在Logstash\bin下cmd输入命令logstash -f logstash.conf
说明:input.file.path=项目的日志文件路径,比如tomcat日志或者springboot输出到文件的日志
logstash.conf内容如下
如果生成固定es的索引,参考下面配置
# Sample Logstash configuration for creating a simple
# Beats -> Logstash -> Elasticsearch pipeline.

input {
    file{
        path =>"E:/Work/2021/target/logs/access_log.*.log"
        type => "tomcat_access_log"
        start_position=>"beginning"
    }
}

input {
 beats {
        port => "5044"
        type => "metricbeat"
    }
}

filter{
    grok{
        match=>{
            "message"=>"%{DATA:ip} - - \[%{HTTPDATE:accessTime}\] \"%{DATA:method} %{DATA:access} %{DATA:httpversion}\" %{DATA:retcode} %{DATA:flow} %{DATA:retTime} \"%{DATA:fromHtml}\" \"%{DATA:useragent}\""
        }

        remove_field=>"message"
        remove_field=> "path"
    }
    date{
        match=>["accessTime","yyyy-MM-dd-HH:mm:ss"]
    }

 ruby {
    code => "event.set('timestamp', event.get('@timestamp').time.localtime + 8*60*60)"
  }
  mutate {
    remove_field => ["@timestamp","ecs"]
  }
}

output {
if "tomcat_access_log" in [type] {
 elasticsearch {
    hosts => ["http://127.0.0.1:9200"]
    index => "tomcat-logstash"
  }
}

if "metricbeat" in [type] {
 elasticsearch {
    hosts => ["http://127.0.0.1:9200"]
    index => "metricbeat-logstash"
  }
}

}
如果要生成es带时间戳的索引,参考下面配置:(如果要索引后面加时间戳,一定要有@timestamp字段,所以注释掉了删除此字段的配置)
# Sample Logstash configuration for creating a simple
# Beats -> Logstash -> Elasticsearch pipeline.

input {
    file{
        path =>"E:/Work/2021/target/logs/access_log.*.log"
        type => "tomcat_access_log"
        start_position=>"beginning"
    }
}

input {
 beats {
        port => "5044"
        type => "metricbeat"
    }
}

filter{
    grok{
        match=>{
            "message"=>"%{DATA:ip} - - \[%{HTTPDATE:accessTime}\] \"%{DATA:method} %{DATA:access} %{DATA:httpversion}\" %{DATA:retcode} %{DATA:flow} %{DATA:retTime} \"%{DATA:fromHtml}\" \"%{DATA:useragent}\""
        }

        remove_field=>"message"
        remove_field=> "path"
    }
    date{
        match=>["accessTime","yyyy-MM-dd-HH:mm:ss"]
    }

 ruby {
    code => "event.set('timestamp', event.get('@timestamp').time.localtime + 8*60*60)"
  }
  #mutate {
    #remove_field => ["@timestamp","ecs"]
  #}
}

output {
if "tomcat_access_log" in [type] {
 elasticsearch {
    hosts => ["http://127.0.0.1:9200"]
    index => "tomcat-logstash-%{+YYYY.MM.dd}"
  }
}

if "metricbeat" in [type] {
 elasticsearch {
    hosts => ["http://127.0.0.1:9200"]
    index => "metricbeat-logstash-%{+YYYY.MM.dd}"
  }
}

}
补充说明:(配置属性说明:start_position
是监听的位置,默认是end,即一个文件如果没有记录它的读取信息,则从文件的末尾开始读取,也就是说,仅仅读取新添加的内容。对于一些更新的日志类型的监听,通常直接使用end就可以了;相反,beginning就会从一个文件的头开始读取。但是如果记录过文件的读取信息,这个配置也就失去作用了。)
案例二:采集nginx日志
1、修改nginx配置,使nginx的日志按天保存,打开nginx.conf,在http标签内添加以下内容
修改前:
log_format  main  '$remote_addr - $remote_user [$time_local] "$request" '
                      '$status $body_bytes_sent "$http_referer" '
                      '"$http_user_agent" "$http_x_forwarded_for"';
修改后:
    log_format  main  '$remote_addr - $remote_user [$time_iso8601] "$request" '
                      '$status $body_bytes_sent "$http_referer" '
                      '"$http_user_agent" "$http_x_forwarded_for"';

    access_log  logs/access.log  main;
然后在server标签里添加:
if ($time_iso8601 ~ '(\d{4}-\d{2}-\d{2})') {
                set $time $1;
		}
		access_log  logs/$time.access.log  main;
完整配置(参考):
user  root;
worker_processes  1;

#error_log  logs/error.log;
#error_log  logs/error.log  notice;
error_log  logs/error.log  debug;

#pid        logs/nginx.pid;


events {
    worker_connections  1024;
}


http {
    include       mime.types;
    default_type  application/octet-stream;

    log_format  main  '$remote_addr - $remote_user [$time_iso8601] "$request" '
                      '$status $body_bytes_sent "$http_referer" '
                      '"$http_user_agent" "$http_x_forwarded_for"';

    #access_log  logs/$tttt.access.log  main;

    access_log  logs/access.log  main;

    sendfile        on;
    #tcp_nopush     on;

    #keepalive_timeout  0;
    keepalive_timeout  65;

    #gzip  on;

	upstream testTomcat{
        server 192.168.175.170:8880 weight=1;
        server 192.168.175.171:8880 weight=1;
	}

    server {
        listen       8888;
        server_name  localhost;

        #charset koi8-r;

	   if ($time_iso8601 ~ '(\d{4}-\d{2}-\d{2})') {
                set $time $1;
        }
        access_log  logs/$time.access.log  main;
        #access_log  logs/host.access.log  main;

        location / {
            #root   html;
            #index  index.html index.htm;#root   html;
            index  index.html index.htm;
            proxy_pass http://testTomcat/ssm/;
        }
    }
}
测试效果:这时启动nginx,访问地址后可以看到日志文件已经按天分开了

2、logstash采集,和采集tomcat日志一样的,修改下logstash的配置即可,如下图。
说明:input {file{path =>"F:/nginx/logs/*.access.log"这里改成nginx的log存放文件,如果同时采集tomcat和nginx,
直接将下面的input标签配置和output标签配置追加进去即可
# Sample Logstash configuration for creating a simple
# Beats -> Logstash -> Elasticsearch pipeline.

input {
    file{
        path =>"F:/nginx/logs/*.access.log"
        type => "nginx_access_log"
        start_position=>"beginning"
    }
}

filter{
    grok{
        match=>{
            "message"=>"%{DATA:ip} - - \[%{HTTPDATE:accessTime}\] \"%{DATA:method} %{DATA:access} %{DATA:httpversion}\" %{DATA:retcode} %{DATA:flow} %{DATA:retTime} \"%{DATA:fromHtml}\" \"%{DATA:useragent}\""
        }

        remove_field=>"message"
        remove_field=> "path"
    }
    date{
        match=>["accessTime","yyyy-MM-dd-HH:mm:ss"]
    }

 ruby {
    code => "event.set('timestamp', event.get('@timestamp').time.localtime + 8*60*60)"
  }
  #mutate {
    #remove_field => ["@timestamp","ecs"]
  #}
}

output {
	if "nginx_access_log" in [type] {
	 elasticsearch {
		hosts => ["http://127.0.0.1:9200"]
		index => "nginx-logstash-%{+YYYY.MM.dd}"
	  }
	}
}
测试效果,启动logstash输入命令:logstash -f logstash.conf
用elasticsearch-head看下数据
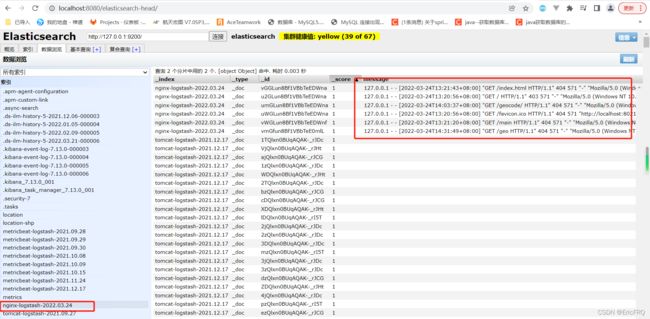
案例三:采集自定义json文件
- 新建json文件,每条自己的json数据得换行,比如下图:

2.启动配置 logstash.conf的编写,内容如下:只用添加第二个input(#库管操作记录收集),output第二个(if "datahub_action_log" in [type]),其他的配置都是采集nginx日志的配置,包括filter{}的全部内容,不用管
input{
    file{
        path =>"${LOGSTASH_HOME}/logs/access-*.log"
        type => "tomcat_access_log"
        start_position=>"beginning"
    }

}
#库管操作记录收集
input {
    file{
        path =>"${LOGSTASH_HOME}/logs/action-log-*.log"
        type => "datahub_action_log"
		codec => json {
            charset => "UTF-8"
		}
        start_position=>"beginning"
    }
}

output{
	if "tomcat_access_log" in [type] {
		elasticsearch {
			hosts => ["localhost:9200"]
			index => "filebeat-log"
		}
		# stdout { codec => rubydebug }
	}

	if "datahub_action_log" in [type] {
		 elasticsearch {
			hosts => ["localhost:9200"]
			index => "action-log-%{+YYYYMMdd}"
		  }
	}

}

filter {
        grok{
            match=>{
                "message"=>"%{DATA:client_ip} - - \[%{HTTPDATE:timestamp}\] \"%{DATA:request_method} %{DATA:request_url} %{DATA:httpversion}\" %{DATA:status_code} %{DATA:bytes} %{DATA:response_time} \"%{DATA:referrer}\" \"%{DATA:agent}\""
            }
        }

        grok {
             match => { "request_url" => [ "request_url", "%{URIPATH:url_path}%{URIPARAM:url_params}?" ]}
        }

        if "role" in [message] and "username" in [message] {
            mutate {
                add_field => {
                    "log_type" => "operation"
                }
            }
        }else{
            mutate {
                add_field => {
                    "log_type" => "access"
                }
            }
        }

        if "\x" in [message]{
            drop {}
        }

        mutate {
            rename => { "verb" => "request_method" }
            rename => { "request" => "request_url" }
            rename => { "clientip" => "client_ip" }
            rename => { "response" => "status_code" }
            rename => { "host" => "host_info" }
            convert => [ "bytes","integer" ]
            convert => [ "response_time","integer" ]
            convert => [ "status_code","integer" ]
            gsub =>  ["url_params","\?","" ]
        }

        urldecode{
            field  => "url_path"
        }
        urldecode{
            field  => "url_params"
        }
        urldecode{
            field  => "url_params_hash"
        }

        kv {
            field_split => "&"
            source => "url_params"
            target => "url_params_hash"
        }

		date {
            match => [ "timestamp" , "dd/MMM/yyyy:HH:mm:ss Z" ]
        }
}
②、metricbeat监控服务器,采集服务器数据
1、metricbeat,在上面三个都启动好了之后,编辑metricbeat.yml,搜索关键字
Output,关闭直接输出到es的配置,如下图
2、搜索关键字
Logstash Output,打开输出到logstash,使用端口5044,和上面的logstash.conf5044对应上,如下图
3、在
ELK\metricbeat-7.13.0-windows-x86_64下cmd输入metricbeat.exe -e
③启动elasticsearch-head,访问http://localhost:8080/elasticsearch-head/
1、将elasticsearch-head丢到tomcat的webapp下,直接启动tomcat即可
2、开启es动态创建索引,这样logstash就能跟据配置动态创建索引了
PUT /_cluster/settings
{
    "persistent" : {
        "action": {
          "auto_create_index": "true"
        }
    }
}
④启动elasticsearch-curator,管理es索引,清理es过期数据
1、下载elasticsearch-curator
官网地址:https://packages.elastic.co/curator/5/windows/elasticsearch-curator-5.8.4-amd64.msi
2、安装。安装目录自选(说明:此安装其实就相当于一个解压过程,安装后的文件夹随意拷贝到其他服务器就能直接用),安装成功后是个文件夹elasticsearch-curator,然后手动创建下面两个文件config.yml、action.yml
3、配置
官网config,yml配置如下,无特殊需求,直接粘贴即可使用
client:
  hosts:
    - 127.0.0.1
  port: 9200
  url_prefix:
  use_ssl: False
  certificate:
  client_cert:
  client_key:
  ssl_no_validate: False
  http_auth:
  timeout: 30
  master_only: False

logging:
  loglevel: INFO
  logfile:
  logformat: default
  blacklist: ['elasticsearch', 'urllib3']
配置action.yml,内容如下; 其中:
actions下的1、2代表多个事件动作,delete_indices代表删除索引事件,其他事件比如关闭索引、合并索引等事件参考官网 ==>action配置说明
description:此事件的描述
options:continue_if_exception遇到异常是否继续
filters:配置删除什么样子的索引,- filtertype:pattern的索引名称模型,kind: prefix索引的前缀,
value: tomcat-logstash-前缀值是什么,- filtertype: age过期时间设置,
timestring: '%Y.%m.%d'索引前缀后面的日期格式,unit: days过期时间的单位,unit_count: 1过期时间的值
actions:
  1:
    action: delete_indices
    description: >-
      Close indices older than 1days (based on index name), forlogstash-
      prefixed indices.
    options:
      continue_if_exception: False
      ignore_empty_list: True
      disable_action: False
    filters:
    - filtertype: pattern
      kind: prefix
      value: metricbeat-logstash-
    - filtertype: age
      source: name
      direction: older
      timestring: '%Y.%m.%d'
      unit: days
      unit_count: 1
  2:
    action: delete_indices
    description: >-
      Close indices older than 7days (based on index name), forlogstash-
      prefixed indices.
    options:
      continue_if_exception: False
      ignore_empty_list: True
      disable_action: False
    filters:
    - filtertype: pattern
      kind: prefix
      value: tomcat-logstash-
    - filtertype: age
      source: name
      direction: older
      timestring: '%Y.%m.%d'
      unit: days
      unit_count: 7
4、启动命令:
curator --config config.yml action.yml
运行结果:两个事件动作都完成!
5、结果验证:可以看到设置删除时间为删除一天前的,我的索引
metricbeat-logstash-2021.09.27已经被删除了
设置为七天前的,tomcat-logstash-2021.09.27、tomcat-logstash-2021.09.28两个都还在
十五、logstash采集数据延迟八小时
场景:
通过metricbeat收集服务器系统日志,metricbeat中的日志发送到kafka中
Logstash中的时间为格林威治时间,因此通过logstash采集到的数据和我们的时间会有8小时的时差
如果在后续代码中处理很有可能会处理遗漏掉,造成数据的时间错误。
版本
logstash 7.6.0
解决方案如下
input {
  tcp {
    mode => "server"
    host => "0.0.0.0"
    port => 4560
    codec => json_lines
  }
}
filter {
        ruby {
                code => "event.set('timestamp', event.get('@timestamp').time.localtime + 8*3600)"
        }
        ruby {
                code => "event.set('@timestamp',event.get('timestamp'))"
        }
        mutate {
                remove_field => ["timestamp"]
        }
}
output {
  elasticsearch {
    hosts => "localhost:9200"
    index => "springboot-logstash-%{+YYYY.MM.dd}"
  }
}
logstash生成文件名中的日期是从@timestamp字段的值中获取,通过设置filter将timestamp中的时间转换成系统时间,问题解决


