使用bootstrap图片上传插件(fileInput)springmvc实现图片上传全流程
2018年4月最新更新附件 做了一些优化
1、文件上传插件File Input介绍
这个插件主页地址是:http://plugins.krajee.com/file-input,可以从这里看到很多Demo的代码展示:http://plugins.krajee.com/file-basic-usage-demo。
这是一个增强的 HTML5 文件输入控件,是一个 Bootstrap 3.x 的扩展,实现文件上传预览,多文件上传等功能。
一般情况下,我们需要引入下面两个文件,插件才能正常使用:
bootstrap-fileinput/css/fileinput.min.css
bootstrap-fileinput/js/fileinput.min.js
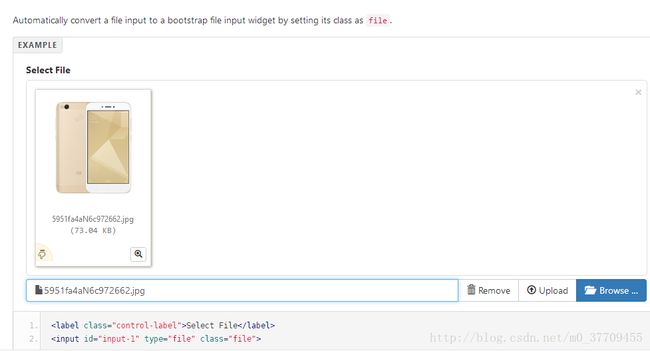
这是其中一个demo,网站有基础的和高级的demo演示,这里有不一一列出来了
插件支持中文版,需要引入zh.js,位置在/js/locales/zh.js

以上是基础的引入,如需其他比如说主题请自行引入其他js和css
1.HTML
 <div class="form-group">
   id="itemImagers" name="itemImagers" type="file" multiple class="file" data-overwrite-initial="false" data-min-file-count="2">
 div>
2.初始化上传插件
//初始化fileinput控件(第一次初始化)
    function initFileInput(ctrlName, uploadUrl) {
        var control = $('#' + ctrlName);
        control.fileinput({
            language: 'zh', //设置语言
            uploadUrl: uploadUrl, //上传的地址
            allowedFileExtensions : ['jpg', 'png','gif'],//接收的文件后缀
            //uploadAsync: false, //插件支持同步和异步
            //showUpload: false, //是否显示上传按钮
        }).on("fileuploaded", function(event, data) {
            //上传图片后的回调函数,可以在这做一些处理
        });
    }


$(function(){
    //指定上传controller访问地址
    var path = 'http://localhost:8080/sbootstrap/upload';
    //页面初始化加载initFileInput()方法传入ID名和上传地址
    initFileInput("itemImagers",path);
})
3.使用spring的图片上传插件
首先springMVC配置文件:
<beans xmlns="http://www.springframework.org/schema/beans"
    xmlns:xsi="http://www.w3.org/2001/XMLSchema-instance" xmlns:p="http://www.springframework.org/schema/p"
    xmlns:context="http://www.springframework.org/schema/context"
    xmlns:mvc="http://www.springframework.org/schema/mvc"
    xsi:schemaLocation="http://www.springframework.org/schema/beans http://www.springframework.org/schema/beans/spring-beans-4.2.xsd
        http://www.springframework.org/schema/mvc http://www.springframework.org/schema/mvc/spring-mvc-4.2.xsd
        http://www.springframework.org/schema/context http://www.springframework.org/schema/context/spring-context-4.2.xsd">


    <mvc:annotation-driven/>

    <context:component-scan base-package="cn.yuan"/>


    <bean id="multipartResolver"
        class="org.springframework.web.multipart.commons.CommonsMultipartResolver">

        <property name="defaultEncoding" value="UTF-8">property>

        <property name="maxUploadSize" value="5242880">property>
    bean>

beans>
4.Controller
package cn.ipanel.controller;

import java.io.File;
import java.util.UUID;

import javax.servlet.http.HttpServletRequest;

import org.springframework.stereotype.Controller;
import org.springframework.ui.Model;
import org.springframework.web.bind.annotation.RequestMapping;
import org.springframework.web.bind.annotation.RequestMethod;
import org.springframework.web.bind.annotation.RequestParam;
import org.springframework.web.bind.annotation.ResponseBody;
import org.springframework.web.multipart.MultipartFile;


/**
 * 上传图片
 * @author 会飞的大猿猿
 *
 */
@Controller
public class ItemUpload {

     @RequestMapping(value="/upload",method=RequestMethod.POST)
     @ResponseBody
        private String fildUpload(@RequestParam(value="itemImagers",required=false) MultipartFile file,
                HttpServletRequest request,Model model)throws Exception{
            //基本表单

            //获得物理路径webapp所在路径
            String pathRoot = request.getSession().getServletContext().getRealPath("");
            String path="";
            if(!file.isEmpty()){
                //生成uuid作为文件名称
                String uuid = UUID.randomUUID().toString().replaceAll("-","");
                //获得文件类型(可以判断如果不是图片,禁止上传)
                String contentType=file.getContentType();
                //获得文件后缀名称
                String imageName=contentType.substring(contentType.indexOf("/")+1);
                //地址
                path="/static/images/"+uuid+"."+imageName;
                file.transferTo(new File(pathRoot+path));
            }else {
                //可以使用以下包装类。响应结果,请看附件
                //ResponseResult.build(400,"上传图片失败");
            }
            System.out.println(path);
            request.setAttribute("imagesPath", path);
            model.addAttribute("imgPath",path);
            return path;
        }
}
必须要引入的jar包
注意
这个图片上传插件如果是多张图片,那么每一张图片请求一次,3张图片请求3次,所以在回调函数中,可以将返回的路径拼接好存入数据库等。
此教程还待完善,如有好的想法可一起讨论。谢谢
=================================
**
2018年4月3日更新附件
我再后期优化了一下代码 把上传/编辑/查看图片写成的公用方法 我把附件添加上 下面是项目的demo1和demo2 有不懂得随时联系,私密我可附带QQ号. 里面包括 图片上传、编辑、查看 页面jsp和js
https://pan.baidu.com/s/1F0sawwB4EvcuGtePy8Khsg
**


