| 角色 | 节点名 | ip |
|---|---|---|
| master, data, voting_only | node-master01 | 172.28.254.221 |
| master, data | node-master02 | 172.28.254.27 |
| master, data | node-master03 | 172.28.253.227 |
1、安装Elasticsearch集群
elasticsearch文件目录介绍:
- bin :可执行文件,包括 ES 启动 & 安装插件等等
- config : elasticsearch.yml(ES 配置文件)、jvm.options(JVM 配置文件)、日志配置文件等等
- data : ES 启动的时候,会有该目录,用来存储索引数据,该目录可以设置
- JDK : 内置的 JDK,不重要可忽略。
- lib : 类库,存放源码jar包
- logs : 日志文件
- modules : 自带的一些模块,不可删除。比如x-pack模块等
- plugins : ES 已经安装的插件。默认没有插件
yum方式安装(推荐,本文使用此方法)
sudo yum --disablerepo=\* --enablerepo=elasticsearch install elasticsearch-7.17.3 -y源码安装(不推荐)
官方地址 https://www.elastic.co/downloads/
#创建es用户,因为es不能用root启动。
groupadd elasticsearch
useradd elasticsearch -m -g elasticsearch

#解压文件
tar zxvf elasticsearch-7.17.3-linux-x86_64.tar.gz -C /usr/local/

##主机:172.28.254.221
mv /usr/local/elasticsearch-7.17.3 /usr/local/es7-master01

##主机:172.28.254.27
mv /usr/local/elasticsearch-7.17.3 /usr/local/es7-master02

##主机:172.28.253.227
mv /usr/local/elasticsearch-7.17.3 /usr/local/es7-master03
2、配置Elasticsearch集群
添加DNS域名解析:
[root@Elk_Server01 ~]# vim /etc/hosts

172.28.254.221  node-master01
172.28.254.27   node-master02
172.28.253.227  node-master03
目录配置
#创建es目录
##主机:172.28.254.221
mkdir -p /data-es/elasticsearch01/{data,logs,esbak}
chown -R elasticsearch:elasticsearch /data-es

##主机:172.28.254.27
mkdir -p /data-es/elasticsearch02/{data,logs,esbak}
chown -R elasticsearch:elasticsearch /data-es

##主机:172.28.253.227
mkdir -p /data-es/elasticsearch03/{data,logs,esbak}
chown -R elasticsearch:elasticsearch /data-es

#备份配置
cp /etc/elasticsearch/elasticsearch.yml /etc/elasticsearch/elasticsearch.yml-bak
配置Elasticsearch集群
官方文档: https://www.elastic.co/guide/en/elasticsearch/reference/7.17/important-settings.html
修改es配置
- sed配置主机(172.28.254.221)
#master03
##修改集群名
sed -i 's/^.*cluster.name:.*$/cluster.name: elk-cluster/g' /etc/elasticsearch/elasticsearch.yml
##修改节点名
sed -i 's/^.node.name:.$/node.name: node-master01/g' /etc/elasticsearch/elasticsearch.yml
#修改为本机地址,默认情况下,ES 仅绑定到环回地址
sed -i 's/^.network.host.$/network.host: 172.28.254.221/g' /etc/elasticsearch/elasticsearch.yml
#监听端口,HTTP 客户端通信绑定的端口
sed -i 's/^.http.port.$/http.port: 9200/g' /etc/elasticsearch/elasticsearch.yml
##设置data存放路径
sed -i 's/^.path.data.$/path.data: \/data-es\/elasticsearch01\/data/g' /etc/elasticsearch/elasticsearch.yml
##设置logs日志路径
sed -i 's/^.path.logs.$/path.logs: \/data-es\/elasticsearch01\/logs/g' /etc/elasticsearch/elasticsearch.yml
- sed配置主机(172.28.254.27)
```bash
#master02
sed -i 's/^.*cluster.name:.*$/cluster.name: elk-cluster/g' /etc/elasticsearch/elasticsearch.yml
sed -i 's/^.*node.name:.*$/node.name: node-master02/g' /etc/elasticsearch/elasticsearch.yml
sed -i 's/^.*network.host.*$/network.host: 172.28.254.27/g' /etc/elasticsearch/elasticsearch.yml
sed -i 's/^.*http.port.*$/http.port: 9200/g' /etc/elasticsearch/elasticsearch.yml
sed -i 's/^.*path.data.*$/path.data: \/data-es\/elasticsearch02\/data/g' /etc/elasticsearch/elasticsearch.yml
sed -i 's/^.*path.logs.*$/path.logs: \/data-es\/elasticsearch02\/logs/g' /etc/elasticsearch/elasticsearch.yml-
sed配置主机(172.28.253.227)
#master03 sed -i 's/^.*cluster.name:.*$/cluster.name: elk-cluster/g' /etc/elasticsearch/elasticsearch.yml sed -i 's/^.*node.name:.*$/node.name: node-master03/g' /etc/elasticsearch/elasticsearch.yml sed -i 's/^.*network.host.*$/network.host: 172.28.253.227/g' /etc/elasticsearch/elasticsearch.yml sed -i 's/^.*http.port.*$/http.port: 9200/g' /etc/elasticsearch/elasticsearch.yml sed -i 's/^.*path.data.*$/path.data: \/data-es\/elasticsearch03\/data/g' /etc/elasticsearch/elasticsearch.yml sed -i 's/^.*path.logs.*$/path.logs: \/data-es\/elasticsearch03\/logs/g' /etc/elasticsearch/elasticsearch.yml - 手动添加以下配置(172.28.254.221)
vim /etc/elasticsearch/elasticsearch.yml#------------------------------------ Node ------------------------------------ #添加此行配置,定义节点的角色,参考url(https://www.elastic.co/guide/en/elasticsearch/reference/7.17/modules-node.html): node.roles: [ master, data, voting_only ]
#---------------------------------- Network -----------------------------------
#tcp通讯端口,为节点之间的通信绑定的端口
transport.port: 9330
#开启跨域访问支持,默认为false
http.cors.enabled: true
#跨域访问允许的域名地址,(允许所有域名)以上使用正则
http.cors.allow-origin: /.*/
http.cors.allow-headers: Authorization,X-Requested-With,Content-Length,Content-Type
#--------------------------------- Discovery ----------------------------------
#参考url(https://www.elastic.co/guide/en/elasticsearch/reference/7.17/modules-discovery-settings.html)
#设置自动发现的Node,以便集群中的节点可以相互发现并选举一个主节点。
discovery.seed_hosts:
- 172.28.254.221:9330
- 172.28.254.27:9330
- 172.28.253.227:9330
#初始化主节点,当第一次启动 ES 集群时, 集群引导步骤会确定在第一次选举中计票的符合主节点资格的节点集。
cluster.initial_master_nodes:
- node-master01
- node-master02
- node-master03
#设置节点在再次询问其对等方之后将等待多长时间,然后才认为请求失败。默认为3s.
discovery.request_peers_timeout: 30s
#--------------------------------- Gateway ----------------------------------
##下面两个参数在 7.7.0以上版本中已弃用,请勿开启!
#gateway.recover_after_nodes
#gateway.expected_nodes
#设置集群中N个数据节点加入集群后就可以进行数据恢复
gateway.recover_after_data_nodes: 2
#设置初始化数据恢复进程的超时时间,默认是5分钟。
gateway.recover_after_time: 3m
#集群中预期的数据节点数。当预期数量的数据节点加入集群时,本地分片的恢复开始。默认为0.
gateway.expected_data_nodes: 3
#---------------------------------- Security ----------------------------------
#在节点上启用 Elasticsearch 安全功能
xpack.security.enabled: true
#设置为true在节点上启用审计。默认值为false。
xpack.security.audit.enabled: false
#--------------------------------- Index ----------------------------------
#这个关闭了自动创建索引。为的也是安全考虑,否则即使是内网,也有很多扫描程序,一旦开启,扫描程序会自动给你创建很多索引。
action.auto_create_index: false
- 手动添加以下配置(172.28.254.27,172.28.253.227)
```bash
node.roles: [ master, data ]
transport.port: 9330
http.cors.enabled: true
http.cors.allow-origin: /.*/
http.cors.allow-headers: Authorization,X-Requested-With,Content-Length,Content-Type
discovery.seed_hosts:
   - 172.28.254.221:9330
   - 172.28.254.27:9330
   - 172.28.253.227:9330
cluster.initial_master_nodes:
   - node-master01
   - node-master02
   - node-master03
discovery.request_peers_timeout: 30s
gateway.recover_after_data_nodes: 2
gateway.recover_after_time: 3m
gateway.expected_data_nodes: 3
xpack.security.enabled: true
xpack.security.audit.enabled: false
action.auto_create_index: false
master01节点配置
[root@Elk_Server01 config]# grep -v '#' /etc/elasticsearch/elasticsearch.yml

cluster.name: elk-cluster
node.name: node-master01
node.roles: [ master, data, voting_only ]
path.data: /data-es/elasticsearch01/data
path.logs: /data-es/elasticsearch01/logs
network.host: 172.28.254.221
http.port: 9200
transport.port: 9330
http.cors.enabled: true
http.cors.allow-origin: /.*/
http.cors.allow-headers: Authorization,X-Requested-With,Content-Length,Content-Type
discovery.seed_hosts:
   - 172.28.254.221:9330
   - 172.28.254.27:9330
   - 172.28.253.227:9330
discovery.request_peers_timeout: 30s
cluster.initial_master_nodes:
   - node-master01
   - node-master02
   - node-master03
xpack.security.enabled: true
xpack.security.audit.enabled: false

gateway.recover_after_data_nodes: 2
gateway.recover_after_time: 3m
gateway.expected_data_nodes: 3

action.auto_create_index: false
master02节点配置
[root@Elk_Server02 ~]# grep -v '#' /etc/elasticsearch/elasticsearch.yml

cluster.name: elk-cluster
node.name: node-master02
path.data: /data-es/elasticsearch02/data
path.logs: /data-es/elasticsearch02/logs
network.host: 172.28.254.27
http.port: 9200
node.roles: [ master, data ]
transport.port: 9330
http.cors.enabled: true
http.cors.allow-origin: /.*/
http.cors.allow-headers: Authorization,X-Requested-With,Content-Length,Content-Type
discovery.seed_hosts:
   - 172.28.254.221:9330
   - 172.28.254.27:9330
   - 172.28.253.227:9330
cluster.initial_master_nodes:
   - node-master01
   - node-master02
   - node-master03
discovery.request_peers_timeout: 30s
gateway.recover_after_data_nodes: 2
gateway.recover_after_time: 3m
gateway.expected_data_nodes: 3
xpack.security.enabled: true
xpack.security.audit.enabled: false
action.auto_create_index: false
master03节点配置
[root@Elk_Server03 ~]# grep -v '#' /etc/elasticsearch/elasticsearch.yml

cluster.name: elk-cluster
node.name: node-master03
path.data: /data-es/elasticsearch03/data
path.logs: /data-es/elasticsearch03/logs
network.host: 172.28.253.227
http.port: 9200
node.roles: [ master, data ]
transport.port: 9330
http.cors.enabled: true
http.cors.allow-origin: /.*/
http.cors.allow-headers: Authorization,X-Requested-With,Content-Length,Content-Type
discovery.seed_hosts:
   - 172.28.254.221:9330
   - 172.28.254.27:9330
   - 172.28.253.227:9330
cluster.initial_master_nodes:
   - node-master01
   - node-master02
   - node-master03
discovery.request_peers_timeout: 30s
gateway.recover_after_data_nodes: 2
gateway.recover_after_time: 3m
gateway.expected_data_nodes: 3
xpack.security.enabled: true
xpack.security.audit.enabled: false
action.auto_create_index: false
3、系统参数调整
##修改es三个节点的JVM运行内存
[root@Elk_Server ]# vim /etc/elasticsearch/jvm.options
-Xms4g
-Xmx4g

##修改Linux最大打开文件数
[root@Elk_Server~]# vim /etc/security/limits.conf
* soft nofile 655350
* hard nofile 655350

[root@Elk_Server~]# ulimit -n 655350

##修改sysctl.conf文件
[root@Elk_Server ~]# vim /usr/lib/sysctl.d/elasticsearch.conf
vm.max_map_count=655350
[root@Elk_Server ~]# sysctl -p
4、启动Elasticsearch(ES只能使用普通用户启动)
-
目录权限
chown -R elasticsearch:elasticsearch /data-es - 启动服务
systemctl daemon-reload
systemctl restart elasticsearch
systemctl enable elasticsearch
检查es目录的权限,否则es启动会报如下错误:
main ERROR Unable to locate appender "rolling" for logger config "root"
main ERROR Unable to locate appender "rolling_old" for logger config "root"
main ERROR Unable to locate appender "index_indexing_slowlog_rolling_old" for logger config "index.indexing.slowlog.index"
5、安装插件
安装插件,重启ES后生效!
分词插件
IK分析插件将Lucene IK分析器(http://code.google.com/p/ik-analyzer/)集成到elasticsearch中,支持自定义字典。
源码地址:https://github.com/medcl/elasticsearch-analysis-ik#使用 elasticsearch-plugin 安装(从 v5.5.1 版本开始支持) /usr/share/elasticsearch/bin/elasticsearch-plugin install https://github.com/medcl/elasticsearch-analysis-ik/releases/download/v7.17.3/elasticsearch-analysis-ik-7.17.3.zip重启Elasticsearch
systemctl restart elasticsearch
6、安装elasticsearch-head
只需在node-master01安装
head插件能够生成集群的统计数据,并提供浏览器查询,同时还能对elasticsearch索引进行结构化查询。
对于 Elasticsearch 5.x、6.x 和 7.x:不支持站点插件。作为独立服务器运行
安装node
##install node v7.x
wget https://nodejs.org/dist/latest-v7.x/node-v7.10.1-linux-x64.tar.gz
tar zxvf node-v7.10.1-linux-x64.tar.gz -C /usr/local/
mv /usr/local/node-v7.10.1-linux-x64 /usr/local/node7
sudo ln -s /usr/local/node7/bin/node /usr/bin/node
sudo ln -s /usr/local/node7/bin/npm /usr/bin/npm

#修改为淘宝的源
npm config set registry https://registry.npm.taobao.org
npm config list
安装es-head
cd /opt/
git clone https://github.com/mobz/elasticsearch-head.git
cd elasticsearch-head/
#//安装grunt,华为源:
npm install -g grunt --registry=https://mirrors.huaweicloud.com/repository/npm/
npm install -g grunt-cli --registry=https://mirrors.huaweicloud.com/repository/npm/
#安装插件(如果失败多试几次)
npm install --registry=https://mirrors.huaweicloud.com/repository/npm/
修改head配置
[root@Elk_Server01 elasticsearch-head]# vim Gruntfile.js
                connect: {
                        server: {
                                options: {
                                        port: 19100,  ##如果端口冲突可修改
                                        hostname: '172.28.254.221',   ##添加这行,冒号后面有空格
                                        base: '.',
                                        keepalive: true
                                }
                        }
                }

        });
启动es-head插件
- 手动启动
[root@Elk_Server01 elasticsearch-head]# npm run start
[email protected] start /opt/elasticsearch-head
grunt server
Running "connect:server" (connect) task
Waiting forever...
Started connect web server on http://172.28.254.221:19100
- 启动脚本
```bash
cat << EOF >/usr/lib/systemd/system/es-head.service
    [Unit]
    Description=Elasticsearch-head Service
    After=network.target

    [Service]
    Type=simple
    KillMode=control-group
    WorkingDirectory=/opt/elasticsearch-head
    ExecStart=/usr/bin/npm run start
    ExecStop=/bin/kill -9 \$MAINPID
    ExecReload=/bin/kill -s HUP \$MAINPID
    SuccessExitStatus=0 143
    Restart=always
    RestartSec=30

    [Install]
    WantedBy=multi-user.target
EOF
systemctl start es-head.service
systemctl enable es-head.service或者通过浏览器访问:http://172.28.254.221:19100/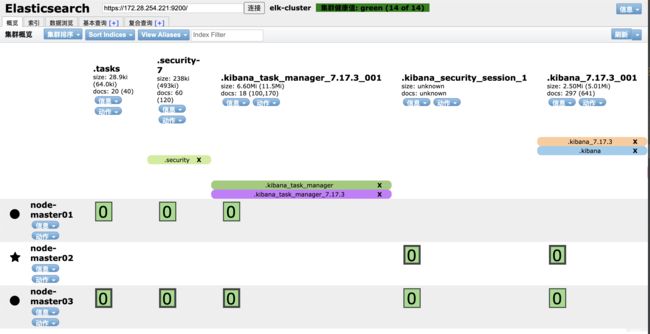
7、启用 Elasticsearch 安全功能编辑
当您使用基本许可证时,默认禁用 Elasticsearch 安全功能。启用 Elasticsearch 安全功能会启用基本身份验证,以便您可以使用用户名和密码身份验证运行本地集群。
如果设置为false(基本许可证和试用许可证的默认值),则会禁用安全功能。它还会影响连接到此 Elasticsearch 实例的所有 Kibana 实例;有关在特定 Kibana 实例中禁用安全功能的更多信息,请参阅 Kibana 安全设置。
启用安全
-
在集群中的每个节点上,增加 xpack.security.enabled设置到$ES_PATH_CONF/elasticsearch.yml 文件并将值设置为true
xpack.security.enabled: true注:如果集群只有一个节点,请在 $ES_PATH_CONF/elasticsearch.yml 文件中添加 discovery.type 设置并将值设置为single-node. 此设置可确保您的节点不会无意中连接到可能在您的网络上运行的其他集群。
- 重启es服务,使配置生效
systemctl restart elasticsearch
为内置用户创建密码
要与集群通信,您必须为内置用户配置用户名。除非您启用匿名访问,否则所有不包含用户名和密码的请求都会被拒绝。
cd /usr/share/elasticsearch
./bin/elasticsearch-setup-passwords interactive
#分别为以下用户创建密码(elastic,apm_system,kibana,kibana_system,logstash_system,beats_system,remote_monitoring_user)
- 保存生成的密码。您需要他们将内置用户添加到 Kibana。
- 为用户设置密码后elastic,您将无法 elasticsearch-setup-passwords再次运行该命令。
验证密码
curl -X GET http://172.28.254.221:9200/_cluster/health?pretty --user elastic:es123
{
  "cluster_name" : "elk-cluster",
  "status" : "green",
  "timed_out" : false,
  "number_of_nodes" : 3,
  "number_of_data_nodes" : 3,
  "active_primary_shards" : 2,
  "active_shards" : 4,
  "relocating_shards" : 0,
  "initializing_shards" : 0,
  "unassigned_shards" : 0,
  "delayed_unassigned_shards" : 0,
  "number_of_pending_tasks" : 0,
  "number_of_in_flight_fetch" : 0,
  "task_max_waiting_in_queue_millis" : 0,
  "active_shards_percent_as_number" : 100.0
}
8、ES集群接口操作
-
方法一:
curl 'http://172.28.254.221:9200/_search?pretty'//或者通过浏览器访问:http://172.28.254.221:9200/
- 方法二:
#检查es版本信息 curl -u: http://192.168.6.108:9200
#此时观察ES集群状态:
curl http://172.28.254.221:9200/_cluster/health?pretty
#观察集群内各索引状态:
curl http://172.28.254.221:9200/_cat/indices?pretty
#查询elasticsearch节点状态:
curl -XGET http://172.28.254.221:9200/_cat/shards |grep UNASSIGNED
#查看节点列表
curl http://172.28.254.221:9200/_cat/nodes?v
#列出所有索引及存储大小
curl 'http://172.28.254.221:9200/_cat/indices?v'
#创建索引
创建索引名为XX,默认会有5个分片,1个副本
curl -XPUT 'http://172.28.254.221:9200/XX?pretty'
#创建索引名为qsh_test ,有10个分片,2个副本
curl -XPUT http://172.28.254.221:9200/qsh_test -d '{
"settings": {
"number_of_shards": 10,
"number_of_replicas": 2
}
}'
#添加一个类型
curl -XPUT 'http://172.28.254.221:9200/XX/external/2?pretty' -d '
{
"gwyy": "John"
}'
#更新一个类型
curl -XPOST 'http://172.28.254.221:9200/XX/external/1/_update?pretty' -d '
{
"doc": {"name": "Jaf"}
}'
#删除指定索引
curl -XDELETE 'http://172.28.254.221:9200/_index?pretty'
#删除索引:booklist 下的所有数据
curl -XPOST http://
"query": {
"match_all": {
}
}
}'
更多操作请参阅[ES接口调用](https://blog.51cto.com/qiangsh/2362062)