Elasticsearch集群,java操作es
今日内容
- 集群和分布式
- Elasticsearch集群
- Elasticsearch客户端
java代码取操作ES有三种方式
1、es提供的原生的操作方式 在es 8.0后会移除
2、es提供的rest风格的操作方式
3、SpringDataElasticSearch的方式
第一章 集群和分布式
集群和分布式的概念有联系也有区别,我们一起来看。
1. 单点式服务的问题
如图所示,是我们之前项目使用的架构方式,单点服务架构。整个服务使一个完整的项目,部署在一台tomcat,使用一个mysql数据库:
所有的请求,都由这一台服务器处理,存在很大风险:
A:并发处理能力有限。因为单服务器的性能有限制。所以单台Tomcat的最大连接数有限制,

B:容错率低,一旦服务器故障,整个服务就无法访问了。

    eBay于 1999年6月停机22小时的事故,中断了约230万的拍卖,使eBay的股票下降了9.2个百分点。

C:单台服务器计算能力低,无法完成复杂的海量数据计算。
如何解决这样的问题呢?那就需要使用计算机集群了。
2. 集群
来看下维基百科对集群的介绍:
集群是==一组计算机==高度紧密协作,完成计算工作。其中的每个计算机称为一个==节点==。根据这些计算机的协作方式不同或者目的不同,我们将集群分成三类:
- 高可用集群
- 负载均衡集群
- 科学计算集群(分布式处理)
上述几种集群方式并非必须独立使用,我们在系统架构时经常会组合使用。
2.1. 高可用集群
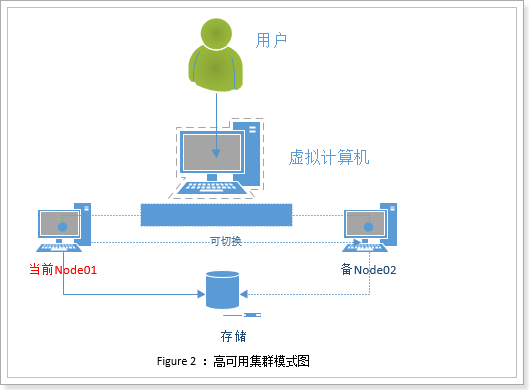
High availability Cluster高可用群集,简称HAC。其设计思想是为了避免出现单点故障问题,在故障时可以==快速恢复,快速继续提供服务==。
如图所示,集群中两台计算机node01和node02,两者共享资源,处理业务也基本一致,互为==主从==。当node01工作时,node02就处于待命状态。所有业务在Node01上运行,若发生故障服务和资源会转移到Node02上。
这种架构保证了服务的高可用,但是闲置的节点是对资源的一种浪费。
2.2. 负载均衡集群
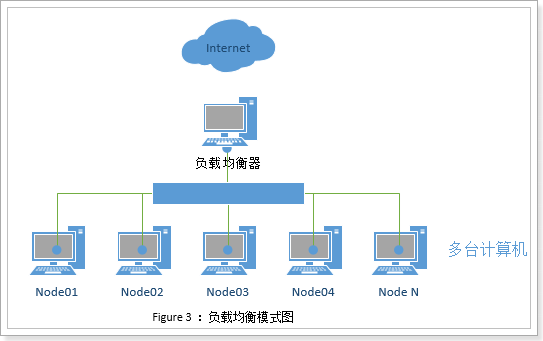
Load Balancing负载均衡,集群中的每一台计算机都来完成相同业务,不分主次。当用户请求到达时,通过某种算法,让请求均衡的分发到集群中的每个节点,充分利用每个节点的资源。如图所示:
因为每个节点业务相同,如果某个节点出现故障,只需要把请求分发到其它节点即可。
2.3. 科学计算集群
因为硬件设备的限制,单台计算机的处理性能是有上限的,如果计算需要的资源超过了单台计算机的能力,该怎么办呢?此时就可以使用科学计算集群。
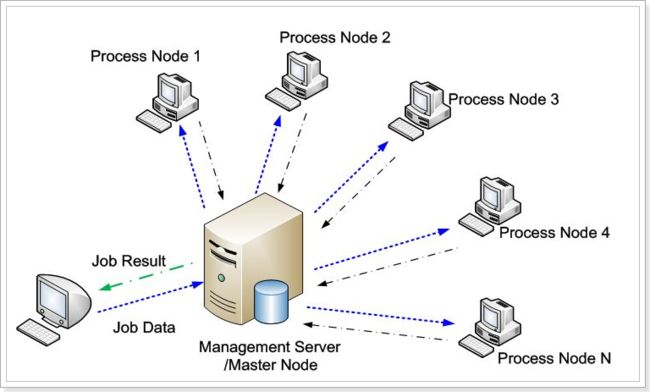
我们把复杂任务拆分成一个个小的子任务,然后分配到集群中的不同节点上完成,最后再把计算结果汇总。这样大量低廉的PC机互联起来,组成一个”超级计算机”以解决复杂的计算任务。
这样的方式也称为==分布式运算或者分布式集群==,集群中的每个节点完成==不同任务==。
3. 分布式web应用
上述计算机协作的集群方式任何领域都可以使用,在web开发中也是如此,不过有一些细节的不同。我们以一个电商网站为例,看看几种架构方式:
3.1. 单体应用
所有业务在一个系统中完成:
出现的问题:
- 系统庞大,功能耦合,难以维护
- 并发能力差,容易出现单点故障
- 无法针对不同功能进行优化
3.2. 分布式架构
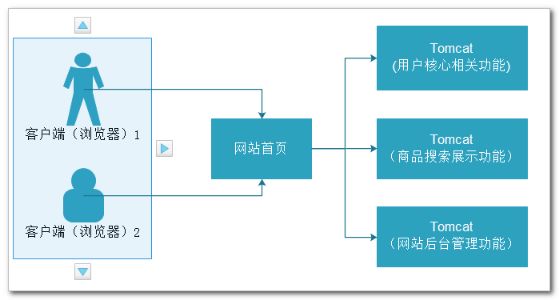
按照上面的分布式集群概念,集群中的每个节点完成不同业务。在web开发中也是如此,我们把完整系统进行拆分,形成独立系统,然后部署到不同的tomcat节点,不同节点通过网络通信,相互协作。
这样就将复杂系统细分,但是却带来了另一个问题,就是单个节点故障会导致整个系统不完整。
3.3. 高可用分布式集群架构
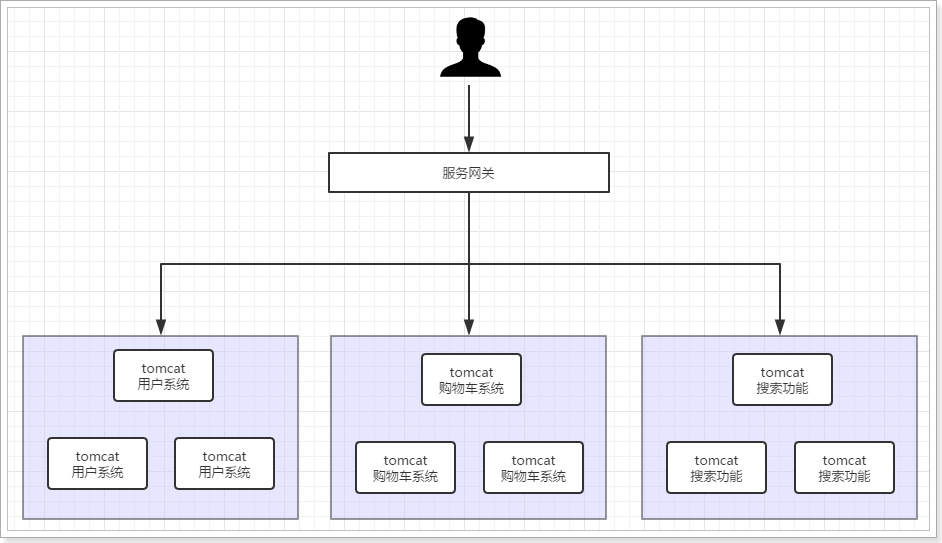
为了解决上面所述的单点故障问题,我们可以为分布式系统中的每个节点都部署负载均衡节点,即:每个业务系统都有一个负载均衡的小集群。
第二章 Elasticsearch集群
在之前的课程中,我们都是使用单点的elasticsearch,接下来我们会学习如何搭建Elasticsearch的集群。
1.单点的问题
单点的elasticsearch存在哪些可能出现的问题呢?
- 单台机器存储容量有限
- 单服务器容易出现单点故障,无法实现高可用
- 单服务的并发处理能力有限
所以,为了应对这些问题,我们需要对elasticsearch搭建集群
2.集群的结构
那么,到底该如何搭建集群呢?
2.1.数据分片
首先,我们面临的第一个问题就是数据量太大,单点存储量有限的问题。
大家觉得应该如何解决?
没错,我们可以把数据拆分成多份,每一份存储到不同机器节点(node),从而实现减少每个节点数据量的目的。这就是数据的分布式存储,也叫做:数据分片(Shard)。
2.2.数据备份
数据分片解决了海量数据存储的问题,但是如果出现单点故障,那么分片数据就不再完整,这又该如何解决呢?
没错,就像大家为了备份手机数据,会额外存储一份到移动硬盘一样。我们可以给每个分片数据进行备份,存储到其它节点,防止数据丢失,这就是数据备份,也叫数据副本(replica)。
数据备份可以保证高可用,但是每个分片备份一份,所需要的节点数量就会翻一倍,成本实在是太高了!
为了在高可用和成本间寻求平衡,我们可以这样做:
- 首先对数据分片,存储到不同节点
- 然后对每个分片进行备份,放到对方节点,完成互相备份
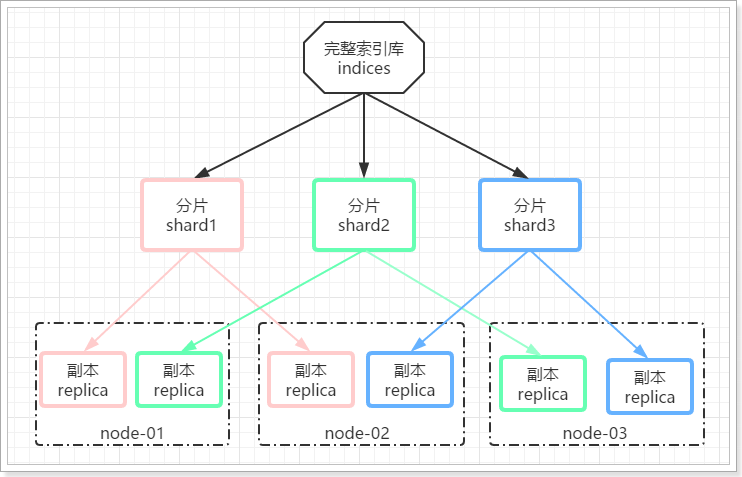
这样可以大大减少所需要的服务节点数量,如图,我们以3分片,每个分片备份一份为例:
在这个集群中,如果出现单节点故障,并不会导致数据缺失,所以保证了集群的高可用,同时也减少了节点中数据存储量。并且因为是多个节点存储数据,因此用户请求也会分发到不同服务器,并发能力也得到了一定的提升。
3.搭建集群
集群需要多台机器,我们这里用一台机器来模拟,因此我们需要在一台虚拟机中部署多个elasticsearch节点,每个elasticsearch的端口都必须不一样。
我们计划集群名称为:mryhl-elastic,部署3个elasticsearch节点,分别是:
node-01:http端口9201,TCP端口9301
node-02:http端口9202,TCP端口9302
node-03:http端口9203,TCP端口9303
先把目前电脑上的es和kibana关闭
第一步:把昨天安装的ES软件中复制一份,把复制出来软件中的data文件夹的数据删除(一定要做)
第二步:复制es软件粘贴3次,分别改名
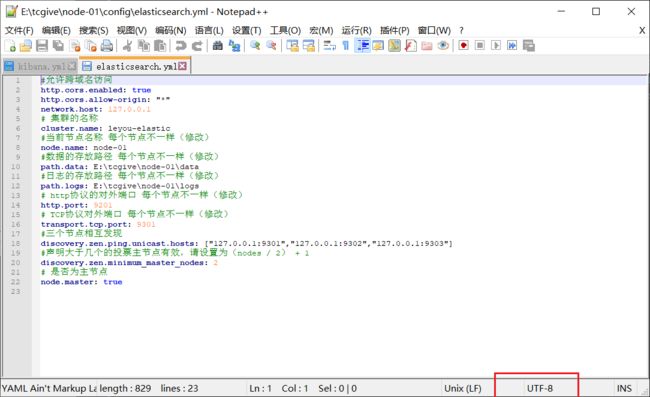
第三步:修改每一个节点的配置文件 config下的elasticsearch.yml,下面已第一份配置文件为例
#允许跨域名访问
http.cors.enabled: true
http.cors.allow-origin: "*"
network.host: 127.0.0.1
## 集群的名称
cluster.name: mryhl-elastic
#当前节点名称 每个节点不一样(修改)
node.name: node-01
#数据的存放路径 每个节点不一样(修改)
path.data: d:\class\sorfware\elasticsearch-9201\data
#日志的存放路径 每个节点不一样(修改)
path.logs: d:\class\sorfware\elasticsearch-9201\logs
## http协议的对外端口 每个节点不一样(修改)
http.port: 9201
## TCP协议对外端口 每个节点不一样(修改)
transport.tcp.port: 9301
#三个节点相互发现
discovery.zen.ping.unicast.hosts: ["127.0.0.1:9301","127.0.0.1:9302","127.0.0.1:9303"]
#声明大于几个的投票主节点有效,请设置为(nodes / 2) + 1
discovery.zen.minimum_master_nodes: 2
## 是否为主节点
node.master: true
按照上面的内容修改其他两个配置文件,注意:保存时一定确保文件的保存编码是utf-8
第四步:启动集群
把三个节点分别启动,启动时不要着急,要一个一个地启动
使用head插件查看
4.测试集群中创建索引库
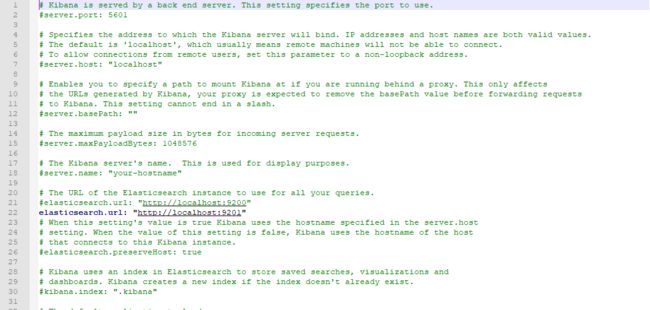
配置kibana,再重启
搭建集群以后就要创建索引库了,那么问题来了,当我们创建一个索引库后,数据会保存到哪个服务节点上呢?如果我们对索引库分片,那么每个片会在哪个节点呢?
这个要亲自尝试才知道。
还记得创建索引库的API吗?
请求方式:PUT
请求路径:/索引库名
请求参数:json格式:
{
    "settings": {
        "属性名": "属性值"
      }
}
settings:就是索引库设置,其中可以定义索引库的各种属性,目前我们可以不设置,都走默认。
这里给搭建看看集群中分片和备份的设置方式,示例:
PUT /mryhl
{
  "settings": {
    "number_of_shards": 3,
    "number_of_replicas": 1
  }
}
这里有两个配置:
- number_of_shards:分片数量,这里设置为3
- number_of_replicas:副本数量,这里设置为1,每个分片一个备份,一个原始数据,共2份。
通过chrome浏览器的head查看,我们可以查看到分片的存储结构:
可以看到,heima这个索引库,有三个分片,分别是0、1、2,每个分片有1个副本,共6份。
- node-01上保存了0号分片和1号分片的副本
- node-02上保存了1号分片和2号分片的副本
- node-03上保存了0号分片和2号分片的副本
第三章 Elasticsearch客户端
1.客户端介绍
在elasticsearch官网中提供了各种语言的客户端:https://www.elastic.co/guide/en/elasticsearch/client/index.html
我们接下来要学习的是JavaRestClient的客户端。
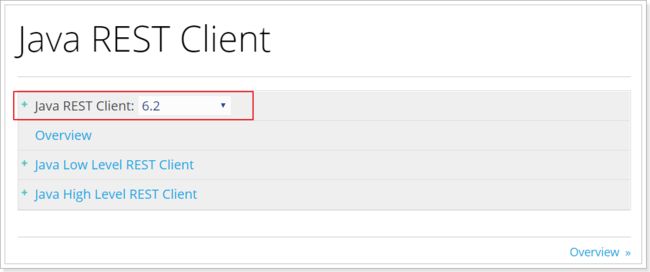
注意点击进入后,选择版本到6.2,因为我们之前按照的都是6.2.4版本:
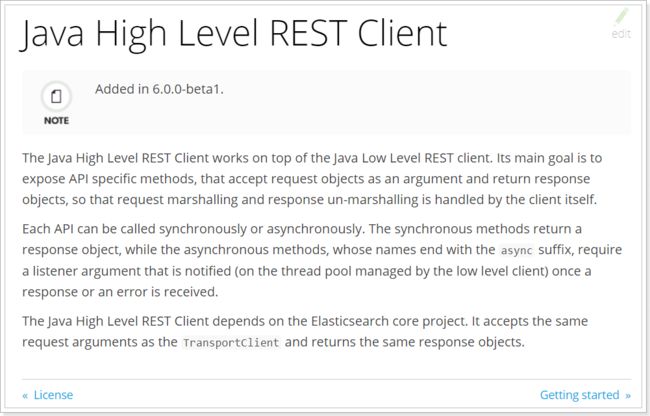
然后选择Java High Level Rest Client版本:
2.创建Demo工程
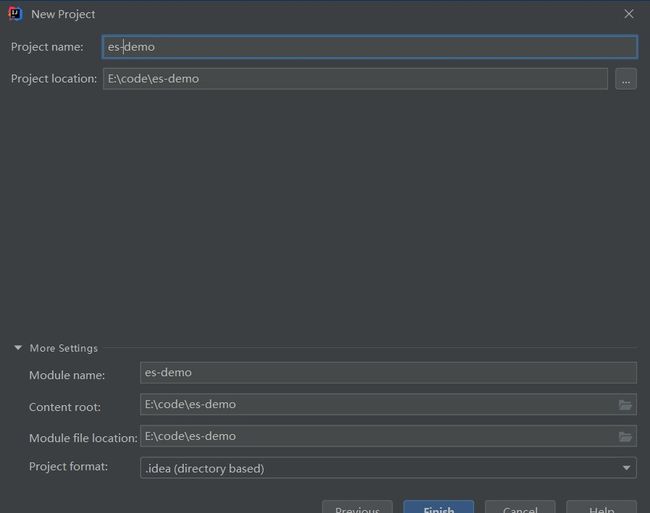
2.1.初始化项目
选择用maven创建:
2.2.pom文件
注意,这里我们直接导入了SpringBoot的启动器,方便后续讲解。不过还需要手动引入elasticsearch的High-level-Rest-Client的依赖:
<project xmlns="http://maven.apache.org/POM/4.0.0"
         xmlns:xsi="http://www.w3.org/2001/XMLSchema-instance"
         xsi:schemaLocation="http://maven.apache.org/POM/4.0.0 http://maven.apache.org/xsd/maven-4.0.0.xsd">
	<modelVersion>4.0.0modelVersion>

	<groupId>cn.itcastgroupId>
	<artifactId>es-demoartifactId>
	<version>1.0-SNAPSHOTversion>
	<parent>
		<groupId>org.springframework.bootgroupId>
		<artifactId>spring-boot-starter-parentartifactId>
		<version>2.1.3.RELEASEversion>
	parent>
	<dependencies>
		<dependency>
			<groupId>org.springframework.bootgroupId>
			<artifactId>spring-boot-starter-testartifactId>
		dependency>

		<dependency>
			<groupId>org.springframework.bootgroupId>
			<artifactId>spring-boot-starter-loggingartifactId>
		dependency>

		<dependency>
			<groupId>com.google.code.gsongroupId>
			<artifactId>gsonartifactId>
			<version>2.8.5version>
		dependency>

		<dependency>
			<groupId>org.apache.commonsgroupId>
			<artifactId>commons-lang3artifactId>
			<version>3.8.1version>
		dependency>

		<dependency>
			<groupId>org.elasticsearch.clientgroupId>
			<artifactId>elasticsearch-rest-high-level-clientartifactId>
			<version>6.4.3version>
		dependency>
    <dependency>
      <groupId>org.projectlombokgroupId>
      <artifactId>lombokartifactId>
    dependency>

    <dependency>
      <groupId>org.springframework.bootgroupId>
      <artifactId>spring-boot-starter-data-elasticsearchartifactId>
    dependency>
	dependencies>
	<build>
		<plugins>
			<plugin>
				<groupId>org.springframework.bootgroupId>
				<artifactId>spring-boot-maven-pluginartifactId>
			plugin>
		plugins>
	build>

project>
2.3.配置文件
我们在resource下引入application.yml: 先空着,一会儿用
## 服务名称
spring:
  application:
    name: es-demo
编写引导类
package cn.itcast;
import org.springframework.boot.SpringApplication;
import org.springframework.boot.autoconfigure.SpringBootApplication;
/**
* @author: mryhl
* @date: Created in 2020/11/7 9:59
* @description: 引导类
*/
public class ESApplication {
public static void main(String[] args) {
SpringApplication.run(ESApplication.class,args);
}
}
3.索引库及映射
创建索引库的同时,我们也会创建type及其映射关系,但是这些操作不建议使用java客户端完成,原因如下:
索引库和映射往往是初始化时完成,不需要频繁操作,不如提前配置好
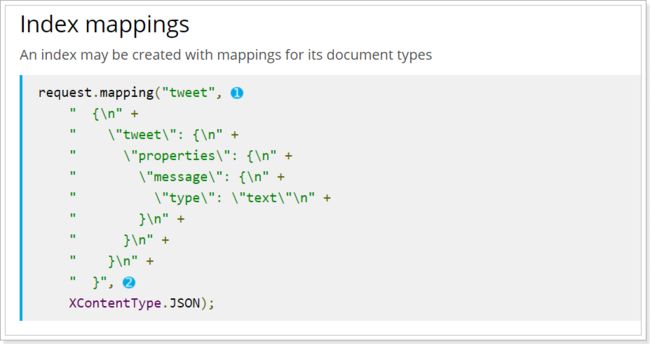
官方提供的创建索引库及映射API非常繁琐,需要通过字符串拼接json结构:
因此,这些操作建议还是使用我们昨天学习的Rest风格API去实现。
我们接下来以这样一个商品数据为例来创建索引库:
package cn.itcast.es.pojo;
import lombok.AllArgsConstructor;
import lombok.Data;
import lombok.NoArgsConstructor;
/**
* @author: mryhl
* @date: Created in 2020/11/7 11:56
* @description: Goods实体类
* 提供get/set/tostring 和全参空参构造
*/
public class Goods {
// id
private Long id;
//标题
private String title;
// 分类
private String category;
// 品牌
private String brand;
// 价格
private Double price;
// 图片地址
private String images;
}
分析一下数据结构:
- id:可以认为是主键,将来判断数据是否重复的标示,不分词,可以使用keyword类型
- title:搜索字段,需要分词,可以用text类型
- category:商品分类,这个是整体,不分词,可以使用keyword类型
- brand:品牌,与分类类似,不分词,可以使用keyword类型
- price:价格,这个是double类型
- images:图片,用来展示的字段,不搜索,index为false,不分词,可以使用keyword类型
我们可以编写这样的映射配置:
PUT /mryhl
{
    "settings": {
      "number_of_shards": 3,
      "number_of_replicas": 1
    },
    "mappings": {
        "goods": {
            "properties": {
                "id": {
                    "type": "keyword"
                },
                "title": {
                    "type": "text",
                    "analyzer": "ik_max_word"
                },
                "category": {
                    "type": "keyword"
                },
                "brand": {
                    "type": "keyword"
                },
                "images": {
                    "type": "keyword",
                    "index":  false
                },
                "price": {
                    "type": "double"
                }
            }
        }
    }
}
注意:java基于restful风格操作es,索引库和映射创建,不要是java代码完成,基于kibana语法完成
4.索引数据操作
有了索引库,我们接下来看看如何新增索引数据
4.0.初始化客户端
完成任何操作都需要通过HighLevelRestClient客户端,看下如何创建。
我们先编写一个测试类:
然后再@Before的方法中编写client初始化:
package cn.itcast.test;
import org.apache.http.HttpHost;
import org.elasticsearch.client.RestClient;
import org.elasticsearch.client.RestHighLevelClient;
import org.junit.After;
import org.junit.Before;
import java.io.IOException;
/**
* @author: mryhl
* @date: Created in 2020/11/7 12:03
* @description:
*/
public class RestClientTest {
RestHighLevelClient client = null;
public void testBefore() {
client = new RestHighLevelClient(
RestClient.builder(
HttpHost.create("http://127.0.0.1:9201"),
HttpHost.create("http://127.0.0.1:9202"),
HttpHost.create("http://127.0.0.1:9203")
)
);
}
public void testAfter() throws IOException {
client.close();
}
}
4.1.新增文档
示例:
/**
* @author mryhl
* 新增数据
*/
public void testAddDoc() throws Exception {
// 文档数据
Goods goods = new Goods(1L, "华为手机9", " 手机","华为", 3499.00, "http://image.mryhl.com/13123.jpg");
// 转为json格式
String json = gson.toJson(goods);
// 创建索引的请求对象
IndexRequest indexRequest = new IndexRequest("mryhl", "goods", goods.getId().toString());
// 绑定数据到请求对象
indexRequest.source(json, XContentType.JSON);
// 创建文档对象
client.index(indexRequest, RequestOptions.DEFAULT);
}
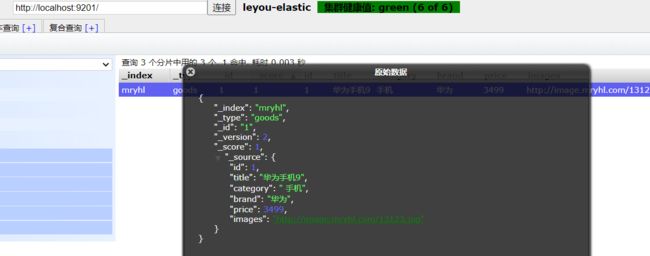
看下响应:
4.2.查看文档
根据rest风格,查看应该是根据id进行get查询,难点是对结果的解析:
public void testFindById() throws Exception{
//创建查询请求对象
GetRequest getRequest = new GetRequest("mryhl","goods","1");
//查询文档数据
GetResponse response = client.get(getRequest, RequestOptions.DEFAULT);
String json = response.getSourceAsString();
//解析json
Goods goods = gson.fromJson(json, Goods.class);
System.out.println(goods);
}
结果:
Goods(id=1, title=华为手机9, category= 手机, brand=华为, price=3499.0, images=http://image.mryhl.com/13123.jpg)
4.3.修改文档
新增时,如果传递的id是已经存在的,则会完成修改操作,如果不存在,则是新增。
补充另一种修改操作(实现相对麻烦,了解即可)
/**
* @author mryhl
* 修改文档
*/
public void testUpdateDoc() throws Exception {
// 文档数据
UpdateRequest updateRequest = new UpdateRequest("mryhl", "goods", "1");
// 准备写入数据
updateRequest.doc(XContentType.JSON,"id",1,"title","荣耀手机10");
// 修改文档数据
client.update(updateRequest,RequestOptions.DEFAULT);
}
4.4.删除文档
根据id删除:
/**
* @author mryhl
* 删除文档
*/
public void testDelete() throws Exception {
// 需要删除的文档
DeleteRequest deleteRequest = new DeleteRequest("mryhl", "goods", "1");
client.delete(deleteRequest,RequestOptions.DEFAULT);
}
4.5.批量新增
/**
* @author mryhl
* 批量新增
*/
public void testBatchAdd() throws Exception {
// 准备文档数据
List list = new ArrayList<>();
list.add(new Goods(1L, "华为手机7", "手机", "华为", 3299.00, "http://image.mryhl.com/13123.jpg"));
list.add(new Goods(2L, "坚果手机R1", "手机", "锤子", 3699.00, "http://image.mryhl.com/13123.jpg"));
list.add(new Goods(3L, "华为META10", "手机", "华为", 4499.00, "http://image.mryhl.com/13123.jpg"));
list.add(new Goods(4L, "华为Mix2S", "手机", "华为", 4299.00, "http://image.mryhl.com/13123.jpg"));
list.add(new Goods(5L, "荣耀V10", "手机", "荣耀", 2799.00, "http://image.mryhl.com/13123.jpg"));
BulkRequest bulkRequest = new BulkRequest();
for (Goods goods : list) {
bulkRequest.add(new IndexRequest("mryhl", "goods", goods.getId().toString()).source(gson.toJson(goods), XContentType.JSON));
}
// 批量新增
client.bulk(bulkRequest, RequestOptions.DEFAULT);
}
关键点:
BulkRequest:批量请求,可以添加多个IndexRequest对象,完成批处理
5.搜索数据
5.1.查询所有match_all
GET /mryhl/_search
{
  "query": {
    "match_all": {}
  }
}
java实现
/**
* @author mryhl
* 查询所有数据
*/
public void testMatchAll() throws Exception {
// 构建查询请求对象
SearchRequest searchRequest = new SearchRequest("mryhl");
// 创建查询构建器
SearchSourceBuilder sourceBuilder = new SearchSourceBuilder();
// 设置查询对象
sourceBuilder.query(QueryBuilders.matchAllQuery());
// 执行查询操作
SearchResponse response = client.search(searchRequest, RequestOptions.DEFAULT);
// 获取查询的数据结果
SearchHits hits = response.getHits();
long totalHits = hits.getTotalHits();
System.out.println("满足查询条件的总记录数:" + totalHits);
// 获取查询结果集
SearchHit[] searchHits = hits.getHits();
for (SearchHit searchHit : searchHits) {
// 获取查询结果数据 json格式字符串
String sourceAsString = searchHit.getSourceAsString();
// 解析json
Goods goods = gson.fromJson(sourceAsString, Goods.class);
System.out.println(goods);
}
}
结果:
满足查询条件的总记录数:5
Goods(id=2, title=坚果手机R1, category=手机, brand=锤子, price=3699.0, images=http://image.mryhl.com/13123.jpg)
Goods(id=4, title=华为Mix2S, category=手机, brand=华为, price=4299.0, images=http://image.mryhl.com/13123.jpg)
Goods(id=5, title=荣耀V10, category=手机, brand=荣耀, price=2799.0, images=http://image.mryhl.com/13123.jpg)
Goods(id=1, title=华为手机7, category=手机, brand=华为, price=3299.0, images=http://image.mryhl.com/13123.jpg)
Goods(id=3, title=华为META10, category=手机, brand=华为, price=4499.0, images=http://image.mryhl.com/13123.jpg)
注意,上面的代码中,搜索条件是通过sourceBuilder.query(QueryBuilders.matchAllQuery())来添加的。这个query()方法接受的参数是:QueryBuilder接口类型。
这个接口提供了很多实现类,分别对应我们在之前中学习的不同类型的查询,例如:term查询、match查询、range查询、boolean查询等,如图:
因此,我们如果要使用各种不同查询,其实仅仅是传递给sourceBuilder.query()方法的参数不同而已。而这些实现类不需要我们去new,官方提供了QueryBuilders工厂帮我们构建各种实现类:
5.2.关键字搜索match
其实搜索类型的变化,仅仅是利用QueryBuilders构建的查询对象不同而已,其他代码基本一致:
GET /mryhl/_search
{
  "query": {
    "match": {
      "title": "手机"
    }
  }
}
/**
* @author mryhl
* 匹配查询
*/
public void testMatchQuery() throws Exception {
//构建查询请求对象 默认执行的是查询所有操作
SearchRequest searchRequest = new SearchRequest("mryhl");
// 创建查询构建器
SearchSourceBuilder sourceBuilder = new SearchSourceBuilder();
// 设置查询对象
sourceBuilder.query(QueryBuilders.matchQuery("title","华为手机").operator(Operator.AND));
//关联查询方式到请求对象中
searchRequest.source(sourceBuilder);
// 执行查询操作
SearchResponse response = client.search(searchRequest, RequestOptions.DEFAULT);
printResult(response);
}
结果:
满足查询条件的总记录数:1
Goods(id=1, title=华为手机7, category=手机, brand=华为, price=3299.0, images=http://image.mryhl.com/13123.jpg)
因此,我们可以把这段代码封装,然后把查询条件作为参数传递:
/**
	 * @author mryhl
	 * 抽取的打印方法
	 */
	private void printResult(SearchResponse response) {
		// 获取查询的数据结果
		SearchHits hits = response.getHits();
		long totalHits = hits.getTotalHits();
		System.out.println("满足查询条件的总记录数:" + totalHits);
		// 获取查询结果集
		SearchHit[] searchHits = hits.getHits();
		for (SearchHit searchHit : searchHits) {
			// 获取查询结果数据 json格式字符串
			String sourceAsString = searchHit.getSourceAsString();
			// 解析json
			Goods goods = gson.fromJson(sourceAsString, Goods.class);
			System.out.println(goods);
		}
	}
5.3.范围查询range
与页面上一样,支持下面的范围关键字:
| 方法 | 说明 |
|---|---|
| gt(Object from) | 大于 |
| gte(Object from) | 大于等于 |
| lt(Object from) | 小于 |
| lte(Object from) | 小于等于 |
示例:
GET /mryhl/_search
{
  "query": {
    "range": {
      "price": {
        "gt": 1000,
        "lte": 4000
      }
    }
  }
}
/**
* @author mryhl
* 范围查询
*/
public void testRangeQuery() throws Exception {
// 构建查询请求对象 默认执行的是查询所有操作
SearchRequest searchRequest = new SearchRequest("mryhl");
// 创建查询构建器
SearchSourceBuilder sourceBuilder = new SearchSourceBuilder();
// 设置查询对象
sourceBuilder.query(QueryBuilders.rangeQuery("price").gte(3000).lte(5000));
//关联查询方式到请求对象中
searchRequest.source(sourceBuilder);
//执行查询操作
SearchResponse response = client.search(searchRequest, RequestOptions.DEFAULT);
//解析结果集
printResult(response);
}
结果:
满足查询条件的总记录数:4
Goods(id=2, title=坚果手机R1, category=手机, brand=锤子, price=3699.0, images=http://image.mryhl.com/13123.jpg)
Goods(id=4, title=华为Mix2S, category=手机, brand=华为, price=4299.0, images=http://image.mryhl.com/13123.jpg)
Goods(id=1, title=华为手机7, category=手机, brand=华为, price=3299.0, images=http://image.mryhl.com/13123.jpg)
Goods(id=3, title=华为META10, category=手机, brand=华为, price=4499.0, images=http://image.mryhl.com/13123.jpg)
其他各种查询:
/**
* @author mryhl
* 词条查询
*/
public void testTermQuery() throws Exception {
// 构建查询请求对象 默认执行的是查询所有操作
SearchRequest searchRequest = new SearchRequest("mryhl");
// 创建查询构建器
SearchSourceBuilder sourceBuilder = new SearchSourceBuilder();
// 设置查询对象
sourceBuilder.query(QueryBuilders.termQuery("title","华为"));
//关联查询方式到请求对象中
searchRequest.source(sourceBuilder);
//执行查询操作
SearchResponse response = client.search(searchRequest, RequestOptions.DEFAULT);
//解析结果集
printResult(response);
}
满足查询条件的总记录数:3
Goods(id=4, title=华为Mix2S, category=手机, brand=华为, price=4299.0, images=http://image.mryhl.com/13123.jpg)
Goods(id=1, title=华为手机7, category=手机, brand=华为, price=3299.0, images=http://image.mryhl.com/13123.jpg)
Goods(id=3, title=华为META10, category=手机, brand=华为, price=4499.0, images=http://image.mryhl.com/13123.jpg)
/**
* @author mryhl
* 组合查询
*/
public void testBoolQuery() throws Exception {
// 构建查询请求对象 默认执行的是查询所有操作
SearchRequest searchRequest = new SearchRequest("mryhl");
// 创建查询构建器
SearchSourceBuilder sourceBuilder = new SearchSourceBuilder();
// 设置查询对象
sourceBuilder.query(QueryBuilders.boolQuery().must(QueryBuilders.matchQuery("title","华为")).must(QueryBuilders.rangeQuery("price").gte(4300).lte(5000)));
//关联查询方式到请求对象中
searchRequest.source(sourceBuilder);
//执行查询操作
SearchResponse response = client.search(searchRequest, RequestOptions.DEFAULT);
//解析结果集
printResult(response);
}
满足查询条件的总记录数:1
Goods(id=3, title=华为META10, category=手机, brand=华为, price=4499.0, images=http://image.mryhl.com/13123.jpg)
5.4.source过滤
默认情况下,索引库中所有数据都会返回,如果我们想只返回部分字段,可以通过source filter来控制。
GET /mryhl/_search
{
  "query": {
    "range": {
      "price": {
        "gt": 1000,
        "lte": 4000
      }
    }
  },
  "_source": ["id","title","price"]
}
/**
* @author mryhl
* 过滤查询
*/
public void testFilterResult() throws Exception {
// 构建查询请求对象 默认执行的是查询所有操作
SearchRequest searchRequest = new SearchRequest("mryhl");
// 创建查询构建器
SearchSourceBuilder sourceBuilder = new SearchSourceBuilder();
// 设置查询对象
sourceBuilder.query(QueryBuilders.rangeQuery("price").gte(3000).lte(5000));
//设置展示的内容
sourceBuilder.fetchSource(new String[]{"title","price"},null);
//关联查询方式到请求对象中
searchRequest.source(sourceBuilder);
//执行查询操作
SearchResponse response = client.search(searchRequest, RequestOptions.DEFAULT);
//解析结果集
printResult(response);
}
关键代码:
//设置展示的内容
sourceBuilder.fetchSource(new String[]{"title","price"},null);
结果:
满足查询条件的总记录数:4
Goods(id=null, title=坚果手机R1, category=null, brand=null, price=3699.0, images=null)
Goods(id=null, title=华为Mix2S, category=null, brand=null, price=4299.0, images=null)
Goods(id=null, title=华为手机7, category=null, brand=null, price=3299.0, images=null)
Goods(id=null, title=华为META10, category=null, brand=null, price=4499.0, images=null)
结果过滤:
searchSourceBuilder.query(QueryBuilders.boolQuery().must(QueryBuilders.matchQuery("title","华为手机")).filter(QueryBuilders.rangeQuery("price").gte(4000).lte(5000)));
6.排序
依然是通过sourceBuilder来配置:
GET /mryhl/_search
{
  "query": {
    "range": {
      "price": {
        "gt": 1000,
        "lte": 4000
      }
    }
  },
  "_source": ["id","title","price"]
  , "sort": [
    {
      "price": {
        "order": "desc"
      }
    }
  ]
}
java实现
/**
* @author mryhl
* 排序查询
*/
public void testSortQuery() throws Exception {
// 构建查询请求对象 默认执行的是查询所有操作
SearchRequest searchRequest = new SearchRequest("mryhl");
// 创建查询构建器
SearchSourceBuilder sourceBuilder = new SearchSourceBuilder();
// 设置查询对象
sourceBuilder.query(QueryBuilders.rangeQuery("price").gte(3000).lte(5000));
//设置展示的内容
sourceBuilder.sort("price", SortOrder.DESC);
//关联查询方式到请求对象中
searchRequest.source(sourceBuilder);
//执行查询操作
SearchResponse response = client.search(searchRequest, RequestOptions.DEFAULT);
//解析结果集
printResult(response);
}
结果:
满足查询条件的总记录数:4
Goods(id=3, title=华为META10, category=手机, brand=华为, price=4499.0, images=http://image.mryhl.com/13123.jpg)
Goods(id=4, title=华为Mix2S, category=手机, brand=华为, price=4299.0, images=http://image.mryhl.com/13123.jpg)
Goods(id=2, title=坚果手机R1, category=手机, brand=锤子, price=3699.0, images=http://image.mryhl.com/13123.jpg)
Goods(id=1, title=华为手机7, category=手机, brand=华为, price=3299.0, images=http://image.mryhl.com/13123.jpg)
7.分页
分页需要视图层传递两个参数给我们:
- 当前页:page
- 每页大小:size
而elasticsearch中需要的不是当前页,而是起始位置,还好有公式可以计算出:
- 起始位置:start = (page - 1) * size
代码:
/**
* @author mryhl
* 排序查询
*/
public void testPageQuery() throws Exception {
// 构建查询请求对象 默认执行的是查询所有操作
SearchRequest searchRequest = new SearchRequest("mryhl");
// 创建查询构建器
SearchSourceBuilder sourceBuilder = new SearchSourceBuilder();
// 设置查询对象
sourceBuilder.query(QueryBuilders.rangeQuery("price").gte(3000).lte(5000));
//设置展示的内容
sourceBuilder.sort("price", SortOrder.DESC);
//设置分页条件
int page=2;
int size=3;
int index=(page-1)*size;
sourceBuilder.from(index);//分页起始值
sourceBuilder.size(size);//每页记录数
//关联查询方式到请求对象中
searchRequest.source(sourceBuilder);
//执行查询操作
SearchResponse response = client.search(searchRequest, RequestOptions.DEFAULT);
//解析结果集
printResult(response);
}
当我们传page为2的时候,结果是:
满足查询条件的总记录数:4
Goods(id=1, title=华为手机7, category=手机, brand=华为, price=3299.0, images=http://image.mryhl.com/13123.jpg)
8.聚合
再来试试聚合,我们这里以brand字段来聚合,看看有哪些品牌,每个品牌有多少数量。
聚合关键是弄清楚这几点:
- 聚合的字段是什么
- 聚合的类型是什么
- 给聚合起个名
与查询类似,聚合条件通过sourceBuilder.aggregation()方法来设置,而参数是一个接口:AggregationBuilder,这个接口也有大量的实现类,代表不同的聚合种类:
同样,我们也不需要自己去new,官方提供了一个工厂帮我们创建实例:
kibana查询语句
GET /mryhl/_search
{
  "query": {
    "match_all": {}
  }
  , "aggs": {
    "brandAggs": {
      "terms": {
        "field": "brand"
      }
    }
  },
  "size": 0
}
代码示例:
/**
* @author mryhl
* 聚合查询
*/
public void testAggsQuery() throws Exception {
// 构建查询请求对象 默认执行的是查询所有操作
SearchRequest searchRequest = new SearchRequest("mryhl");
// 创建查询构建器
SearchSourceBuilder sourceBuilder = new SearchSourceBuilder();
// 设置查询对象
sourceBuilder.query(QueryBuilders.matchAllQuery());
每页记录数
sourceBuilder.size(0);
//设置聚合条件 指定聚合三要素:聚合方式 聚合名称 聚合字段
sourceBuilder.aggregation(AggregationBuilders.terms("brandAgg").field("brand"));
//关联查询方式到请求对象中
searchRequest.source(sourceBuilder);
//执行查询操作
SearchResponse response = client.search(searchRequest, RequestOptions.DEFAULT);
Aggregations aggregations = response.getAggregations();
Terms brandAgg = aggregations.get("brandAgg");
List buckets = brandAgg.getBuckets();
for (Terms.Bucket bucket : buckets) {
System.out.println("聚合得到的品牌是:"+bucket.getKeyAsString());
System.out.println("该名牌对应的商品数量是:"+bucket.getDocCount());
}
//解析结果集
printResult(response);
}
结果:
聚合得到的品牌是:华为
该名牌对应的商品数量是:3
聚合得到的品牌是:荣耀
该名牌对应的商品数量是:1
聚合得到的品牌是:锤子
该名牌对应的商品数量是:1
满足查询条件的总记录数:5
9.高亮(了解)
kibana代码
GET /mryhl/_search
{
  "query": {
    "match": {
      "title": "手机"
    }
  },
  "highlight": {
    "fields": {
      "title": {}
    },
    "pre_tags": "",
    "post_tags": ""
  }

}
代码示例:
/**
* @author mryhl
* 高亮
*/
public void testHighLightQuery() throws Exception {
// 构建查询请求对象 默认执行的是查询所有操作
SearchRequest searchRequest = new SearchRequest("mryhl");
// 创建查询构建器
SearchSourceBuilder sourceBuilder = new SearchSourceBuilder();
// 设置查询对象
sourceBuilder.query(QueryBuilders.matchQuery("title","手机"));
HighlightBuilder highlightBuilder = new HighlightBuilder();
highlightBuilder.field("title");//高亮字段
highlightBuilder.preTags("");//高亮前缀
highlightBuilder.postTags("");//高亮后缀
sourceBuilder.highlighter(highlightBuilder);
//关联查询方式到请求对象中
searchRequest.source(sourceBuilder);
//执行查询操作
SearchResponse response = client.search(searchRequest, RequestOptions.DEFAULT);
//获取查询的数据结果
SearchHits hits = response.getHits();
long totalHits = hits.getTotalHits();
System.out.println("满足查询条件的总记录数:"+totalHits);
//获取查询结果集
SearchHit[] searchHits = hits.getHits();
for (SearchHit searchHit : searchHits) {
//处理高亮结果
Map highlightFields = searchHit.getHighlightFields();
HighlightField highlightField = highlightFields.get("title");
//高亮内容数组
Text[] fragments = highlightField.getFragments();
//转为高亮字符串
String title = StringUtils.join(fragments);
//获取查询结果数据 json格式字符串
String sourceAsString = searchHit.getSourceAsString();
//解析json
Goods goods = gson.fromJson(sourceAsString, Goods.class);
//设置title字段
goods.setTitle(title);
System.out.println(goods);
}
}
满足查询条件的总记录数:2
Goods(id=2, title=坚果<font color='red'>手机font>R1, category=手机, brand=锤子, price=3699.0, images=http://image.mryhl.com/13123.jpg)
Goods(id=1, title=华为<font color='red'>手机font>7, category=手机, brand=华为, price=3299.0, images=http://image.mryhl.com/13123.jpg)
关键代码:
查询条件中添加高亮字段:
-
new HighlightBuilder():创建高亮构建器.field("title"):指定高亮字段.preTags("")和.postTags(""):指定高亮的前置和后置标签
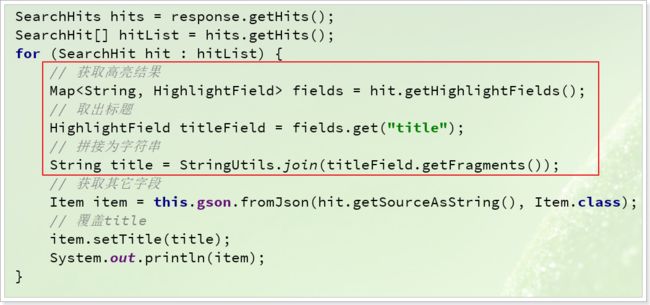
解析高亮结果:
第四章 SpringDataElasticsearch
接下来我们学习Spring提供的elasticsearch组件:Spring Data Elasticsearch
1.什么是SpringDataElasticsearch
SpringDataElasticsearch(以后简称SDE)是Spring Data项目下的一个子模块。
查看 Spring Data的官网:http://projects.spring.io/spring-data/
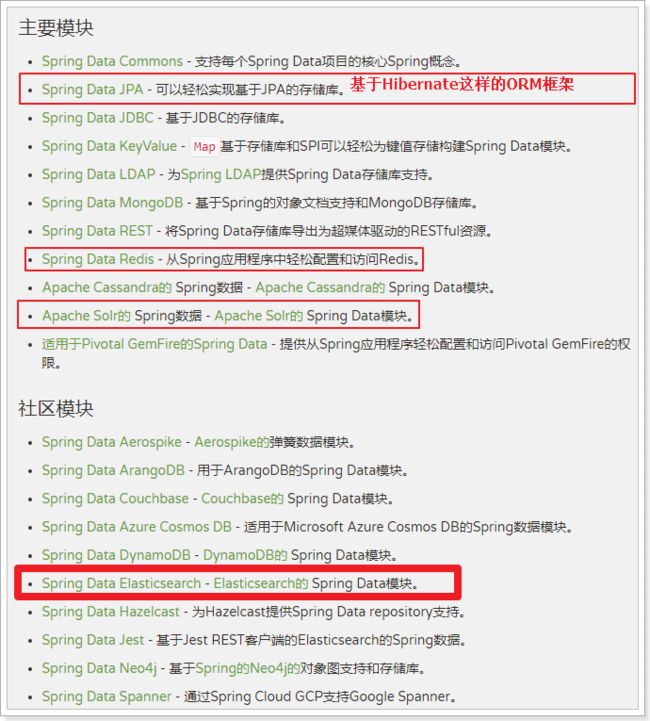
Spring Data 的使命是给各种数据访问提供统一的编程接口,不管是关系型数据库(如MySQL),还是非关系数据库(如Redis),或者类似Elasticsearch这样的索引数据库。从而简化开发人员的代码,提高开发效率。
包含很多不同数据操作的模块:
Spring Data Elasticsearch的页面:https://projects.spring.io/spring-data-elasticsearch/
特征:
- 支持Spring的基于
@Configuration的java配置方式,或者XML配置方式 - 提供了用于操作ES的便捷工具类
ElasticsearchTemplate。包括实现文档到POJO之间的自动智能映射。 - 利用Spring的数据转换服务实现的功能丰富的对象映射
- 基于注解的元数据映射方式,而且可扩展以支持更多不同的数据格式
- 根据持久层接口自动生成对应实现方法,无需人工编写基本操作代码(类似mybatis,根据接口自动得到实现)。当然,也支持人工定制查询
2.配置SpringDataElasticsearch
我们在pom文件中,引入SpringDataElasticsearch的启动器:
<dependency>
    <groupId>org.springframework.bootgroupId>
    <artifactId>spring-boot-starter-data-elasticsearchartifactId>
dependency>
然后,只需要在resources下新建application.yml文件,引入elasticsearch的host和port即可:
spring:
  application:
    name: es-demo
  data:
    elasticsearch:
      cluster-name: mryhl-elastic
      cluster-nodes: 127.0.0.1:9301,127.0.0.1:9302,127.0.0.1:9303
需要注意的是,SpringDataElasticsearch底层使用的不是Elasticsearch提供的RestHighLevelClient,而是TransportClient,并不采用Http协议通信,而是访问elasticsearch对外开放的tcp端口,我们之前集群配置中,设置的分别是:9301,9302,9303
添加引导类
package cn.itcast;
import org.springframework.boot.SpringApplication;
import org.springframework.boot.autoconfigure.SpringBootApplication;
public class ESApplication {
public static void main(String[] args) {
SpringApplication.run(ESApplication.class,args);
}
}
另外,SpringBoot已经帮我们配置好了各种SDE配置,并且注册了一个ElasticsearchTemplate供我们使用。接下来一起来试试吧。
3.索引库操作
创建索引库&并指定映射
准备一个pojo对象
然后准备一个新的实体类,作为下面与索引库对应的文档:
实际上,与我们自定义工具类类似,SDE也是通过实体类上的注解来配置索引库信息的,我们需要在Goods上添加下面的一些注解:
package cn.itcast.es.pojo;
import lombok.AllArgsConstructor;
import lombok.Data;
import lombok.NoArgsConstructor;
import org.springframework.data.annotation.Id;
import org.springframework.data.elasticsearch.annotations.Document;
import org.springframework.data.elasticsearch.annotations.Field;
import org.springframework.data.elasticsearch.annotations.FieldType;
(indexName = "mryhlbx",type = "goods",shards = 3,replicas = 1)
public class Goods {
private Long id;
(type = FieldType.Text, analyzer = "ik_max_word")
private String title; //标题
(type = FieldType.Keyword)
private String category;// 分类
(type = FieldType.Keyword)
private String brand; // 品牌
(type = FieldType.Double)
private Double price; // 价格
(type = FieldType.Keyword,index = false)
private String images; // 图片地址
}
我们先创建一个测试类,然后注入ElasticsearchTemplate:下面是创建索引库的API示例:
package cn.itcast.test;
import cn.itcast.es.pojo.Goods;
import cn.itcast.es.repository.GoodsRepository;
import org.junit.Test;
import org.junit.runner.RunWith;
import org.springframework.beans.factory.annotation.Autowired;
import org.springframework.boot.test.context.SpringBootTest;
import org.springframework.data.elasticsearch.core.ElasticsearchTemplate;
import org.springframework.test.context.junit4.SpringRunner;
/**
* @author: mryhl
* @date: Created in 2020/11/7 20:41
* @description:
*/
(SpringRunner.class)
@SpringBootTest
public class SpringDataESTest {
private ElasticsearchTemplate esTemplate;
private GoodsRepository goodsRepository;
/**
* 创建索引库
*/
public void testCreateIndex() throws Exception{
esTemplate.createIndex(Goods.class);
}
/**
* 创建映射
*/
public void testCreateMapping() throws Exception{
esTemplate.putMapping(Goods.class);
}
}
几个用到的注解:
- @Document:声明索引库配置
- indexName:索引库名称
- type:类型名称,默认是“docs”
- shards:分片数量,默认5
- replicas:副本数量,默认1
- @Id:声明实体类的id
- @Field:声明字段属性
- type:字段的数据类型
- analyzer:指定分词器类型
- index:是否创建索引
]
查看索引库:
4.索引数据CRUD
SDE的索引数据CRUD并没有封装在ElasticsearchTemplate中,而是有一个叫做ElasticsearchRepository的接口:
我们需要自定义接口,继承ElasticsearchRespository:
package cn.itcast.es.repository;

import cn.itcast.es.pojo.Goods;
import org.springframework.data.elasticsearch.repository.ElasticsearchRepository;

public interface GoodsRepository extends ElasticsearchRepository<Goods,Long> {
}
4.4.1.创建索引数据
创建索引有单个创建和批量创建之分,先来看单个创建
/**
* @author mryhl
* 新增文档数据
*/
public void testSave() throws Exception {
Goods goods = new Goods(1L, "华为手机9", " 手机",
"华为", 3499.00, "http://image.mryhl.com/13123.jpg");
goodsRepository.save(goods);
}
再来看批量创建:
/**
* @author mryhl
* 批量添加文档
*/
public void testSaveAll() throws Exception {
// 准备文档数据:
List list = new ArrayList<>();
list.add(new Goods(1L, "华为手机7", "手机", "华为", 3299.00, "/13123.jpg"));
list.add(new Goods(2L, "坚果手机R1", "手机", "锤子", 3699.00, "/13123.jpg"));
list.add(new Goods(3L, "华为META10", "手机", "华为", 4499.00, "/13123.jpg"));
list.add(new Goods(4L, "华为Mix2S", "手机", "华为", 4299.00, "/13123.jpg"));
list.add(new Goods(5L, "荣耀V10", "手机", "华为", 2799.00, "/13123.jpg"));
goodsRepository.saveAll(list);
}
通过elasticsearch-head查看:
4.4.2.查询索引数据
默认提供了根据id查询,查询所有两个功能:
根据id查询
public void testFindById() throws Exception{
Optional optional = goodsRepository.findById(1L);
Goods goods = optional.get();
System.out.println(goods);
}
结果:
查询所有:
/**
* @author mryhl
* 查询所有
*/
public void testFindAll() throws Exception {
Iterable goods = goodsRepository.findAll();
for (Goods good : goods) {
System.out.println(good);
}
}
结果:
Goods(id=2, title=坚果手机R1, category=手机, brand=锤子, price=3699.0, images=/13123.jpg)
Goods(id=4, title=华为Mix2S, category=手机, brand=华为, price=4299.0, images=/13123.jpg)
Goods(id=5, title=荣耀V10, category=手机, brand=华为, price=2799.0, images=/13123.jpg)
Goods(id=1, title=华为手机7, category=手机, brand=华为, price=3299.0, images=/13123.jpg)
Goods(id=3, title=华为META10, category=手机, brand=华为, price=4499.0, images=/13123.jpg)
删除操作
public void testDelete() throws Exception{
goodsRepository.deleteById(1L);
goodsRepository.deleteAll();
}
4.4.3.自定义方法查询
GoodsRepository提供的查询方法有限,但是它却提供了非常强大的自定义查询功能:
只要遵循SpringData提供的语法,我们可以任意定义方法声明:
package cn.itcast.es.repository;
import cn.itcast.es.pojo.Goods;
import org.springframework.data.elasticsearch.repository.ElasticsearchRepository;
import java.util.List;
public interface GoodsRepository extends ElasticsearchRepository<Goods,Long> {
List findByBrand(String brand) ;
List findByBrandAndCategory(String brand, String category) ;
List findByBrandOrCategory(String brand, String category) ;
}
无需写实现,SDE会自动帮我们实现该方法,我们只需要用即可:
/**
* 自定义查询
*/
public void testFindByCondition() throws Exception{
//基于品牌查询
//List goods = goodsRepository.findByBrand("华为");
//List goods = goodsRepository.findByBrandAndCategory("华为","手机");
List goods = goodsRepository.findByBrandOrCategory("华为","电视");
for (Goods good : goods) {
System.out.println(good);
}
}
结果:
Goods(id=4, title=华为Mix2S, category=手机, brand=华为, price=4299.0, images=/13123.jpg)
Goods(id=5, title=荣耀V10, category=手机, brand=华为, price=2799.0, images=/13123.jpg)
Goods(id=3, title=华为META10, category=手机, brand=华为, price=4499.0, images=/13123.jpg)
支持的一些语法示例:
| Keyword | Sample | Elasticsearch Query String |
|---|---|---|
And |
findByNameAndPrice |
{"bool" : {"must" : [ {"field" : {"name" : "?"}}, {"field" : {"price" : "?"}} ]}} |
Or |
findByNameOrPrice |
{"bool" : {"should" : [ {"field" : {"name" : "?"}}, {"field" : {"price" : "?"}} ]}} |
Is |
findByName |
{"bool" : {"must" : {"field" : {"name" : "?"}}}} |
Not |
findByNameNot |
{"bool" : {"must_not" : {"field" : {"name" : "?"}}}} |
Between |
findByPriceBetween |
{"bool" : {"must" : {"range" : {"price" : {"from" : ?,"to" : ?,"include_lower" : true,"include_upper" : true}}}}} |
LessThanEqual |
findByPriceLessThan |
{"bool" : {"must" : {"range" : {"price" : {"from" : null,"to" : ?,"include_lower" : true,"include_upper" : true}}}}} |
GreaterThanEqual |
findByPriceGreaterThan |
{"bool" : {"must" : {"range" : {"price" : {"from" : ?,"to" : null,"include_lower" : true,"include_upper" : true}}}}} |
Before |
findByPriceBefore |
{"bool" : {"must" : {"range" : {"price" : {"from" : null,"to" : ?,"include_lower" : true,"include_upper" : true}}}}} |
After |
findByPriceAfter |
{"bool" : {"must" : {"range" : {"price" : {"from" : ?,"to" : null,"include_lower" : true,"include_upper" : true}}}}} |
Like |
findByNameLike |
{"bool" : {"must" : {"field" : {"name" : {"query" : "?*","analyze_wildcard" : true}}}}} |
StartingWith |
findByNameStartingWith |
{"bool" : {"must" : {"field" : {"name" : {"query" : "?*","analyze_wildcard" : true}}}}} |
EndingWith |
findByNameEndingWith |
{"bool" : {"must" : {"field" : {"name" : {"query" : "*?","analyze_wildcard" : true}}}}} |
Contains/Containing |
findByNameContaining |
{"bool" : {"must" : {"field" : {"name" : {"query" : "**?**","analyze_wildcard" : true}}}}} |
In |
findByNameIn(Collection |
{"bool" : {"must" : {"bool" : {"should" : [ {"field" : {"name" : "?"}}, {"field" : {"name" : "?"}} ]}}}} |
NotIn |
findByNameNotIn(Collection |
{"bool" : {"must_not" : {"bool" : {"should" : {"field" : {"name" : "?"}}}}}} |
Near |
findByStoreNear |
Not Supported Yet ! |
True |
findByAvailableTrue |
{"bool" : {"must" : {"field" : {"available" : true}}}} |
False |
findByAvailableFalse |
{"bool" : {"must" : {"field" : {"available" : false}}}} |
OrderBy |
findByAvailableTrueOrderByNameDesc |
{"sort" : [{ "name" : {"order" : "desc"} }],"bool" : {"must" : {"field" : {"available" : true}}}} |
5.原生查询
如果觉得上述接口依然不符合你的需求,SDE也支持原生查询,这个时候还是使用ElasticsearchTemplate
而查询条件的构建是通过一个名为NativeSearchQueryBuilder的类来完成的,不过这个类的底层还是使用的原生API中的QueryBuilders、AggregationBuilders、HighlightBuilders等工具。
示例:
/**
* 原生查询方式 将SDE与restful Client查询方式整合在一起
*/
public void testNativeQuery() throws Exception{
//原生查询构建器
NativeSearchQueryBuilder queryBuilder = new NativeSearchQueryBuilder();
//设置查询对象(查询方式)
//queryBuilder.withQuery(QueryBuilders.matchAllQuery());
queryBuilder.withQuery(QueryBuilders.matchQuery("title","手机"));
//queryBuilder.withQuery(QueryBuilders.rangeQuery("price").gte(1000).lte(3000));
//过滤展示的内容
//queryBuilder.withSourceFilter(new FetchSourceFilter(new String[]{"title","price","images"},null));
//分页、排序 注意:分页起始页码是从0开始
//queryBuilder.withPageable(PageRequest.of(0,3));
//queryBuilder.withPageable(PageRequest.of(0,3,Sort.by(Sort.Direction.DESC,"price")));
//设置聚合条件 指定聚合三要素:聚合方式 聚合名称 聚合字段
queryBuilder.addAggregation(AggregationBuilders.terms("brandAgg").field("brand"));
//设置高亮条件
//queryBuilder.withHighlightFields(new HighlightBuilder.Field("title").preTags("").postTags(""));
//执行查询
AggregatedPage result = esTemplate.queryForPage(queryBuilder.build(), Goods.class);
//解析聚合结果
/*Aggregations aggregations = result.getAggregations();
Terms brandAgg = aggregations.get("brandAgg");
List buckets = brandAgg.getBuckets();
for (Terms.Bucket bucket : buckets) {
System.out.println("聚合得到的品牌是:"+bucket.getKeyAsString());
System.out.println("该名牌对应的商品数量是:"+bucket.getDocCount());
}*/
System.out.println("总记录数:"+result.getTotalElements());
System.out.println("总页数:"+result.getTotalPages());
//获取查询结果集
List content = result.getContent();
for (Goods goods : content) {
System.out.println(goods);
}
}
上述查询不支持高亮结果,悲剧。
第五章 经验值
1.往ES6同一个索引库中插入多个类型会报错
在ES6中新建一个索引库,先添加一个映射,再添加一个映射会报错
REST API 调用代码如下
PUT itheima
PUT itheima/_mapping/table1
{
  "properties": {
    "title":{
      "type": "text"
    },
    "images":{
      "type": "keyword",
      "index": false
    },
    "price":{
      "type": "float"
    }
  }
}
PUT itheima/_mapping/table2
{
  "properties": {
    "title1":{
      "type": "text"
    },
    "images1":{
      "type": "keyword",
      "index": false
    },
    "price1":{
      "type": "float"
    }
  }
}
2.出现的问题
3.问题的分析
在ES5.X版本中是可以在同一个索引库下添加多个映射类型的,每个映射类型相当于索引库来说就类似于MySQL中的数据库和表
从ES6.X开始不允许在同一个索引中添加多个映射类型
从ES5.X升级到ES6.X的多个映射类型会被保留
但是通过API来创建的话就只允许一个映射类型
在ES7.X版本中映射就被废弃了,如果想在ES6升级到ES7还兼容的话,映射类型可以设置为固定的
_doc
4.问题解决办法
在一个索引库中只添加一种映射类型,如果之后有升级ES到7.X版本的话,建议这个类型为
_doc,请求代码如下
PUT itheima

PUT itheima/_mapping/_doc
{
  "properties": {
    "title":{
      "type": "text"
    },
    "images":{
      "type": "keyword",
      "index": false
    },
    "price":{
      "type": "float"
    }
  }
}
知识扩展:自定义结果处理器(了解)
要支持高亮,必须自定义结果处理器来实现,结果处理器是一个接口:
可以看到,处理器中的方法接受3个参数:
SearchResponse:搜索的Response,原生查询中就见到过Class:结果的实体类的字节码,本例中的是Goods.classclazz Pageable:分页参数,就是我们定义的PageRequest
返回值一个:AggregatedPage,就是带聚合的分页结果
我们可以实现这个方法,在方法内部对响应处理,带上高亮结果:
/**
* 处理高亮的配置类
*/
class MySearchResultMapper implements SearchResultMapper {
Gson gson = new Gson();
public AggregatedPage mapResults(SearchResponse response, Class clazz, Pageable pageable) {
//获取查询的数据结果
SearchHits hits = response.getHits();
long total = hits.getTotalHits();
//获取聚合结果
Aggregations aggregations = response.getAggregations();
String scrollId = response.getScrollId();
//最大得分
float maxScore = hits.getMaxScore();
//自己封装高亮结果 goods
List content = new ArrayList<>();
//获取高亮结果,封装到content结果集
SearchHit[] searchHits = hits.getHits();
for (SearchHit searchHit : searchHits) {
//处理高亮结果
Map highlightFields = searchHit.getHighlightFields();
for(String key:highlightFields.keySet()){
HighlightField highlightField = highlightFields.get(key);
//高亮内容数组
Text[] fragments = highlightField.getFragments();
//转为高亮字符串
String value = StringUtils.join(fragments);
//获取查询结果数据 json格式字符串
String sourceAsString = searchHit.getSourceAsString();
T t = gson.fromJson(sourceAsString, clazz);
try {
//封装高亮数据到对象中
BeanUtils.setProperty(t,key,value);
} catch (Exception e) {
e.printStackTrace();
}
//将t对象存入content集合
content.add(t);
}
}
return new AggregatedPageImpl(content,pageable,total,aggregations,scrollId,maxScore);
}
}
然后再次编写带高亮查询:
/**
* 原生查询方式 将SDE与restful Client查询方式整合在一起
*/
public void testNativeQuery() throws Exception{
//原生查询构建器
NativeSearchQueryBuilder queryBuilder = new NativeSearchQueryBuilder();
queryBuilder.withQuery(QueryBuilders.matchQuery("title","手机"));
//设置高亮条件
queryBuilder.withHighlightFields(new HighlightBuilder.Field("title").preTags("").postTags(""));
//执行查询
AggregatedPage result = esTemplate.queryForPage(queryBuilder.build(), Goods.class,new MySearchResultMapper());
System.out.println("总记录数:"+result.getTotalElements());
System.out.println("总页数:"+result.getTotalPages());
//获取查询结果集
List content = result.getContent();
for (Goods goods : content) {
System.out.println(goods);
}
}
结果:
总记录数:1
总页数:1
Goods(id=2, title=坚果<font color='red'>手机font>R1, category=手机, brand=锤子, price=3699.0, images=/13123.jpg)


