基于微信小程序 + colorUI 做的form表单封装——input
前言
一、内容
二、先看效果
1.input目前支持的动态配置
2.配置代码
3.效果展示
三、详细步骤
0.引入colorUI
1.引入aw
2.使用
3.增加校验
现在我们模拟一个提交数据前的验证看是否成功
三、全部代码
总结
前言
最近在做一个微信小程序,里面涉及了大量表单组件(如:input、picker、radio)的提交、预览,以及九宫格视频、图片的添加、回显,又看到 colorUI 这个ui库,感觉挺符合我审美,封装的也很好,最终决定在colorUI的基础上再封装一下,增加业务逻辑,使之更契合实际开发项目。
本着记录并回顾学习的心态写下这篇文章,同时如果大家有相同的业务需求,欢迎大家使用,当然,如果可以给我star那就更感谢了。
- github:https://github.com/Paiduils/aw
- 码云:https://gitee.com/paiduils/aw
使用方法相当简单,只需要在项目中引入该组件库,再进行简单的数组配置(一条json就是一个表单组件),就能轻松实现数据驱动视图。
一、内容
- 本篇讲述input的封装,后续将陆续添加picker、radio、checkbox、textarea、九宫格图片等;
- 因为博主本人也是新手,所以讲的也会更入门向一点,纯手摸手教学,同时欢迎大佬指点。
二、先看效果
1.input目前支持的动态配置
/**
     * 当且仅当 type === 'input' 显示该组件
     *
     * ---参数说明---
     * topLine            默认没有上划线,可加
     * clearBottomLine    默认有下划线,可删
     * label              输入框标题(最多长度为6,溢出隐藏)
     * requied            是否必填(显示红星)
     * inputType          input框的类型,默认text
     * disabled           是否禁用
     * value              input值
     * password           是否是密码类型,默认为否
     * maxLen             input框最大长度,默认40
     * placeholder + noPlaceholder        默认为“‘请输入’ + 输入框标题(label)” 通过placeholder可自定义
     *                                    也可通过noPlaceholder 来清除默认placeholder
     * icon               input框右侧是否添加icon(color UI: 如:"cuIcon-locationfill",colorUI的图标)
     * iconColor          icon颜色,默认橘色 "text-orange"
     * BtnText            加按钮的文本(最多四字,溢出隐藏)
     * BtnBgCol           按钮的背景色
     * rule + message     结合“WxValidate.js” 验证输入文本是否符合规则
     *
*/
2.配置代码
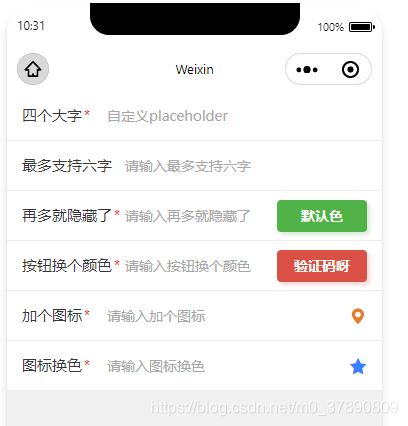
{ label: '四个大字', submitName: 'name', type: 'input', inputType: 'text', value: '', requied: true, placeholder: '自定义placeholder',rule: { required: true },message: { required: '请输入用户名' }},
{ label: '最多支持六字', submitName: 'adress2', type: 'input', inputType: 'text', value: ''},
{ label: '再多就隐藏了呀', submitName: 'adress', type: 'input', inputType: 'text', value: '', requied: true, BtnText: '默认色'},
{ label: '按钮换个颜色', submitName: 'adress', type: 'input', inputType: 'text', value: '', requied: true, BtnText: '验证码呀', BtnBgCol: 'bg-red'},
{ label: '加个图标', submitName: 'adress', type: 'input', inputType: 'text', value: '', requied: true, icon: 'cuIcon-locationfill' },
{ label: '图标换色', submitName: 'adress', type: 'input', inputType: 'text', value: '', requied: true, icon: 'cuIcon-favorfill', iconColor: 'text-blue'}
3.效果展示
- 配置完成后,只需要上述简单的代码,就可以得到下图红框的input
- input输入内容后,会自动将内容发送到配置数组的 “value” 字段中
- 再进行简单的规则配置,即可实现对输入内容的正则验证
- 下面这张图的九宫格图片模块与选择框等模块,会在后续文章中持续输出
三、详细步骤
0.引入colorUI
- 由于本组件的ui主要用的是 colorUI ,所以先将 colorUI 应用到项目中,方法很简单,colorUI 的github描述的也很详细,在这里就不多赘述了
1.引入aw
- 去 码云、github项目中下载aw,将components中的form文件夹拉到你的项目里(不需要根目录,放在components下就可以)
- 之后去app.json中的“usingComponents”里注册该组件(当然,也可以不注册全局组件,哪个页面用,在哪个页面注册也是可以的)

-
ok,到了这一步,已经成功一半了,接下来我们看下如何使用
2.使用
- 新建一个页面form,这就是要使用该组件的页面
- 在form.wxml中添加如下代码
-
在form.js里添加如下代码
Page({ /** * 页面的初始数据 */ data: { form: [ { label: '四个大字', submitName: 'name', type: 'input', inputType: 'text', value: '', requied: true, placeholder: '自定义placeholder',rule: { required: true },message: { required: '请输入用户名' }}, { label: '最多支持六字', submitName: 'adress2', type: 'input', inputType: 'text', value: ''}, { label: '再多就隐藏了呀', submitName: 'adress', type: 'input', inputType: 'text', value: '', requied: true, BtnText: '默认色'}, { label: '按钮换个颜色', submitName: 'adress3', type: 'input', inputType: 'text', value: '', requied: true, BtnText: '验证码呀', BtnBgCol: 'bg-red'}, { label: '加个图标', submitName: 'adress4', type: 'input', inputType: 'text', value: '', requied: true, icon: 'cuIcon-locationfill' }, { label: '图标换色', submitName: 'adres5s', type: 'input', inputType: 'text', value: '', requied: true, icon: 'cuIcon-favorfill', iconColor: 'text-blue'} ] }, }) -
上面步骤没有问题的话,现在form页面应该是这个样子

在输入框输入文本之后,数据会自动同步到form.js里data.form中
3.增加校验
如果想对输入文本进行提交校验,我们只需要在onLoad函数中调用一个事先封装好的initValidate函数
- 在下载的utils文件夹中找到“WxValidate.js” 和 “formMethods.js”,将这俩文件引入你的项目(需同目录下)
-
在form.js中引入formMethods.js
const formMethods = require('../../utils/formMethods.js') -
最后就可以在form.js 的 onLoad函数中调用该函数
  /**
   * 生命周期函数--监听页面加载
   */
  onLoad: function (options) {
    // input验证
    formMethods.initValidate(this.data.form, this);
  },
现在我们模拟一个提交数据前的验证看是否成功
- form.wxml增加提交按钮
- form.js增加submitForm方法
// 验证提交数据
  submitForm: function() {
    const self = this;
    const { form } = this.data;
    const formValidate = {};
    /**
     * submitName字段是唯一的,一般是与后端约定的数据提交的字段名
     * 例如:
     *    前端展示名称    后端存储名称
     *      姓名            name
     *      年龄            age
     *      性别            sex
     * */
    form.forEach(item => { formValidate[item.submitName] = item.value});
    /**
     * 传入表单数据,调用验证方法
     * !!!
     * requied为true时,会默认校验是否必填;当自己增加校验规则时,会覆盖该默认方法
     * */
    if (!self.WxValidate.checkForm(formValidate)) {
      const error = self.WxValidate.errorList[0];
      wx.showToast({ title: error.msg, icon: 'none' });
      return false
    };
    // 数据校验完毕,可发起提交请求
    wx.showToast({ title: '验证完毕' });
  },
四、全部代码
form.wxml
form.js
// pages/form/form.js
const formMethods = require('../../utils/formMethods.js')
Page({

  /**
   * 页面的初始数据
   */
  data: {
    form: [
      { label: '四个大字', submitName: 'name', type: 'input', inputType: 'text', value: '', requied: true,    placeholder: '自定义placeholder',rule: { required: true },message: { required: '请输入用户名' }},
      { label: '最多支持六字', submitName: 'adress2', type: 'input', inputType: 'text', value: ''},
      { label: '再多就隐藏了呀', submitName: 'adress', type: 'input', inputType: 'text', value: '', requied: true, BtnText: '默认色'},
      { label: '按钮换个颜色', submitName: 'adress3', type: 'input', inputType: 'text', value: '', requied: true, BtnText: '验证码呀', BtnBgCol: 'bg-red'},
      { label: '加个图标', submitName: 'adress4', type: 'input', inputType: 'text', value: '', requied: true, icon: 'cuIcon-locationfill' },
      { label: '图标换色', submitName: 'adres5s', type: 'input', inputType: 'text', value: '', requied: true, icon: 'cuIcon-favorfill', iconColor: 'text-blue'}
    ]
  },

  // 验证提交数据
  submitForm: function() {
    const self = this;
    const { form } = this.data;
    const formValidate = {};
    /**
     * submitName字段是唯一的,一般是与后端约定的数据提交的字段名
     * 例如:
     *    前端展示名称    后端存储名称
     *      姓名            name
     *      年龄            age
     *      性别            sex
     * */
    form.forEach(item => { formValidate[item.submitName] = item.value});
    /**
     * 传入表单数据,调用验证方法
     * !!!
     * requied为true时,会默认校验是否必填;当自己增加校验规则时,会覆盖该默认方法
     * */
    if (!self.WxValidate.checkForm(formValidate)) {
      const error = self.WxValidate.errorList[0];
      wx.showToast({ title: error.msg, icon: 'none' });
      return false
    };
    // 数据校验完毕,可发起提交请求
    wx.showToast({ title: '验证完毕' });
  },

  /**
   * 生命周期函数--监听页面加载
   */
  onLoad: function (options) {
    // input验证
    formMethods.initValidate(this.data.form, this);
  },
})
总结
ok,到这里就正式结束了,感谢大家能看到这里,觉得觉得这个小组件还能用的话,请给我个star鼓励一下
我会尽快整理出其他组件,再次感谢大家!
