使用micropython+pycharm开发ESP32
使用micropython+pycharm开发ESP32
1.安装pycharm
此步骤略去,CSDN上有大量参考文章。
2.配置pycharm环境
1.进入file->setting->plugins安装BetterInterllij和micropython模块
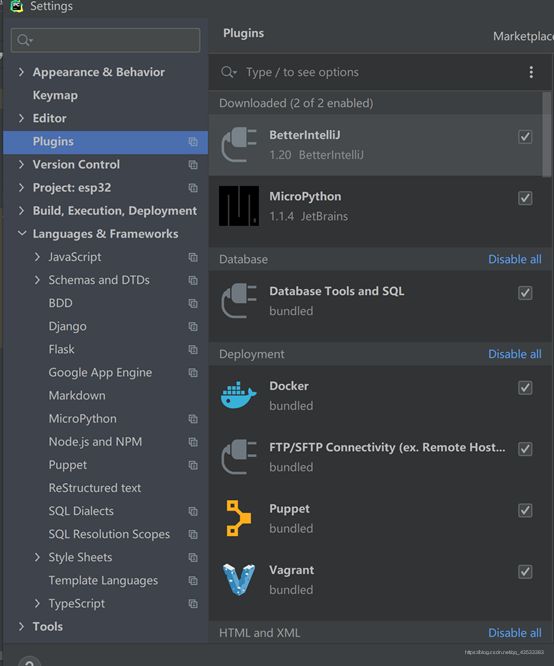
2.进入language里找到micropython选择Enable micropython support,devicetype选择pybord。将ESP32使用数据线连接电脑,在device path里选择esp32对应的com口。

3.刷写esp32固件
在此之前要对esp32刷写micropython固件,相当于在电脑里安装python环境。刷写对应固件后才能跑python代码。
1.在乐鑫官网上下载esp32 的flash刷写工具
flash刷写工具
2.在micropython官网上下载固件包
固件包开源可以自己自定义编译,也可以选择官方编译完成的固件包。
官方固件下载地址
在使用过程中发现V4.x的固件包不支持urequests模块。(网络爬虫需要用到)
3.打开步骤一中的工具按图示操作即可。
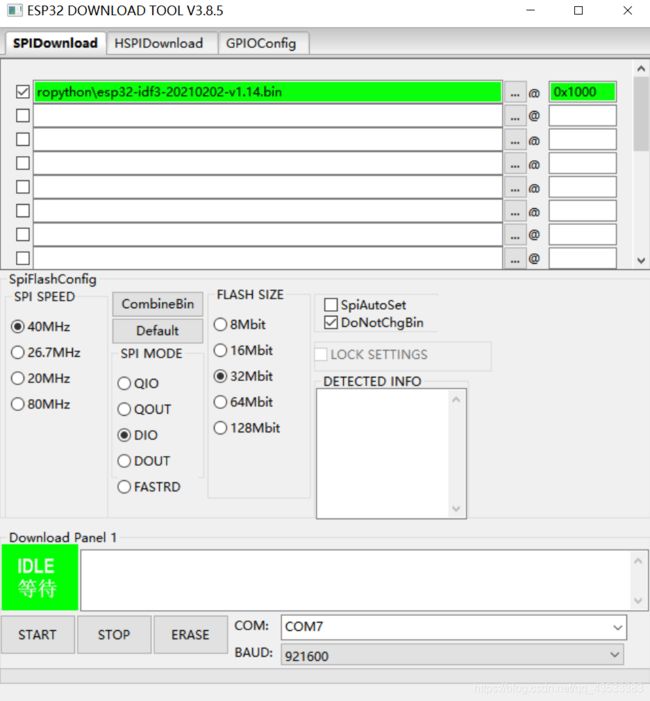
(1).选择对应固件,地址填写0x1000
(2).首先ERASE,等待擦写完成
(3).点击START,等待固件刷写完成
到此,准备工作已经完成
4.在pycharm中写程序并上传到esp32
友情提示,pycharm中micropython的模块和esp32固件中的模块并不完全对应。在pycharm中报错,但是烧写到esp32中可以正常跑起来。比如PWM模块
最后提供一个小例程,实现功能:
1.产生PWM波驱动LED
2.连接WIFI获取当前日期时间
3.多线程:led显示,日期打印放在两个子线程中运行
完结。
内容可能有欠缺,欢迎交流。
from machine import Pin, UART, PWM, freq, RTC
import network
import urequests
import utime
import json
import _thread

ssid = "*******"  # your wifi name
password = "********"  # your wifi password

utime.sleep(2)
uart = UART(1, 115200)
uart.init(115200, bits=8, parity=None, stop=1)
DATE = [0, 0, 0]
TIME = [0, 0, 0]
nowtime = ()

def connect_net():
    """
    this method let esp32 to connect to wifi network
    will be delay 1s,until success to connect to network;
    and print wifi information
    :return:
    """
    net = network.WLAN(network.STA_IF)
    net.active(True)
    net.connect(ssid, password)
    # utime.sleep(5)
    while True:
        if net.isconnected():
            break
        else:
            utime.sleep(1)
    print(net.ifconfig())


def LED_PWM():
    """
    this method can Generate PWM wave to drive LED
    :return:
    """
    while True:
        for i in range(0, 800, 5):
            utime.sleep(0.01)
            PWM(Pin(2), freq=800, duty=i)
        for i in range(0, 800, 5):
            utime.sleep(0.01)
            PWM(Pin(2), freq=800, duty=800 - i)


def get_time():
    """
    this method is use internet to get current time
    :return:
    """
    global DATE, TIME
    url = 'http://quan.suning.com/getSysTime.do'
    res = urequests.get(url).text
    j = json.loads(res)
    t2_date = j['sysTime2'].split()[0]  # 日期
    t2_time = j['sysTime2'].split()[1]  # 时间
    # 初始日期和时间,设置一次即可
    DATE = ([int(x) for x in t2_date.split('-')])  # 设置初始日期年、月、日
    TIME = ([int(x) for x in t2_time.split(':')])  # 设置初始时间时、分、秒
    utime.sleep(1)


def show_time():
    nowtime = tuple([DATE[0], DATE[1], DATE[2], 4, TIME[0], TIME[1], TIME[2], 0])
    rtc = RTC()
    rtc.init(nowtime)
    while True:
        nowtime = rtc.datetime()
        print('%d-%d-%d;%d:%d:%d' % (nowtime[0], nowtime[1], nowtime[2], nowtime[4],
                                     nowtime[5], nowtime[6]))
        # print(rtc.datetime())
        utime.sleep(1)


if __name__ == '__main__':
    connect_net()
    get_time()
    _thread.start_new_thread(LED_PWM, ())
    _thread.start_new_thread(show_time, ())

    freq(160000000)  # frequency must be 20MHz, 40MHz, 80Mhz, 160MHz or 240MHz

    while True:
        print('is running\r')
        print('cpu frequency:%.2fMHz\n' % (freq() / 1000000))
        utime.sleep(10)