使用Vscode 编译 开发 调试 STM32单片机 VScode+openocd+STM32CubeMX+GDB
Vscode 编译 开发 调试 STM32单片机
- 为什么记录这篇文章
- 环境准备
-
- 软件及工具下载
- 软件安装
- VScode功能搭建
-
- 使用STM32CubeMX生成带有makefile的工程
- 配置VScode工程
- 使用vscode 开发,编译,烧录,运行,调试
-
- 开发
- 编译
- 烧录
- 调试
- 总结
为什么记录这篇文章
本文基于使用windows10 系统,计划在VScode上集成开发、编译、烧录和调试一系列功能。
CSDN以及网络上有很多介绍移植STM32到VScode 环境开发调试的文章,但是没有能够找到一篇能够完整的指导自己完成这个工作。所以这里完整记录自己的配置和使用过程。
由于现在软件版本和系统环境迭代变化很快,本人对stm32开发环境不够熟悉,所以一边学习一边操作,亲自做一遍,把步骤和遇到的问题记录下来,供自己日后查阅,也能方便有需要的朋友参考。
环境准备
软件及工具下载
点击软件名称进入官网下载链接,本文使用软件皆为windows平台
- STM32CubeMX 用于生成stm32的工程模板和makefile文件;
- Java SE Runtime Environment 8 STM32CubeMX运行依赖环境,安装STM32CubeMX的前置;
- Visual Studio Code 强大的IDE工具,支持多种开发语言,具有丰富的插件。
- MINGW 看了很多文章都没有说明这个软件的目的,其实是提供了在windows系统中的make 命令,用来解析编译STM32CubeMX生成的makefile,而它同时安装的一些toolchain其实并没有使用到,容易造成误解。所以这里也可以直接换成make for windows。
- GNU Arm Embedded Toolchain windows版本的交叉编译工具链包括编译器(gcc),调试器(gdb),链接器(ld)和其它工具。建议下载安装版本,注意记录安装路径,后面需要用到。
- OpenOCD (Open On-Chip Debugger)开源的调试器,适配市面上大部分的调试器和mcu单片机芯片。本例中主要作为stm32的烧录工具和开启GDB server使用。
软件安装
-
STM32CubeMX
需要注意的是安装stm32需要依赖于JRE环境,在上面的地址提前下载安装JRE最新版本即可。
具体安装步骤可以参考 STM32CubeMX介绍、下载与安装 -
VScode
vscode安装完成后,需要另外安装上插件才能完成本文的工作(ARM和C/C++),同时也有一些推荐的插件建议一起安装上。在vscode中按下ctrlshiftx进入下载插件界面。
- ARM:使的ARM汇编代码获得语法高亮,这里主要用在启动文件上。
- C/C++:使VScode获得对C/C++语言的支持,包括智能提示,调试等。
- Intellisense:提供C++智能感知功能。
- Cortex-Debug:对ARM Cortex-M内核的单片机提供调试支持。
- Cortex-Debug: Device Support Pack -STM32F1(F4,L1):这三个芯片包分别对Cortex-Debug提供三款芯片的设备支持。
- GBKtoUTF8:因为平时的Keil的STM32工程文件大部分都是GB2312编码的,这个扩展可以自动将GB2312
- 转换为UTF-8编码。 LLVM :代码补全
-
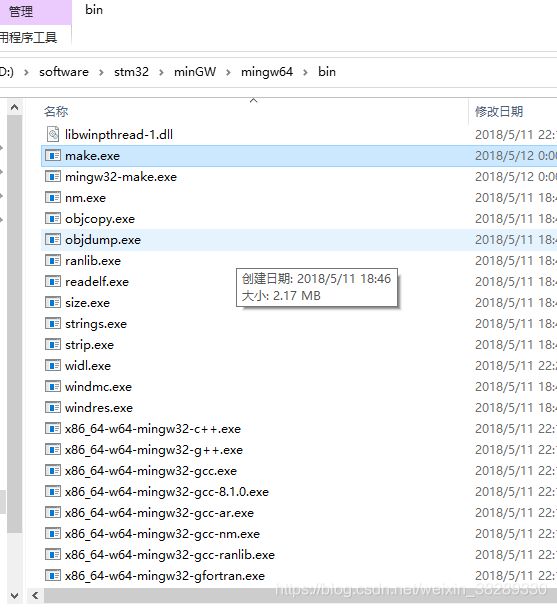
MINGW
这个软件有个需要注意的地方,虽然我们需要mingw提供的make命令,但是这个软件并不提供make(狗头,好多文章都不提及这一点)。mingw提供的命令是mingw32-make.exe。
我们需要进入安装目录的bin目录下,复制mingw32-make.exe重命名为make.exe。
当然你可以不用重命名,然后再后面的vscode json脚本中需要make的位置填入mingw32-make。
-
openocd
运行opeocd需要指定interface和target下的一些配置文件,这和oopenocd.exe 不在同一个目录下面。所以再运行时候会报错 找不到对应的配置文件。
这里我直接将xx\OpenOCD-20201228-0.10.0\bin\中的命令全部copy到\OpenOCD-20201228-0.10.0\share\openocd\scripts下,并将后者路径添加了系统变量中。
其实后面我们在vscode中task json中调用的时候依然找不到配置文件,需要手动将使用到的配置文件拷贝到项目文件夹中。不过这里为了我们能在cmd.exe或者power shell中直接使用,建议这么做。 -
GNU Arm Embedded Toolchain
这里我并没有将arm toolchain 的命令加入系统变量中,原因是exe安装过程中会自己添加系统变量。
对于vscode,在makefile中会指定使用arm toolchain,而make的环境在vode code 的properties 中指定了,这个过程中没有涉及到windows的系统变量,足以找到。 -
添加系统变量
其他软件直接安装即可,需要注意的是记录下软件的安装目录。
其中openocd和MINGW需要将可执行文件目录添加到系统的环境变量中。

-
环境验证
在cmd终端或者power shell或者你又git bash中分别运行如下命令,可以正常打印版本信息没有报错。
arm-none-eabi-gcc -v
openocd -v
make -v
恭喜,环境安装完成,下面进入vscode的集成环境。

VScode功能搭建
使用STM32CubeMX生成带有makefile的工程
使用stm32CubeMX的最初目的是他可以生成makefile,不过使用下来发现,这个软件对于各种mcu 引脚以及时钟的配置非常人性化。
安装完成后,打开STM32CubeMX选择对应芯片类型,软件会自动下载所选择芯片的支持包。在列表中选中芯片,封装号要一致。
创建工程(本文重点是开发环境,若想了解具体了解,请看STM32CubeMX使用方法
创建工程时需要注意两个地方
1.创建工程时,在SYS Mode and Configuration选择后续需要使用的debug方式。默认选择swd。

2.在Project Manager中将Toolchain / IDE选为Makefile。输出makefile文件用于后续vscode 环境编译。
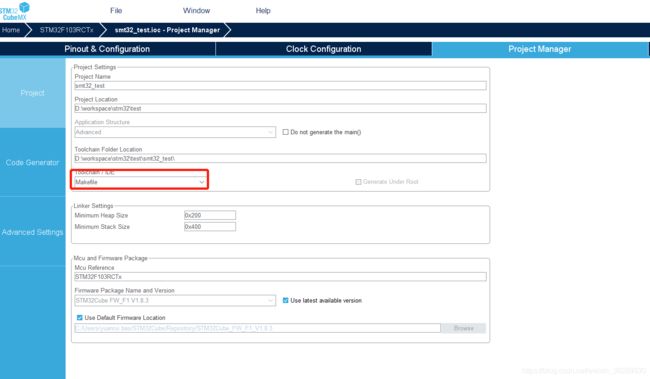
配置完成后点击右上角的GENERATE CODE,在配置的Project Loaction目录下生成项目文件。
其中Makefile文件和Core/Src/就是我们想要的东西。至此STM32CubeMX已经完成了他的使命。
(Application structure 选择advanced会在src目录上多一层core目录。不需要可以不选。)
makefile已经加芯片硬件和时钟相关的code 都添加好,main.c中也有详细的注释说明。
需要注意的是如果另外添加库或者头文件,需要手动修改makefile,添加-I或-L路径。
配置VScode工程
- 使用VScode 打开上述生成的工程文件夹。安装vscode时候选择添加右键菜单的可以直接菜单打开。

- 配置c_cpp_properties.json
使用Ctrl+Shift+P打开命令行,
输入edit configurations(json)他会在工程文件夹下生成一个.vscode文件夹并在其中创建一个c_cpp_properties.json的配置文件。其中include路径和宏定义可以参照makefile添加。
{
    "configurations": [
        {
            "name": "ARM",
            "includePath": [
                "${workspaceFolder}/**",
                "Inc",
                "Drivers/STM32F1xx_HAL_Driver/Inc",
                "Drivers/STM32F1xx_HAL_Driver/Inc/Legacy",
                "Drivers/CMSIS/Device/ST/STM32F1xx/Include",
                "Drivers/CMSIS/Include",
                "Drivers/CMSIS/Include",
                "d:/software/stm32/10 2020-q4-major/bin/../lib/gcc/arm-none-eabi/10.2.1/../../../../arm-none-eabi/include/c++/10.2.1",
                "d:/software/stm32/10 2020-q4-major/bin/../lib/gcc/arm-none-eabi/10.2.1/../../../../arm-none-eabi/include/c++/10.2.1/arm-none-eabi",
                "d:/software/stm32/10 2020-q4-major/bin/../lib/gcc/arm-none-eabi/10.2.1/../../../../arm-none-eabi/include/c++/10.2.1/backward",
                "d:/software/stm32/10 2020-q4-major/bin/../lib/gcc/arm-none-eabi/10.2.1/include",
                "d:/software/stm32/10 2020-q4-major/bin/../lib/gcc/arm-none-eabi/10.2.1/include-fixed",
                "d:/software/stm32/10 2020-q4-major/bin/../lib/gcc/arm-none-eabi/10.2.1/../../../../arm-none-eabi/include"
            ],
            "defines": [
                "USE_HAL_DRIVER",
                "STM32F103xE"
            ],
            "compilerPath": "d:/software/stm32/10 2020-q4-major/bin/arm-none-eabi-gcc",
            "cStandard": "c11",
            "cppStandard": "c++17",
            "intelliSenseMode": "windows-gcc-arm"
        }
    ],
    "version": 4
}
- 配置task.json
这里分别实现了build clean来编译和清除编译。以及ocdflash 和ocddebug,用来区分烧录下载和使用当前芯片中的固件直接开启gdb server用于debug。
{
    // See https://go.microsoft.com/fwlink/?LinkId=733558
    // for the documentation about the tasks.json format
    "version": "2.0.0",
    "tasks": [
        {
            "dependsOn":"clean",
            "label": "build",
            "type": "shell",
            "command": "make",
            "args": [
                "-j4"
            ],
            "group": "build",
            "problemMatcher": "$gcc"
        },
        {
            "label": "clean",
            "type": "shell",
            "command": "make",
            "args": [
                "clean"
            ],
            "problemMatcher": "$gcc"
        },
        {
            "dependsOn":"build",
            "label": "ocdflash",
            "type": "shell",
            "command": "openocd",
            "args": [
                "-f",
                "cmsis-dap.cfg",
                "-f",
                "stm32f1x.cfg",
                "-c",
                "program ./build/${workspaceRootFolderName}.elf verify reset"
            ],
            "problemMatcher": []
        },
        {
            "dependsOn":"build",
            "label": "ocddebug",
            "type": "shell",
            "command": "openocd",
            "args": [
                "-f",
                "cmsis-dap.cfg",
                "-f",
                "stm32f1x.cfg",
            ],
            "problemMatcher": []
        }
    ]
}
- 配置launch.json
{
    // Use IntelliSense to learn about possible attributes.
    // Hover to view descriptions of existing attributes.
    // For more information, visit: https://go.microsoft.com/fwlink/?linkid=830387
    "version": "0.2.0",
    "configurations": [
        {
            "name": "ARM Debug",
            "type": "cppdbg",
            "request": "launch",
            "miDebuggerPath": "d:/software/stm32/10 2020-q4-major/bin/arm-none-eabi-gdb.exe",
            "targetArchitecture": "arm",
            "program": "./build/${workspaceRootFolderName}.elf",
            "setupCommands": [
                {
                    "text": "file './build/${workspaceRootFolderName}.elf'"
                },
                {
                    "text": "target remote localhost:3333"
                },
                {
                    "text": "monitor reset"
                },
                {
                    "text": "monitor halt"
                },
                {
                    "text": "load"
                }
            ],
            //"preLaunchTask": "build",
            //"launchCompleteCommand": "None",
            //"externalConsole": true,
            "cwd": "${workspaceRoot}"
        },
        {
            "name": "Debug (OpenOCD)",
            "cwd": "${workspaceRoot}",
            "executable": "./build/0119test.elf",
            "request": "launch",
            "type": "cortex-debug",
            "servertype": "openocd",
            "device": "STM32F1",
            "runToMain": true,
            "configFiles": [
                "cmsis-dap.cfg",
                "stm32f1x.cfg"
            ]
        }
    ]
}
这里原意是要使用cortex debug这里插件来代替gdb 调试的。但是我这里出现了问题。所以直接使用arm gdb调试。
其实cortex debug插件的作用就是做了arm debug中发送 text cmd的工作,不用自己输入了。底层实现还是通过rm-none-eabi-gdb实现,所以这里没有影响。
-
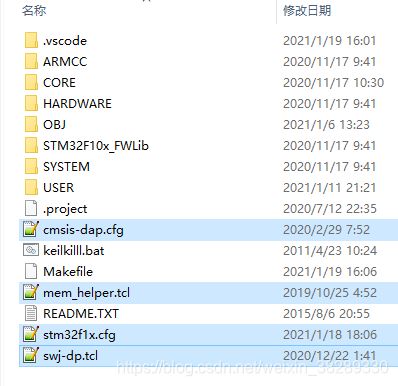
复制openocd 配置文件
将
\OpenOCD-20201228-0.10.0\share\openocd\scripts下
interface/cmsis-dap.cfg
target/stm32f1x.cfg
mem_helper.tcl
target/swj-dp.tcl
四个文件复制到项目工程目录下。
使用vscode 开发,编译,烧录,运行,调试
开发
修改项目中main.c

编译
菜单栏terminal > Run task > select build;(这里可以自定义vscode的快捷键)

生成build目录和target

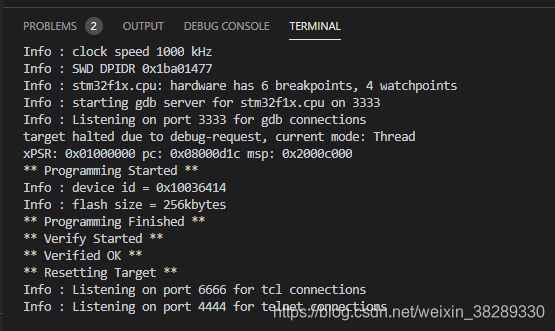
烧录
菜单栏terminal > Run task > select ocdflash; 开始将bin烧录到stm32中。在上面task.json中可以看到我将clean task设置为build的前置操作,将build的tash设置为ocdflash的前置操作。
所以这里我只要运行一次ocdflash ,vscode就会自动帮我们完成这三个task,然后开启各个端口等待调试。
调试
菜单栏Run > Start Debugging > select ARM Debug;(vscode的默认快捷键为F5)

进入debug 窗口
![]()
上面控制面板可以进行全速,单步等调试方式,左侧行号前面点击可以设置断点。左侧变量框内可以跟踪各种变量情况。

总结
自己摸索一边再记录下来确实消耗了比较多的时间,也难以避免的遗漏了一些内容,能理解很多博主心声了。
自己算是完成了这个功能。不过也有cortex debug 插件的问题遗留了下来。初步分析是使用cotex debug 调用openocd 默认打开的 gbd port 是50001 而实际的是3333。但是我查阅了vscode和openocd的官方手册,都没有说明这个端口可以在哪里配置。
后面有时间会继续跟踪这个问题。
这里应感谢如下链接的两篇文章给了我很多帮助:
https://blog.csdn.net/u013671216/article/details/106170433
https://www.bilibili.com/read/cv7820328/