Ansible-大总结(六)
文章目录
-
- Ansible
-
- Ansible的安装
- Ineventory主机清单
-
- 基于密钥连接
- Ad-Hoc
-
- 常用模块
- 帮助手册doc
- bash模块
- yum模块
- 文件管理模块
-
- copy文件拷贝模块
- file文件创建模块
- get_url文件下载模块
- 启停服务模块
- group组模块
- user模块
- crond定时任务模块
- mount挂载模块7 nfs 8客户端挂载
- 防火墙管理模块
- Ansible-Playbook
-
- PlayBook部署httpd小练习
- PlayBook实战
-
- 实战一
- 实战二:2
- Ansible跑起wordpress
- ansible变量
-
- 变量的优先级
- 定义变量
- 变量注册register
- facts变量
-
- setup模块
- 关闭facts
- 常用变量信息参数
- playbook控制
-
- Playbook条件语句
-
- 示例
- 添加yum仓库模块
- playbook循环语句
- handlers
- Playbook任务标签
- playbook文件复用
- Playbook忽略错误
- Playbook错误处理
- Ansible加密模块
- Jinja2模板
-
- Jinja2基本使用
- 配置keepalived配置文件
- mysql剧本模块
- Roles
-
- 解压模块
- 数据库模块
- 配置phpmyadmin
Ansible
ansible所需要掌握的内容
Ansible基础架构(被控端、控制端、inwentory、ad-hoc、playbook)
Inventory主机清单
Ad-Hoc
Playbook
变量
判断语句
异常处理
include包含
tag标记
handlers触发器
jinja模块
role角色
galaxy
ansible加密模块
Ansible自动化管理大纲
什么是Ansible
Ansible是一个IT 自动化的配置管理工具,自动化主要体现在Ansible集成了丰富的模块及丰富的功能的组,可以通过一个命令行
完成一系列的操作。进而能减少我们重复性的工作和维护成本,以提高工作的效率。
同类型软件对比
1.puppet 学习难,安装ruby环境难,没有远程执行功能
2.ansible 轻量级,大规模环境下只通过ssh会很慢,串行的
3.saltstack 一般选择salt会使用C/S结构的模式,salt-master和salt-minion,并行的,大规模批量操作的情况下,
会比Ansible速度快一些,底层使用的是zero-MQ消协队列
自动化运维时代

自动化运维工具的优势

Ansible的功能及优点
1.远程执行
批量执行远程命令,可以对多台主机进行远程操作

2.配置管理
批量配置软件服务,可以进行自动化方式配置,服务的统一配置管理,和启停

3.事件驱动
通过Ansible的模块,对服务进行不同的事件驱动
比如:
1)修改配置后重启
2)只修改配置文件,不重启
3)修改配置文件后,重新加载
4)远程启停服务管理

4.管理公有云
通过API接口的方式管理公有云,不过这方面做的不如saltstack.
saltstack本身可以通过saltcloud管理各大云厂商的云平台。

5.二次开发
因为语法是Python,所以便于运维进行二次开发。

6.任务编排
可以通过playbook的方式来统一管理服务,并且可以使用一条命令,实现一套架构的部署

7.跨平台,跨系统
几乎不受到平台和系统的限制,比如安装apache和启动服务

在Ubuntu上安装apache服务名字叫apache2
在CentOS上安装apache服务名字叫httpd

在CentOS6上启动服务器使用命令:/etc/init.d/nginx start
在CentOS7上启动服务器使用命令:systemctl start nginx
Ansible的架构
1、连接插件connection plugins用于连接主机 用来连接被管理端
2、核心模块core modules连接主机实现操作, 它依赖于具体的模块来做具体的事情
3、自定义模块custom modules根据自己的需求编写具体的模块
4、插件plugins完成模块功能的补充
5、剧本playbookansible的配置文件,将多个任务定义在剧本中,由ansible自动执行
6、主机清单inventor定义ansible需要操作主机的范围
最重要的一点是 ansible是模块化的 它所有的操作都依赖于模块

Ansible的执行流程
1.Ansible读取playbook剧本,剧本中会记录对哪些主机执行哪些任务。
2.首先Ansible通过主机清单找到要执行的主机,然后调用具体的模块。
3.其次Ansible会通过连接插件连接对应的主机并推送对应的任务列表。
4.最后被管理的主机会将Ansible发送过来的任务解析为本地Shell命令执行。
ANsible使用场景
Ansible基础架构(被控端、控制端、inventory、ad-hoc、playbook)
Ansible的安装
搭建环境
10.0.0.61		172.16.1.61			Ansible控制端     oldboy
10.0.0.7		172.16.1.7			Ansible被控端
10.0.0.8		172.16.1.8			Ansible被控端
安装epel
1.先安装epel源(提供最新的ansible)
wget -O /etc/yum.repos.d/epel.repo http://mirrors.aliyun.com/repo/epel-7.repo
安装ansible
2.安装Ansible
yum install ansible -y
查看ansible的版本
3.查看ansible的版本
[root@m01 ~]# ansible --version
ansible 2.7.7
  config file = /etc/ansible/ansible.cfg
  configured module search path = [u'/root/.ansible/plugins/modules', u'/usr/share/ansible/plugins/modules']
  ansible python module location = /usr/lib/python2.7/site-packages/ansible
  executable location = /usr/bin/ansible
  python version = 2.7.5 (default, Apr 11 2018, 07:36:10) [GCC 4.8.5 20150623 (Red Hat 4.8.5-28)]
Ansible配置文件读取顺序
4.Ansible的配置文件,配置文件可以随意放,但有查找顺序
$ANSIBLE_CONFIG             #从变量下查找
ansible.cfg					#当前目录下面查找
.ansible.cfg 				#当前用户的家目录下查找
/etc/ansible/ansible.cfg


[root@m01 ~]# cat /etc/ansible/ansible.cfg
#inventory      = /etc/ansible/hosts      #主机列表配置文件
#library        = /usr/share/my_modules/  #库文件存放目录
#remote_tmp     = ~/.ansible/tmp          #临时py文件存放在远程主机目录
#local_tmp      = ~/.ansible/tmp          #本机的临时执行目录
#forks          = 5                       #默认并发数
#sudo_user      = root                    #默认sudo用户
#ask_sudo_pass  = True                     #每次执行是否询问sudo的ssh密码
#ask_pass       = True                    #每次执行是否询问ssh密码
#remote_port    = 22                      #远程主机端口
host_key_checking = False                 #跳过检查主机指纹
log_path = /var/log/ansible.log           #ansible日志

[privilege_escalation]					  #如果是普通用户则需要配置提权
#become=True
#become_method=sudo
#become_user=root
#become_ask_pass=False

Ineventory主机清单
1.场景一、基于密码连接
[[email protected] ~]# cat /etc/ansible/hosts

#方式一、主机+端口+密码
[webservers]
172.16.1.7 ansible_ssh_port=22 ansible_ssh_user=root ansible_ssh_pass='123456'
172.16.1.8 ansible_ssh_port=22 ansible_ssh_user=root ansible_ssh_pass='123456'

#方式二、主机+端口+密码
[webservers]
web[1:2].oldboy.com ansible_ssh_pass='123456'

#方式三、主机+端口+密码
[webservers]
web[1:2].oldboy.com
[webservers:vars]
ansible_ssh_pass='123456'
注意
如果控制端和被控制端第一次通讯,需要先添加指纹信息,那如果机器特别多少的情况下怎么办?


[root@m01 ~]# vim /etc/ansible/ansible.cfg
#host_key_checking = False  打开注释,默认false他就不用认证了.
  #但是我们一般使用的是推送公钥的办法。
基于密钥连接
我们真正需要使用的方式
需要先创建公钥和私钥,并下发公钥至被控端
[root@m01 ~]# ssh-keygen
[root@m01 ~]# ssh-copy-id -i ~/.ssh/id_rsa.pub [email protected]
[root@m01 ~]# ssh-copy-id -i ~/.ssh/id_rsa.pub [email protected]

-----------------------------------------------------------
[root@m01 ~]# cat hosts
#方式一、主机+端口+密钥
[webservers]
172.16.1.7
172.16.1.8

[root@m01 ~]# ansible webservers -m ping -i ./hosts
172.16.1.8 | SUCCESS => {
    "changed": false,
    "ping": "pong"
}
172.16.1.7 | SUCCESS => {
    "changed": false,
    "ping": "pong"
}
-----------------------------------------------------------
[root@m01 ~]# cat hosts
#方式二、别名+主机+端口+密钥
[webservers]
web01 ansible_ssh_host=172.16.1.7 ansible_ssh_port=22
web02 ansible_ssh_host=172.16.1.8


[root@m01 ~]# ansible webservers -m ping -i ./hosts
web02 | SUCCESS => {
    "changed": false,
    "ping": "pong"
}
web01 | SUCCESS => {
    "changed": false,
    "ping": "pong"
}
--------------------------------------------------
场景三、主机组使用方式
#1.在inventory表里面定义两个组
root@m01 ~]# cat /etc/ansible/hosts
[lbservers]
172.16.1.5
172.16.1.6

[webservers]
172.16.1.7
172.16.1.8

#2.servers组包括两个子组[lbservers,webserver]
[servers:children]
lbservers       #这里为组的名字
webserver        #这里为组的名字
列出当前某个组有多少台主机
[root@m01 ~]# ansible lbservers -m ping -i ./hosts --list-hosts
  hosts (1):
    web01
[root@m01 ~]# ansible webservers -m ping -i ./hosts --list-hosts
  hosts (1):
    web02
[root@m01 ~]# ansible servers -m ping -i ./hosts --list-hosts
  hosts (2):
    web01
    web02
[root@m01 ~]# ansible all -m ping -i ./hosts --list-hosts
  hosts (3):
	web03
    web02
    web01
Ad-Hoc
1.什么是ad-hoc
ad-hoc简而言之就是“临时名列“,执行完即结束,并不会保存,

2.ad-hoc模式使用场景:
比如在多台机器上查看某个进程启动,或拷贝指定文件到本地,等等。

3.ad-hoc模式的命令使用,ansible 'zlx' -m command -a 'df -h',含义如下图

常用模块
command             # 执行shell命令(不支持管道等特殊字符)
shell               # 执行shell命令
scripts             # 执行shell脚本
yum_repository      # 配置yum仓库
联网下载		get_url
安装			yum
配置			copy
启动			service、systemd
创建用户与组	user、group
授权			file
定时任务		crond
挂载			mount
firewalld		firewall
selinux			selinux
批量查看磁盘信息
[root@m01 ~]# ansible web_group -m command -a 'df -h' -i ./hosts
web02 | CHANGED | rc=0 >>
文件系统        容量  已用  可用 已用% 挂载点
/dev/sda3        18G  1.1G   17G    6% /
devtmpfs        981M     0  981M    0% /dev
tmpfs           992M     0  992M    0% /dev/shm
tmpfs           992M  9.5M  982M    1% /run
tmpfs           992M     0  992M    0% /sys/fs/cgroup
/dev/sda1      1014M  124M  891M   13% /boot
tmpfs           199M     0  199M    0% /run/user/0

web01 | CHANGED | rc=0 >>
文件系统        容量  已用  可用 已用% 挂载点
/dev/sda3        18G  1.1G   17G    6% /
devtmpfs        981M     0  981M    0% /dev
tmpfs           992M     0  992M    0% /dev/shm
tmpfs           992M  9.5M  982M    1% /run
tmpfs           992M     0  992M    0% /sys/fs/cgroup
/dev/sda1      1014M  124M  891M   13% /boot
tmpfs           199M     0  199M    0% /run/user/0
#批量查看内存信息
[root@m01 ~]# ansible web_group -m command -a 'free -m' -i ./hosts
web01 | CHANGED | rc=0 >>
              total        used        free      shared  buff/cache   available
Mem:           1982         143        1688           9         150        1668
Swap:          1023           0        1023

web02 | CHANGED | rc=0 >>
              total        used        free      shared  buff/cache   available
Mem:           1982         142        1684           9         155        1666
Swap:          1023           0        1023
帮助手册doc
6.使用过程中需要先了解ansible-doc帮助手册
[root@m01 ~]# ansible-doc -l        # 查看所有模块说明
[root@m01 ~]# ansible-doc copy      # 表示指定模块方法
[root@m01 ~]# ansible-doc -s copy   # 表示指定模块参数
bash模块
7.command默认执行bash命令模块,模块不支持重定向或管道
[root@m01 ~]# ansible web -a "hostname"
8.shell模块,如果需要一些管道操作,则使用shell
[root@m01 ~]# ansible web -m shell -a "ifconfig|grep eth0" -f 50
9.script脚本模块
[root@m01 ~]# cat yum.sh
#!/usr/bin/bash
yum install -y iftop

#在本地运行模块,等同于在远程执行,不需要将脚本文件进行推送目标主机执行
[root@m01 ~]# ansible web -m script -a "/server/scripts/yum.sh"
yum模块
10.yum安装软件模块
[root@m01 ~]# ansible web -m yum -a "name=httpd state=installed"
    name
	httpd							#指定要安装的软件包名称
	file://							#指定从本地哪个目录安装rpm
	http://							#指定从哪个网站安装rpm包
    state       					#指定使用yum的方法
	present   			            #安装软件包
	absent      	            	#移除软件包
	latest			            	#安装最新软件包
list=ansible						#列出当前仓库可用的软件包
disablerepo="epel,ol7_latest"		#安装软件时,不从哪些仓库获取

download_only=true					#仅下载软件包,不安装
download_dir=/root                  #存放路径
文件管理模块
copy文件拷贝模块
#1.拷贝文件文件至被控节点
[root@m01 ~]# ansible oldboy -m copy -a "src=/etc/hosts dest=/tmp/test.txt"

#2.对远端已有文件进行备份,按照时间信息备份
[root@m01 ~]# ansible oldboy -m copy -a "src=/etc/hosts dest=/tmp/test.txt backup=yes"

#3.向被控端主机写入数据,并且会覆盖远端文件内原有数据信息
[root@m01 ~]# ansible oldboy -m copy -a "content='bgx' dest=/tmp/oldboy"

src             #推送数据的源文件信息
dest            #推送数据的目标路径

backup          #对推送传输过去的文件,进行备份  只有文件发生改变的时候才会产生新备份
content         #直接批量在被管理端文件中添加内容   他是覆盖式的,而不是追加,所以使用时一定要小心。

group           #将本地文件推送到远端,指定文件属组信息
owner           #将本地文件推送到远端,指定文件属主信息
mode            #将本地文件推送到远端,指定文件权限信息
file文件创建模块
1.直接修改被控端的权限
[root@m01 ~]# ansible web01 -m file -a "path=/opt mode=0400" -i ./hosts

2.在被控端创建目录
[root@m01 ~]# ansible oldboy -m file -a "path=/tmp/oldboy state=directory"

3.在被控端创建文件
[root@m01 ~]# ansible oldboy -m file -a "path=/tmp/tt state=touch mode=555 owner=root group=root"

4.递归授权目录权限
[root@m01 ~]# ansible oldboy -m file -a "path=/data owner=bgx group=bgx recurse=yes"
path            #指定远程主机目录或文件
recurse         #递归授权
state           #状态
directory       #在远端创建目录
touch           #在远端创建文件
link            #创建链接文件
absent          #表示删除文件或目录
mode            #设置文件或目录权限
owner           #设置文件或目录属主
group           #设置文件或目录属组
get_url文件下载模块
1.通过get_url下载文件或者软件
[root@m01 ~]# ansible webservers -m get_url -a "url=http,https  dest=/opt mode=0777" -i ./hosts

2.下载一个文件前先进行md5校验,通过则下载,不通过则失败
ansible webservers -m get_url -a "url=http,https  dest=/opt mode=0777 checksum=md5:76eb3af80ffd" -i ./hosts
url			#文件在网络上的具体位置
dest		#下载到被控端的哪个目录下
checksum	#校验(md5  sha256)
启停服务模块
ansible管理服务的启动与停止,使用service、systemd
#1.启动crond服务,并加入开机自启
[root@m01 ~]# ansible webservers -m service -a "name=crond state=started enabled=yes"
#2.停止crond服务,并删除开机自启
[root@m01 ~]# ansible webservers -m service -a "name=crond state=stopped enabled=no"
#3.重启crond服务
[root@m01 ~]# ansible webservers -m service -a "name=crond state=restarted"
#4.重载crond服务
[root@m01 ~]# ansible webservers -m service -a "name=crond state=reloaded"

name        # 定义要启动服务的名称
state       # 指定服务状态
started     #启动服务
stopped     #停止服务
restarted   #重启服务
reloaded    #重载服务
enabled         #开机自启
group组模块
[root@m01 ~]# ansible webservers -m group -a "name=oldgirl gid=888"
name            #指定创建的组名
gid             #指定组的gid
state:
absent          #移除远端主机的组
present         #创建远端主机的组(默认)
user模块
1.创建用户指定uid和gid,不创建家目录也不允许登陆
[root@m01 ~]# ansible oldboy -m user -a "name=oldgirl uid=888 group=888 shell=/sbin/nologin create_home=no"

2.删除用户
[root@m01 ~]# ansible webservers -m user -a "name=tmd state=absent" -i ./hosts

3.给新创建的用户生成ssh密钥对
[root@m01 ~]# ansible webservers -m user -a "name=oo uid=6677 group=adm generate_ssh_key=yes ssh_key_bits=2048
ssh_key_file=.ssh/id_rsa" -i ./hosts

4.将明文密码进行hash加密,然后进行用户创建
[root@m01 ~]# ansible localhost -m debug -a "msg={{ '123456' | password_hash('sha512', 'salt') }}"
localhost | SUCCESS => {
    "msg": "$6$salt$MktMKPZJ6t59GfxcJU20DwcwQzfMvOlHFVZiOVD71w.igcOo1R7vBYR65JquIQ/7siC7VRpmteKvZmfSkNc69."
}
[root@m01 ~]# ansible webservers -m user -a 'name=xlw password=$6$salt$MktMKPZJ6t59GfxcJU20DwcwQzfMvOlHFVZ
iOVD71w.igcOo1R7vBYR65JquIQ/7siC7VRpmteKvZmfSkNc69. create_home=yes shell=/bin/bash' -i ./hosts

uid             #指定用户的uid
group           #指定用户组名称
groups          #指定附加组名称
password        #给用户添加密码(记得单引号)
shell           #指定用户登录shell
create_home     #是否创建家目录
crond定时任务模块
# 正常使用crond服务(默认没写的时间都算*表示)
[root@m01 ~]# crontab -l
* * * * *  /bin/sh /server/scripts/yum.sh

# 使用ansible添加一条定时任务
[root@m01 ~]# ansible webservers -m cron -a "minute=* hour=* day=* month=* weekday=* job='/bin/sh test.sh'"
[root@m01 ~]# ansible webservers -m cron -a "job='/bin/sh /server/scripts/test.sh'"

# 设置定时任务注释信息,防止重复,name设定
[root@m01 ~]# ansible webservers -m cron -a "name='cron01' job='/bin/sh /server/scripts/test.sh'"

# 删除相应定时任务
[root@m01 ~]# ansible webservers -m cron -a "name='ansible cron02' minute=0 hour=0 job='/bin/sh test.sh' state=absent"

# 注释相应定时任务,使定时任务失效
[root@m01 scripts]# ansible oldboy -m cron -a "name='ansible cron01' minute=0 hour=0 job='/bin/sh test.sh' disabled=yes"
mount挂载模块7 nfs 8客户端挂载
[root@m01 ~]# ansible web01 -m yum -a 'name=nfs-utils state=present' -i ./hosts
[root@m01 ~]# ansible web01 -m file -a 'path=/data state=directory' -i ./hosts
[root@m01 ~]# ansible web01 -m copy -a 'content="/data 172.16.1.0/24(rw,sync,no_all_squash)" dest=/etc/exports' -i ./hosts
[root@m01 ~]# ansible web01 -m systemd -a "name=nfs state=started enabled=yes" -i ./hosts


[root@m01 ~]# ansible web02 -m mount -a "src=172.16.1.7:/data path=/data fstype=nfs opts=defaults state=present"
[root@m01 ~]# ansible web02 -m mount -a "src=172.16.1.7:/data path=/data fstype=nfs opts=defaults state=mounted"
[root@m01 ~]# ansible web02 -m mount -a "src=172.16.1.7:/data path=/data fstype=nfs opts=defaults state=unmounted"
[root@m01 ~]# ansible web02 -m mount -a "src=172.16.1.7:/data path=/data fstype=nfs opts=defaults state=absent"

present     # 开机挂载,仅将挂载配置写入/etc/fstab
mounted     # 挂载设备,并将配置写入/etc/fstab
unmounted   # 卸载设备,不会清除/etc/fstab写入的配置
absent      # 卸载设备,会清理/etc/fstab写入的配置
防火墙管理模块
Selinux模块
[root@m01 ~]# ansible webservers -m selinux -a "state=disabled" -i ./hosts

firewalld模块
[root@m01 ~]# ansible webservers -m systemd -a "name=firewalld state=started" -i ./hosts
[root@m01 ~]# ansible webservers -m firewalld -a "service=http immediate=yes permanent=yes state=enabled" -i ./hosts
[root@m01 ~]# ansible webservers -m firewalld -a "port=8080-8090/tcp immediate=yes permanent=yes state=enabled" -i ./hosts

service				#指定开放或关闭的服务名称
port				#指定开放或关闭的端口
masquerade			#开启地址伪装
immediate			#临时生效
permanent			#是否添加永久生效
state				#开启或是关闭

zone				#指定配置某个区域
rich_rule			#配置富规则
source				#指定来源IP
Ansible-Playbook
什么是PlayBook
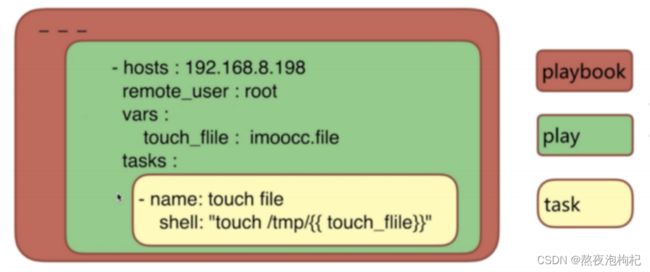
PlayBook即”剧本”,”兵书”之意,PlayBook是由以下部分组成的

- host(play:) 定义的是主机的角色。(主角还是配角,找哪个明星)
task: 定义的是具体执行的任务。(角色的台词和动作)


playbook: 由一个或多个play(角色)组成,一个play(角色)可以包含多个task(台词,动作,大腕每集拍什么)。

简单理解为: 使用不同的模块完成一件事情
在Ansible中”剧本文件”是以yml结尾的文件。
在SaltStack中”剧本文件”是以sls结尾的文件。
但是语法,使用的都是yaml语法
PlayBook与ad-hoc
1.PlayBook功能比ad-hoc更全,是对ad-hoc的一种编排.
2.PlayBook能很好的控制先后执行顺序, 以及依赖关系.
3.PlayBook语法展现更加的直观.
4.playbook可以持久使用,ad-hoc无法持久使用.
YAML语法
| 语法 | 描述 |
|---|---|
| 缩进 | YAML使用固定的缩进风格表示层级结构,每个缩进由两个空格组成, 不能使用TAB |
| 冒号 | 以冒号结尾的除外,其他所有冒号后面所有必须有空格 |
| 短横线 | 表示列表项,使用一个短横杠加一个空格,多个项使用同样的缩进级别作为同一列表 |
yum:
  name: vsftpd
  state: present


yum:
  name:
    - httpd
    - nginx
    - php-fpm
  state: present
PlayBook部署httpd小练习
编写httpd剧本
#创建目录剧本存放目录
[root@m01 ~]# mkdir httpd

#编辑Inventory
[root@m01 ~]# vim /etc/ansible/hosts
[web]
web01 ansible_ssh_host=10.0.0.7
web02 ansible_ssh_host=10.0.0.8
需求一:编写安装httpd剧本
[root@m01 ~]# vim /root/httpd/httpd.yml
---
- hosts: web_group

  tasks:
    - name: Install httpd Server
      yum:
        name: httpd
        state: present

#检查语法
[root@m01 ~]# ansible-playbook --syntax-check httpd/httpd.yml

playbook: httpd/httpd.yml

#测试安装
[root@m01 ~]# ansible-playbook -C httpd/httpd.yml

PLAY [web_group] *******************************************************************************

TASK [Gathering Facts] ************************************************************************************************
ok: [web02]
ok: [web01]

TASK [Install httpd Server] ************************************************************************************************
changed: [web02]
changed: [web01]

PLAY RECAP *************************************************************************************
web01                      : ok=2    changed=1    unreachable=0    failed=0    skipped=0    rescued=0    ignored=0
web02                      : ok=2    changed=1    unreachable=0    failed=0    skipped=0    rescued=0    ignored=0
需求二:安装完httpd服务并启动加入开机自启
[root@m01 ~]# vim /root/httpd/httpd.yml
---
- hosts: web_group

#安装httpd
  tasks:
    - name: Install httpd Server
      yum:
        name: httpd
        state: present
#启动httpd
    - name: Start Httpd Server
      systemd:
        name: httpd
        state: started
        enabled: yes

#测试安装和启动
[root@m01 ~]# ansible-playbook -C httpd/httpd.yml

PLAY [web_group]
************************************************************************

TASK [Gathering Facts] ************************************************************************
ok: [web02]
ok: [web01]

TASK [Install httpd Server] ************************************************************************
changed: [web02]
changed: [web01]

TASK [Start Httpd Server] ************************************************************************
changed: [web02]
changed: [web01]

PLAY RECAP *************************************************************
web01                      : ok=3    changed=2    unreachable=0    failed=0    skipped=0    rescued=0    ignored=0
web02                      : ok=3    changed=2    unreachable=0    failed=0    skipped=0    rescued=0    ignored=0
需求三:编写网站页面并启动
- hosts: web_group

#安装httpd
  tasks:
    - name: Install httpd Server
      yum:
        name: httpd
        state: present

#配置网站
    - name: Config Httpd Server
      copy:
        content: oldboy_web_page
        dest: /var/www/html/index.html
#启动httpd
    - name: Start Httpd Server
      systemd:
        name: httpd
        state: started
        enabled: yes

#执行
[root@m01 httpd]# ansible-playbook /root/httpd/httpd.yml
需求四:开启防火墙端口
- hosts: web_group

#安装httpd
  tasks:
    - name: Install httpd Server
      yum:
        name: httpd
        state: present

#配置网站
    - name: Config Httpd Server
      copy:
        content: oldboy_web_page
        dest: /var/www/html/index.html
#启动httpd
    - name: Start Httpd Server
      systemd:
        name: httpd
        state: started
        enabled: yes

#启动防火墙
    - name: Start Firewalld Server
      systemd:
        name: firewalld
        state: started
        enabled: yes

#开启防火墙的80端口
    - name: Config Firewalld Server
      firewalld:
        service: http
        immediate: yes
        permanent: yes
        state: enabled
打开浏览器访问网站:
http://10.0.0.7
http://10.0.0.8

需求五:不同的主机配置不同的网站
---
- hosts: web_group

#安装httpd
  tasks:
    - name: Install httpd Server
      yum:
        name: httpd
        state: present

#启动httpd
    - name: Start Httpd Server
      systemd:
        name: httpd
        state: started
        enabled: yes

#启动防火墙
    - name: Start Firewalld Server
      systemd:
        name: firewalld
        state: started
        enabled: yes

#开启防火墙的80端口
    - name: Config Firewalld Server
      firewalld:
        service: http
        immediate: yes
        permanent: yes
        state: enabled


#单独配置web01页面
- hosts: web01

  tasks:
    - name: Config Httpd Server
      copy:
        content: oldboy_web01_page
        dest: /var/www/html/index.html

#单独配置web02页面
- hosts: web02

  tasks:
    - name: Config Httpd Server
      copy:
        content: oldboy_web02_page
        dest: /var/www/html/index.html

[root@m01 httpd]# ansible-playbook  /root/httpd/httpd.yml
打开浏览器访问网站:
http://10.0.0.7
http://10.0.0.8

PlayBook实战
实战一
配置环境
| 主机名 | 公网ip | 私网ip | 服务 | 角色 |
|---|---|---|---|---|
| m01 | 10.0.0.61 | 172.16.1.61 | Ansible | 控制端 |
| backup | 10.0.0.41 | 172.16.1.41 | rsync服务端 | 被控端 |
| web01 | 10.0.0.7 | 172.16.1.7 | rsync服务端 | 被控端 |
| web02 | 10.0.0.8 | 72.16.1.8 | rsync服务端 | 被控端 |
准备配置文件
#创建rsync剧本存放目录
[root@m01 ~]# mkdir rsyncd

#编辑Inventory
[root@m01 ~]# vim /etc/ansible/hosts
[web_group]
web01 ansible_ssh_host=10.0.0.7
web02 ansible_ssh_host=10.0.0.8

[backup_group]
backup ansible_ssh_host=10.0.0.41

#准备rsync配置文件
[root@m01 rsyncd]# vim /root/rsyncd/rsyncd.j2
uid = www
gid = www
port = 873
fake super = yes
use chroot = no
max connections = 200
timeout = 600
ignore errors
read only = false
list = false
auth users = rsync_backup
secrets file = /etc/rsync.passwd
log file = /var/log/rsyncd.log
#####################################
[backup]
comment = welcome to oldboyedu backup!
path = /backup
playbook
#编写剧本
[root@m01 ~]# vim /root/rsyncd/rsyncd.yml
- hosts: all

  tasks:

#安装rsync
    - name: Install Rsyncd Server
      yum:
        name: rsync
        state: present

#创建www组
    - name: Create www Group
      group:
        name: www
        gid: 666

#创建www用户
    - name: Create www User
      user:
        name: www
        group: www
        uid: 666
        create_home: false
        shell: /sbin/nologin

- hosts: backup_group

  tasks:

#推送rsync配置文件
    - name: Scp Rsync Config
      copy:
        src: ./rsyncd.j2
        dest: /etc/rsyncd.conf
        owner: root
        group: root
        mode: 0644

#创建密码文件并授权
    - name: Create Passwd File
      copy:
        content: 'rsync_backup:123'
        dest: /etc/rsync.passwd
        owner: root
        group: root
        mode: 0600

#创建/backup目录
    - name: Create backup Directory
      file:
        path: /backup
        state: directory
        mode: 0755
        owner: www
        group: www
        recurse: yes

#启动rsync服务
    - name: Start Rsyncd Server
      systemd:
        name: rsyncd
        state: started

#检测语法
[root@m01 ~]# ansible-playbook --syntax-check /root/rsyncd/rsyncd.yml

playbook: /root/rsyncd/rsyncd.yml

#测试
[root@m01 ~]# ansible-playbook -C /root/rsyncd/rsyncd.yml

PLAY [all] ************************************************************************

TASK [Gathering Facts] ************************************************************
ok: [backup]
ok: [web02]
ok: [web01]

TASK [Install Rsyncd Server]*******************************************************
changed: [backup]
changed: [web02]
changed: [web01]

TASK [Scp Rsync Config]************************************************************
changed: [web02]
changed: [web01]
changed: [backup]

TASK [Create www Group] ***********************************************************************************
changed: [backup]
changed: [web01]
changed: [web02]

TASK [Create www User] ***********************************************************************************
changed: [web02]
changed: [web01]
changed: [backup]

TASK [Create backup Directory] ***********************************************************************************
changed: [web01]
changed: [backup]
changed: [web02]

TASK [Start Rsyncd Server] ***********************************************************************************
changed: [web01]
changed: [web02]
changed: [backup]

PLAY RECAP ************************************************************************
backup                     : ok=7    changed=6    unreachable=0    failed=0    skipped=0    rescued=0    ignored=0
web01                      : ok=7    changed=6    unreachable=0    failed=0    skipped=0    rescued=0    ignored=0
web02                      : ok=7    changed=6    unreachable=0    failed=0    skipped=0    rescued=0    ignored=0
扩展需求:
1.给客户端推送脚本
2.加入crontab做备份
完成刚开始学架构阶段的rsync的实战案例
实战二:2
部署NFS服务,NFS服务端,敞开大门提供挂载点给web01和web02
| 主机名 | 公网ip | 私网ip | 服务 | 角色 |
|---|---|---|---|---|
| m01 | 10.0.0.61 | 172.16.1.61 | Ansible | 控制端 |
| backup | 10.0.0.41 | 172.16.1.41 | rsync服务端 | 被控端 |
| web01 | 10.0.0.7 | 172.16.1.7 | rsync服务端 | 被控端 |
| web02 | 10.0.0.8 | 72.16.1.8 | rsync服务端 | 被控端 |
环境部署
#编辑Ansible Inventory
[root@m01 ~]# vim /etc/ansible/hosts
[web]
web01 ansible_ssh_host=10.0.0.7
web02 ansible_ssh_host=10.0.0.8

[backup]
backup ansible_ssh_host=10.0.0.41

[nfs]
nfs ansible_ssh_host=10.0.0.31

[nfs_all:children]
web_group
nfs_group

#创建项目存放目录
[root@m01 ~]# mkdir nfs

#准备nfs配置文件
[root@m01 ~]# cat /root/nfs/nfs.j2
/data 10.0.0.0/24(rw,sync,all_squash,anonuid=666,anongid=666)
playbook
[root@m01 ~]# vim /root/nfs/nfs.yml
- hosts: nfs_all
  tasks:

#安装nfs
    - name: Install nfs-utils
      yum:
        name: nfs-utils
        state: present

#创建www组
    - name: Create www Group
      group:
        name: www
        gid: 666

#创建www用户
    - name: Create www User
      user:
        name: www
        group: www
        uid: 666
        create_home: false
        shell: /sbin/nologin

- hosts: nfs
  tasks:

#推送配置文件
    - name: Scp NFS Server
      copy:
        src: ./nfs.j2
        dest: /etc/exports
        owner: root
        group: root
        mode: 0644

#创建挂载目录并授权
    - name: Create data Directory
      file:
        path: /data
        state: directory
        owner: www
        group: www
        mode: 0755
        recurse: yes

#启动nfs-server
    - name: Start NFS Server
      systemd:
        name: nfs-server
        state: started
        enabled: yes

#web01和web02挂载目录
- hosts: web
  tasks:
    - name: Mount NFS Server
      mount:
        path: /opt
        src: 10.0.0.31:/data
        fstype: nfs
        opts: defaults
        state: mounted

#检查语法
[root@m01 ~]# ansible-playbook --syntax-check /root/nfs/nfs.yml
playbook: /root/nfs/nfs.yml

#执行
[root@m01 ~]# ansible-playbook /root/nfs/nfs.yml
Ansible跑起wordpress
部署需求:
1.使用yum安装httpd、php、php-mysql、php-pdo、mariadb
2.启动httpd、mariadb服务
3.下载wordpress代码
4.部署到httpd站点目录
1.环境准备
| 主机名 | 公网ip | 私网ip | 服务 | 角色 |
|---|---|---|---|---|
| m01 | 10.0.0.61 | 172.16.1.61 | Ansible | 控制端 |
| web01 | 10.0.0.7 | 172.16.1.7 | rsync服务端 | 被控端 |
| web02 | 10.0.0.8 | 72.16.1.8 | rsync服务端 | 被控端 |
因为这只是一个练习,所以我们将apache mariadb php全部都写在一个yml文件中,并且放在一个目录下,
注意:在生产中,我们是不会这么做的,我们需要每一个服务单独拎出来,解耦。
#创建项目目录
[root@m01 ~]# cd lamp/

#编辑Inventory
[root@m01 lamp]# cat /etc/ansible/hosts
[web]
web01 ansible_ssh_host=10.0.0.7
web02 ansible_ssh_host=10.0.0.8

[backup]
backup ansible_ssh_host=10.0.0.41

[backup_all:children]
web
backup

[nfs]
nfs ansible_ssh_host=10.0.0.31

[nfs_all:children]
web_group
nfs_group
playbook
- hosts: web01
  vars:                        #变量
   package:                    #变量名
    - httpd
    - mariadb-server           #安装需要全名
    - php                      #安装需要卸载原有文件
    - php-mysql
    - php-pdo
    - MySQL-python
  tasks:
    - name: Istall Httpd Mariadb Php Server
      yum:
        name: "{{ package }}"
        state: present
    - name: Stop Nginx
      systemd:
        name: nginx
        state: stopped
    - name: Started Httpd
      systemd:
        name: httpd
        state: started
        enabled: yes
    - name: Started Mariadb
      systemd:
        name: mariadb
        state: started
        enabled: yes
    - name: Install Wordpress
      unarchive:             #解压模块
        src: /root/wordpress/wordpress-5.0.3.tar.gz
        dest: /var/www/html/
        copy: yes            #解压并复制,这里必须开启
    - name: Change Mode Httpd
      file:
        path: /var/www/html/
        owner: apache
        group: apache
        recurse: yes
    - name: Create Database user
      mysql_user:
        name: autumn
        password: autumn123.com
        priv: '*.*:ALL'
        state: present
        host: localhost
    - name: Create Database wordpress
      mysql_db:
        login_user: autumn
        login_password: autumn123.com
        login_host: localhost
        login_port: 3306
        name: wordpress
        state: present
打开浏览器访问:
http://10.0.0.7/wordpress/wp-admin/setup-config.php
http://10.0.0.8/wordpress/wp-admin/setup-config.php

ansible变量
概述
变量提供了便捷的方式来管理ansible项目中的动态值。比如zabbix-3.4.15,可能后期会反复的使用这个版本的值,那么如果将
此值设置为变量,后续使用和修改将变得非常方便,这样可以简化项目的创建和维护
定义变量分为如下三种方式
1.通过命令行进行变量定义     #使用-e参数,优先级是最高的
2.在play文件中进行定义变量   #使用vars_file或者vars定义变量
3.通过inventory在主机组或单个主机中设置变量   #通过host_vars或者group_vars定义变量
变量的优先级
如果定义的变量出现重复,且造成冲突,优先级如下:
命令行变量--->play中的vars_files--->play中的vars变量-->host_vars中定义的变量--->group_vars/组--->group_vars/all
[root@m01 wget]# ansible-playbook wget.yml -e "webserver=zarafa-devel"  #命令行变量.优先级第一名

[root@m01 project1]# cat p5.yml
- hosts: webservers
#  vars:                        #play中vars变量  优先级第三
#    filename: play_vars
#  vars_files:                  #play中var_files变量,优先级第二
#    - ./vars.yml
  tasks:

[root@m01 project1]# cat host_vars/webserver    #优先级第四

[root@m01 project1]# cat group_vars/webserver   #优先级第五

[root@m01 project1]# cat group_vars/all         #优先级第六
定义变量
playbook变量
playbook变量可以通过多种方式进行定义,最简单的方式就是在playbook的开头通过vars进行定义

#方法一:
- hosts: web_group
  vars:
    packages:
      - httpd
      - mariadb-server
      - php
      - php-mysql
      - php-pdo
  tasks:
  - name: Install httpd  mariadb php Server
    yum:
      name: "{{ packages }}"
#方法二:
- hosts: web_group
  vars:
    - web_server: httpd
    - db_server: mariadb-server
    - php_server: php,php-mysql,php-pdo
  tasks:
  - name: Install httpd  mariadb php Server
    yum:
      name:
        - "{{ web_server }}"
        - "{{ db_server }}"
        - "{{ php_server }}"
这种在playbook中使用vars定义变量,有一个缺陷,就是其他的playbook无法使用该变量。
使用vars_file定义变量
#定义阶段
[root@m01 project1]# cat vars.yml
web_package: httpd
ftp_package: vsftpd

[root@m01 project1]# cat p2.yml
- hosts: webservers
  vars_files: ./vars.yml
  tasks:
    - name: Installed Packages
      yum:
        name:
          - "{{ web_package }}"
          - "{{ ftp_package }}"
        state: present
在inventory中定义变量,主机变量优先级高于主机组变量(不推荐使用)
[root@m01 project1]# vim /etc/ansible/hosts
[webservers]
web01 ansible_ssh_host=172.16.1.7
web02 ansible_ssh_host=172.16.1.8
[webservers:vars]
filename=group_vars

[root@m01 project1]# cat p3.yml
- hosts: webservers
  tasks:
    - name: Create File
      file: path=/tmp/{{ filename }} state=touch
创建host_vars和group_vars目录,使用变量
[root@m01 project1]# cat /etc/ansible/hosts
[webservers]
web01 ansible_ssh_host=172.16.1.7
web02 ansible_ssh_host=172.16.1.8

# host_vars目录下必须存放和inventory清单文件中定义的组名一致

[root@m01 project1]# cat host_vars/web01
web_package: zlib-static
ftp_package: zmap


# group_vars目录下必须存放和inventory清单文件中定义的组名一致,如下

[root@m01 project1]# cat group_vars/webservers
web_package: httpd
ftp_package: vsftpd


[root@m01 project1]# cat group_vars/all

注意:系统提供了特殊的组,all,也就说在group_vars目录下创建一个all文件,定义变量对所有的主机都生效
[root@m01 project1]# cat host_vars/web01
web_package: zlib-static
ftp_package: zmap

[root@m01 project1]# cat group_vars/webservers
web_package: httpd
ftp_package: vsftpd


[root@m01 project1]#  cat p4.yml
- hosts: webservers
#- hosts: otherservers
  tasks:
    - name: Installed Packages
      yum:
        name:
          - "{{ web_package }}"
          - "{{ ftp_package }}"
        state: present


[root@m01 project1]# ansible-playbook p4.yml

PLAY [webservers] *****************************************************

TASK [Gathering Facts] ***********************************************************************
ok: [web02]
ok: [web01]

TASK [Installed Packages] ***********************************************************************
ok: [web02]
changed: [web01]

PLAY RECAP ************************************************************
web01                      : ok=2    changed=1    unreachable=0    failed=0
web02                      : ok=2    changed=0    unreachable=0    failed=0
变量注册register
当ansible的模块运行之后,其实会有一些result结果,就像是执行脚本,我们有的时候需要脚本给我们return返回值,
我们才知道是否可以执行成功,但是,默认情况下,ansible的result并不会显示出来,所以,我们可以把这些返回值"存储"到变量中,
这样我们就能通过'调用'对应的变量名,从而获取到这些result,这种将模块的返回值,写入到变量中的方法被称为变量注册
- hosts: webservers
  tasks:
    - name: Get Network Port Status
      shell: netstat -lntp
      register: net_port      #定义变量(netstat -lntp)

    - name: OutPut Network Port Status
      debug:                     #debug模块
        msg: "{{ net_port.stdout_lines }}"    #这里.stdout_lines是指仅仅只输出shell命令中netstat -lntup中的.stdout_lines包含的值


#debug :调试模块,用于在调试中输出信息 常用参数:
msg:调试输出的消息var:将某个任务执行的输出作为变量传递给debug模块,
debug会直接将其打印输出 verbosity:debug的级别(默认是0级,全部显示)
变量也支持层级定义,使用".“可能会有问题,建议使用”[]"代替。
[root@m01 project1]# cat vars1.yml
rainbow:
  web:
    web_package: httpd
    db_package: mariadb

code:
  web:
    filename: code_web_filename


[root@m01 project1]# cat p8.yml
- hosts: webservers
  vars_files: ./vars1.yml
  tasks:
    - name: Install Package
      yum: name= "{{ rainbow['web']['web_package'] }}"

    - name: create filename
      file:
        path: /tmp/{{ code.web.filename }}
        state: touch
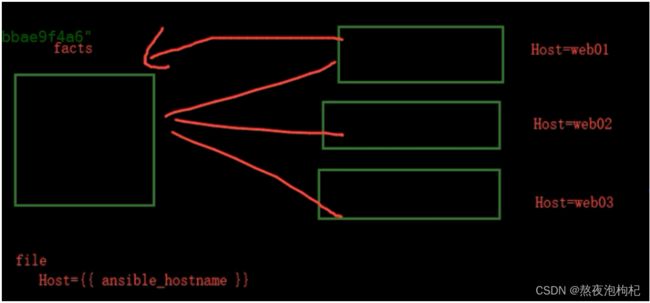
facts变量
Ansible facts是在被管理主机上通过ansible自动采集发现的变量。facts包含每台特定主机信息。
比如:被控制的主机、IP地址、系统版本、CPU数据、内存状态、磁盘状态等等。
fact使用场景
1.通过facts检查CPU,来生成对应的Nginx配置文件,
2.通过facts检查主机名信息,来生成不同的Zabbix配置文件。
3.通过facts检查的内存情况来自定义mysql的配置文件
setup模块
命令行取变量用setup模块
使用setup模块可以取到主机所有的硬件信息及变量名(静态信息)
[root@m01 vars]# ansible web01 -m setup -a 'filter=ansible_fqdn'
[root@m01 vars]# ansible web01 -m setup -a "filter="ansible_fqdn"
取变量示例
[root@m01 debug]# vim debug.yml
    - name: OutPut Variables Ansible Facts
      debug:
        msg: >
          this default IPv4 address"{{ansible_fqdn}}"is"{{ansible_eth1.ipv4.address }}"
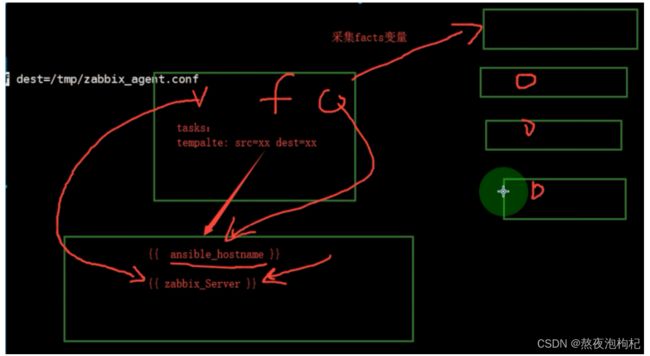
使用ansible facts安装zabbix-agent
copy模块不支持解析变量

template模块支持解析变量,其他功能根本copy模块一样
[root@m01 ~]# vim /etc/zabbix/zabbix_agentd.conf

Server= {{ zabbix_server }}    # 定义变量playbook里的变量

Hostname={{ ansible_hostname }}   # 读取facts的变量


#facts(setup模块)
他们其实是同样的原理和功能,setup模块的原理就是facts

[root@m01 zabbix]# vim zabbix.yml
- hosts: web01
  #gather_facts: no #关闭信息采集
  vars:
    - zabbix_server: 172.16.1.71      #
  tasks:
    - name: Copy zabbix configure
      template:                           #如果使用copy模块不能解析变量
        src: /etc/zabbix/zabbix_agentd.conf
        dest: /tmp/zabbix_agentd.conf
facts自定义安装memcached
我们在这里要学会用使用变量百分之比的值给被控端配置文件
playbook安装一个memcached

[root@m01 ~]# yum install memcached -y

[root@m01 project1]# cat memcached.j2       #配置文件内容
PORT="11211"
USER="memcached"
MAXCONN="1024"
CACHESIZE="{{ ansible_memtotal_mb //2 }}"   #设置变量并且除以2
OPTIONS=""

[root@m01 project1]# cat p11.yml            #编写剧本
- hosts: webservers
  tasks:
    - name: Installed Memcached
      yum: name=memcached state=present

    - name: Configure Memcached
      template: src=./memcached.j2 dest=/etc/sysconfig/memcached

    - name: Start Memcached
      service: name=memcached state=started enabled=yes
关闭facts
[root@m01 ~]# vim facts.yml
- hosts: web_group
  gather_facts: no #关闭信息采集
  tasks:

# 在这里我们要知道,如果关闭了facts变量,我们就无法在当前的剧本使用facts里的变量的值了
常用变量信息参数
ansible_all_ipv4_addresses:仅显示ipv4的信息。
ansible_devices:仅显示磁盘设备信息。
ansible_distribution:显示是什么系统,例:centos,suse等。
ansible_distribution_major_version:显示是系统主版本。
ansible_distribution_version:仅显示系统版本。
ansible_machine:显示系统类型,例:32位,还是64位。
ansible_eth0:仅显示eth0的信息。
ansible_hostname:仅显示主机名。
ansible_kernel:仅显示内核版本。
ansible_lvm:显示lvm相关信息。
ansible_memtotal_mb:显示系统总内存。
ansible_memfree_mb:显示可用系统内存。
ansible_memory_mb:详细显示内存情况。
ansible_swaptotal_mb:显示总的swap内存。
ansible_swapfree_mb:显示swap内存的可用内存。
ansible_mounts:显示系统磁盘挂载情况。
ansible_processor:显示cpu个数(具体显示每个cpu的型号)。
ansible_processor_vcpus:显示cpu个数(只显示总的个数)。
playbook控制
-------task任务处理相关流程与控制参数
	when 			判断
	item 			循环
	handlers		触发器(需要task使用notify通知)
	tags			标签(调试使用)
	include_tasks	包含task任务
                ignore_errors   忽略错误
	错误处理
       force_handlers  #扩展
	   changed_when	false   抑制改变的状态为ok(获取系统的状态信息时)
-------重要(检查服务的配置是否正常,正常则不处理,不正常则中断)
	   register: httpd_check
	   changed_when:
	     - httpd_check.stdout.find('OK')
	     - false
Playbook条件语句
判断在Ansible任务中的使用频率非常高。比如yum模块可以检测软件包是否已经安装,而这个过程中我们不用做太多的人工干预。
但是部分任务需要进行判断,比如:web服务器角色都需要使用nginx仓库,但是其他的服务器角色并不需要,此时就会用到when判断。
比如:CentOS和Ubuntu系统都需要安装httpd服务,那么久需要使用when判断主机系统,然后调用不同的模块执行。
示例
根据不同操作系统,安装相同的软件包
[root@m01 when]# cat when.yml
- hosts: webservers
  tasks:

    - name: Install httpd Server
      yum: name=httpd state=present
      when: ansible_distribution == "CentOS"

    - name: Install httpd Server
      apt: name=httpd2 state=present
      when: ansible_distribution == "Ubuntu"
按照不同的主机名称进行判断
[root@m01 when]# cat when.yml
- hosts: web
  vars:
    remote_ip: "{{ ansible_default_ipv4.address }}"
    host_name: "{{ ansible_fqdn }}"
  tasks:

    - name: Print ip
      debug:
        msg:
         - "{{ remote_ip }}"
         - "{{ host_name }}"
    - name: Reboot Server
      command: reboot

      when: ansible_fqdn  == "web02"
按照不同的IP地址进行判断
[root@m01 when]# cat when.yml
- hosts: web
  vars:
    remote_ip: "{{ ansible_default_ipv4.address }}"
    host_name: "{{ ansible_fqdn }}"
  tasks:

    - name: Print ip
      debug:
        msg:
         - "{{ remote_ip }}"
         - "{{ host_name }}"
    - name: Reboot Server
      command: reboot

      when: ansible_default_ipv4.address  == "10.0.0.7"
按照获取客户端的某参数值得大小判断
[root@m01 when]# cat when.yml
- hosts: web
  vars:
    remote_ip: "{{ ansible_default_ipv4.address }}"
    host_name: "{{ ansible_fqdn }}"
    host_mem: "{{ ansible_memtotal_mb }}"
  tasks:

    - name: Print ip
      debug:
        msg:
         - "{{ remote_ip }}"
         - "{{ host_name }}"
         - "{{ host_mem }}"
    - name: Reboot Server
      command: reboot

      when: ansible_memtotal_mb|int < "2000"
添加yum仓库模块
所有为web主机名的添加nginx仓库,其余的都跳过添加
	1.如何添加yum仓库
	2.如何判断,判断什么内容
---
[root@m01 when]# cat when.yml
- hosts: web
  tasks:
    - name: Add Nginx Repos
      yum_repository:          #模块
        name: nginx_tet        #它代表/etc/yum.repos.d/nginx_tet.repo
        description: Nginx YUM repo      #描述  (不加会报错)
        baseurl: http://nginx.org/packages/centos/7/$basearch/
        gpgcheck: no           #把效验本地给关掉
      when: (ansible_hostname is match ("web*")) or (ansible_hostname is match ("lb*"))     #根据官方的写法
列表方式判断 and关系 并且关系
[root@m01 when]# cat when.yml
- hosts: web
  vars:
    remote_ip: "{{ ansible_default_ipv4.address }}"
    host_name: "{{ ansible_fqdn }}"
    host_mem: "{{ ansible_memtotal_mb }}"
    host_ver: "{{ ansible_distribution }}"
  tasks:

    - name: Print ip
      debug:
        msg:
         - "{{ remote_ip }}"
         - "{{ host_name }}"
         - "{{ host_mem }}"
         - "{{ host_ver }}"
    - name: Reboot Server
      file:
        path: /root/web01.txt
        state: touch

      when:
        - ansible_distribution == "CentOS"
        - ansible_fqdn == "web01"
修改Nginx配置文件 把Nginx从ansible服务器拷贝到web服务器
拷贝过去需要启动或者重启  如果Nginx配置文件不对 不让加载
   如何判断Nginx文件配置是否正确?

   1. 安装Nginx
   2. 拷贝文件到Nginx.conf 判断文件是否正确 ngixn -t 变量注册接收结果
   3. 启动
   4. 重新加载  在重新加载的地方进行when判断
[root@m01 when]# cat nginx.yml
- hosts: web02
  tasks:
    - name: Install Nginx
      yum:
        name: nginx
        state: present

    - name: scp configure Nginx
      copy:
        src: ./nginx.j2
        dest: /etc/nginx/nginx.conf

    - name: Check Nginx Configure
      command: /usr/sbin/nginx -t
      register: result
      ignore_errors: yes				# 忽略错误继续执行

    - name: print result
      debug:
        msg: "{{ result.rc }}"

    - name: Reload Nginx
      systemd:
        name: nginx
        state: reloaded
      when: result.rc == 0			    # 判断nginx -t执行结果 是否为0 通过变量注册获取的


	-----------------------------
	    - name: Reload Nginx
      systemd:
        name: nginx
        state: reloaded
      when: result.rc is match "0"
判断http是否存活
- hosts: web02
  tasks:
    - name: Install Nginx
      yum:
        name: nginx
        state: present

    - name: scp configure Nginx
      copy:
        src: ./nginx.j2
        dest: /etc/nginx/nginx.conf

    - name: Check Nginx Configure
      command: /usr/sbin/nginx -t
      register: result
      ignore_errors: yes

    - name: Check HTTP Server
      command: systemctl is-active httpd
      register: result_http
      ignore_errors: yes

    - name: print result
      debug: var=result_http

    - name: Reload Nginx
      systemd:
        name: nginx
        state: reloaded
      when: result.rc == 0
playbook循环语句
有时候我们写playbook的时候发现了很多tasks都要反复引用某个模块,比如一次启动10个服务,或者一次拷贝10个文件,
如果按照传统的写法最少要写10次,这样会显得很臃肿,如果使用循环的方式来编写playbook,这样可以减少重复使用某个模块.
==实践案例一 ==
弃用的写法,因为有可能会提示warn
[root@m01 when]# vim when.yml
- hosts: web
  tasks:
    - name: Started Server
      systemd:
        name: "{{ item }}"    #官方定义的
        state: started
      with_items:    #定义的循环的服务内容
      loop:          #或者这么使用
        - httpd
        - mariadb


#在这里httpd和mariadb对被控端重复循环
这种循环写法是官方推荐的写法
[root@m01 when]# vim when.yml    #但是他这里只属于yum模块的命令
- hosts: web
  tasks:
    - name: Started Server
      yum:
        name: "{{ packages }}"
        state: present
      vars:
        packages:
          - httpd
          - mariadb
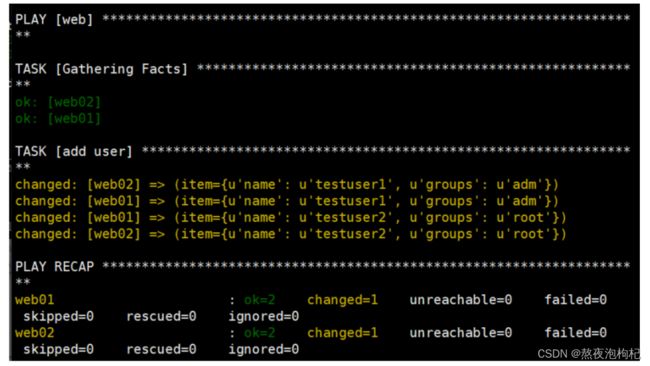
实践案例三:使用字典的方式创建用户和批量拷贝文件
[root@m01 when]# vim when.yml
- hosts: web
  tasks:
    - name: add user
      user:
        name: "{{ item.name }}"
        groups: "{{ item.groups}}"
        state: present
      with_items:    或者使用loop
        - { name: 'testuser1', groups: 'adm' }
        - { name: 'testuser2', groups: 'root' }
[root@m01 when]# vim when.yml
- hosts: webservers
  tasks:
    - name: Copy Rsync configure and Rsync passwd
      copy: src={{ item.src }} dest={{ item.dest }} mode={{ item.mode }}
      loop:
        - { src: "./rsyncd.conf", dest: "/etc/rsyncd.conf", mode: "0644" }
        - { src: "./rsync.passwd", dest: "/tmp/rsync.passwd", mode: "0600" }
handlers
handlers注意事项
1.无论多少个task通知了相同的handlers,handlers仅会在所有tasks结束后运行一次。
2.只有task发生改变了才会通知handlers,没有改变则不会触发handlers
3.不能使用handlers替代tasks
[root@m01 project2]# cat han.yml
- hosts: web
  #force-handlers: yes         #强制执行handlers,在这里使用的次数比较少
  vars:
    - http_port: 8083
  tasks:

    - name: Install Http Server
      yum: name=httpd state=present

    - name: configure httpd server
      template: src=./httpd.conf.j2 dest=/etc/httpd/conf/httpd.conf
      notify:                     #在这里我们要注意notify是模块层
        - Restart Httpd Server    #与handlers的- name对应,必须一致
        - Restart PHP Server      #与handlers的- name对应,必须一致

    - name: start httpd server        #这里必须启动服务器来,handlers无法替代tasks起来启动服务。
      service: name=httpd state=started enabled=yes

  handlers:                       #handlers是模块层
    - name: Restart Httpd Server
      systemd: name=httpd state=restarted

    - name: Restart PHP Server
      systemd: name=php-fpm state=restarted

#handlers是同过notify监听服务是否发生改变来出发的,如果服务没发生改变,handlers是无法触发的。
Playbook任务标签
默认情况下,Ansible在执行的一个playbook时,会执行playbook中定义的所有任务。Ansible的标签(Tags)功能可以给
单独任务甚至整个playbook打上标签,然后利用这些标签来指定要运行的playbook中的个别任务,或不执行指定的任务。
1.打标签的方式有几种,比如:
对一个task打一个标签、对一个task打多个标签、对多个task打一个标签

2.对task打完标签应该如何使用
-t: 执行指定的tag标签任务
--skip-tags:执行--skip-tags之外的标签任务
可以通过–list-tags查看yml剧本中的标签数
[root@m01 project2]# ansible-playbook tag.yml --list-tags
可以用-t参数对指定tags执行命令
[root@m01 project2]# ansible-playbook tag.yml -t tags(定义的标签)
这里-t也执行单独运行多个tags标签

[root@m01 project2]# ansible-playbook tag.yml -t tags1,tags2
可以用–skip-tags对指定tags排除
[root@m01 project2]# ansible-playbook tag.yml --skip-tags  tags(定义的标签)

同时--skip-tags也可以排除多个tags标签

[root@m01 project2]# ansible-playbook tag.yml --skip-tags  tags1,tags2
示例
[root@m01 project2]# cat tag.yml
- hosts: web
  vars:
    - http_port: 8083
  tasks:

    - name: Install Http Server
      yum: name=httpd state=present
      tags:
        - install_httpd
        - httpd_server

    - name: configure httpd server
      template: src=./httpd.conf.j2 dest=/etc/httpd/conf/httpd.conf
      notify: Restart Httpd Server
      tags:
        - confiure_httpd
        - httpd_server

    - name: start httpd server
      service: name=httpd state=started enabled=yes
      tags: service_httpd

  handlers:
    - name: Restart Httpd Server
      systemd: name=httpd state=restarted
由于生产场景里的playbook过于臃肿,其中如果某个task出了错误,
我们测试可能需要全部再执行一次,需要浪费很多的时间,非常不方便,如果我们对单独的tasks指定tags,对单个的tags进行调试,我们会方便很多
playbook文件复用
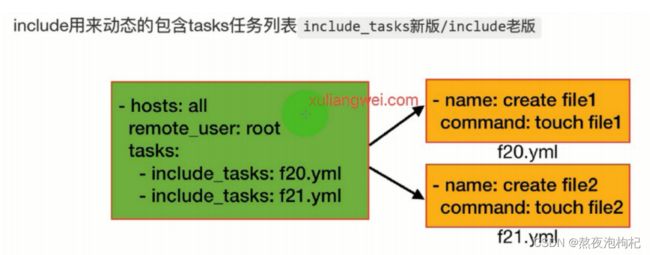
include(import_playbook)
#这种方式已经弃用,现在使用的是import_playbook,它包括的是任务文件.

include_tasks
#这种方式,include包含的是命令文件.

[root@m01 project2]# cat task.yml
- hosts: web
  vars:                       #定义端口变量
    - http_port: 801

  tasks:
    - include_tasks: task_install.yml            #包含安装文件
    - include_tasks: task_configure.yml          #包含配置文件
    - include_tasks: task_start.yml              #包含启动文件

  handlers:                                      #触发器,一旦改变,重启服务使他生效
    - name: Restart Httpd Server
      systemd: name=httpd state=restarted

[root@m01 project2]# cat task_install.yml        #安装文件的内容
- name: Install Http Server
  yum: name=httpd state=present

[root@m01 project2]# cat task_configure.yml      #配置文件的内容
- name: configure httpd server
  template: src=./httpd.conf.j2 dest=/etc/httpd/conf/httpd.conf
  notify: Restart Httpd Server

[root@m01 project2]# cat task_start.yml          #启动服务的文件
- name: start httpd server
  service: name=httpd state=started enabled=yes
Playbook忽略错误
默认Playbook会检查tasks执行的返回状态,如果遇到错误则会立即终止playbook的后续执行,然而有时候playbook即使执行错误了也要让其继续执行
加入参数:ignore_errors:yes  忽略错误.
示例
[root@manager ~]# cat f9.yml
- hosts: web
  tasks:
    - name: Ignore False
      command: /bin/false
      ignore_errors: yes

    - name: touch new file
      file: path=/tmp/bgx_ignore state=touch
Playbook错误处理
通常情况下,当task失败后,play将会终止,任何在前面已经被tasks notify的handlers都不会执行.
如果你在play中设置了force_handlers:yes参数,被通知的handlers就会强制执行.(有些特殊场景可能会使用到)
示例一
force_handlers: yes #强制调用handlers
[root@m01 project2]# cat tag.yml
- hosts: web
  vars:
    - http_port: 8083
  force_handlers: yes     #强制调用handlers
  tasks:

    - name: Install Http Server
      yum: name=httpd state=present
      tags:
        - install_httpd
        - httpd_server

    - name: configure httpd server
      template: src=./httpd.conf.j2 dest=/etc/httpd/conf/httpd.conf
      notify: Restart Httpd Server
      tags:
        - confiure_httpd
        - httpd_server

    - name: start httpd server
      service: name=httpd state=started enabled=yes
      tags: service_httpd

  handlers:
    - name: Restart Httpd Server
      systemd: name=httpd state=restarted
示例二
changed_when: false #当文件状态没有被改变,我们可以用这个参数抑制changed状态的报告。
- hosts: web
  vars:
    - http_port: 8083
  force_handlers: yes     #强制调用handlers
  tasks:
    - name: Command
      shell: netstat -lntp|grep httpd
      registet: check_httpd
      changed_when: false  #当文件状态没有被改变,我们可以用这个参数抑制changed状态的报告。
    - name: Debug
      debug: msg={{ check_httpd.stdout_lines }}
示例三
在这里我们加上了判断,如果我们加上了判断,这里如果配置文件发生了错误,
将不会重启配置文件,这样就能在保证生产线的情况下让我有足够的时间排错
[root@m01 project2]# cat tag.yml
- hosts: web
  vars:
    - http_port: 8083
  force_handlers: yes     #强制调用handlers
  tasks:

    - name: configure httpd server
      template: src=./httpd.conf.j2 dest=/etc/httpd/conf/httpd.conf

    - name: Check Httpd
      shell: /usr/sbin/httpd -t    #检测apache配置文件语法格式是否正确
      registet: check_httpd
      changed_when:
        - check_httpd.stdout.find('OK')
        - false
      notify: Restart Httpd Server

    - name: Srart Httpd Server
      systemd: name=httpd state=started enabled=yes

  handlers:
    - name: Restart Httpd Server
      systemd: name=httpd state=restarted
判断失败示例
failed_when
命令不依赖返回状态码来判定是否执行失败,而是要查看命令返回内容来决定,比如返回内容中包括 failed 字符串,则判定为失败。示例如下:
- name: this command prints FAILED when it fails
  command: /usr/bin/example-command -x -y -z
  register: command_result
  failed_when: "'FAILED' in command_result.stderr"
Ansible加密模块
ansible加密模块
[root@m01 project2]# ansible-vault --help
Usage: ansible-vault [create|decrypt|edit|encrypt|encrypt_string|rekey|view] [options] [vaultfile.yml]
加密一个文件
[root@m01 project2]# ansible-vault encrypt include.yml
查看一个文件
[root@m01 project2]# ansible-vault view include.yml
Vault password:
- import_playbook: han.yml
- import_playbook: when2.yml
修改加密的文件内容
[root@m01 project2]# ansible-vault edit include.yml
rekey 修改密码
[root@m01 project2]# ansible-vault rekey include.yml
Vault password:
New Vault password:
Confirm New Vault password:
Rekey successful
执行加密的playbook
[root@m01 project2]# echo "1" >pass
[root@m01 project2]# chmod 600 pass
[root@m01 project2]# ansible-playbook include.yml  --vault-password-file=pass
移除密码
[root@m01 project2]# ansible-vault decrypt include.yml
Vault password:
Jinja2模板
什么是jinja2
Jinja2是Python的全功能模板引擎
Jinja2模板与Ansible有什么关系
Ansible通常会使用Jinja2模板来修改被管理主机的配置文件,例如给10台远程主
机装上httpd服务,但是要求每个服务器的端口不一样,如何解决?
Ansible如果使用Jinja2模板
使用ansible的Jinja2模板,也就是template模板.该模块跟copy模块一样,都是将
文件复制到远端主机上去,但是区别在于template模块可以获取要复制的文件中变
量的值,而copy则是原封不动的把文件内容复制过去,不如:针对不同的主机定义不
同的变量,template会在将配置文件分发出去前读取变量Jinja2模块,然后分发到
不同的被管理主机上.
Jinja2基本使用
语法:
{{EXPR}}输出变量的值(会输出自定义变量的值或facts)
1)playbook文件使用template参数
2)模板文件里面变量使用(名称),比如{PORT}或者使用facts。
jinja模板逻辑关系
{% for i in EXPR %}...{% endfor%}作为循环表达式
{% if EXPR %}...{% elif EXPR %}...{% endif%}作为条件判断
{# COMMENT #}表示注释
jinja模板使用示例,使用facts变量的示例
1.编辑playbook
[root@m01 ~]# vim jinja2.yml
- hosts: web_group
  tasks:
    - name: Copy Template File
      template:
        src: ./motd.j2
        dest: /etc/motd
2.准备motd.j2文件
[root@m01 ~]# vim motd.j2
Welcome to {{ ansible_fqdn }}
This system total mem is : {{ ansible_memtotal_mb }} MB
This system free mem is: {{ ansible_memfree_mb }} MB
3.执行playbook
[root@m01 ~]# ansible-playbook jinja2.yml


#查看结果
[root@m01 ~]# ansible web_group -a 'cat /etc/motd'
web01 | CHANGED | rc=0 >>
Welcome to web01
This system total mem is : 1982 MB
This system free mem is: 1106 MB

web02 | CHANGED | rc=0 >>
Welcome to web02
This system total mem is : 1982 MB
This system free mem is: 1096 MB
jinja 模板逻辑关系
Nginx
[root@m01 project2]# cat jinja_nginx.yml
- hosts: webservers
  vars:
    - http_port: 80
    - server_name: www.oldboyedu.com
  tasks:
    - name: Copy Nginx COnfigure
      template:
        src: ./oldboyedu.conf.j2 dest: /etc/nginx/conf.d/oldboyedu_proxy.conf
[root@m01 project2]# cat oldboyedu.conf.j2
upstream {{ server_name }} {
{% for i in range(1,20) %}
  server 172.16.1.{{i}}:{{http_port}};
{%endfor%}
}
server {
	listen {{ http_port }};
	server_name {{ server_name }};
	location / {
		proxy_pass http://{{ server_name }};
		proxy_set_header Host $http_host;
	}
}
配置keepalived配置文件
[root@m01 project2]# cat jinja_keepalived.yml
- hosts: webservers
  tasks:
    - name: Copy Keepalived Configure
      template:
        src: ./kee.conf.j2
        dest: /tmp/keepalived.conf
[root@m01 project2]# cat kee.conf.j2
global_defs {
    router_id {{ ansible_hostname }}
}

vrrp_instance VI_1 {
{%if ansible_hostname =="web01" %}
    state MASTER
    priority 150
{%elif ansible_hostname == "web02" %}
    state BACKUP
    priority 100
{%endif%}

    interface eth0
    virtual_router_id 50
    advert_int 1
    authentication {
        auth_type PASS
        auth_pass 1111
}
    virtual_ipaddress {
        10.0.0.3
    }
}
mysql剧本模块
数据库模块
- name: Create Database User
  mysql_user:
    name: autumn                          #创建的用户
    password: autumn123.com               #创建用户的密码
    priv: '*.*:ALL,GRANT'                 #授权用户
    host: '%'                             #授权的网段
    state: present                        #创建


- name: Create New Databases
  mysql_db:                               #添加库信息
    name:
     - wordpress
     - phpshe
    login_user: root                      #登录的用户为root
    login_port: 3306                      #登录的端口
    login_host                            #登录的网段
    login_password                        #登录的密码
    state: present                        #创建
[root@m01 project2]# cat jinja_mysql.yml
- hosts: webservers
  gather_facts: no
  vars:
    PORT: 13306
   # PORT: false  #相当于开关
  tasks:
    - name: Copy MySQL Configure
      template: src=./my.cnf.j2 dest=/tmp/my.cnf
[root@m01 project2]# cat my.cnf.j2
{% if PORT %}
bind-address=0.0.0.0:{{ PORT }}
{% else %}
bind-address=0.0.0.0:3306
{%endif%}
Roles
概述
roles不管是Ansible还是saltstack,我在写一键部署的时候,都不可能把所有的步骤全部写入到
一个’剧本’文件当中,我们肯定需要把不同的工作模块,拆分开来,解耦,那么说到解耦,我们
就需要用到roles官方推荐,因为roles的目录结构层次更加清晰。

例如:我们之前推荐大家写一个base.yml里面写所有基础优化的项
目,其实把所有东西摞进去也是很鸡肋的,不如我们把这些功能全部拆分开,谁需要使用,就调用即可。

建议:每个roles最好只使用一个tasks这样方便我们去调用,能够很好的做到解耦。(SOA)
Ansible Roles目录结构
[root@m01 ~]# cd /etc/ansible/roles
[root@m01 roles]# mkdir {nfs,rsync,web}/{vars,tasks,template,handlers,files,meta} -p
[root@m01 roles]# tree
.
|── nfs
├── defaults        #低优先级变量
├── files           #存放文件
├── handlers        #触发器文件
├── meta            #依赖关系文件
├── tasks           #工作任务文件
├── templates       #jinja2模板文件
├── tests           #测试文件
└── vars            #变量文件
Ansible Roles依赖关系
roles允许你再使用roles时自动引入其他的roles。role依赖关系存储在roles目录中meta/main.yml文件中。

例如:推送wordpress并解压,前提条件,必须要安装nginx和php,把服务跑起来,才能运行wordpress的页面,此时我们就可以在wordpress的roles中定义依赖nginx和php的roles
[root@m01 roles]# cat wordpress/meta/main.yml
dependencies:
  - role: web_server
    when: ansible_hostname is match "web"
  - role: php_server
    when: ansible_hostname is match "web"
  - role: mysql_server
    when: ansible_hostname is match "db"
[root@m01 roles]# cat nfs/tasks/install.yml
- name: Install NFS-utils Server
  yum:
    name: nfs-utils
    state: present
[root@m01 roles]# cat nfs/tasks/config.yml
- name: Configure Nfs-utils Server
  template:
    src: ./exports.j2
    dest: /etc/exports
    owner: root
    group: root
    mode: 0644
  notify: Restart NFS Server
[root@m01 roles]# cat nfs/tasks/start.yml
- name: Start NFS Server
  systemd:
    name: nfs
    state: started
    enabled: yes
[root@m01 roles]# cat nfs-client/tasks/main.yml
- name: Mount NFS Server
  mount:
   path: /opt src=172.16.1.7:/data fstype=nfs opts=defaults state: mounted
[root@m01 roles]# cat site.yml
- hosts: web01
  roles:
    - nfs

- hosts: web02
  roles:
    - nfs-client
解压模块
- name: 解压压缩包
  unarchive:
    src: wordpress.tar.gz
    dest: /code
    owner: www
    group: www
    creates: /code/wordpress  如果存在就不解压
数据库模块
- name: 创建数据库表文件
  mysql_db:
    name:
      - wordpress
      - phpshe
    login_user: root
    login_port: 3306
    state: present


- name: 创建数据库用户
  mysql_user:
    name: autumn
    password: autumn123.com
    priv: `*.*ALL,GRANT`
    host: `%`
    state: present
配置phpmyadmin
tasks目录
[root@m01 roles]# cat phpmyadmin/tasks/main.yml
- name: Configure PhpMyadmin
  copy:
    src: "{{ item.src }}"
    dest: "{{ item.dest }}"
  loop:
    - { src: php.ini,dest: /etc/php.ini }
    - { src: www.conf,dest: /etc/php-fpm.d/www.conf }
  notify: Restart PHP


- name: Create Code Dir
  file:
    path: /code
    state: directory


- name: Configure PhpMyadmin Server
  unarchive:
    src: phpmyadmin.tar.gz
    dest: /code
    owner: www
    group: www
    creates: /code/myadmin


- name: Configure PhpMyadmin Conf
  template:
    src: "{{ item.src }}"
    dest: "{{ item.dest }}"
  loop:
    - { src: myadmin.oldboy.com.conf ,dest: /etc/nginx/conf.d/myadmin.oldboy.com.conf }
    - { src: nginx.conf,dest: /etc/nginx/nginx.conf }
  notify: Restart Nginx


- name: Check Nginx
  shell: /usr/sbin/nginx -t
  register: result


- name: Start Nginx
  systemd:
    name: nginx
    state: started
    enabled: yes


- name: Start PHP-FPM
  systemd:
    name: php-fpm
    state: started
    enabled: yes


- name: Create Dir
  file:
    path: /server/script
    state: directory
    recurse: yes


- name: Configure Push Script
  template:
    src: client_push_data.sh
    dest: /server/script/client_push_data.sh


- name: Cron Push Script
  cron:
    name: "push backup"
    minute: "*/5"
    job: "sh /server/script/client_push_data.sh > /dev/null"
j2目录
[root@m01 roles]# ll phpmyadmin/templates/
total 12
-rw-r--r-- 1 root root 793 Apr 19 16:37 client_push_data.sh
-rw-r--r-- 1 root root 275 Apr 20 17:38 myadmin.oldboy.com.conf
-rw-r--r-- 1 root root 639 Mar 27 15:31 nginx.conf
files目录
[root@m01 roles]# ll phpmyadmin/files
total 13584
-rw-r--r-- 1 root root    62688 Apr 20 19:52 php.ini
-rw-r--r-- 1 root root 13822582 Apr 20 15:27 phpmyadmin.tar.gz
-rw-r--r-- 1 root root    17964 Apr 20 12:05 www.conf