Nacos - 服务发现和配置管理
Nacos - 服务发现和配置管理
一、学习目标
1)能够理解微服务架构的特点
2)能够理解服务发现的流程
3)能够说出Nacos的功能
4)掌握Nacos的安装方法
5)掌握RESTful服务发现开发方法
6)掌握Dubbo服务发现开发方法
7)理解Nacos服务发现的数据模型
8)能够掌握Nacos配置管理方法
9)掌握Nacos扩展配置方法
二、Nacos 简介
官网
Nacos与Spring Cloud一起使用
Nacos与Kubernetes一起使用
Nacos与Dubbo一起使用
Nacos与gRPC一起使用
Nacos与Istio一起使用
1、下载
你可以通过源码和发行包两种方式来获取 Nacos。
从 Github 上下载源码方式
git clone https://github.com/alibaba/nacos.git
cd nacos/
mvn -Prelease-nacos -Dmaven.test.skip=true clean install -U
ls -al distribution/target/

// change the $version to your actual path
cd distribution/target/nacos-server-$version/nacos/bin
下载编译后压缩包方式
您可以从 最新稳定版本 下载 nacos-server-$version.zip 包。
  unzip nacos-server-$version.zip 或者 tar -xvf nacos-server-$version.tar.gz
  cd nacos/bin
2、快速开始
这个快速开始手册是帮忙您快速在您的电脑上,下载、安装并使用 Nacos。
1、预备环境准备
Nacos 依赖 Java 环境来运行。如果您是从代码开始构建并运行Nacos,还需要为此配置 Maven环境,请确保是在以下版本环境中安装使用:
- 64 bit OS,支持 Linux/Unix/Mac/Windows,推荐选用 Linux/Unix/Mac。
- 64 bit JDK 1.8+;下载 & 配置。
- Maven 3.2.x+;下载 & 配置。
2.启动服务器
- 注:Nacos的运行需要以至少2C4g60g*3的机器配置下运行。
Linux/Unix/Mac
启动命令(standalone代表着单机模式运行,非集群模式):
sh startup.sh -m standalone
如果您使用的是ubuntu系统,或者运行脚本报错提示[[符号找不到,可尝试如下运行:
bash startup.sh -m standalone
Windows
启动命令(standalone代表着单机模式运行,非集群模式):
startup.cmd -m standalone
3.服务注册&发现和配置管理
服务注册
curl -X POST 'http://127.0.0.1:8848/nacos/v1/ns/instance?serviceName=nacos.naming.serviceName&ip=20.18.7.10&port=8080'
服务发现
curl -X GET 'http://127.0.0.1:8848/nacos/v1/ns/instance/list?serviceName=nacos.naming.serviceName'
发布配置
curl -X POST "http://127.0.0.1:8848/nacos/v1/cs/configs?dataId=nacos.cfg.dataId&group=test&content=HelloWorld"
获取配置
curl -X GET "http://127.0.0.1:8848/nacos/v1/cs/configs?dataId=nacos.cfg.dataId&group=test"
4.关闭服务器
Linux/Unix/Mac
sh shutdown.sh
Windows
shutdown.cmd
或者双击shutdown.cmd运行文件。
5、配置到数据库
新建一个实例名为 nacos 的数据库,并执行nacos/conf下的nacos-mysql.sql文件创建表。
打开conf下的application.properties文件,修改数据库连接。
spring.datasource.platform=mysql
# spring.sql.init.platform=mysql
db.num=1
db.url.0=jdbc:mysql://127.0.0.1:3306/nacos?characterEncoding=utf8&connectTimeout=1000&socketTimeout=3000&autoReconnect=true&useUnicode=true&useSSL=false&serverTimezone=UTC
db.user=root
db.password=123456
打开bin/startup.cmd 文件,将MODE从cluster改为 standalone
set MODE=“cluster” 改为 set MODE=“standalone”
set MODE="standalone"
6、权限配置
配置权限
#*************** Spring Boot Related Configurations ***************#
### Default web context path:
### 默认web上下文路径:
server.servlet.contextPath=/nacos
### Include message field
### 包括消息字段
server.error.include-message=ALWAYS
### Default web server port:
### 默认web服务器端口:
server.port=8848

#*************** Network Related Configurations ***************#
### If prefer hostname over ip for Nacos server addresses in cluster.conf:
### 如果cluster.conf中的Nacos服务器地址更喜欢主机名而不是ip:
# nacos.inetutils.prefer-hostname-over-ip=false

### Specify local server's IP:
### 指定本地服务器的IP:
# nacos.inetutils.ip-address=


#*************** Config Module Related Configurations ***************#
### If use MySQL as datasource:
### 如果使用MySQL作为数据源:
### Deprecated configuration property, it is recommended to use `spring.sql.init.platform` replaced.
### 配置属性已弃用,建议使用`spring.sql.init.platform`替换。
spring.datasource.platform=mysql
# spring.sql.init.platform=mysql

### Count of DB:
db.num=1

### Connect URL of DB:
db.url.0=jdbc:mysql://127.0.0.1:3306/nacos?characterEncoding=utf8&connectTimeout=1000&socketTimeout=3000&autoReconnect=true&useUnicode=true&useSSL=false&serverTimezone=UTC
db.user=root
db.password=123456

### Connection pool configuration: hikariCP
### 连接池配置:hikariCP
db.pool.config.connectionTimeout=30000
db.pool.config.validationTimeout=10000
db.pool.config.maximumPoolSize=20
db.pool.config.minimumIdle=2

#*************** Naming Module Related Configurations ***************#

### If enable data warmup. If set to false, the server would accept request without local data preparation:
### 如果启用数据预热。如果设置为false,则服务器将在不准备本地数据的情况下接受请求:
# nacos.naming.data.warmup=true

### If enable the instance auto expiration, kind like of health check of instance:
### 如果启用实例自动过期,类似于实例的健康检查:
# nacos.naming.expireInstance=true

### Add in 2.0.0
### The interval to clean empty service, unit: milliseconds.
### 清理空服务的间隔,单位为毫秒。
# nacos.naming.clean.empty-service.interval=60000

### The expired time to clean empty service, unit: milliseconds.
### 清理空服务的过期时间,单位:毫秒。
# nacos.naming.clean.empty-service.expired-time=60000

### The interval to clean expired metadata, unit: milliseconds.
### 清理过期元数据的间隔,单位为毫秒。
# nacos.naming.clean.expired-metadata.interval=5000

### The expired time to clean metadata, unit: milliseconds.
### 清理元数据的过期时间,单位为毫秒。
# nacos.naming.clean.expired-metadata.expired-time=60000

### The delay time before push task to execute from service changed, unit: milliseconds.
### 从服务更改推送任务执行之前的延迟时间,单位为毫秒。
# nacos.naming.push.pushTaskDelay=500

### The timeout for push task execute, unit: milliseconds.
### 执行推送任务的超时时间,单位为毫秒。
# nacos.naming.push.pushTaskTimeout=5000

### The delay time for retrying failed push task, unit: milliseconds.
### 重试失败推送任务的延迟时间,单位为毫秒。
# nacos.naming.push.pushTaskRetryDelay=1000

### Since 2.0.3
### The expired time for inactive client, unit: milliseconds.
### 非活动客户端的过期时间,单位为毫秒。
# nacos.naming.client.expired.time=180000

#*************** CMDB Module Related Configurations ***************#
### The interval to dump external CMDB in seconds:
### 转储外部CMDB的间隔(秒):
# nacos.cmdb.dumpTaskInterval=3600

### The interval of polling data change event in seconds:
### 轮询数据更改事件的间隔(秒):
# nacos.cmdb.eventTaskInterval=10

### The interval of loading labels in seconds:
### ###加载标签的间隔(秒):
# nacos.cmdb.labelTaskInterval=300

### If turn on data loading task:
### 如果打开数据加载任务
# nacos.cmdb.loadDataAtStart=false


#*************** Metrics Related Configurations ***************#
### Metrics for prometheus
#management.endpoints.web.exposure.include=*

### Metrics for elastic search
### 弹性搜索的度量
management.metrics.export.elastic.enabled=false
#management.metrics.export.elastic.host=http://localhost:9200

### Metrics for influx
management.metrics.export.influx.enabled=false
#management.metrics.export.influx.db=springboot
#management.metrics.export.influx.uri=http://localhost:8086
#management.metrics.export.influx.auto-create-db=true
#management.metrics.export.influx.consistency=one
#management.metrics.export.influx.compressed=true

#*************** Access Log Related Configurations ***************#
### If turn on the access log:
### 如果打开访问日志:
server.tomcat.accesslog.enabled=true

### The access log pattern:
### ###访问日志模式:
server.tomcat.accesslog.pattern=%h %l %u %t "%r" %s %b %D %{User-Agent}i %{Request-Source}i

### The directory of access log:
### 访问日志的目录:
server.tomcat.basedir=file:.

#*************** Access Control Related Configurations ***************#
### If enable spring security, this option is deprecated in 1.2.0:
## 如果启用弹簧安全性,则此选项在1.2.0中被弃用:
#spring.security.enabled=false

### The ignore urls of auth
## 身份验证的忽略URL
nacos.security.ignore.urls=/,/error,/**/*.css,/**/*.js,/**/*.html,/**/*.map,/**/*.svg,/**/*.png,/**/*.ico,/console-ui/public/**,/v1/auth/**,/v1/console/health/**,/actuator/**,/v1/console/server/**

## 启鉴权之后,application.properties中的配置信息为:
### The auth system to use, currently only 'nacos' and 'ldap' is supported:
nacos.core.auth.system.type=nacos
### If turn on auth system:如果打开身份验证系统:
nacos.core.auth.enabled=true

### Turn on/off caching of auth information. By turning on this switch, the update of auth information would have a 15 seconds delay.
# 打开/关闭身份验证信息的缓存。通过打开此开关,身份验证信息的更新将延迟15秒。
nacos.core.auth.caching.enabled=true

### Since 1.4.1, Turn on/off white auth for user-agent: nacos-server, only for upgrade from old version.
# 自1.4.1起,启用/禁用用户代理的白色身份验证:nacos服务器,仅用于从旧版本升级。
nacos.core.auth.enable.userAgentAuthWhite=false

### 这两个属性是身份验证的白名单,用于标识来自其他服务器的请求。
### Since 1.4.1, worked when nacos.core.auth.enabled=true and nacos.core.auth.enable.userAgentAuthWhite=false.
### 自1.4.1起,在nacos.core.auth.enabled=true和nacos.core.auth.eenable.userAgentAuthWhite=false时工作。
### The two properties is the white list for auth and used by identity the request from other server.
### 这两个属性是身份验证的白名单,用于标识来自其他服务器的请求。
nacos.core.auth.server.identity.key=example
nacos.core.auth.server.identity.value=example

### worked when nacos.core.auth.system.type=nacos
### 在 nacos.core.auth.system.type=nacos 时工作
### The token expiration in seconds:
### 令牌过期时间(秒):
nacos.core.auth.plugin.nacos.token.cache.enable=false
nacos.core.auth.plugin.nacos.token.expire.seconds=18000
### The default token (Base64 String):
# 自定义密钥时,推荐将配置项设置为Base64编码的字符串,且原始密钥长度不得低于32字符。
# nacos.core.auth.plugin.nacos.token.secret.key=SecretKey012345678901234567890123456789012345678901234567890123456789
nacos.core.auth.plugin.nacos.token.secret.key=SecretKeyaujioeanwfkajsdfjsalkdjoiIjlksajdfljasdofaf12sa456132165453165


#*************** Istio Related Configurations ***************#
#*************** Istio相关配置 ***************#
### If turn on the MCP server:
# 如果打开MCP服务器:
nacos.istio.mcp.server.enabled=false


#*************** Core Related Configurations ***************#
#*************** 核心相关配置 ***************#

### set the WorkerID manually
### 手动设置WorkerID
# nacos.core.snowflake.worker-id=

### Member-MetaData
### 成员元数据
# nacos.core.member.meta.site=
# nacos.core.member.meta.adweight=
# nacos.core.member.meta.weight=

### MemberLookup
### 成员查找
### Addressing pattern category, If set, the priority is highest
### 寻址模式类别,如果设置,则优先级最高
# nacos.core.member.lookup.type=[file,address-server]
## Set the cluster list with a configuration file or command-line argument
## 使用配置文件或命令行参数设置群集列表
# nacos.member.list=192.168.16.101:8847?raft_port=8807,192.168.16.101?raft_port=8808,192.168.16.101:8849?raft_port=8809
## for AddressServerMemberLookup
## 用于AddressServerMemberLookup
# Maximum number of retries to query the address server upon initialization
# nacos.core.address-server.retry=5
## Server domain name address of [address-server] mode
## [地址服务器]模式的服务器域名地址
# address.server.domain=jmenv.tbsite.net
## Server port of [address-server] mode
## [地址服务器]模式的服务器端口
# address.server.port=8080
## Request address of [address-server] mode
## [地址服务器]模式的请求地址
# address.server.url=/nacos/serverlist

#*************** JRaft Related Configurations ***************#

### Sets the Raft cluster election timeout, default value is 5 second
# nacos.core.protocol.raft.data.election_timeout_ms=5000
### Sets the amount of time the Raft snapshot will execute periodically, default is 30 minute
# nacos.core.protocol.raft.data.snapshot_interval_secs=30
### raft internal worker threads
# nacos.core.protocol.raft.data.core_thread_num=8
### Number of threads required for raft business request processing
# nacos.core.protocol.raft.data.cli_service_thread_num=4
### raft linear read strategy. Safe linear reads are used by default, that is, the Leader tenure is confirmed by heartbeat
# nacos.core.protocol.raft.data.read_index_type=ReadOnlySafe
### rpc request timeout, default 5 seconds
# nacos.core.protocol.raft.data.rpc_request_timeout_ms=5000

#*************** Distro Related Configurations ***************#

### Distro data sync delay time, when sync task delayed, task will be merged for same data key. Default 1 second.
# nacos.core.protocol.distro.data.sync.delayMs=1000

### Distro data sync timeout for one sync data, default 3 seconds.
# nacos.core.protocol.distro.data.sync.timeoutMs=3000

### Distro data sync retry delay time when sync data failed or timeout, same behavior with delayMs, default 3 seconds.
# nacos.core.protocol.distro.data.sync.retryDelayMs=3000

### Distro data verify interval time, verify synced data whether expired for a interval. Default 5 seconds.
# nacos.core.protocol.distro.data.verify.intervalMs=5000

### Distro data verify timeout for one verify, default 3 seconds.
# nacos.core.protocol.distro.data.verify.timeoutMs=3000

### Distro data load retry delay when load snapshot data failed, default 30 seconds.
# nacos.core.protocol.distro.data.load.retryDelayMs=30000

### enable to support prometheus service discovery
#nacos.prometheus.metrics.enabled=true

### Since 2.3
#*************** Grpc Configurations ***************#

## sdk grpc(between nacos server and client) configuration
## Sets the maximum message size allowed to be received on the server.
#nacos.remote.server.grpc.sdk.max-inbound-message-size=10485760

## Sets the time(milliseconds) without read activity before sending a keepalive ping. The typical default is two hours.
#nacos.remote.server.grpc.sdk.keep-alive-time=7200000

## Sets a time(milliseconds) waiting for read activity after sending a keepalive ping. Defaults to 20 seconds.
#nacos.remote.server.grpc.sdk.keep-alive-timeout=20000


## Sets a time(milliseconds) that specify the most aggressive keep-alive time clients are permitted to configure. The typical default is 5 minutes
#nacos.remote.server.grpc.sdk.permit-keep-alive-time=300000

## cluster grpc(inside the nacos server) configuration
#nacos.remote.server.grpc.cluster.max-inbound-message-size=10485760

## Sets the time(milliseconds) without read activity before sending a keepalive ping. The typical default is two hours.
#nacos.remote.server.grpc.cluster.keep-alive-time=7200000

## Sets a time(milliseconds) waiting for read activity after sending a keepalive ping. Defaults to 20 seconds.
#nacos.remote.server.grpc.cluster.keep-alive-timeout=20000

## Sets a time(milliseconds) that specify the most aggressive keep-alive time clients are permitted to configure. The typical default is 5 minutes
#nacos.remote.server.grpc.cluster.permit-keep-alive-time=300000
原始配置文件内容:
#
# Copyright 1999-2021 Alibaba Group Holding Ltd.
#
# Licensed under the Apache License, Version 2.0 (the "License");
# you may not use this file except in compliance with the License.
# You may obtain a copy of the License at
#
#      http://www.apache.org/licenses/LICENSE-2.0
#
# Unless required by applicable law or agreed to in writing, software
# distributed under the License is distributed on an "AS IS" BASIS,
# WITHOUT WARRANTIES OR CONDITIONS OF ANY KIND, either express or implied.
# See the License for the specific language governing permissions and
# limitations under the License.
#

#*************** Spring Boot Related Configurations ***************#
### Default web context path:
server.servlet.contextPath=/nacos
### Include message field
server.error.include-message=ALWAYS
### Default web server port:
server.port=8848

#*************** Network Related Configurations ***************#
### If prefer hostname over ip for Nacos server addresses in cluster.conf:
# nacos.inetutils.prefer-hostname-over-ip=false

### Specify local server's IP:
# nacos.inetutils.ip-address=


#*************** Config Module Related Configurations ***************#
### If use MySQL as datasource:
### Deprecated configuration property, it is recommended to use `spring.sql.init.platform` replaced.
# spring.datasource.platform=mysql
# spring.sql.init.platform=mysql

### Count of DB:
# db.num=1

### Connect URL of DB:
# db.url.0=jdbc:mysql://127.0.0.1:3306/nacos?characterEncoding=utf8&connectTimeout=1000&socketTimeout=3000&autoReconnect=true&useUnicode=true&useSSL=false&serverTimezone=UTC
# db.user.0=nacos
# db.password.0=nacos

### Connection pool configuration: hikariCP
db.pool.config.connectionTimeout=30000
db.pool.config.validationTimeout=10000
db.pool.config.maximumPoolSize=20
db.pool.config.minimumIdle=2

#*************** Naming Module Related Configurations ***************#

### If enable data warmup. If set to false, the server would accept request without local data preparation:
# nacos.naming.data.warmup=true

### If enable the instance auto expiration, kind like of health check of instance:
# nacos.naming.expireInstance=true

### Add in 2.0.0
### The interval to clean empty service, unit: milliseconds.
# nacos.naming.clean.empty-service.interval=60000

### The expired time to clean empty service, unit: milliseconds.
# nacos.naming.clean.empty-service.expired-time=60000

### The interval to clean expired metadata, unit: milliseconds.
# nacos.naming.clean.expired-metadata.interval=5000

### The expired time to clean metadata, unit: milliseconds.
# nacos.naming.clean.expired-metadata.expired-time=60000

### The delay time before push task to execute from service changed, unit: milliseconds.
# nacos.naming.push.pushTaskDelay=500

### The timeout for push task execute, unit: milliseconds.
# nacos.naming.push.pushTaskTimeout=5000

### The delay time for retrying failed push task, unit: milliseconds.
# nacos.naming.push.pushTaskRetryDelay=1000

### Since 2.0.3
### The expired time for inactive client, unit: milliseconds.
# nacos.naming.client.expired.time=180000

#*************** CMDB Module Related Configurations ***************#
### The interval to dump external CMDB in seconds:
# nacos.cmdb.dumpTaskInterval=3600

### The interval of polling data change event in seconds:
# nacos.cmdb.eventTaskInterval=10

### The interval of loading labels in seconds:
# nacos.cmdb.labelTaskInterval=300

### If turn on data loading task:
# nacos.cmdb.loadDataAtStart=false


#*************** Metrics Related Configurations ***************#
### Metrics for prometheus
#management.endpoints.web.exposure.include=*

### Metrics for elastic search
management.metrics.export.elastic.enabled=false
#management.metrics.export.elastic.host=http://localhost:9200

### Metrics for influx
management.metrics.export.influx.enabled=false
#management.metrics.export.influx.db=springboot
#management.metrics.export.influx.uri=http://localhost:8086
#management.metrics.export.influx.auto-create-db=true
#management.metrics.export.influx.consistency=one
#management.metrics.export.influx.compressed=true

#*************** Access Log Related Configurations ***************#
### If turn on the access log:
server.tomcat.accesslog.enabled=true

### The access log pattern:
server.tomcat.accesslog.pattern=%h %l %u %t "%r" %s %b %D %{User-Agent}i %{Request-Source}i

### The directory of access log:
server.tomcat.basedir=file:.

#*************** Access Control Related Configurations ***************#
### If enable spring security, this option is deprecated in 1.2.0:
#spring.security.enabled=false

### The ignore urls of auth
nacos.security.ignore.urls=/,/error,/**/*.css,/**/*.js,/**/*.html,/**/*.map,/**/*.svg,/**/*.png,/**/*.ico,/console-ui/public/**,/v1/auth/**,/v1/console/health/**,/actuator/**,/v1/console/server/**

### The auth system to use, currently only 'nacos' and 'ldap' is supported:
nacos.core.auth.system.type=nacos

### If turn on auth system:
nacos.core.auth.enabled=false

### Turn on/off caching of auth information. By turning on this switch, the update of auth information would have a 15 seconds delay.
nacos.core.auth.caching.enabled=true

### Since 1.4.1, Turn on/off white auth for user-agent: nacos-server, only for upgrade from old version.
nacos.core.auth.enable.userAgentAuthWhite=false

### Since 1.4.1, worked when nacos.core.auth.enabled=true and nacos.core.auth.enable.userAgentAuthWhite=false.
### The two properties is the white list for auth and used by identity the request from other server.
nacos.core.auth.server.identity.key=
nacos.core.auth.server.identity.value=

### worked when nacos.core.auth.system.type=nacos
### The token expiration in seconds:
nacos.core.auth.plugin.nacos.token.cache.enable=false
nacos.core.auth.plugin.nacos.token.expire.seconds=18000
### The default token (Base64 String):
nacos.core.auth.plugin.nacos.token.secret.key=

### worked when nacos.core.auth.system.type=ldap,{0} is Placeholder,replace login username
#nacos.core.auth.ldap.url=ldap://localhost:389
#nacos.core.auth.ldap.basedc=dc=example,dc=org
#nacos.core.auth.ldap.userDn=cn=admin,${nacos.core.auth.ldap.basedc}
#nacos.core.auth.ldap.password=admin
#nacos.core.auth.ldap.userdn=cn={0},dc=example,dc=org
#nacos.core.auth.ldap.filter.prefix=uid
#nacos.core.auth.ldap.case.sensitive=true


#*************** Istio Related Configurations ***************#
### If turn on the MCP server:
nacos.istio.mcp.server.enabled=false

#*************** Core Related Configurations ***************#

### set the WorkerID manually
# nacos.core.snowflake.worker-id=

### Member-MetaData
# nacos.core.member.meta.site=
# nacos.core.member.meta.adweight=
# nacos.core.member.meta.weight=

### MemberLookup
### Addressing pattern category, If set, the priority is highest
# nacos.core.member.lookup.type=[file,address-server]
## Set the cluster list with a configuration file or command-line argument
# nacos.member.list=192.168.16.101:8847?raft_port=8807,192.168.16.101?raft_port=8808,192.168.16.101:8849?raft_port=8809
## for AddressServerMemberLookup
# Maximum number of retries to query the address server upon initialization
# nacos.core.address-server.retry=5
## Server domain name address of [address-server] mode
# address.server.domain=jmenv.tbsite.net
## Server port of [address-server] mode
# address.server.port=8080
## Request address of [address-server] mode
# address.server.url=/nacos/serverlist

#*************** JRaft Related Configurations ***************#

### Sets the Raft cluster election timeout, default value is 5 second
# nacos.core.protocol.raft.data.election_timeout_ms=5000
### Sets the amount of time the Raft snapshot will execute periodically, default is 30 minute
# nacos.core.protocol.raft.data.snapshot_interval_secs=30
### raft internal worker threads
# nacos.core.protocol.raft.data.core_thread_num=8
### Number of threads required for raft business request processing
# nacos.core.protocol.raft.data.cli_service_thread_num=4
### raft linear read strategy. Safe linear reads are used by default, that is, the Leader tenure is confirmed by heartbeat
# nacos.core.protocol.raft.data.read_index_type=ReadOnlySafe
### rpc request timeout, default 5 seconds
# nacos.core.protocol.raft.data.rpc_request_timeout_ms=5000

#*************** Distro Related Configurations ***************#

### Distro data sync delay time, when sync task delayed, task will be merged for same data key. Default 1 second.
# nacos.core.protocol.distro.data.sync.delayMs=1000

### Distro data sync timeout for one sync data, default 3 seconds.
# nacos.core.protocol.distro.data.sync.timeoutMs=3000

### Distro data sync retry delay time when sync data failed or timeout, same behavior with delayMs, default 3 seconds.
# nacos.core.protocol.distro.data.sync.retryDelayMs=3000

### Distro data verify interval time, verify synced data whether expired for a interval. Default 5 seconds.
# nacos.core.protocol.distro.data.verify.intervalMs=5000

### Distro data verify timeout for one verify, default 3 seconds.
# nacos.core.protocol.distro.data.verify.timeoutMs=3000

### Distro data load retry delay when load snapshot data failed, default 30 seconds.
# nacos.core.protocol.distro.data.load.retryDelayMs=30000

### enable to support prometheus service discovery
#nacos.prometheus.metrics.enabled=true

### Since 2.3
#*************** Grpc Configurations ***************#

## sdk grpc(between nacos server and client) configuration
## Sets the maximum message size allowed to be received on the server.
#nacos.remote.server.grpc.sdk.max-inbound-message-size=10485760

## Sets the time(milliseconds) without read activity before sending a keepalive ping. The typical default is two hours.
#nacos.remote.server.grpc.sdk.keep-alive-time=7200000

## Sets a time(milliseconds) waiting for read activity after sending a keepalive ping. Defaults to 20 seconds.
#nacos.remote.server.grpc.sdk.keep-alive-timeout=20000


## Sets a time(milliseconds) that specify the most aggressive keep-alive time clients are permitted to configure. The typical default is 5 minutes
#nacos.remote.server.grpc.sdk.permit-keep-alive-time=300000

## cluster grpc(inside the nacos server) configuration
#nacos.remote.server.grpc.cluster.max-inbound-message-size=10485760

## Sets the time(milliseconds) without read activity before sending a keepalive ping. The typical default is two hours.
#nacos.remote.server.grpc.cluster.keep-alive-time=7200000

## Sets a time(milliseconds) waiting for read activity after sending a keepalive ping. Defaults to 20 seconds.
#nacos.remote.server.grpc.cluster.keep-alive-timeout=20000

## Sets a time(milliseconds) that specify the most aggressive keep-alive time clients are permitted to configure. The typical default is 5 minutes
#nacos.remote.server.grpc.cluster.permit-keep-alive-time=300000
三、服务发现中心
1、服务发现中心有
2、restful服务发现
Spring Cloud是一套微服务开发框架集合,包括微服务开发的方方页面,Spring Cloud是一套微服务开发的标准,
集成了很多优秀的开源框架,比如有名的Netflix公司的众多项目。
Spring Cloud 项目地址:https://spring.io/projects/spring-cloud
本测试环境采用阿里开源的Spring Cloud Alibaba微服务开发框架,Spring Cloud Alibaba是阿里巴巴公司基于
Spring Cloud标准实现一套微服务开发框架集合,它和Netflix一样都是Spring Cloud微服务开发实现方案。
Spring Cloud Alibaba项目地址:https://github.com/alibaba/spring-cloud-alibaba
通过Spring Cloud Alibaba实现解决:
1、服务发现客户端从服务发现中心获取服务列表
2、服务消费方通过负载均衡获取服务地址
在nacos-discovery父工程中添加依赖管理
服务注册(服务提供方)
服务提供方就是将服务注册到注册中心
在nacos-discovery父工程中添加依赖管理
pom.xml
<dependencies>
    <dependency>
        <groupId>org.springframework.bootgroupId>
        <artifactId>spring-boot-dependenciesartifactId>
        <version>2.1.3.RELEASEversion>
        <type>pomtype>
        <scope>importscope>
    dependency>
    <dependency>
        <groupId>org.springframework.cloudgroupId>
        <artifactId>spring-cloud-dependenciesartifactId>
        <version>Greenwich.RELEASEversion>
        <type>pomtype>
        <scope>importscope>
    dependency>
    <dependency>
        <groupId>com.alibaba.cloudgroupId>
        <artifactId>spring-cloud-alibaba-dependenciesartifactId>
        <version>2.1.0.RELEASEversion>
        <type>pomtype>
        <scope>importscope>
    dependency>
dependencies>
nacos-restful-provider 注册服务到nacos中的 maven坐标
pom.xml
<dependency>
    <groupId>org.springframework.bootgroupId>
    <artifactId>spring-boot-starter-webartifactId>
dependency>

<dependency>
    <groupId>com.alibaba.cloudgroupId>
    <artifactId>spring-cloud-starter-alibaba-nacos-discoveryartifactId>
    <version>2.1.0.RELEASEversion>
dependency>
yml 配置
server:
  port: 56010
spring:
  application:
    name: nacos-restful-provider # 工程名--服务名
  cloud:
    nacos:
      discovery:
        server‐addr: 127.0.0.1:8848   # 服务发现中心地址
controller
package com.xidida.nacos.provider.controller;

import org.springframework.web.bind.annotation.GetMapping;
import org.springframework.web.bind.annotation.RestController;

/**
 * @author YJC
 * @e-mail [email protected]
 * @Date 2023/6/3 18:23
 * @notes
 */
@RestController
public class RestProviderController {
    @GetMapping(value = "/service")
    public String service(){
        System.out.println("提供方被调用");
        return "提供方被调用";
    }
}
启动类:
/**
 * @author YJC
 * @e-mail [email protected]
 * @Date 2023/6/3 23:25
 * @notes
 */
@SpringBootApplication
public class SpringRestProviderBootstrap{
    public static void main(String[] args) {
        ConfigurableApplicationContext run = SpringApplication.run(SpringRestProviderBootstrap.class, args);
        ConfigurableEnvironment environment = run.getEnvironment();
        String property = environment.getProperty("server.port");
        System.out.println("====================================");
        System.out.println("后台接口:"+"http://127.0.0.1:"+property);
//        System.out.println("后台接口:"+"http://127.0.0.1:"+property+"/doc.html#/home");
        System.out.println("=====================================");
    }
}
展示:
服务发现(消费方)
从服务中心来获取服务列表;
在子工程中nacos-restful-consumer
pom.xml
<dependency>
    <groupId>com.alibaba.cloudgroupId>
    <artifactId>spring-cloud-starter-alibaba-nacos-discoveryartifactId>
dependency>
application.yml
spring:
  application:
    name: nacos-restful-consumer # 服务名
  cloud:
    nacos:
      discovery:
        server-addr: 127.0.0.1:8848   # 服务发现中心
controller
package com.xidida.nacos.controller;

import org.springframework.beans.factory.annotation.Autowired;
import org.springframework.beans.factory.annotation.Value;
import org.springframework.cloud.client.ServiceInstance;
import org.springframework.cloud.client.loadbalancer.LoadBalancerClient;
import org.springframework.web.bind.annotation.GetMapping;
import org.springframework.web.bind.annotation.RestController;
import org.springframework.web.client.RestTemplate;

import java.net.URI;

/**
 * @author YJC
 * @e-mail [email protected]
 * @Date 2023/6/3 23:48
 * @notes
 */
@RestController
public class RestConsumerController {
    // 指定服务名
    String  serviceId = "nacos-restful-peovider";
    // 通过负载均衡发现地址,流程是从服务发现中心拿到 nacos-restful-peovider 服务列表,通过负载均衡的算法获取一个地址
    @Autowired
    LoadBalancerClient loadBalancerClient;
    @GetMapping(value = "/service1")
    public String service1(){
        // 远程调用
        RestTemplate restTemplate = new RestTemplate();
        // 发现一个地址
        ServiceInstance serviceInstance = loadBalancerClient.choose(serviceId);
        // 获取服务的 http://IP:端口
        URI uri = serviceInstance.getUri();
        String result = restTemplate.getForObject(uri + "/service", String.class);
        return "consum invode|"+result;
    }

}
启动类:
/**
 * @author YJC
 * @e-mail [email protected]
 * @Date 2023/6/3 23:25
 * @notes
 */
@SpringBootApplication
public class SpringRestProviderBootstrap {
    public static void main(String[] args) {
        ConfigurableApplicationContext run = SpringApplication.run(SpringRestProviderBootstrap.class, args);
        ConfigurableEnvironment environment = run.getEnvironment();
        String property = environment.getProperty("server.port");
        System.out.println("消费方启动成功...");
        System.out.println("====================================");
        System.out.println("后台接口:"+"http://127.0.0.1:"+property);
//        System.out.println("后台接口:"+"http://127.0.0.1:"+property+"/doc.html#/home");
        System.out.println("=====================================");
    }
}
负载均衡
在RESTful服务发现的流程中,ServiceA通过负载均衡调用ServiceB,下边来了解一下负载均衡:
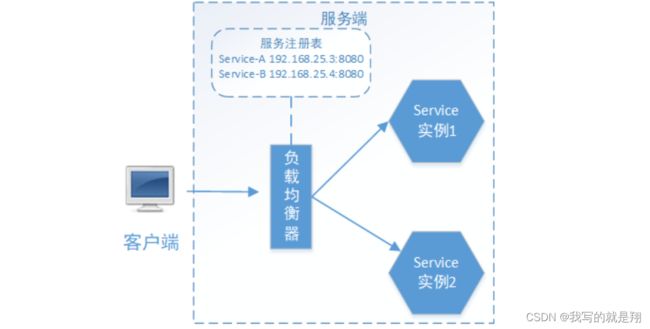
负载均衡就是将用户请求(流量)通过一定的策略,分摊在多个服务实例上执行,它是系统处理高并发、缓解网络
压力和进行服务端扩容的重要手段之一。它分为服务端负载均衡和客户端负载均衡。
服务器端负载均衡:
在负载均衡器中维护一个可用的服务实例清单,当客户端请求来临时,负载均衡服务器按照某种配置好的规则(负
载均衡算法)从可用服务实例清单中选取其一去处理客户端的请求。这就是服务端负载均衡。
例如Nginx,通过Nginx进行负载均衡,客户端发送请求至Nginx,Nginx通过负载均衡算法,在多个服务器
之间选择一个进行访问。即在服务器端再进行负载均衡算法分配。
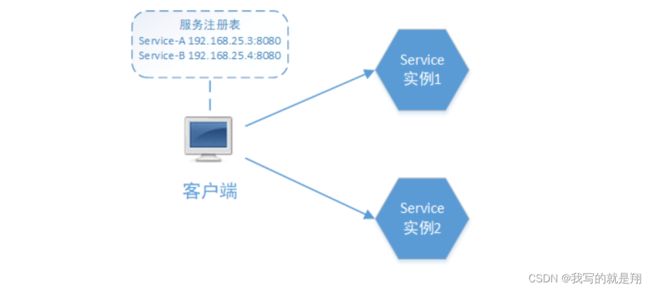
客户端服务负载均衡:
上边使用的LoadBalancerClient就是一个客户端负载均衡器,具体使用的是Ribbon客户端负载均衡器。
Ribbon在发送请求前通过负载均衡算法选择一个服务实例,然后进行访问,这是客户端负载均衡。即在客户
端就进行负载均衡的分配。
Ribbon是一个客户端负载均衡器,它的责任是从一组实例列表中挑选合适的实例,如何挑选?取决于负载均衡策
略 。
Ribbon核心组件IRule是负载均衡策略接口,它有如下实现,大家仅做了解:
- RoundRobinRule(默认):轮询,即按一定的顺序轮换获取实例的地址。
- RandomRule:随机,即以随机的方式获取实例的地址。
- AvailabilityFilteringRule: 会先过滤掉由于多次访问故障而处于断路器跳闸状态的服务,以及并发的连接数量
超过阈值的服务,然后对剩余的服务列表按照轮询策略进行访问; - WeightedResponseTimeRule: 根据平均响应时间计算所有服务的权重,响应时间越快,服务权重越大,被选中的
机率越高;
刚启动时,如果统计信息不足,则使用RoundRobinRule策略,等统计信息足够时,会切换到
WeightedResponseTimeRule - RetryRule: 先按照RoundRobinRule的策略获取服务,如果获取服务失败,则在指定时间内会进行重试,获取可用
的服务; - BestAvailableRule: 会先过滤掉由于多次访问故障而处于断路器跳闸状态的服务,然后选择一个并发量最小的
服务; - ZoneAvoidanceRule: 默认规则,复合判断server所在区域的性能和server的可用性选择服务器;
准备测试环境:
启动多个服务提供方进程,为保证端口不冲突,通过启动参数配置端口,并启动这两个进程。


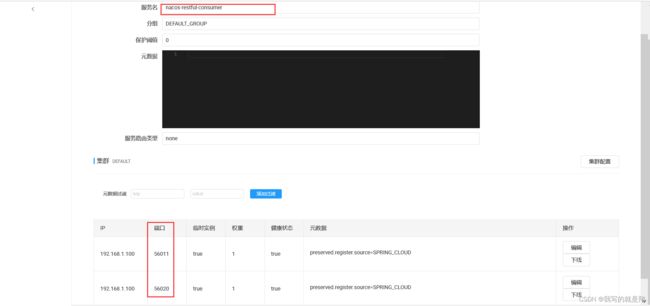
配置Ribbon的负载均衡策略:
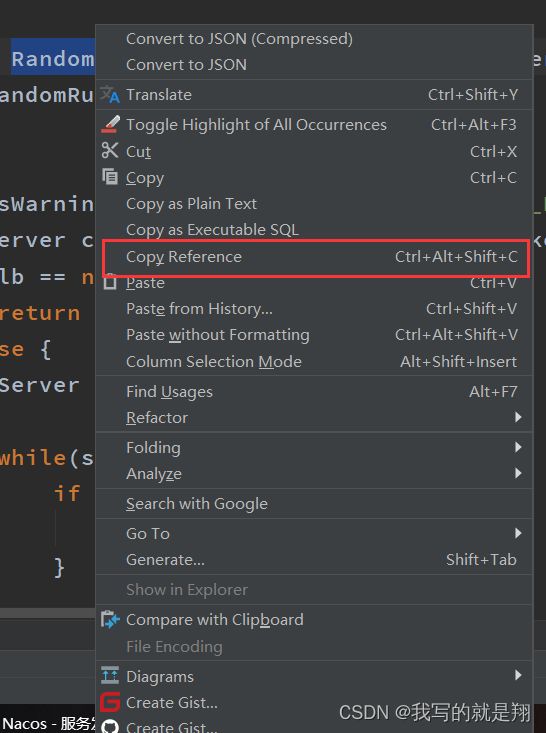
获取策略名:
shift 连按两下—> 得到搜索(下图) --》输入策略名–》点击确定—》选中类名右键获—》Copy Refernce 即可得到全类名
小结:
服务注册与发现流程:
1、服务提供方将自己注册到服务注册中心
2、服务消费方从注册中心获取服务地址
3、通过客户端负载均衡器进行远程调用
3、dobbo服务发现
Dubbo是阿里巴巴公司开源的RPC框架,在国内有着非常大的用户群体,但是其微服务开发组件相对Spring Cloud
来说并不那么完善。
Spring Cloud Alibaba微服务开发框架集成了Dubbo,可实现微服务对外暴露Dubbo协议的接口,Dubbo协议相
比RESTful协议速度更快。
RPC:RPC是远程过程调用(Remote Procedure Call)的缩写形式,调用RPC远程方法就像调用本地方法一样,非
常方便。
3.1Dubbo服务架构
下图是微服务采用Dubbo协议的系统架构图:
组件说明:
1、客户端:前端或外部系统
2、API网关:系统唯一入口,路由转发
3、application-1 :应用1,前端提供Http接口,接收用户的交互请求
4、service-1 :微服务1,提供业务逻辑处理服务
5、service-2:微服务2,提供业务逻辑处理服务
交互流程:
1、网关负责客户端请求的统一入口,路由转发,前端通过网关请求后端服务。
2、网关收到前端请求,转发请求给应用。
3、应用接收前端请求,调用微服务进行业务逻辑处理
4、微服务为应用提供业务逻辑处理的支撑,为应用提供Dubbo协议接口
优势分析:
此架构同时提供RESTful和Dubbo接口服务,应用层对前端提供RESTful接口,RESTful是互联网通用的轻量级交互
协议,方便前端接入系统;微服务层向应用层提供Dubbo接口,Dubbo接口基于RPC通信协议速度更快。
本架构采用阿里开源的Nacos,集服务发现和配置中心于一身,支持RESTful及Dubbo服务的注册。
3.2测试环境
父工程:仍然使用nacos-dicovery。
application1:使用nacos-restful-consumer。
service1微服务:需要新建
service2微服务:需要新建
api网关:后边的课程内容讲解。
3.2.1 service2微服务
service2对外暴露dubbo协议的接口,考虑远程接口可能 会被其它多个服务调用,这里将service2的接口单独抽取
出api工程,service2微服务工程的结构如下:

service2-api:存放接口,独立成一个工程方便被其它服务工程依赖。
service2-server:存放接口实现,即dubbo服务的实现部分。
3.2.1.1 定义service2-api
1、创建service2工程
<?xml version="1.0" encoding="UTF-8"?>
://maven.apache.org/POM/4.0.0"
xmlns:xsi="http://www.w3.org/2001/XMLSchema-instance"
xsi:schemaLocation="http://maven.apache.org/POM/4.0.0 http://maven.apache.org/xsd/maven-4.0.0.xsd">
>
>nacos-dubbo-service2 >
>com.xidida.nacos >
>1.0-SNAPSHOT >
>
>4.0.0 >
>service2-server >
>
<!-- api 服务 -->
com.xidida.nacos
service2-api
1.0-SNAPSHOT
com.alibaba.cloud
spring-cloud-starter-dubbo
>
>
2、创建service2-api工程
<project xmlns="http://maven.apache.org/POM/4.0.0"
         xmlns:xsi="http://www.w3.org/2001/XMLSchema-instance"
         xsi:schemaLocation="http://maven.apache.org/POM/4.0.0 http://maven.apache.org/xsd/maven-4.0.0.xsd">
    <parent>
        <artifactId>nacos-dubbo-service2artifactId>
        <groupId>com.xidida.nacosgroupId>
        <version>1.0-SNAPSHOTversion>
    parent>
    <modelVersion>4.0.0modelVersion>
    <artifactId>service2-apiartifactId>
project>
3、定义接口
package com.xidida.microservice.server2.api;

/**
 * @author YJC
 * @e-mail [email protected]
 * @Date 2023/6/7 23:13
 * @notes
 */
public interface Service2Api {
    public String service();
}
3.2.1.2 定义service2-server
1、定义接口实现
package com.xidida.microservice.service2.servicce;

import com.xidida.microservice.server2.api.Service2Api;

/**
 * @author YJC
 * @e-mail [email protected]
 * @Date 2023/6/7 23:14
 * @notes
 */
//org.apache.dubbo.config.annotation.Service 注解标注的service暴露为dubbo服务
@org.apache.dubbo.config.annotation.Service
public class Service2ApiImpl implements Service2Api {
    public String service() {
        return "dubbo Service2";
    }
}
2、定义启动类
package com.xidida.microservice.service2;

import org.springframework.boot.SpringApplication;
import org.springframework.boot.autoconfigure.SpringBootApplication;
import org.springframework.context.ConfigurableApplicationContext;
import org.springframework.core.env.ConfigurableEnvironment;

/**
 * @author YJC
 * @e-mail [email protected]
 * @Date 2023/6/8 21:37
 * @notes
 */
@SpringBootApplication
public class Service2Bootstrap {
    public static void main(String[] args) {

        ConfigurableApplicationContext run = SpringApplication.run(Service2Bootstrap.class, args);
        ConfigurableEnvironment environment = run.getEnvironment();
        String property = environment.getProperty("server.port");
        System.out.println("====================================");
        System.out.println("后台接口:"+"http://127.0.0.1:"+property);
//        System.out.println("后台接口:"+"http://127.0.0.1:"+property+"/doc.html#/home");
        System.out.println("=====================================");
    }

}
3、定义配置文件bootstrap.yml
# 加载顺序要比springboot开发中的application.yml要提前
server:
  port: 5600
spring:
  application:
    name: dubbo-service2  # 服务名称
  main:
    allow-bean-definition-overriding: true  # Springboot 2.1 需要设定  当有两个bin相同的时候不让其报错
  cloud:
    nacos:
      discovery:
        server-addr:  127.0.0.1:8848   #nacos请求
dubbo:
  scan:
    base-packages: com.xidida.microservice.service2.servicce  # dubbo 服务扫描基准包
  protocol:    # 协议
    name: dubbo  #dubbo 协议
    port: 2081  # 协议端口
  registry:
    address: nacos://127.0.0.1:8848   # 指定dubbo注册中心地址
  application:
    qos-enable: false # dubbo 运维服务是否开启
  consumer:
    check: false  # 启动是是否检查依赖服务
5、启动service2-server
启动成功观察nacos的服务列表:

6、bootstrap.yml配置说明
bootstrap.yml内容中以dubbo开头的为dubbo服务 的配置:
dubbo.scan.base-packages : 指定 Dubbo 服务实现类的扫描基准包,将
@org.apache.dubbo.config.annotation.Service注解标注的service暴露为dubbo服务。
dubbo.protocol : Dubbo 服务暴露的协议配置,其中子属性 name 为协议名称, port 为dubbo协议端口
可以指定多协议,如:dubbo.protocol.rmi.port=1099
dubbo.registry : Dubbo 服务注册中心配置,其中子属性 address 的值 “nacos://127.0.0.1:8848”,说明
dubbo服务注册到nacos
相当于原生dubbo的xml配置中的
bootstrap.yml内容的上半部分为SpringCloud的相关配置:
spring.application.name : Spring 应用名称,用于 Spring Cloud 服务注册和发现。
该值在 Dubbo Spring Cloud 加持下被视作 dubbo.application.name ,因此,无需再显示地配置
dubbo.application.name
spring.cloud.nacos.discovery : Nacos 服务发现与注册配置,其中子属性 server-addr 指定 Nacos 服务器
主机和端口
3.3application1调用service2
根据dubbo服务的架构图,本章节将nacos-restful-consumer作为application1,实现application1调用
service2。
3.3.1引用service2
在nacos-restful-consumer工程中引用service2依赖
在pom.xml中引入service2-api的依赖
 <dependency>
     <groupId>com.xidida.nacosgroupId>
     <artifactId>service2-apiartifactId>
     <version>1.0-SNAPSHOTversion>
dependency>
引入 spring-cloud-starter-dubbo依赖,它会根据接口生成代理对象
<dependency>
    <groupId>com.alibaba.cloudgroupId>
    <artifactId>spring-cloud-starter-dubboartifactId>
dependency>
3.3.2 实现远程调用
修改nacos-restful-consumer工程的RestConsumerController:
// org.apache.dubbo.config.annotation.Reference; 将接口注入
@Reference
Service2Api service2Api;
@GetMapping(value = "service2")
public String service2(){
    // 远程调用 service2
    String result = service2Api.service();
    return result;
}
Note:注意:这里的 @Reference 注解是 org.apache.dubbo.config.annotation.Reference
测试:
请求:http://127.0.0.1:56020/service2
显示:dubboService2 表明service2调用成功。
3.4 service1微服务
service1采用和service2相同的工程结构。
本节实现service1对外暴露dubbo接口,并用实现service1调用service2。
3.4.1定义service1-api
1、创建service1工程
<project xmlns="http://maven.apache.org/POM/4.0.0"
         xmlns:xsi="http://www.w3.org/2001/XMLSchema-instance"
         xsi:schemaLocation="http://maven.apache.org/POM/4.0.0 http://maven.apache.org/xsd/maven-4.0.0.xsd">
    <parent>
        <artifactId>nacos‐discoveryartifactId>
        <groupId>com.xidida.nacosgroupId>
        <version>1.0-SNAPSHOTversion>
    parent>
    <modelVersion>4.0.0modelVersion>

    <artifactId>nacos‐dubbo‐service1artifactId>
    <packaging>pompackaging>
    <modules>
        <module>service1-apimodule>
        <module>service1-servermodule>
    modules>

project>
2、创建service1-api工程
<project xmlns="http://maven.apache.org/POM/4.0.0"
         xmlns:xsi="http://www.w3.org/2001/XMLSchema-instance"
         xsi:schemaLocation="http://maven.apache.org/POM/4.0.0 http://maven.apache.org/xsd/maven-4.0.0.xsd">
    <parent>
        <artifactId>nacos‐dubbo‐service1artifactId>
        <groupId>com.xidida.nacosgroupId>
        <version>1.0-SNAPSHOTversion>
    parent>
    <modelVersion>4.0.0modelVersion>
    <artifactId>service1-apiartifactId>
project>
3、定义接口
package com.xidida.microservice.service1.api;

/**
 * @author YJC
 * @e-mail [email protected]
 * @Date 2023/6/10 21:50
 * @notes
 */
public interface Service1Api {
    public String dubboService1();
}
3.4.2 定义service1-server
1、创建service1-server工程
由于实现service1调用service2,这里需要引入 service2依赖。
<project xmlns="http://maven.apache.org/POM/4.0.0"
         xmlns:xsi="http://www.w3.org/2001/XMLSchema-instance"
         xsi:schemaLocation="http://maven.apache.org/POM/4.0.0 http://maven.apache.org/xsd/maven-4.0.0.xsd">
    <parent>
        <artifactId>nacos‐dubbo‐service1artifactId>
        <groupId>com.xidida.nacosgroupId>
        <version>1.0-SNAPSHOTversion>
    parent>
    <modelVersion>4.0.0modelVersion>

    <artifactId>service1-serverartifactId>
    <dependencies>
        <dependency>
            <groupId>com.xidida.nacosgroupId>
            <artifactId>service1-apiartifactId>
            <version>1.0-SNAPSHOTversion>
        dependency>
        <dependency>
            <groupId>com.xidida.nacosgroupId>
            <artifactId>service2-apiartifactId>
            <version>1.0-SNAPSHOTversion>
        dependency>

        <dependency>
            <groupId>com.alibaba.cloudgroupId>
            <artifactId>spring-cloud-starter-dubboartifactId>
        dependency>

        <dependency>
            <groupId>com.alibaba.cloudgroupId>
            <artifactId>spring-cloud-starter-alibaba-nacos-discoveryartifactId>
        dependency>
    dependencies>

project>
2、定义接口实现
package com.xidida.microservice.service1.service;

import com.xidida.microservice.server2.api.Service2Api;
import com.xidida.microservice.service1.api.Service1Api;

/**
 * @author YJC
 * @e-mail [email protected]
 * @Date 2023/6/10 21:53
 * @notes
 */
@org.apache.dubbo.config.annotation.Service
public class Service1ApiImpl implements Service1Api {

    @org.apache.dubbo.config.annotation.Reference
    Service2Api service2Api;

    public String dubboService1() {
        // 远程调用 service2
        String s = service2Api.service();
        return "dubboServis1->远程调用:serviser2"+s;
    }
}
注意:
@org.apache.dubbo.config.annotation.Service
3、定义启动类
package com.xidida.microservice.service1;

import org.springframework.boot.SpringApplication;
import org.springframework.boot.autoconfigure.SpringBootApplication;
import org.springframework.context.ConfigurableApplicationContext;
import org.springframework.core.env.ConfigurableEnvironment;

/**
 * @author YJC
 * @e-mail [email protected]
 * @Date 2023/6/10 21:58
 * @notes
 */

@SpringBootApplication
public class Service1Applications {
    public static void main(String[] args) {
        ConfigurableApplicationContext run = SpringApplication.run(Service1Applications.class, args);
        ConfigurableEnvironment environment = run.getEnvironment();
        String property = environment.getProperty("server.port");
        System.out.println("====================================");
        System.out.println("后台接口:"+"http://127.0.0.1:"+property);
//        System.out.println("后台接口:"+"http://127.0.0.1:"+property+"/doc.html#/home");
        System.out.println("=====================================");

    }
}
4、定义配置文件bootstrap.yml
# 加载顺序要比springboot开发中的application.yml要提前
server:
  port: 5601     # 《----- 不能与其他端口重复
spring:
  application:
    name: service1-server  # 服务名称
  main:
    allow-bean-definition-overriding: true  # Springboot 2.1 需要设定  当有两个bin相同的时候不让其报错
  cloud:
    nacos:
      discovery:
        server-addr:  127.0.0.1:8848   #nacos请求
dubbo:
  scan:
    base-packages: com.xidida.microservice.service1.service  # dubbo 服务扫描基准包  # 《----- 扫描位置修改
  protocol:    # 协议
    name: dubbo  #dubbo 协议
    port: 2082  # 协议端口   《----- 不能与其他端口重复
  registry:
    address: nacos://127.0.0.1:8848   # 指定dubbo注册中心地址
  application:
    qos-enable: false # dubbo 运维服务是否开启
  consumer:
    check: false  # 启动是是否检查依赖服务
5、启动service1-server
启动成功观察nacos的服务列表

3.4.3 application1调用service1
参考 application1调用service2的方法实现。
1、在application1引入 service1-api的依赖
略
2、在application1的controller中调用service1接口
3、测试,请求http://127.0.0.1:56020/service3
显示 :
![]()
service2成功。
3.5 服务发现数据模型
3.5.1Namespace 隔离设计
命名空间(Namespace)用于进行租户粒度的隔离,Namespace 的常用场景之一是不同环境的隔离,例如开发测试
环境和生产环境的资源(如配置、服务)隔离等。
从一个租户(用户)的角度来看,如果有多套不同的环境,那么这个时候可以根据指定的环境来创建不同的
namespce,以此来实现多环境的隔离。例如,你可能有开发,测试和生产三个不同的环境,那么使用一套
nacos 集群可以分别建以下三个不同的 namespace。如下图所示:

从多个租户(用户)的角度来看,每个租户(用户)可能会有自己的 namespace,每个租户(用户)的配置数据以及注
册的服务数据都会归属到自己的 namespace 下,以此来实现多租户间的数据隔离。例如超级管理员分配了三
个租户,分别为张三、李四和王五。分配好了之后,各租户用自己的账户名和密码登录后,创建自己的命名
空间。如下图所示:
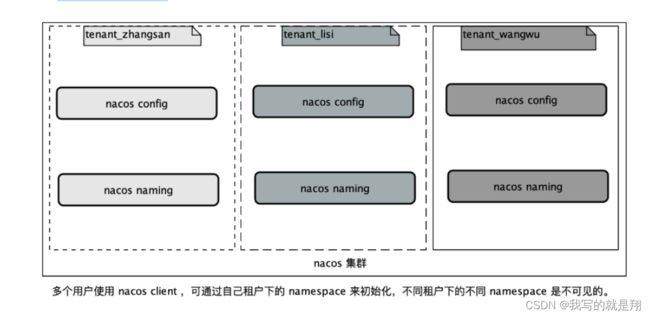
注意: 在此教程编写之时,nacos多租户(用户)功能还在规划中。
3.5.2 命名空间管理
前面已经介绍过,命名空间(Namespace)是用于隔离多个环境的(如开发、测试、生产),而每个应用在不同环
境的同一个配置(如数据库数据源)的值是不一样的。因此,我们应针对企业项目实际研发流程、环境进行规划。
如某软件公司拥有开发、测试、生产三套环境,那么我们应该针对这三个环境分别建立三个namespace。

建立好所有namespace后,在配置管理与服务管理模块下所有页面,都会包含用于切换namespace(环境)的tab按
钮,如下图:

Note: namesace 为 public 是 nacos 的一个保留空间,如果您需要创建自己的 namespace,不要和 public
重名,以一个实际业务场景有具体语义的名字来命名,以免带来字面上不容易区分自己是哪一个
namespace。
Note:在编写程序获取配置集时,指定的namespace参数一定要填写命名空间ID,而不是名称
3.5.3 数据模型
Nacos在经过阿里内部多年生产经验后提炼出的数据模型,则是一种服务-集群-实例的三层模型,这样基本可以满
足服务在所有场景下的数据存储和管理。

nacos服务发现的数据模型如下:
服务
对外提供的软件功能,通过网络访问预定义的接口。
服务名
服务提供的标识,通过该标识可以唯一确定要访问的服务。
实例
提供一个或多个服务的具有可访问网络地址(IP:Port)的进程,启动一个服务,就产生了一个服务实例。
元信息
Nacos数据(如配置和服务)描述信息,如服务版本、权重、容灾策略、负载均衡策略、鉴权配置、各种自定义标
签 (label),从作用范围来看,分为服务级别的元信息、集群的元信息及实例的元信息。
集群
服务实例的集合,服务实例组成一个默认集群, 集群可以被进一步按需求划分,划分的单位可以是虚拟集群,相同
集群下的实例才能相互感知。
通过数据模型可知:
应用通过Namespace、Service、Cluster(DEFAULT)的配置,描述了该服务向哪个环境(如开发环境)的哪个集群
注册实例。
例子如下:
指定namespace的id:a1f8e863-3117-48c4-9dd3-e9ddc2af90a8(注意根据自己环境设置namespace的id)
指定集群名称:DEFAULT表示默认集群,可不填写

spring:
	application:
		name: transaction‐service
	cloud:
		nacos:
		  discovery:
			server‐addr: 127.0.0.1:7283 # 注册中心地址
			namespace: 464a9114-0ee0-426a-99bf-b5208a963291  # 指定命名空间的ID 如果要添加就必须将所依赖的都添加进去
			cluster‐name: DEFAULT # 默认集群,可不填写
Note: 集群作为实例的隔离,相同集群的实例才能相互感知。
Note: namespace、cluster-name若不填写都将采取默认值,namespace的默认是public命名空间,
cluster-name的默认值为DEFAULT集群。
4、nacos配置管理
4.1 理解配置中心
4.1.1 什么是配置
应用程序在启动和运行的时候往往需要读取一些配置信息,配置基本上伴随着应用程序的整个生命周期,比如:数
据库连接参数、启动参数等。
配置主要有以下几个特点:
配置是独立于程序的只读变量
配置对于程序是只读的,程序通过读取配置来改变自己的行为,但是程序不应该去改变配置
配置伴随应用的整个生命周期
配置贯穿于应用的整个生命周期,应用在启动时通过读取配置来初始化,在运行时根据配置调整行为。
比如:启动时需要读取服务的端口号、系统在运行过程中需要读取定时策略执行定时任务等。
配置可以有多种加载方式
常见的有程序内部hard code,配置文件,环境变量,启动参数,基于数据库等
配置需要治理
同一份程序在不同的环境(开发,测试,生产)、不同的集群(如不同的数据中心)经常需要有不同的
配置,所以需要有完善的环境、集群配置管理
4.1.2 什么是配置中心
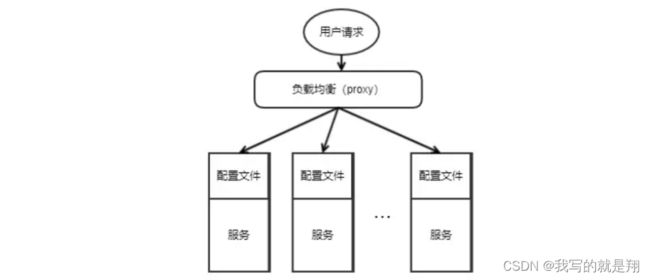
在微服务架构中,当系统从一个单体应用,被拆分成分布式系统上一个个服务节点后,配置文件也必须跟着迁移
(分割),这样配置就分散了,不仅如此,分散中还包含着冗余,如下图:
下图显示了配置中心的功能,配置中心将配置从各应用中剥离出来,对配置进行统一管理,应用自身不需要自己去
管理配置。

配置中心的服务流程如下:
1、用户在配置中心更新配置信息。
2、服务A和服务B及时得到配置更新通知,从配置中心获取配置。
总得来说,配置中心就是一种统一管理各种应用配置的基础服务组件。
在系统架构中,配置中心是整个微服务基础架构体系中的一个组件,如下图,它的功能看上去并不起眼,无非就是
配置的管理和存取,但它是整个微服务架构中不可或缺的一环。
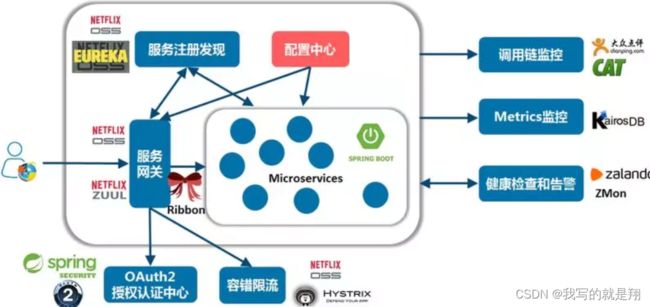
总结一下,在传统巨型单体应用纷纷转向细粒度微服务架构的历史进程中,配置中心是微服务化不可缺少的一个系
统组件,在这种背景下中心化的配置服务即配置中心应运而生,一个合格的配置中心需要满足如下特性:
- 配置项容易读取和修改
- 分布式环境下应用配置的可管理性,即提供远程管理配置的能力
- 支持对配置的修改的检视以把控风险
- 可以查看配置修改的历史记录
- 不同部署环境下应用配置的隔离性
4.1.3 主流配置中心对比
目前市面上用的比较多的配置中心有:Spring Cloud Config、Apollo、Nacos和Disconf等。
由于Disconf不再维护,下面主要对比一下Spring Cloud Config、Apollo和Nacos。
| 对比项目 | Spring Cloud Config | Apollo | Nacos |
|---|---|---|---|
| 配置实时推送 | 支持(Spring Cloud Bus) | 支持(HTTP长轮询1s内) | 支持(HTTP长轮询1s内) |
| 版本管理 | 支持(Git) | 支持 | 支持 |
| 配置回滚 | 支持(Git) | 支持 | 支持 |
| 灰度发布 | 支持 | 支持 | 不支持 |
| 权限管理 | 支持(依赖Git) | 支持 | 不支持 |
| 多集群 | 支持 | 支持 | 支持 |
| 多环境 | 支持 | 支持 | 支持 |
| 监听查询 | 支持 | 支持 | 支持 |
| 多语言 | 只支持Java | 主流语言,提供了Open API | 主流语言,提供了Open API |
| 配置格式校验 | 不支持 | 支持 | 支持 |
| 单机读(QPS) | 7(限流所致) | 9000 | 15000 |
| 单击写(QPS) | 5(限流所致) | 1100 | 1800 |
| 3节点读(QPS) | 21(限流所致) | 27000 | 45000 |
| 3节点写(QPS) | 5(限流所致) | 3300 | 5600 |
从配置中心角度来看,性能方面Nacos的读写性能最高,Apollo次之,Spring Cloud Config依赖Git场景不适合开
放的大规模自动化运维API。功能方面Apollo最为完善,nacos具有Apollo大部分配置管理功能,而Spring Cloud
Config不带运维管理界面,需要自行开发。Nacos的一大优势是整合了注册中心、配置中心功能,部署和操作相比
Apollo都要直观简单,因此它简化了架构复杂度,并减轻运维及部署工作。
综合来看,Nacos的特点和优势还是比较明显的,下面我们一起进入Nacos的世界。
4.2 nacos 配置管理
4.2.1 发布配置
3.2.1 发布配置
首先在nacos发布配置,nacos-restful-consumer服务从nacos读取配置。
浏览器访问 http://127.0.0.1:8848/nacos ,打开nacos控制台,并点击菜单配置管理->配置列表:
在Nacos添加如下的配置:
nacos-restful-consumer:
Namespace: public
Data ID: nacos‐restful‐consumer.yaml
Group : DEFAULT_GROUP
配置格式: YAML
配置内容: common:
		name: application1 config

4.2.2 获取配置
要想从配置中心获取配置添加nacos-config的依赖:
<dependency>
    <groupId>com.alibaba.cloudgroupId>
    <artifactId>spring-cloud-starter-alibaba-nacos-configartifactId>
dependency>
配置:bootstrap.yml
spring:
  cloud:
    nacos:
      config: # 指定配置中心的地址
        group: DEFAULT_GROUP  #
        server-addr: 127.0.0.1:8848
        file-extension: yaml
注意:要使用配置中心,要在bootsrap.yml中来配置,bootstrap.yml 配置文件中加载顺序要比application.yml 优先;
全部配置
server:
  port: 56020
#  配置服务提供方(ip和端口)
provider:
  address: 127.0.0.1:56010
spring:
  application:
    name: nacos-restful-consumer # 服务名
  cloud:
    nacos:
      discovery:
        server-addr: 127.0.0.1:8848   # 服务发现中心
#        namespace: 464a9114-0ee0-426a-99bf-b5208a963291  # 指定命名空间的ID
      config:
        server-addr: 127.0.0.1:8848 # 配置中心地址
        group: DEFAULT_GROUP   #
        file-extension: yaml   # 文件类型,会根据启动的 application.name 获取到服务名称拼接上文件类型即可得到 nacos-restful-consumer.yaml


nacos-restful-peovider:
  ribbon:
    NFLoadBalancerRuleClassName: com.netflix.loadbalancer.RandomRule
controller.java 代码
方法一:
@Value("${common.name}")
private String common_name;

@GetMapping(value = "getconfig")
public String getConfig(){
    return common_name;
}
在nacos-restful-consumer工程的controller中增加获取配置的web访问端点/configs,通过标准的spring @Value
方式。
不能实时刷新。
方法二:
// import org.springframework.context.ConfigurableApplicationContext;
@Autowired
private ConfigurableApplicationContext applicationContext;

@GetMapping(value = "getconfig1")
public String getConfig2(){
    String property = applicationContext.getEnvironment().getProperty("common.name");
    return property;
}
4.2.3 配置管理模型
对于Nacos配置管理,通过Namespace、group、Data ID能够定位到一个配置集。

对于Nacos配置管理,通过Namespace、group、Data ID能够定位到一个配置集。
配置集(Data ID)
在系统中,一个配置文件通常就是一个配置集,一个配置集可以包含了系统的各种配置信息,例如,一个配置集可
能包含了数据源、线程池、日志级别等配置项。每个配置集都可以定义一个有意义的名称,就是配置集的ID即Data
ID。
配置项
配置集中包含的一个个配置内容就是配置项。它代表一个具体的可配置的参数与其值域,通常以 key=value 的形
式存在。例如我们常配置系统的日志输出级别(logLevel=INFO|WARN|ERROR) 就是一个配置项。
配置分组(Group)
配置分组是对配置集进行分组,通过一个有意义的字符串(如 Buy 或 Trade )来表示,不同的配置分组下可以有
相同的配置集(Data ID)。当您在 Nacos 上创建一个配置时,如果未填写配置分组的名称,则配置分组的名称默
认采用 DEFAULT_GROUP 。配置分组的常见场景:可用于区分不同的项目或应用,例如:学生管理系统的配置集
可以定义一个group为:STUDENT_GROUP。
命名空间(Namespace)
命名空间(namespace)可用于进行不同环境的配置隔离。例如可以隔离开发环境、测试环境和生产环境,因为
它们的配置可能各不相同,或者是隔离不同的用户,不同的开发人员使用同一个nacos管理各自的配置,可通过
namespace隔离。不同的命名空间下,可以存在相同名称的配置分组(Group) 或 配置集。
Nacos抽象定义了Namespace、Group、Data ID的概念,具体这几个概念代表什么,取决于我们把它们看成什
么,这里推荐给大家一种用法,如下图:
Namespace:代表不同环境,如开发、测试、生产环境。
Group:代表某项目,如XX医疗项目、XX电商项目
DataId:每个项目下往往有若干个工程,每个配置集(DataId)是一个工程的主配置文件

获取某配置集的代码:
获取配置集需要指定:
1、nacos服务地址,必须指定
2、namespace,如不指定默认public
在config中指定namespace,例子如下:
config:
  server-addr: 127.0.0.1:8848 # 配置中心地址
  group: DEFAULT_GROUP   #
  file-extension: yaml   # 文件类型,会根据启动的 application.name 获取到服务名称拼接上文件类型即可得到 nacos-restful-consumer.yaml
3、group,如不指定默认 DEFAULT_GROUP
见上边第2点的例子。
4、dataId,必须指定,名称为应用名称+配置文件扩展名

4.3 自定义扩展
4.3.1ext-config扩展配置
Spring Cloud Alibaba Nacos Config可支持自定义 Data Id 的配置。 一个完整的配置案例如下所示:
server:
  port: 56020
#  配置服务提供方(ip和端口)
provider:
  address: 127.0.0.1:56010
spring:
  application:
    name: nacos-restful-consumer # 服务名
  cloud:
    nacos:
      discovery:
        server-addr: 127.0.0.1:8848   # 服务发现中心
#        namespace: 464a9114-0ee0-426a-99bf-b5208a963291  # 指定命名空间的ID
      config:
        server-addr: 127.0.0.1:8848 # 配置中心地址
        group: DEFAULT_GROUP   #  1、Data Id group:组名,refresh:动态刷新
        file-extension: yaml   # 文件类型,会根据启动的 application.name 获取到服务名称拼接上文件类型即可得到 nacos-restful-consumer.yaml
        ext-config[0]:  # 扩展配置文件
          data-id: ext-config-common01.yaml
          group: COMMON_GROUP
          refresh: true  # 当文件更新就立即刷新
        ext-config[1]:
          data-id: ext-config-common02.yaml
          group: COMMON_GROUP
          refresh: true
可以看到:
通过 spring.cloud.nacos.config.ext-config[n].data-id 的配置方式来支持多个 Data Id 的配置。
通过 spring.cloud.nacos.config.ext-config[n].group 的配置方式自定义 Data Id 所在的组,不明确配置
的话,默认是 DEFAULT_GROUP。通过 spring.cloud.nacos.config.ext-config[n].refresh 的配置方式来控制该 Data Id 在配置变更时,是
否支持应用中可动态刷新, 感知到最新的配置值。默认是不支持的。
Note : spring.cloud.nacos.config.ext-config[n].data-id 的值必须带文件扩展名,文件扩展名既可支持
properties,又可以支持 yaml/yml。 此时 spring.cloud.nacos.config.file-extension 的配置对自定义扩
展配置的 Data Id 文件扩展名没有影响。
测试:
配置ext-config-common01.yaml:

编写测试代码:
@GetMapping(value = "getconfig2")
public String getConfig2(){
    String name = applicationContext.getEnvironment().getProperty("common.name");
    String addr = applicationContext.getEnvironment().getProperty("common.addr");
    return name+"|"+addr;
}
重启nacos-restful-consumer工程
访问:http://127.0.0.1:56020/getconfig2
通过测试发现:
扩展配置优先级是 spring.cloud.nacos.config.ext-config[n].data-id 其中 n 的值越大,优先级越高。
通过内部相关规则(应用名、扩展名 )自动生成相关的 Data Id 配置的优先级最大。

4.3.2 案例
案例需求如下:
1、抽取servlet公用的配置到独立的配置文件,配置文件内容如下:
# HTTP格式配置
spring:
  http:
    encoding:
        charset: UTF-8
        force: true
        enabled: true
    messages:
        encoding: UTF‐8

# tomcat头信息和访问路径配置
server:
    tomcat:
        remote_ip_header: x‐forwarded‐for
        protocol_header: x‐forwarded‐proto
    servlet:
        context‐path: /a
    use‐forward‐headers: true
2、如果有context-path的个性配置可以单独设置
实现如下:
1、抽取servlet公用的配置到独立的配置文件
在nacos-restful-consumer中添加扩展配置文件,下图中红色框内为指定的配置文件名称:
server:
  port: 56020
#  配置服务提供方(ip和端口)
provider:
  address: 127.0.0.1:56010
spring:
  application:
    name: nacos-restful-consumer # 服务名
  cloud:
    nacos:
      discovery:
        server-addr: 127.0.0.1:8848   # 服务发现中心
#        namespace: 464a9114-0ee0-426a-99bf-b5208a963291  # 指定命名空间的ID
      config:
        server-addr: 127.0.0.1:8848 # 配置中心地址
        group: DEFAULT_GROUP   #  1、Data Id group:组名,refresh:动态刷新
        file-extension: yaml   # 文件类型,会根据启动的 application.name 获取到服务名称拼接上文件类型即可得到 nacos-restful-consumer.yaml
        ext-config[0]:  # 扩展配置文件
          data-id: ext-config-common01.yaml
          group: COMMON_GROUP
          refresh: true  # 当文件更新就立即刷新
        ext-config[1]:
          data-id: ext-config-common02.yaml
          group: COMMON_GROUP
          refresh: true
        ext-config[2]: # 抽取出来的公共配置文件
          data-id: ext-config-http.yaml
          group: COMMON_GROUP
          refresh: true
在nacos中添加扩展配置文件,下图中红色框内是servlet公用的配置内容。

发布配置,重启nacos-restful-consumer
访问http://127.0.0.1:56020/a/getconfig2验证配置是否生效

2、如果有context-path的个性配置可以单独设置
这里我们需要对nacos-restful-consumer的context-path设置为根路径,如何实现?
方案1:修改ext-config-http.yaml中context-path为根路径,但是此文件定义为公用配置文件,其它服务可使用
了,此方案不可行。
方案2:在nacos-restful-consumer.yaml中定义context-path为根路径,因为nacos-restful-consumer.yaml单独
属于nacos-restful-consumer工程,且nacos-restful-consumer.yaml的优先级比ext-config-http.yaml高,所以此
方案可行。
在nacos中配置nacos-restful-consumer.yaml
总结
Nacos是阿里巴巴公司开源的项目,它用来实现配置中心和服务注册中心。
什么是服务发现?
在微服务架构中一个业务流程需要多个微服务通过网络接口调用完成业务处理,服务消费方从服务注册中心获取服
务提供方的地址,从而进行远程调用,这个过程叫做服务发现。
服务发现的流程是什么?
1、服务发现的客户端从服务注册中心获取服务列表
2、服务消费方通过客户端负载均衡获取服务实例地址,进行远程调用。
什么是配置中心?
在微服务架构中为了统一管理各各微服务的配置信息专门设置配置中心,配置中心就是一种统一管理各种应用配置
的基础服务组件。
配置中心的应用流程是什么?
1、发布配置,将配置信息发布到配置中心。
2、获取配置,配置中心客户端得到配置中心的通知,从配置中心获取配置。
Spring Cloud是什么?
Spring Cloud是一套微服务开发框架集合,包括微服务开发的方方页面,Spring Cloud是一套微服务开发的标准,
集成了很多优秀的开源框架,比如有名的Netflix公司的众多项目。
Spring Cloud Alibaba是什么?
Spring Cloud Alibaba是阿里巴巴公司基于Spring Cloud标准实现一套微服务开发框架集合,它和Netflix一样都是
Spring Cloud微服务开发实现方案。
Dubbo服务开发流程是什么?
1、定义api工程。
方便其它服务原来api工程,远程调用dubbo服务。
2、定义api实现工程。
service实现类使用 @org.apache.dubbo.config.annotation.Service注解标记为dubbo服务。
3、服务消费方开发
引入api工程依赖
使用org.apache.dubbo.config.annotation.Reference注解注入service,发起远程调用
consumer.yaml
ext-config[0]: # 扩展配置文件
data-id: ext-config-common01.yaml
group: COMMON_GROUP
refresh: true # 当文件更新就立即刷新
ext-config[1]:
data-id: ext-config-common02.yaml
group: COMMON_GROUP
refresh: true
ext-config[2]: # 抽取出来的公共配置文件
data-id: ext-config-http.yaml
group: COMMON_GROUP
refresh: true
在nacos中添加扩展配置文件,下图中红色框内是servlet公用的配置内容。

!(file\image-20230615001829755.png)

[外链图片转存中...(img-ScznSjMU-1686921269942)]

发布配置,重启nacos-restful-consumer
访问http://127.0.0.1:56020/a/getconfig2验证配置是否生效

[外链图片转存中...(img-O3x4JlOX-1686921269943)]2、如果有context-path的个性配置可以单独设置
这里我们需要对nacos-restful-consumer的context-path设置为根路径,如何实现?
方案1:修改ext-config-http.yaml中context-path为根路径,但是此文件定义为公用配置文件,其它服务可使用
了,此方案不可行。
方案2:在nacos-restful-consumer.yaml中定义context-path为根路径,因为nacos-restful-consumer.yaml单独
属于nacos-restful-consumer工程,且nacos-restful-consumer.yaml的优先级比ext-config-http.yaml高,所以此
方案可行。
在nacos中配置nacos-restful-consumer.yaml


### 总结

Nacos是阿里巴巴公司开源的项目,它用来实现配置中心和服务注册中心。

**什么是服务发现?**
在微服务架构中一个业务流程需要多个微服务通过网络接口调用完成业务处理,服务消费方从服务注册中心获取服
务提供方的地址,从而进行远程调用,这个过程叫做服务发现。

**服务发现的流程是什么?**
1、服务发现的客户端从服务注册中心获取服务列表
2、服务消费方通过客户端负载均衡获取服务实例地址,进行远程调用。

**什么是配置中心?**
在微服务架构中为了统一管理各各微服务的配置信息专门设置配置中心,配置中心就是一种统一管理各种应用配置
的基础服务组件。

**配置中心的应用流程是什么?**
1、发布配置,将配置信息发布到配置中心。

2、获取配置,配置中心客户端得到配置中心的通知,从配置中心获取配置。


**Spring Cloud是什么?**
Spring Cloud是一套微服务开发框架集合,包括微服务开发的方方页面,Spring Cloud是一套微服务开发的标准,
集成了很多优秀的开源框架,比如有名的Netflix公司的众多项目。


**Spring Cloud Alibaba是什么?**
Spring Cloud Alibaba是阿里巴巴公司基于Spring Cloud标准实现一套微服务开发框架集合,它和Netflix一样都是
Spring Cloud微服务开发实现方案。


**Dubbo服务开发流程是什么?**
1、定义api工程。
方便其它服务原来api工程,远程调用dubbo服务。
2、定义api实现工程。
service实现类使用 **@org.apache.dubbo.config.annotation.Service**注解标记为dubbo服务。
3、服务消费方开发
引入api工程依赖
使用**org.apache.dubbo.config.annotation.Reference**注解注入service,发起远程调用


