SpringBoot的Data开发篇:整合JDBC、整合Mybatis&MP,YAML文件加密的实现,数据&项目监控平台的使用和实现
SpringBoot整合JDBC
实现步骤:
-
导pom文件坐标
除springboot启动器和test坐标外,还需要导入spring jdbc和mysql的坐标
<dependencies> <dependency> <groupId>org.springframework.bootgroupId> <artifactId>spring-boot-starter-data-jdbcartifactId> dependency> <dependency> <groupId>mysqlgroupId> <artifactId>mysql-connector-javaartifactId> <version>8.0.29version> <scope>runtimescope> dependency> <dependency> <groupId>org.springframework.bootgroupId> <artifactId>spring-boot-starterartifactId> dependency> <dependency> <groupId>org.springframework.bootgroupId> <artifactId>spring-boot-starter-testartifactId> <scope>testscope> dependency> dependencies> -
application.yaml配置文件,配置数据源
#配置数据源 spring: datasource: driver-class-name: com.mysql.cj.jdbc.Driver url: jdbc:mysql://localhost:3306/spring?serverTimezone=GMT username: root password: 123456 -
创建实体类
public class Emp { private int eid; private String ename; private String esex; // get,set,toString,有参无参构造 } -
创建映射器
public class MyRowMapper implements RowMapper<Emp> { @Override public Emp mapRow(ResultSet rs, int rowNum) throws SQLException { int eid = rs.getInt("eid"); String ename = rs.getString("ename"); String esex = rs.getString("esex"); Emp emp = new Emp(eid, ename, esex); return emp; } } -
junit测试
@SpringBootTest
class Springboot01DataJdbcApplicationTests {
    @Autowired(required = false)
    JdbcTemplate jdbcTemplate;

    @Test
    void show1(){
        int row = jdbcTemplate.update("insert into emp(ename,esex) values(?,?)", "张三", "男");
        System.out.println(row);
    }

    @Test
    void show2(){
        int row = jdbcTemplate.update("delete from emp where eid=?", "2");
        System.out.println(row);
    }
    @Test
    void show3() {
        Emp emp = jdbcTemplate.queryForObject("select * from emp where eid=?", new MyRowMapper(), "1");
        System.out.println(emp);

    }
    @Test
    void show4(){
        List<Emp> query = jdbcTemplate.query("select * from emp", new MyRowMapper());
        query.forEach(System.out::println);
    }
}
总结:SpringBoot整合JDBC后使用JDBC和dbutil非常相似,用到了模板模式,核心是jdbcTemplate,增删改用update方法,全查用query方法,查询返回值一个实例用queryObject方法,查询都需要传一个映射器
SpringBoot整合Mybatis&MP
实现步骤:
-
导pom.xml文件坐标
<dependencies> <dependency> <groupId>org.springframework.bootgroupId> <artifactId>spring-boot-starterartifactId> dependency> <dependency> <groupId>org.springframework.bootgroupId> <artifactId>spring-boot-starter-testartifactId> <scope>testscope> dependency> <dependency> <groupId>org.projectlombokgroupId> <artifactId>lombokartifactId> dependency> <dependency> <groupId>com.baomidougroupId> <artifactId>mybatis-plus-boot-starterartifactId> <version>3.4.3version> dependency> <dependency> <groupId>mysqlgroupId> <artifactId>mysql-connector-javaartifactId> <version>8.0.29version> dependency> dependencies> -
application.yaml配置文件
#数据源 spring: datasource: driver-class-name: com.mysql.cj.jdbc.Driver url: jdbc:mysql://localhost:3306/spring?serverTimezone=GMT username: root password: 123456 #mybatis mybatis: configuration: map-underscore-to-camel-case: true type-aliases-package: com.dong.pojo mybatis-plus: configuration: map-underscore-to-camel-case: true log-impl: org.apache.ibatis.logging.stdout.StdOutImpl #mybatis所执行的sql输出控制台-
mybatis:
- map-underscore-to-camel-case: true ——》配置自动驼峰映射
- type-aliases-package: com.dong.pojo ——》mybatis配置起别名
-
mybatis-plus:
-
map-underscore-to-camel-case: true ——》自动驼峰映射
-
llog-impl: org.apache.ibatis.logging.stdout.StdOutImpl ——》
mybatis所执行的sql输出控制台
-
-
-
实体类:
@NoArgsConstructor @AllArgsConstructor @Data @TableName(value = "student") public class Student implements Serializable { @TableId("stu_id") private int stuId; @TableField("stu_name") private String stuName; @TableField("stu_sex") private String stuSex; public Student(String stuName, String stuSex) { this.stuName = stuName; this.stuSex = stuSex; } } -
dao层
@Mapper/*逐个注入*/ public interface StudentMapper extends BaseMapper<Student> { @Select("select * from student") public List<Student> findAll(); }-
StudentMapper接口继承了MP的公共dao层方法,继承公共方法还可以自定义方法
-
@Mapper:将Mapper注入导容器,@Mapper是逐个注入,并创建Mapper实例,每个Mapper接口都需要添加此注解
-
@MapperScan:将Mapper批量注入导容器中,只需要在主启动程序添加此注解就可以
演示:
@SpringBootApplication
@MapperScan(basePackages = "com.dong.mapper")
public class Springboot02DataMybatisMpApplication {
    public static void main(String[] args) {
    SpringApplication.run(Springboot02DataMybatisMpApplication.class, args);
    }
}
@MapperScan(basePackages = “com.dong.mapper”),basePackages属性填写Mapper存放的路径,就可以扫描到所有的Mapper接口注入容器并创建实例
-
-
实现分页查询
实现分页查询需要写一个配置类,配置分页拦截器
/*分页查询配置*/ @Configuration public class MybatisPlusConfig { //注入mp拦截器 @Bean public MybatisPlusInterceptor mybatisPlusInterceptor(){ //1.实例化拦截器 MybatisPlusInterceptor mybatisPlusInterceptor = new MybatisPlusInterceptor(); //2.分页拦截器 mybatisPlusInterceptor.addInnerInterceptor(new PaginationInnerInterceptor()); return mybatisPlusInterceptor; } } -
junit测试:
@SpringBootTest
class Springboot02DataMybatisMpApplicationTests {
    @Autowired(required = false)
    StudentMapper studentMapper;

    //新增
    @Test
    void show1(){
        Student stu = new Student("李四","男");
        int row = studentMapper.insert(stu);
        System.out.println(row);
    }

    // 删除
    @Test
    void show2(){
        int row = studentMapper.deleteById("4");
        System.out.println(row);
    }

    // 修改
    @Test
    void show3(){
        Student student = new Student();
        student.setStuSex("女");
        student.setStuId(1);
        int row = studentMapper.updateById(student);
        System.out.println(row);
    }

    // 单查
    @Test
    void show4(){
        Student student = studentMapper.selectById(3);
        System.out.println(student);
    }

    // 全查
    @Test
    void show5(){
        List<Student> list =  studentMapper.findAll();
        list.forEach(System.out::println);
    }

    // 分页查询
    @Test
    void show6(){
        //1.创建分页规则
        IPage<Student> page = new Page<Student>(2,2);
        //2.查询
        studentMapper.selectPage(page,null);
        //3 获取分页结果
        System.out.println("当前页码值:"+page.getCurrent());
        System.out.println("每页显示数:"+page.getSize());
        System.out.println("一共多少页:"+page.getPages());
        System.out.println("一共多少条数据:"+page.getTotal());
        System.out.println("数据:"+page.getRecords());
    }
}
总结实现流程:
- 建库建项目
- 导坐标
- 写applicaiton.yaml文件
- 写enjoy配置类
- 实体类,@TableName()注解关联数据库
- dao层,service层
- controller层和页面(因为需要上传文件到七牛云,写文件工具类)
SpringBoot切换Druid数据源
实现步骤:
-
导入druid坐标
<dependency> <groupId>com.alibabagroupId> <artifactId>druid-spring-boot-starterartifactId> <version>1.2.18version> dependency> -
配置application.yaml主配置文件
#配置数据源 spring: datasource: driver-class-name: com.mysql.cj.jdbc.Driver url: jdbc:mysql://localhost:3306/spring?serverTimezone=GMT username: root password: 123456 type: com.alibaba.druid.pool.DruidDataSource数据源新增配置:type;配置后数据源即切换为druid
-
编写DruidConfig配置类
@Configuration
public class DruidConfig {
    // 给druid配置数据源
    @Bean
    @ConfigurationProperties(prefix = "spring.datasource")
    public DataSource dataSource(){
        return new DruidDataSource();
    }
}
告诉druid数据库的信息
-
可以在juint单元测试中测试
@Autowired(required = false)
DataSource dataSource;

@Test
void contextLoads() throws Exception{
    System.out.println(dataSource.getClass());
    System.out.println(dataSource.getConnection());
}
结果:
class com.alibaba.druid.pool.DruidDataSource
com.alibaba.druid.proxy.jdbc.ConnectionProxyImpl@c7f4457
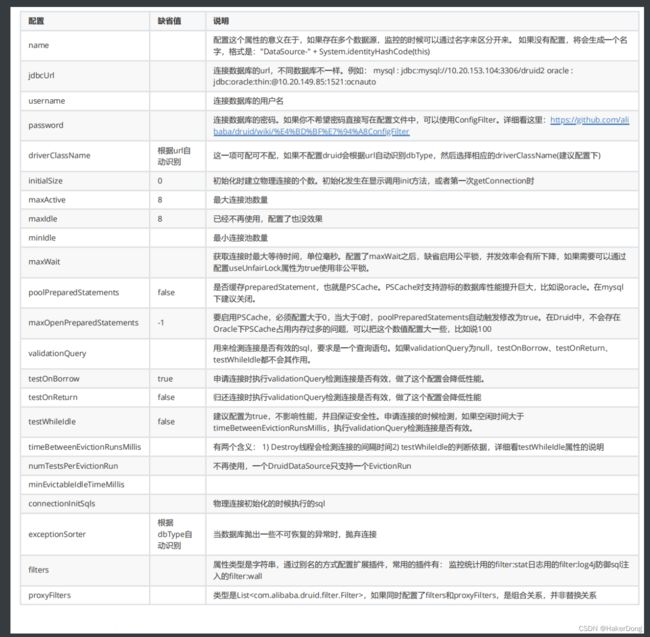
Druid的配置参数
YAML文件加密的实现
因为主配置文件中数据库的账号密码都是明文的,不安全,所以需要对YAML主配置文件进行加密
实现方式:
-
druid自带可以对密码加密(有且只能对密码加密)
-
Jasypt任意内容加密
演示:Jasypt对账号密码加密实现步骤
实现步骤:
-
添加jasypt坐标
<dependency> <groupId>com.github.ulisesbocchiogroupId> <artifactId>jasypt-spring-boot-starterartifactId> <version>2.1.0version> dependency> -
启动类添加注解:@EnableConfigurationProperties
@EnableConfigurationProperties:作用,开启加密
@SpringBootApplication @EnableConfigurationProperties public class Springboot03DataDruidApplication { public static void main(String[] args) { SpringApplication.run(Springboot03DataDruidApplication.class, args); } } -
通过测试类生成密码
@Test void show1(){ StandardPBEStringEncryptor standardPBEStringEncryptor = new StandardPBEStringEncryptor(); EnvironmentPBEConfig config = new EnvironmentPBEConfig(); // 加密的算法,这个算法是默认的 config.setAlgorithm("PBEWithMD5AndDES"); // 加密的密钥,随便自己填写,很重要千万不要告诉别人 config.setPassword("programmerdong"); standardPBEStringEncryptor.setConfig(config); //自己的密码 String plainText = "root"; String encryptedText = standardPBEStringEncryptor.encrypt(plainText); System.out.println(encryptedText); }- config.setPassword:加密的密钥,密钥会和想要加密的内容通过算法一起生成加密的内容,解密的时候也需要此密钥,简单来说,使用加密后的内容解密也需要密钥
- String plainText = " ":字符串中写想要加密的内容,账号、密码等等
- 运行测试类,控制台会打印加密后的内容,将账号输入运行一次,再将密码输入运行一次
- 注意:账号密码最好都生成后再去yaml文件中改,如果生成了一个之后配置了yaml,一定要配置密钥,否则第二次生成报错
-
配置yaml文件
spring: datasource: driver-class-name: com.mysql.cj.jdbc.Driver url: jdbc:mysql://localhost:3306/spring?serverTimezone=GMT username: ENC(lrPe70ChJmyln/gFKmdXLw==) # 加密后的账号 password: ENC(7J9GcM0PbiAa8uEtNNrtcg==) # 加密后的密码 type: com.alibaba.druid.pool.DruidDataSource # 数据源 Druid # 密钥 jasypt: encryptor: password: programmerdong- 注意:加密后的内容在配置文件中需要写在ENC()中
- 这里配置的密钥是生成加密内容是自己设置的密钥
Druid数据监控平台
Druid的监控主要监控数据访问层
实现步骤:
-
导pom文件坐标,略
-
yaml主配置文件
spring: datasource: driver-class-name: com.mysql.cj.jdbc.Driver url: jdbc:mysql://localhost:3306/spring?serverTimezone=GMT username: root password: 123456 type: com.alibaba.druid.pool.DruidDataSource filters: stat,wall- 使用Druid监控平台使用Druid数据源
- filters:配置Druid监控平台
-
编写Druid配置类
@Configuration public class DruidConfig { // 给druid配置数据源 @Bean @ConfigurationProperties(prefix = "spring.datasource") public DataSource dataSource(){ return new DruidDataSource(); } // 配置servlet @Bean public ServletRegistrationBean registrationBean(){ //1.创建servlet注册类 ServletRegistrationBean<StatViewServlet> servletRegistrationBean = new ServletRegistrationBean<StatViewServlet>(); //2.创建制作页面的servlet StatViewServlet statViewServlet = new StatViewServlet(); //3.绑定servlet servletRegistrationBean.setServlet(statViewServlet); servletRegistrationBean.setUrlMappings(Arrays.asList("/druid/*")); //4.参数绑定 Map<String,String> maps = new HashMap<String,String>(); maps.put(StatViewServlet.PARAM_NAME_USERNAME,"admin"); maps.put(StatViewServlet.PARAM_NAME_PASSWORD,"123"); maps.put(StatViewServlet.PARAM_NAME_ALLOW,"");//白名单 maps.put(StatViewServlet.PARAM_NAME_DENY,"192.168.0.12");//黑名单 servletRegistrationBean.setInitParameters(maps); return servletRegistrationBean; } // 配置listener @Bean public FilterRegistrationBean filterRegistrationBean(){ FilterRegistrationBean<WebStatFilter> bean = new FilterRegistrationBean<WebStatFilter>(); bean.setFilter(new WebStatFilter()); //所有请求进行监控处理 bean.setUrlPatterns(Arrays.asList("/*")); Map<String, String> initPrams = new HashMap<>(); //添加不需要忽略的格式信息 initPrams.put(WebStatFilter.PARAM_NAME_EXCLUSIONS, "*.js,*.css,/druid/*"); bean.setInitParameters(initPrams); return bean; } } -
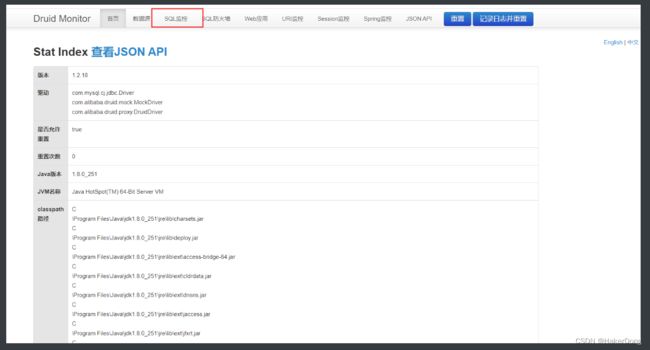
访问监控平台路径:localhost:8080/druid/login
输出账号密码即可登录
SpringBoot 项目监控的使用实现
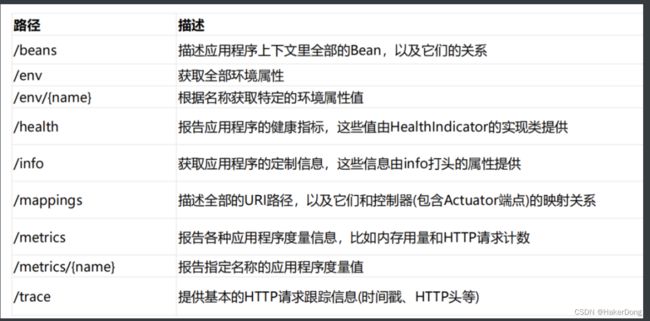
Druid监控平台主要用于监控数据访问层,监测整个Spring项目不是很好用,而SpringBoot自带监控功能Actuator,可以帮助实现对程序内部运行情况监控,比如监控状况、Bean加载情况、配置属性 、日志信息等
实现Actuator的步骤:
-
导入依赖坐标
<dependency> <groupId>org.springframework.bootgroupId> <artifactId>spring-boot-starter-actuatorartifactId> dependency> -
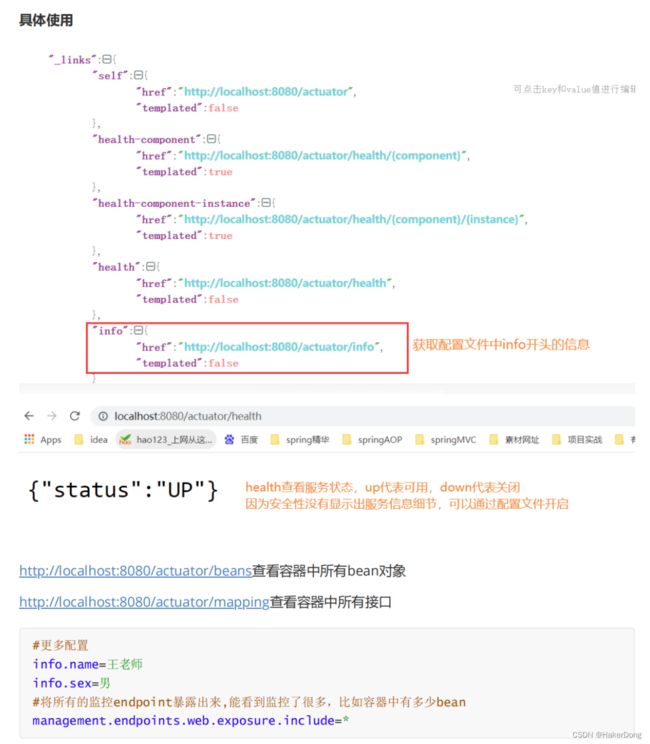
访问http://localhost:8080/actuator访问后可以通过json.cn查看json
注意:使用时一定要先访问一个普通接口,否则不开启监控,报错404
SpringBoot Admin
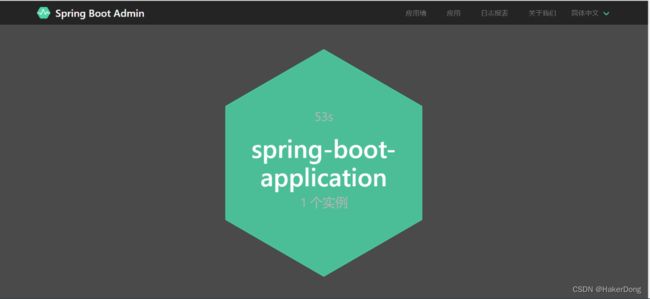
因为Actuator的监控信息都是JSON的文本,可读性差,有社区开源项目做出了可视化页面
- Spring Boot Admin是一个开源社区项目,用于管理和监控SpringBoot应用程序。
- Spring Boot Admin 有两个角色,客户端(Client)和服务端(Server)。
- 应用程序作为Spring Boot Admin Client向为Spring Boot Admin Server注册
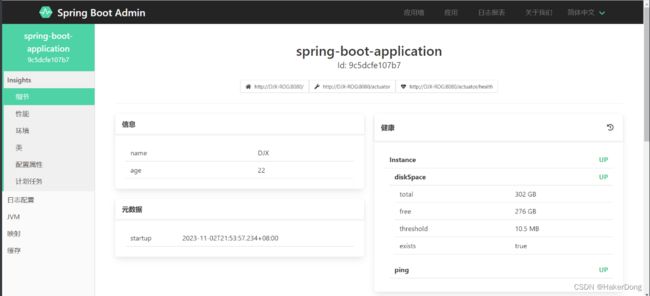
- Spring Boot Admin Server 的UI界面将Spring Boot Admin Client的Actuator Endpoint上的一些监控信息。
实现步骤:
被监控的叫做客户端,监控叫做服务器端
客户端admin-client:
-
创建admin-client模块(一个springboot web项目)
-
导入坐标:admin-starter-client
<dependency>
    <groupId>de.codecentricgroupId>
    <artifactId>spring-boot-admin-starter-clientartifactId>
    <version>2.2.0version>
dependency>
这里SpringBoot版本的问题肯能导致监控失败,建议使用SpringBoot版本:2.4.3
-
配置文件:server地址等
配置文件properties或yanl;这里用到的是properties
# 配置Info信息
info.name=DJX
info.age=22

# 开启健康检查的完整信息
management.endpoint.health.show-details=always
# 将所有的监控endponit暴露出来,能够看到监控了很多,比如容器中的Bean
management.endpoints.web.exposure.include=*

# admin-server访问地址
spring.boot.admin.client.url=http://localhost:8081
服务器端admin-server:
-
创建admin-server模块(springboot的项目)
-
导入坐标: admin-starter-server
<dependency>
    <groupId>de.codecentricgroupId>
    <artifactId>spring-boot-admin-starter-serverartifactId>
    <version>2.7.3version>
dependency>
建议使用Springboot版本为2.7.2
-
配置端口号
server.port=8081这里的端口号是客户端配置的服务器访问地址,需要对应上
-
在启动类上添加注解:@EnableAdminServer
测试:
