ClusterControl部署PostgreSQL主从复制集群
ClusterControl简介
ClusterControl是一个用于部署数据库集群的无代理管理和自动化软件,它能够直接从用户界面部署,监控,管理和扩展数据库服务器/集群。ClusterControl能够处理维护数据库服务器或集群所需的大多数管理任务。
ClusterControl由许多组件组成:
| Component | Package naming | Role |
|---|---|---|
| ClusterControl Controller (cmon) | clustercontrol-controller | The brain of ClusterControl. A backend service performing automation, management, monitoring and scheduling tasks. All the collected data will be stored directly inside CMON database. |
| ClusterControl REST API [1] | clustercontrol-cmonapi | Interprets request and response data between ClusterControl UI and CMON database. |
| ClusterControl UI | clustercontrol | A modern web user interface to visualize and manage the cluster. It interacts with CMON controller via remote procedure call (RPC) or REST API interface. |
| ClusterControl SSH | clustercontrol-ssh | Optional package introduced in ClusterControl 1.4.2 for ClusterControl’s web SSH console. Only works with Apache 2.4+. |
| ClusterControl Notifications | clustercontrol-notifications | Optional package introduced in ClusterControl 1.4.2 providing a service and user interface for notification services and integration with third party tools. |
| ClusterControl Cloud | clustercontrol-cloud | Optional package introduced in ClusterControl 1.5.0 providing a service and user interface for integration with cloud providers. |
| ClusterControl Cloud File Manager | clustercontrol-clud | Optional package introduced in ClusterControl 1.5.0 providing a command-line interface to interact with storage objects on cloud. |
| ClusterControl CLI | s9s-tools | Open-source command line tool to manage and monitor clusters provisioned by ClusterControl. |
支持的Database Server/Cluste
ClusterControl支持一下数据库服务器和集群:
-
Galera Cluster
-
Percona XtraDB Cluster (Percona)
-
MariaDB Galera Cluster (MariaDB)
-
-
MySQL Cluster (NDB)
-
MySQL/MariaDB Replication (master-master and master-slave)
-
MySQL Group Replication (beta)
-
MySQL/MariaDB Standalone
-
MongoDB/Percona Server for MongoDB
-
Replica set
-
Sharded cluster
-
Replicated sharded cluster
-
-
PostgreSQL
-
Single instance
-
Streaming replication
-
支持的Load Balancer
ClusterControl支持以下路由软件:
-
HAProxy
-
MariaDB MaxScale
-
ProxySQL
-
Keepalived (virtual IP address only)
使用ClusterControl,您可以:
-
在您选择的技术堆栈上部署独立,复制或集群数据库。
-
在多语言数据库和动态基础架构之间统一自动执行故障转移,恢复和日常任务。
-
您可以创建完整备份或增量备份并对其进行计划。
-
对整个数据库和服务器基础架构进行统一,全面的实时监控。
-
使用单个操作轻松添加或删除节点。
-
在PostgreSQL上,如果您遇到事故,您的slave节点可以自动升级为master状态。
-
它是一个非常完整的工具,带有免费的社区版本(还包括免费的企业版试用版)。
ClusterControl原理
ClusterControl组件必须驻留在除数据库集群之外的独立节点上。 例如,如果您有一个三节点Galera集群,则应在第四个节点上安装ClusterControl。 以下是使用ClusterControl构建Galera集群的示例:

启动cmon服务后,它会将内部/etc/cmon.cnf和/etc/cmon.d/cmon_*.cnf(如果存在)的所有配置选项加载到CMON数据库中。每个CMON配置文件表示具有不同群集ID的群集。它首先注册主机,收集信息,并通过SSH定期在所有受管节点上执行检查和预定作业。在ClusterControl中设置无密码SSH对于无代理管理至关重要。对于监视,可以使用无代理和基于代理的设置配置ClusterControl,有关详细信息,请参阅监视操作。
ClusterControl os_user使用ssh_identityCMON配置文件中定义的SSH密钥连接到所有受管节点。有关详细信息,请参阅无密码SSH部分。
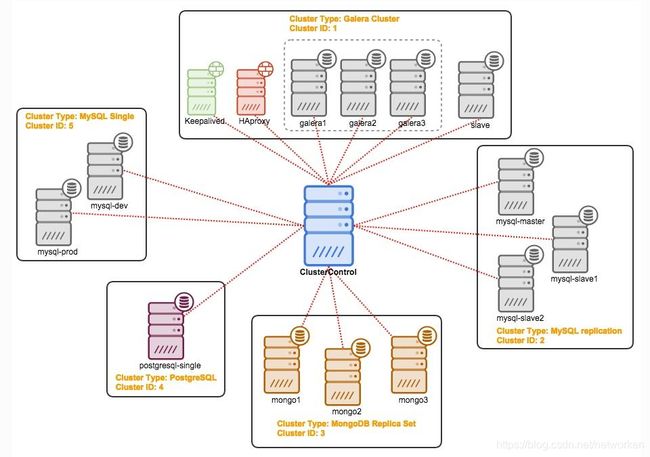
用户真正需要做的是访问位于http://ClusterControl_host/clustercontrol的ClusterControl UI 并从那里开始管理数据库集群。您可以从导入现有数据库集群开始,或者在本地或云中创建新的数据库服务器或集群。ClusterControl支持在单个ClusterControl服务器下监视多个群集和群集类型,如下图所示:
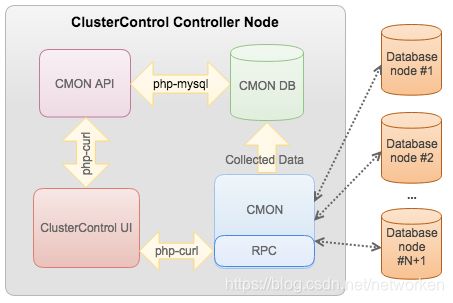
ClusterControl通过端口9500上的远程过程调用(RPC)(由RPC令牌进行身份验证),端口9501(带有TLS的RPC)和可访问的REST API http://ClusterControl_host/cmonapi(由API token进行身份验证)公开所有功能。ClusterControl UI与这些接口交互以检索监控数据(集群负载,主机状态,警报,备份状态等)或发送管理命令(添加/删除节点,运行备份,升级集群等)。下图说明了ClusterControl的体系结构:
ClusterControl对性能影响最小,尤其是基于代理的监视设置,不会导致数据库服务器或群集停机。实际上,它会在找到失败的数据库节点或集群时执行自动恢复(如果已启用)。
ClusterControl功能
ClusterControl能够处理维护数据库服务器或集群所需的大多数管理任务。以下是ClusterControl可以在您的数据库基础结构上执行的一些任务:
-
监控主机统计信息(CPU / RAM /磁盘/网络/交换)
-
在单个CMON进程中配置多个数据库服务器/集群
-
监视数据库的统计信息,变量,日志文件,查询,以及单个节点以及群集范围
-
数据库配置管理
-
数据库集群/节点恢复
-
触发警报并发送通知
-
安排并执行数据库备份(mysqldump,Xtrabackup,pgdump,pg_basebackup,mongodump,mongodb-consistent-backup)
-
数据库备份状态
-
恢复备份
-
验证独立主机上的备份还原
-
MySQL时间点恢复
-
将备份上载到AWS S3 / Google云存储/ Azure存储
-
停止/启动/引导数据库服务
-
从备份重建数据库节点以避免SST
-
在本地或云上部署新的数据库服务器/集群
-
添加现有的MySQL / MariaDB服务器/集群,MongoDB副本集和PostgreSQL服务器
-
扩展数据库集群(添加/删除Galera节点,garbd和复制从属)
-
部署数据库负载平衡器(HAProxy,MaxScale,ProxySQL)和虚拟IP地址(Keepalived)
-
监视HAProxy / MaxScale / ProxySQL统计信息
-
管理MySQL用户权限
-
升级MySQL服务器
-
推动MySQL / PostgreSQL奴隶掌握
-
设置延迟的奴隶
-
从主备份或现有备份中暂存复制从站
-
管理数据库SSL的私钥和证书
-
客户端 - 服务器加密,复制加密,备份加密(静止或传输中)
-
从备份创建群集
-
还有很多…
有关更多详细信息,请参阅ClusterControl产品页面https://severalnines.com/product/clustercontrol。您可能还想查看ClusterControl更改日志以获取最新的开发更新。
部署postgresql集群
部署环境
使用ClusterControl实现一个带有负载均衡服务的主从PostgreSQL集群,并在它们之间配置keepalived,所有这一切都来自友好且易于使用的界面。
对于我们的示例,我们将创建:
节点信息:
| 节点名称 | IP地址 | 角色 | 监听端口 | 版本 |
|---|---|---|---|---|
| clustercontrol | 192.168.92.10 | clustercontrol | 80 | v 1.7.1 |
| pgmaster | 192.168.92.11 | master/haproxy/keepalived | 5432 | PostgreSQL 11.2 |
| pgslave01 | 192.168.92.12 | slave/haproxy/keepalived | 5432 | PostgreSQL 11.2 |
| pgslave02 | 192.168.92.13 | slave/haproxy/keepalived | 5432 | PostgreSQL 11.2 |
| vip | 192.168.92.15 | vip for cluster | rw:3307/ro:3308 |
clustercontrol文档:
https://severalnines.com/docs/getting-started.html
https://severalnines.com/docs/installation.html
postgresql指南:
https://severalnines.com/blog/how-deploy-postgresql-high-availability
https://severalnines.com/docs/user-guide/postgresql/overview.html
部署ClusterControl节点
官方支持yum源、脚本自动安装、离线安装、docker安装等多种方式部署clustercontrol节点,这里仅介绍以下两种:
以脚本方式安装:
在192.168.92.10节点执行以下操作
wget http://severalnines.com/downloads/cmon/install-cc.sh
chmod +x install-cc.sh
sudo ./install-cc.sh
以docker方式安装:
dockerhub地址:https://hub.docker.com/r/severalnines/clustercontrol
docker run -d severalnines/clustercontrol
配置SSH免密登录
必须可以从ClusterControl节点SSH免密访问从属节点
ssh-keygen
ssh-copy-id 192.168.92.11
ssh-copy-id 192.168.92.12
ssh-copy-id 192.168.92.13
部署PostgreSQL集群
访问ClusterControl web界面,填写email地址注册用户并登陆:
http://192.168.92.10/clustercontrol
创建3节点PostgeSQL主从复制集群
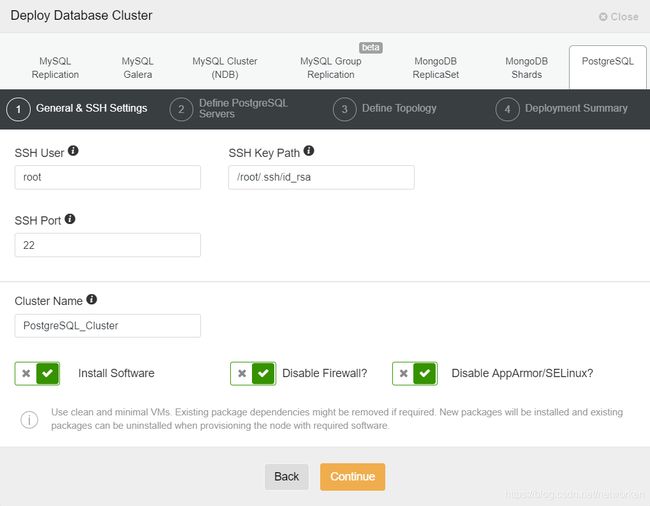
点击Deploy,选择PostgreSQL,配置SSH
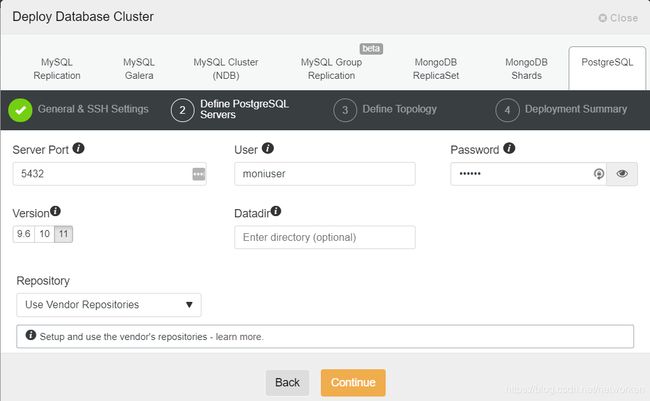
配置端口,创建复制用户moniuser/123456, PostgreSQL版本选择11。
配置主从节点IP
选择是否开启主从节点同步复制(同步或异步)
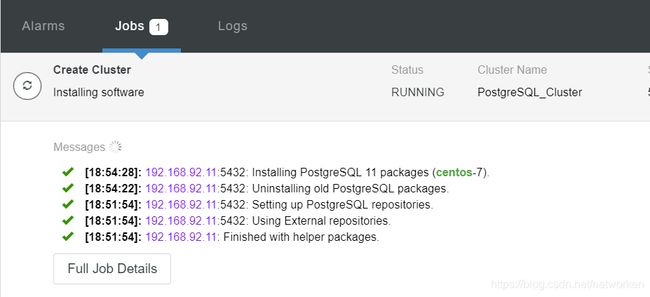
通过查看job观察部署进度:
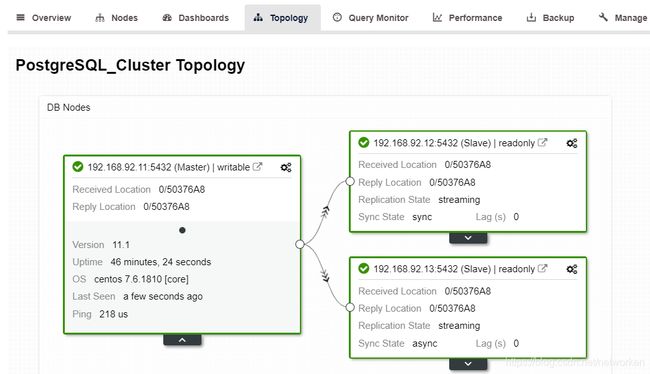
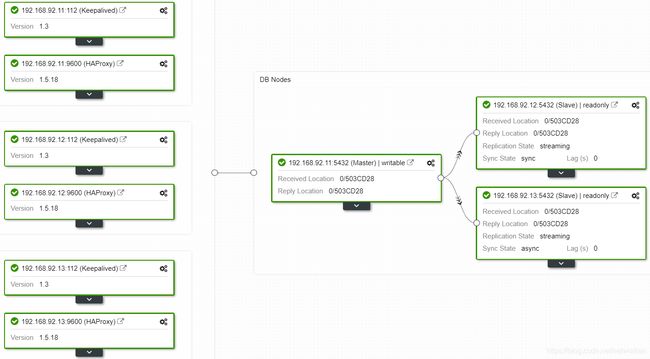
等待部署完成后查看拓扑状态
部署Load Balancer
参考:
https://severalnines.com/docs/user-guide/postgresql/manage.html#postgresql-manage-load-balancer
负载均衡器
负载均衡器是故障转移时需要考虑的重要工具,特别是如果想在数据库拓扑中使用自动故障转移。
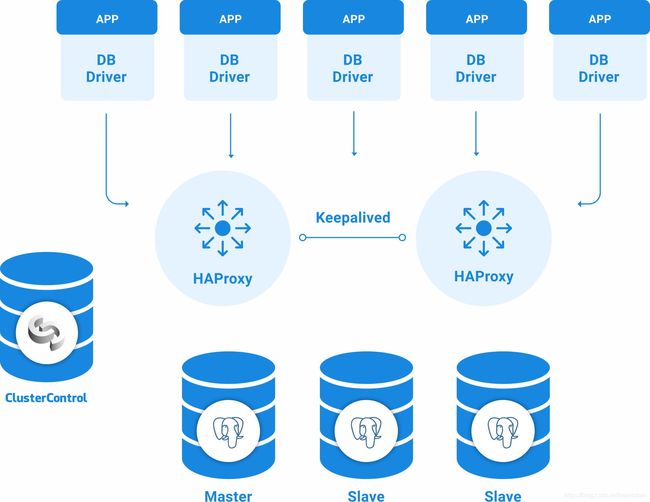
为了使故障转移对用户和应用程序都是透明的,我们需要一个中间的组件,因为它不足以将主服务器提升为从服务器。为此,我们可以使用HAProxy + Keepalived。
什么是HAProxy?
HAProxy是一种负载均衡器,可将流量从一个源分发到一个或多个目标,并可为此任务定义特定的规则和/或协议。如果任何目标停止响应,则将其标记为脱机,并将流量发送到其余可用目标。这可以防止将流量发送到不可访问的目的地,并通过将流量指向有效目的地来防止丢失此流量。
什么是Keepalived?
Keepalived允许您在主动/被动服务器组中配置虚拟IP。此虚拟IP分配给活动的"主"服务器。如果此服务器出现故障,IP将自动迁移到被发现为"被动"的"辅助"服务器,从而允许它以透明的方式继续使用相同的IP系统。
部署haproxy
在想要为负载均衡器实现故障转移的情况下,必须至少配置两个实例。HAProxy配置有两个不同的端口,一个是读写3307,一个是只读3308。
这里在3个节点上部署haproxy,以192.168.92.11节点为例(选择群集 - >管理 - >负载均衡器 - > Keepalived)。
依次在另外两个节点执行以上操作,完成后查看haproxy状态,用户名密码admin/admin
http://192.168.92.11:9600/stats
在3个节点上部署keepalived
要执行keepalived部署,请选择群集,转到"Manage"菜单和"Load Balancer"部分,然后选择"Keepalived"选项。
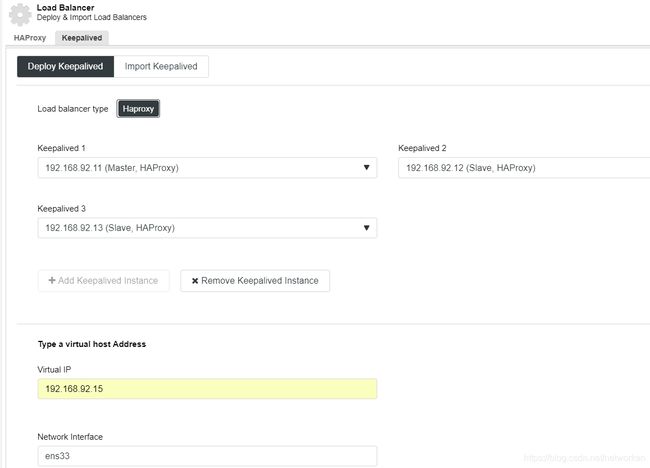
选择3个haproxy节点,并配置虚IP和网卡。
Keepalived使用虚拟IP在发生故障时将其从一个负载均衡器迁移到另一个负载均衡器,操作完成后应该具有以下拓扑:
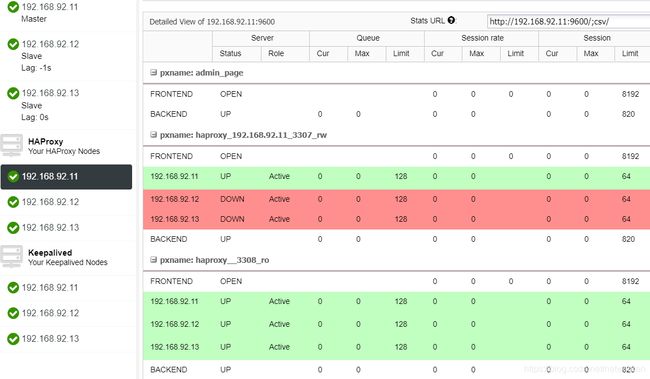
查看haproxy
在读写端口中,将主服务器设置为在线,将其余节点设置为脱机。在只读端口中,主站和从站都是在线状态。通过这种方式,我们可以平衡节点之间的读取流量。写入时,将使用读写端口,该端口将指向主站。
当HAProxy检测到我们的某个节点(主节点或从节点)无法访问时,它会自动将其标记为脱机。HAProxy不会向其发送任何流量。此检查由部署时由ClusterControl配置的运行状况检查脚本完成。这些检查实例是否已启动,是否正在进行恢复,或者是否为只读。
当ClusterControl将从属服务器提升为主服务器时,我们的HAProxy将旧主服务器标记为脱机(对于两个端口),并将提升的节点置于联机状态(在读写端口中)。通过这种方式,我们的系统继续正常运行。
如果我们的活动HAProxy(分配了我们系统连接的虚拟IP地址)失败,Keepalived会自动将此IP迁移到我们的被动HAProxy。这意味着我们的系统能够继续正常运行。
测试集群功能
基本配置
配置数据库远程连接
所有节点修改配置文件允许远程连接
修改pg_hba.conf配置文件
vim /var/lib/pgsql/11/data/pg_hba.conf
# TYPE  DATABASE        USER            ADDRESS                 METHOD

# "local" is for Unix domain socket connections only
local   all             all                                     peer
# IPv4 local connections:
host    all             all             127.0.0.1/32            ident
host    all             all             192.168.92.0/24         md5
# IPv6 local connections:
host    all             all             ::1/128                 ident
# Allow replication connections from localhost, by a user with the
# replication privilege.
新增一行允许192.168.92.0/24所有主机使用所有合法的数据库用户名访问数据库,并提供加密的密码验证。
重启数据库使配置生效
systemctl restart postgresql-11.service
为postgres用户设置密码
su - postgres
psql
ALTER USER postgres WITH PASSWORD ‘123456’;
安装psql客户端
这里在clustercontrol节点安装psql客户端进行测试。
yum install -y https://download.postgresql.org/pub/repos/yum/11/redhat/rhel-7-x86_64/pgdg-centos11-11-2.noarch.rpm
yum install -y postgresql11
配置环境变量
cat >> /etc/profile << EOF
export PATH=$PATH:/usr/pgsql-11/bin
EOF
source /etc/profile
连接数据库
用户名密码postgres/123456连接默认数据库postgres。
访问读写数据库:92.168.92.15:3307
访问只读数据库:92.168.92.15:3308
测试主从复制
客户端连接数据库3307端口
psql -h 192.168.92.15 -U postgres -p 3307 -d postgres
在主库查看流复制信息
postgres=# select pid,state,client_addr,sync_priority,sync_state from pg_stat_replication;
  pid  |   state   |  client_addr  | sync_priority | sync_state
-------+-----------+---------------+---------------+------------
 55316 | streaming | 192.168.92.12 |             1 | sync
 55233 | streaming | 192.168.92.13 |             0 | async
(2 rows)

postgres=#
创建测试数据库test:
postgres=\# create database test;
在主库上,我们可以正常的进行读写操作。
登录slave节点(以192.168.92.12节点为例)查看是否同步成功:
psql -h 192.168.92.12 -U postgres -p 5432 -d postgres

postgres=\# \\l
slave节点为只读节点,创建数据库报错:
postgres=\# create database test1;

ERROR: cannot execute CREATE DATABASE in a read-only transaction
在备库上,我们只能进行读操作。
测试主从切换
clustercontrol支持web界面手动或主库故障时自动将从库切换为主库,但未加载license时该功能不可用,这里以访问数据库执行手动切换为例:
停止主库服务模拟故障
[root@pg-master ~]# su - postgres
-bash-4.2$ /usr/pgsql-11/bin/pg_ctl stop -m fast
waiting for server to shut down.... done
server stopped
-bash-4.2$
-bash-4.2$ /usr/pgsql-11/bin/pg_controldata | grep 'Database cluster state'
Database cluster state:               shut down
-bash-4.2$
切换从库
登录从库节点,手动执行以下命令,将从库切换为主库
[root@bogon ~]# su - postgres
Last login: Sun Feb 17 21:09:20 CST 2019
-bash-4.2$  /usr/pgsql-11/bin/pg_ctl promote
waiting for server to promote.... done
server promoted
-bash-4.2$ /usr/pgsql-11/bin/pg_controldata | grep 'Database cluster state'
Database cluster state:               in production
-bash-4.2$
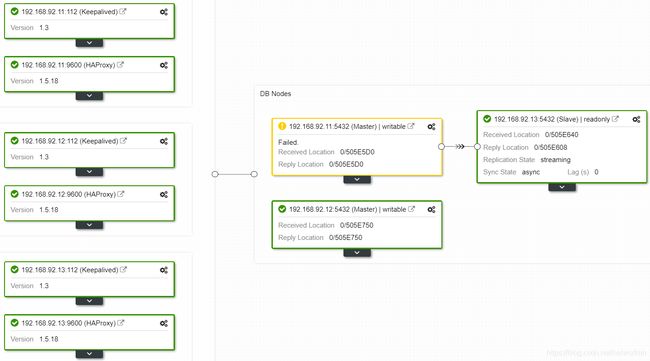
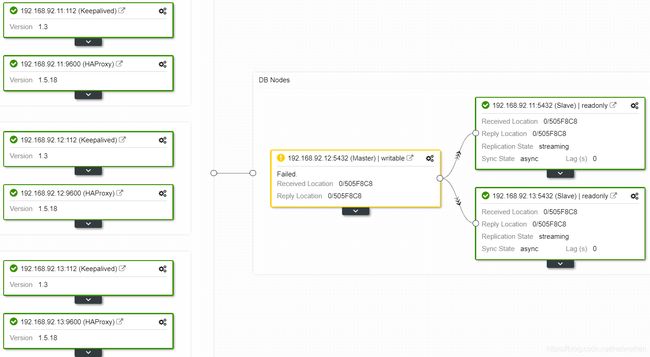
在clusterclotrol web界面查看, 192.168.92.12节点升级为主库,同时原主库为failed状态:
完成后重新从psql客户端连接:
[root@clustercontrol ~]# psql -U postgres -h 192.168.92.15 -d postgres -p 3307
Password for user postgres:
psql (11.2, server 11.1)
Type "help" for help.

postgres=# select pg_is_in_recovery();
 pg_is_in_recovery
-------------------
 f
(1 row)

postgres=#
写入数据测试正常,但是该节点为独立master节点,未与另一个slave节点建立主从关系
postgres=# create database test1;
CREATE DATABASE
postgres=#
postgres=# select pid,state,client_addr,sync_priority,sync_state from pg_stat_replication;
 pid | state | client_addr | sync_priority | sync_state
-----+-------+-------------+---------------+------------
(0 rows)

postgres=#
修改pgslave02节点配置,将其重新连接到新主库
[root@pgslave02 ~]# sed -i 's/192.168.92.11/192.168.92.12/g' /var/lib/pgsql/11/data/recovery.conf
[root@pgslave02 ~]# su - postgres
-bash-4.2$ pg_ctl restart
新主库pgslave01查看备份状态
postgres=# select pid,state,client_addr,sync_priority,sync_state from pg_stat_replication;
 pid  |   state   |  client_addr  | sync_priority | sync_state
------+-----------+---------------+---------------+------------
 1637 | streaming | 192.168.92.13 |             0 | async
(1 row)
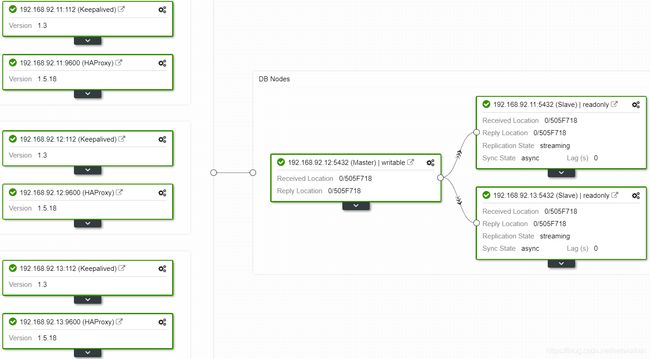
查看拓扑状态,已经连接到新主库
将原主库作为从库连接到新主库,复制一份recovery.conf配置文件到原主库节点即可
[root@pgslave02 ~]# scp /var/lib/pgsql/11/data/recovery.conf 192.168.92.11:/var/lib/pgsql/11/data/recovery.conf
[root@pgmaster data]# chown postgres: recovery.conf
重新启动原主库
su - postgres
pg_ctl restart
查看拓扑状态,已经恢复正常:
新主库pgslave01查看备份状态
postgres=# select pid,state,client_addr,sync_priority,sync_state from pg_stat_replication;
  pid  |   state   |  client_addr  | sync_priority | sync_state
-------+-----------+---------------+---------------+------------
 59545 | streaming | 192.168.92.11 |             0 | async
  1637 | streaming | 192.168.92.13 |             0 | async
(2 rows)

postgres=#
自动主从切换
ClusterControl支持手动或故障时自动进行主备切换,开启30天企业版试用权限,测试相应功能。
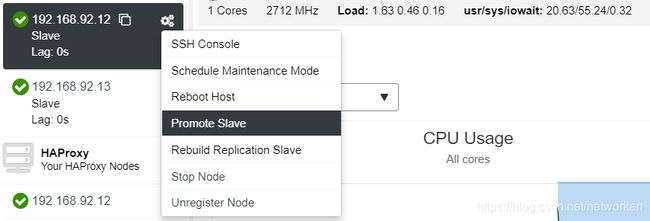
要执行手动故障转移,请转到ClusterControl - >选择Cluster - > Nodes,然后在我们的某个从站的Action Node中,选择"Promote Slave"。通过这种方式,几秒钟后,我们的slave成为master,而我们以前的master就变成了slave。
这里以将slave01节点手动转为master节点为例:
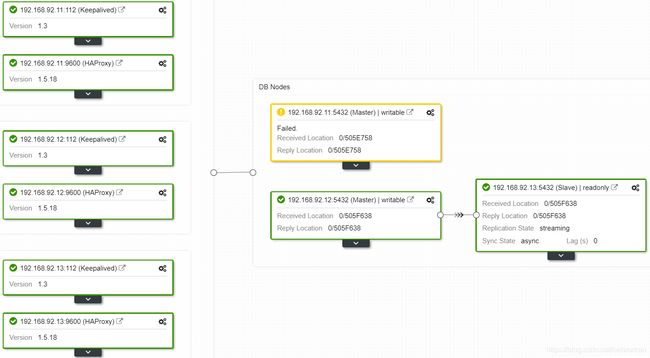
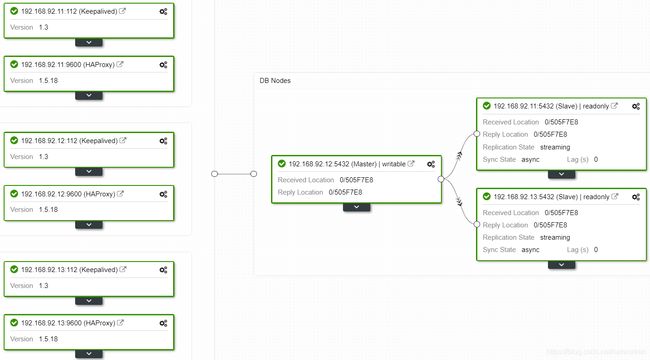
查看拓扑状态,192.168.92.12节点成为master:
然后停掉192.168.92.12节点服务,模拟master故障,测试自动切换:
[root@pgslave01 ~]# su - postgres
-bash-4.2$ pg_ctl stop
等待几秒后192.168.92.11自动切换为master,并且slave02也正常连接到该节点:
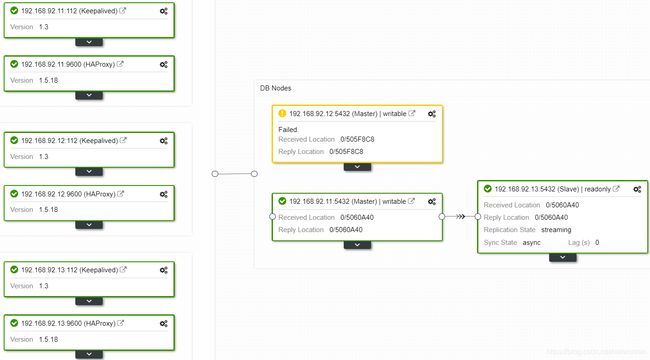
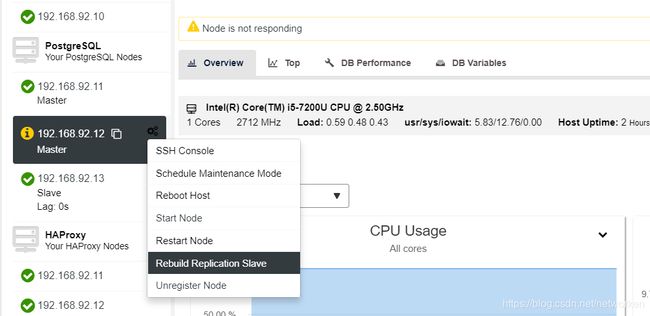
下面将192.168.92.12作为slave节点连接到192.168.92.11
注意,如果我们设法恢复旧的失败主库,它将不会自动重新引入群集。我们需要手动完成。其中一个原因是,如果我们的副本在失败时被延迟,如果我们将旧主服务器添加到集群,则意味着信息丢失或跨节点的数据不一致。我们可能还想详细分析这个问题。如果我们只是将故障节点重新引入群集,我们可能会丢失诊断信息。此外,如果故障转移失败,则不再进行尝试。需要手动干预来分析问题并执行相应的操作。这是为了避免ClusterControl作为高可用性管理器尝试提升下一个奴隶和下一个奴隶的情况。
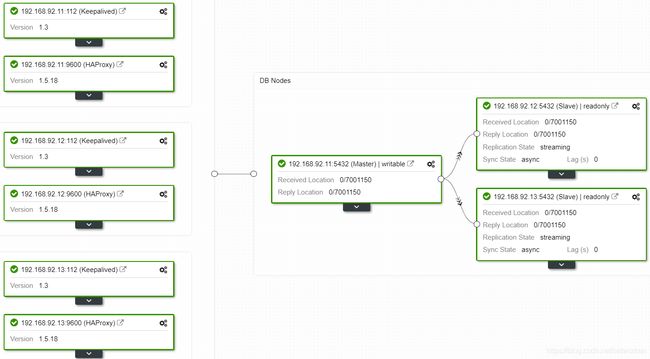
完成后状态:
添加slave节点
如果我们想要在另一个数据中心添加一个从服务器,或者作为意外事件或者要迁移您的系统,我们可以转到Cluster Actions,然后选择Add Replication Slave。
我们需要输入一些基本数据,例如IP或主机名,数据目录(可选),同步或异步从站。我们应该让我们的slave节点在几秒钟后启动并运行。
在使用其他数据中心的情况下,我们建议创建异步从站,否则延迟会显着影响性能。
配置文件参考
pg_hba.conf配置文件
cat /var/lib/pgsql/11/data/pg_hba.conf
......
# TYPE  DATABASE        USER            ADDRESS                 METHOD
host  all  s9smysqlchk  ::1/128  md5
host  all  s9smysqlchk  localhost  md5
host  all  s9smysqlchk  127.0.0.1/32  md5

# "local" is for Unix domain socket connections only
local   all             all                                     peer
# IPv4 local connections:
host    all             all             127.0.0.1/32            ident
host    all             all             192.168.92.0/24         md5
# IPv6 local connections:
host    all             all             ::1/128                 ident
# Allow replication connections from localhost, by a user with the
# replication privilege.
local   replication     all                                     peer
host    replication     all             127.0.0.1/32            ident
host    replication     all             ::1/128                 ident
host  replication  cmon_replication  192.168.92.11/32  md5
host  replication  cmon_replication  192.168.92.13/32  md5
host  replication  cmon_replication  192.168.92.12/32  md5
host  all  moniuser  192.168.92.10/32  md5
host  all  s9smysqlchk  192.168.92.12/32  md5
[root@bogon data]#
postgresql.conf配置文件
pgmaster比pgslave多一行配置synchronous_standby_names = ‘pgsql_node_0’
$ cat postgresql.conf | grep -v "^[[:space:]].*#" | grep -v "^#" | grep -v "^$"
data_directory = '/var/lib/pgsql/11/data'       # use data in another directory
listen_addresses = '*'  # what IP address(es) to listen on;
port = 5432     # (change requires restart)
max_connections = 100                   # (change requires restart)
shared_buffers = 503955kB                       # min 128kB
work_mem = 10079kB      # min 64kB
maintenance_work_mem = 125988kB # min 1MB
dynamic_shared_memory_type = posix      # the default is the first option
wal_level = hot_standby # minimal, replica, or logical
full_page_writes = on   # recover from partial page writes
wal_log_hints = on      # also do full page writes of non-critical updates
max_wal_size = 1GB
min_wal_size = 80MB
checkpoint_completion_target = 0.9      # checkpoint target duration, 0.0 - 1.0
max_wal_senders = 16    # max number of walsender processes
wal_keep_segments = 32  # in logfile segments; 0 disables
synchronous_standby_names = 'pgsql_node_0'      # standby servers that provide sync rep
hot_standby = on        # "off" disallows queries during recovery
effective_cache_size = 1511865kB
log_destination = 'stderr'              # Valid values are combinations of
logging_collector = on                  # Enable capturing of stderr and csvlog
log_directory = 'log'                   # directory where log files are written,
log_filename = 'postgresql-%a.log'      # log file name pattern,
log_truncate_on_rotation = on           # If on, an existing log file with the
log_rotation_age = 1d                   # Automatic rotation of logfiles will
log_rotation_size = 0                   # Automatic rotation of logfiles will
log_line_prefix = '%m [%p] '            # special values:
log_timezone = 'PRC'
track_activity_query_size = 2048        # (change requires restart)
datestyle = 'iso, mdy'
timezone = 'PRC'
lc_messages = 'en_US.UTF-8'                     # locale for system error message
lc_monetary = 'en_US.UTF-8'                     # locale for monetary formatting
lc_numeric = 'en_US.UTF-8'                      # locale for number formatting
lc_time = 'en_US.UTF-8'                         # locale for time formatting
default_text_search_config = 'pg_catalog.english'
shared_preload_libraries = 'pg_stat_statements' # (change requires restart)
pg_stat_statements.track=all
recovery.conf配置文件
$ cat recovery.conf
standby_mode = 'on'
primary_conninfo = 'application_name=pgsql_node_0 host=192.168.92.11 port=5432 user=cmon_replication password=jvEDSGDzwZ'
recovery_target_timeline = 'latest'
trigger_file = '/tmp/failover.trigger'
haproxy.cfg配置文件
[root@pgmaster ~]# cat /etc/haproxy/haproxy.cfg
global
        pidfile /var/run/haproxy.pid
        daemon
        user haproxy
        group haproxy
        stats socket /var/run/haproxy.socket user haproxy group haproxy mode 600 level admin
        node haproxy_192.168.92.11
        description haproxy server

        #* Performance Tuning
        maxconn 8192
        spread-checks 3
        quiet
defaults
        #log    global
        mode    tcp
        option  dontlognull
        option tcp-smart-accept
        option tcp-smart-connect
        #option dontlog-normal
        retries 3
        option redispatch
        maxconn 8192
        timeout check   3500ms
        timeout queue   3500ms
        timeout connect 3500ms
        timeout client  10800s
        timeout server  10800s

userlist STATSUSERS
        group admin users admin
        user admin insecure-password admin
        user stats insecure-password admin

listen admin_page
        bind *:9600
        mode http
        stats enable
        stats refresh 60s
        stats uri /
        acl AuthOkay_ReadOnly http_auth(STATSUSERS)
        acl AuthOkay_Admin http_auth_group(STATSUSERS) admin
        stats http-request auth realm admin_page unless AuthOkay_ReadOnly
        #stats admin if AuthOkay_Admin

listen  haproxy_192.168.92.11_3307_rw
        bind *:3307
        mode tcp
        timeout client  10800s
        timeout server  10800s
        tcp-check expect string master\ is\ running
        balance leastconn
        option tcp-check
#       option allbackups
        default-server port 9201 inter 2s downinter 5s rise 3 fall 2 slowstart 60s maxconn 64 maxqueue 128 weight 100
        server 192.168.92.11 192.168.92.11:5432 check
        server 192.168.92.12 192.168.92.12:5432 check
        server 192.168.92.13 192.168.92.13:5432 check


listen  haproxy__3308_ro
        bind *:3308
        mode tcp
        timeout client  10800s
        timeout server  10800s
        tcp-check expect string is\ running
        balance leastconn
        option tcp-check
#       option allbackups
        default-server port 9201 inter 2s downinter 5s rise 3 fall 2 slowstart 60s maxconn 64 maxqueue 128 weight 100
        server 192.168.92.11 192.168.92.11:5432 check
        server 192.168.92.12 192.168.92.12:5432 check
        server 192.168.92.13 192.168.92.13:5432 check
keepalived.conf配置文件
[root@pgmaster ~]# cat /etc/keepalived/keepalived.conf
#haproxy - You can add more types manually after this.

vrrp_script chk_haproxy {
   script "killall -0 haproxy"   # verify the pid existance
   interval 2                    # check every 2 seconds
   weight 2                      # add 2 points of prio if OK
}
vrrp_instance VI_HAPROXY {
   interface ens33                # interface to monitor
   state MASTER
   virtual_router_id 51          # Assign one ID for this route
   priority 102
   unicast_src_ip 192.168.92.11
   unicast_peer {
      192.168.92.12
192.168.92.13

   }
   virtual_ipaddress {
       192.168.92.15                        # the virtual IP
   }
   track_script {
       chk_haproxy
   }
#    notify /usr/local/bin/notify_keepalived.sh
}

# DO NOT REMOVE THE NEXT LINE
#@S9S_NEXT_SECTION@
