Java提高与实践
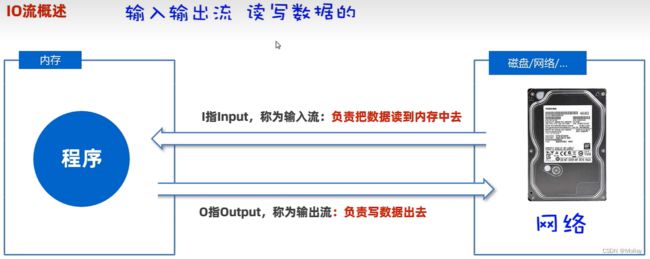
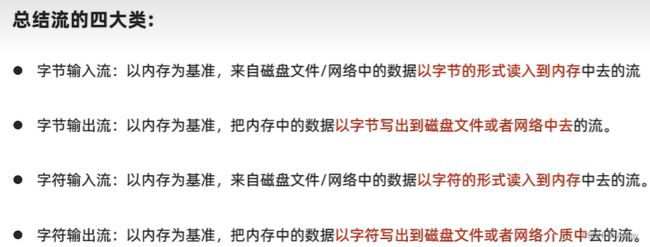
IO流
IO流概述

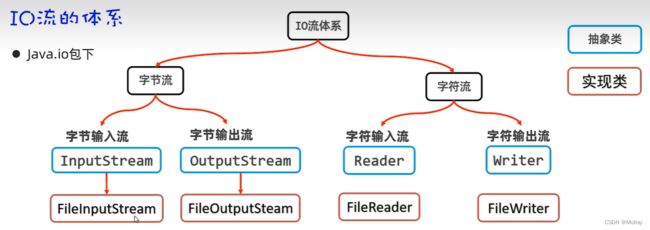

- 文件字节输入流:每次读取一个字节
package fileStream;

import java.io.*;

public class HelloFileInputStream {
    public static void main(String[] args) throws IOException {
        //创建文件字节输入流 管道,与源文件接通
        //写法一
        //InputStream is = new FileInputStream(new File("IO\\src\\fileTest.txt"));
        //写法二
        InputStream is = new FileInputStream(("IO\\src\\fileTest.txt"));//文件内容abdc

        //开始读取文件的字节数据
        //int read()每次读取一个字节返回,若无则返回-1
//        int b1 = is.read();
//        System.out.println((char)b1);//a
//        int b2 = is.read(), b3 = is.read(), b4 = is.read(), b5 = is.read();
//        System.out.println((char)b2 +", " +  (char)b3 +", " +  (char)b4);//b, d, c
//        System.out.println(b5);//-1

        //从磁盘中读数据,读取性能很差
        //读取汉字输出会乱码(汉字是多字节存储,而该方法每次只读取一字节)

        //借助循环读取文件内容
        int b;
        while((b = is.read()) != -1){//abdc
            System.out.print((char)b);
        }

        //流使用完毕后,必须关闭!释放系统资源
        is.close();
    }
}
- 文件 字节输入流:每次读取多个字节
package fileStream;

import java.io.FileInputStream;
import java.io.FileNotFoundException;
import java.io.IOException;
import java.io.InputStream;

public class FileInputStream1 {
    public static void main(String[] args) throws IOException {
        InputStream is = new FileInputStream(("IO\\src\\fileTest.txt"));
        byte[] buffer = new byte[3];
        //int read(byte[] b)每次读取多个字节到字节数组中,返回读取的字节量,读取完毕则返回-1
        int len = is.read(buffer);
        String s = new String(buffer);
        System.out.println(s);//abd
        System.out.println("本次读取数据的字节量" + len);//3

//        int len1 = is.read(buffer);
//        String s1 = new String(buffer);
//        System.out.println(s1);//cbd 注意:读取多少,就倒出多少
//        System.out.println(len1);//1
        int len1 = is.read(buffer);
        String s1 = new String(buffer, 0, len1);
        System.out.println(s1);//c
        System.out.println(len1);//1

        int len2 = is.read(buffer);
        System.out.println(len2);//-1
        is.close();
    }
}
package fileStream;

import java.io.FileInputStream;
import java.io.IOException;
import java.io.InputStream;

public class FileInputStream2 {
    public static void main(String[] args) throws IOException {
        InputStream is = new FileInputStream(("IO\\src\\fileTest1.txt"));//我爱你abca我爱你
        byte[] buffer = new byte[3];
        int len;
        //该方法性能有一定提升,但仍无法解决汉字乱码问题
        while((len = is.read(buffer)) != -1){//我爱你abca������
            String s = new String(buffer, 0, len);
            System.out.print(s);
        }
        is.close();
    }
}
- 文件字节输入流:一次读取全部字节流


package fileStream;

import java.io.*;

public class FileInputStream3 {
    public static void main(String[] args) throws IOException {
        InputStream is = new FileInputStream(("IO\\src\\fileTest1.txt"));
        File tFile = new File("IO\\src\\fileTest1.txt");
        long size = tFile.length();
        byte[] buffer = new byte[(int) size];
        String s = new String(buffer);
        int len = is.read(buffer);
        System.out.println(s);//
        System.out.println(new String(buffer));//我爱你abca我爱你
        System.out.println(len);//22
        System.out.println(s.length());//22
    }
}
package fileStream;

import java.io.FileInputStream;
import java.io.FileNotFoundException;
import java.io.IOException;
import java.io.InputStream;

public class FileInputStream4 {
    public static void main(String[] args) throws IOException {
        InputStream is = new FileInputStream(("IO\\src\\fileTest1.txt"));
        byte[] buffer = is.readAllBytes();
        System.out.println(new String(buffer));//我爱你abca我爱你
        is.close();
    }
}
- 文件字节输出流:写字节出去


package fileStream;

import java.io.FileNotFoundException;
import java.io.FileOutputStream;
import java.io.IOException;
import java.io.OutputStream;

public class FileOutputStream1 {
    public static void main(String[] args) throws IOException {
        //创建一个字节输出流管道和文件接通
        //覆盖管道:覆盖之前的数据内容
        OutputStream os = new FileOutputStream("IO\\src\\fileTest2.txt");
        os.write(97);
        os.write('b');
        //os.write('中');默认只能写出去一个字节
        byte[] bytes = "永远不要挨饿".getBytes();
        os.write(bytes);
        os.write(bytes, 0, 6);
        os.close();
    }
}

package fileStream;

import java.io.FileOutputStream;
import java.io.IOException;
import java.io.OutputStream;

public class FileOutputStream2 {
    public static void main(String[] args) throws IOException {
        OutputStream os = new FileOutputStream("IO\\src\\fileTest2.txt", true);
        os.write("\n冲冲冲".getBytes());
        os.close();
    }
}

- 文件复制


package fileStream;
import java.io.*;
public class CopyFile {
public static void main(String[] args) throws IOException {
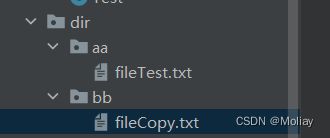
InputStream is = new FileInputStream("IO\\src\\dir\\aa\\fileTest.txt");
OutputStream os = new FileOutputStream("IO\\src\\dir\\bb\\fileCopy.txt");
byte[] buffer = new byte[1024];//一般大小为1kb
int len;
while((len = is.read(buffer)) != -1){
os.write(buffer, 0, len);
}
os.close();//流:后创建,先关闭
is.close();
}
}
释放资源
- try-catch-finally

package fileResource;

public class Finally {
    public static void main(String[] args) {
        try{
            System.out.println(10/0);
        } catch (Exception e) {
            throw new RuntimeException(e);
        }
        finally代码区:无论try中程序是正常执行还是出现异常,都会执行finally区,除非JVM终止
        //作用:一般用于在程序执行完成后进行资源的释放操作(专业级操作)
        finally{
            System.out.println("finally did");
            System.out.println(divide(10, 2));//-1 结果异常==>建议遵循单一出口原则
        }
    }

    public static int divide(int a, int b){
        try{
            return a / b;
        }
        catch(Exception e){
            e.printStackTrace();
        }
        finally{
            return -1;
        }
    }
}
package fileStream;

import java.io.*;

public class CopyFile {
    public static void main(String[] args) throws IOException {
        InputStream is = null;
        OutputStream os= null;
        try {
            is = new FileInputStream("IO\\src\\dir\\aa\\fileTest.txt");
            os = new FileOutputStream("IO\\src\\dir\\bb\\fileCopy.txt");
            byte[] buffer = new byte[1024];//一般大小为1kb
            int len;
            while((len = is.read(buffer)) != -1){
                os.write(buffer, 0, len);
            }
        } catch (IOException e) {
            throw new RuntimeException(e);
        } finally {
            try {
                if(os != null) os.close();//流:后创建,先关闭
            } catch (IOException e) {
                throw new RuntimeException(e);
            }
            try {
                if(is != null) is.close();
            } catch (IOException e) {
                throw new RuntimeException(e);
            }
        }
    }
}
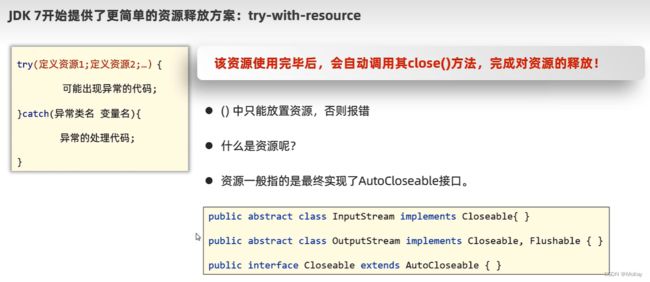
- try-with-resource
package fileStream;

import java.io.*;

public class CopyFile1 {
    public static void main(String[] args) throws IOException {
        try(
            //只能放资源对象(流对象)(资源对象都会实现AutoCloseable接口)
            //AutoCloseable接口有close()方法,故每个资源都会有一个close()方法,用完后进行自动调用
            InputStream is = new FileInputStream("IO\\src\\dir\\aa\\fileTest.txt");
            OutputStream os = new FileOutputStream("IO\\src\\dir\\bb\\fileCopy.txt");
            MyConllection con = new MyConllection();
            ){
            byte[] buffer = new byte[1024];//一般大小为1kb
            int len;
            while((len = is.read(buffer)) != -1){
                os.write(buffer, 0, len);
            }
            System.out.println(con);
        } catch (Exception e) {
            throw new RuntimeException(e);
        }
    }
}
package fileStream;

public class MyConllection implements AutoCloseable{

    @Override
    public void close() throws Exception {
        System.out.println("释放了和某硬件连接的资源~");
    }
}
字符流
- 文件字符输入流


package file;

import java.io.FileReader;
import java.io.Reader;

public class HelloFileReader {
    public static void main(String[] args) {
        try(
                Reader fr = new FileReader("IO\\src\\fileTest.txt");
                ){
            int count;
            //每次只读一个字符,性能较差
            while((count = fr.read()) != -1){
                System.out.print((char)count);
            }
        }catch(Exception e){
            e.printStackTrace();
        }

    }
}
package file;

import java.io.FileReader;
import java.io.Reader;

public class HelloFileReader1 {
    public static void main(String[] args) {
        try(
                Reader fr = new FileReader("IO\\src\\fileTest.txt");
                ){
            char[] buffer = new char[3];
            int count;
            while((count = fr.read(buffer)) != -1){
                //System.out.println(new  String(buffer, 0, count));
                System.out.print(new String(buffer, 0, count));
            }
        }catch(Exception e){
            e.printStackTrace();
        }
    }
}
- 文件字符输出流


package file;

import java.io.FileWriter;
import java.io.Writer;

public class HelloFileWriter {
    public static void main(String[] args) {
        try(
                //覆盖管道
                Writer fw = new FileWriter("IO\\src\\fileTest3.txt")
                ) {
            fw.write(97);
            fw.write('b');
            fw.write('中');
            fw.write("我是字符串");
            fw.write("\n");
            fw.write("\r\n");//换行
            char[] arr = {'我', '是', '字', 'f', 'u'};
            fw.write(arr, 0, arr.length);
            fw.write("\r\n");
            fw.write(arr, 0, 2);
        }catch(Exception e){
            e.printStackTrace();
        }
    }
}

package file;

import java.io.FileWriter;
import java.io.Writer;

public class HelloWrite {
    public static void main(String[] args) {
        try(
                //追加管道
                Writer fw = new FileWriter("IO\\src\\fileTest3.txt", true) ;
                ){
            fw.write("\r\n我是追加内容");
        }catch(Exception e){
            e.printStackTrace();
        }
    }
}

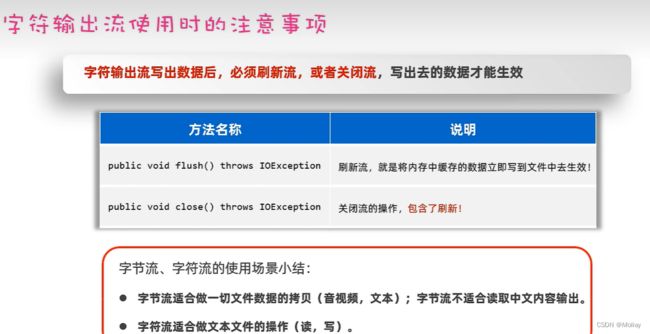
缓冲区已满时,会自动刷新和写入数据
fw.flush();//刷新流(关闭流中包含刷新流)
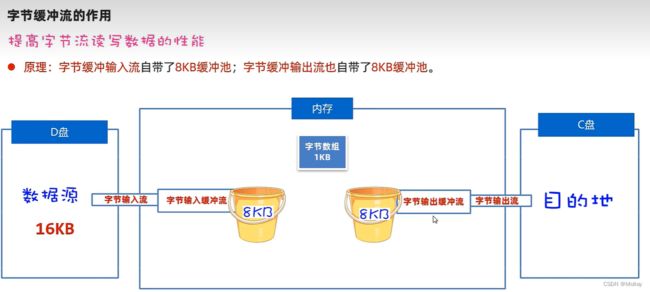
缓冲流
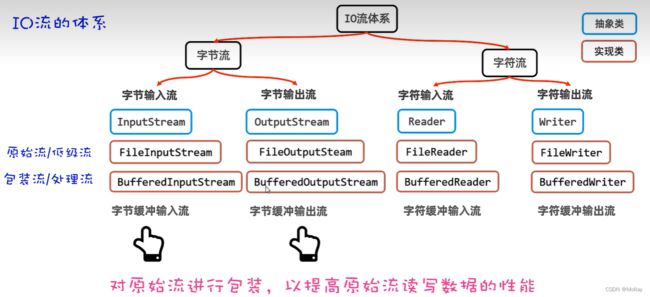
- 字节缓冲流

package buffer;

import java.io.*;

public class HelloBufferedInputStream {
    public static void main(String[] args){
        try(
                InputStream is = new FileInputStream("IO\\src\\fileTest.txt");
                InputStream bis = new BufferedInputStream(is);
                OutputStream os = new FileOutputStream("IO\\src\\fileTest1.txt");
                OutputStream bos = new BufferedOutputStream(os);
                ){
            byte[] buffer = new byte[1024];
            int len;
            while((len = bis.read(buffer)) != -1){
                bos.write(buffer, 0, len);
            }
        }catch(Exception e){
            e.printStackTrace();
        }
    }
}
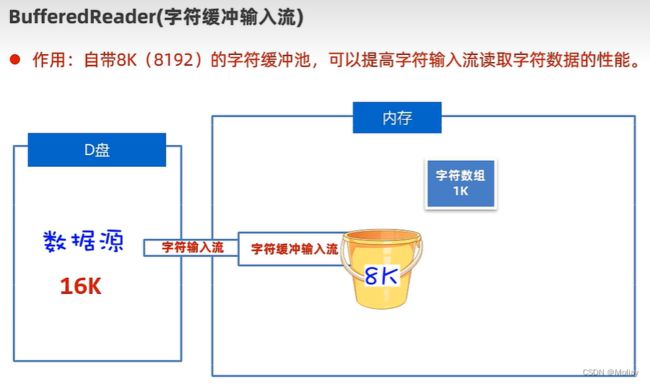
- 字符缓冲流

package buffer;

import java.io.BufferedReader;
import java.io.FileReader;
import java.io.Reader;

public class HelloBufferedReader {
    public static void main(String[] args){
        try(
                Reader r = new FileReader("IO\\src\\fileTest.txt");
                BufferedReader br = new BufferedReader(r);
                ){
            char[] buffer = new char[3];
            int len;
            while((len = br.read(buffer)) != -1){
                System.out.print(new String(buffer, 0,len));
            }
        }catch(Exception e){
            e.printStackTrace();
        }
    }
}
package buffer;

import java.io.BufferedReader;
import java.io.FileReader;
import java.io.Reader;

public class HelloBufferedReader1 {
    public static void main(String[] args){
        try(
                Reader r = new FileReader("IO\\src\\fileTest.txt");
                BufferedReader br = new BufferedReader(r);
                ){
            String line;//记住每次读取的一行数据
            while((line = br.readLine()) != null){
                System.out.println(line);
            }
        }catch(Exception e){
            e.printStackTrace();
        }
    }
}

package buffer;

import java.io.BufferedWriter;
import java.io.FileWriter;
import java.io.Writer;

public class HelloBufferedWriter {
    public static void main(String[] args){
        try(
                Writer w = new FileWriter("IO\\src\\dir\\fileTestW.txt");
                BufferedWriter bw = new BufferedWriter(w);
                ){
            bw.write(97);
            bw.write('b');
            bw.write('中');
            bw.newLine();//换行
            bw.write("我是字符串吖");
        }catch(Exception e){
			e.printStackTrace();
        }
    }

}

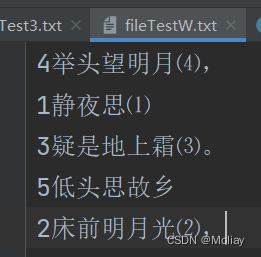
简单应用:拷贝文件内容到另一个文件,并对内容排序
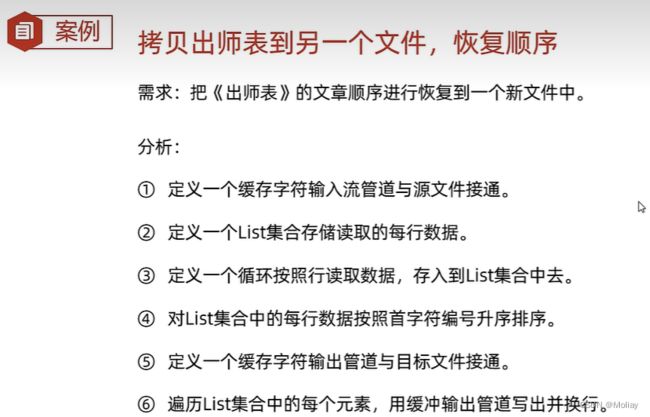
package buffer;

import java.io.*;
import java.util.ArrayList;
import java.util.Arrays;
import java.util.List;

public class Apply {
    public static void main(String[] args){
        try(
                Writer w = new FileWriter("IO\\src\\dir\\fileTestCopy.txt");
                BufferedWriter bw  = new BufferedWriter(w);
                Reader r = new FileReader("IO\\src\\dir\\fileTestW.txt");
                BufferedReader br = new BufferedReader(r);
                ){
            List<String> list = new ArrayList<>();
            String line;
            while((line = br.readLine()) != null){
                list.add(new String(line));
            }
            list.sort(((o1, o2) -> o1.compareTo(o2)));
            //System.out.println(list);[1静夜思⑴, 2床前明月光⑵,, 3疑是地上霜⑶。, 4举头望明月⑷,, 5低头思故乡]
            for(String s : list){
                bw.write(s);
            }
        }catch(Exception e){
            e.printStackTrace();
        }
    }
}
![]()
package buffer;

import java.io.*;
import java.util.ArrayList;
import java.util.Arrays;
import java.util.Collections;
import java.util.List;

public class Apply1 {
    public static void main(String[] args){
        try(
            BufferedWriter bw  = new BufferedWriter(new FileWriter("IO\\src\\dir\\fileTestCopy.txt"));
            BufferedReader br = new BufferedReader(new FileReader("IO\\src\\dir\\fileTestW.txt"));
        ){
            List<String> list = new ArrayList<>();
            String line;
            while((line = br.readLine()) != null){
                list.add(new String(line));
            }
            Collections.sort(list);
            //System.out.println(list);[1静夜思⑴, 2床前明月光⑵,, 3疑是地上霜⑶。, 4举头望明月⑷,, 5低头思故乡]
            for(String s : list){
                bw.write(s);
                bw.newLine();
            }
        }catch(Exception e){
            e.printStackTrace();
        }
    }
}

原始流和缓冲流的性能分析

在一定范围内,内存越大越好;
到达极限后,内存已经最优化之后再增加也不会有效提高速度

转换流


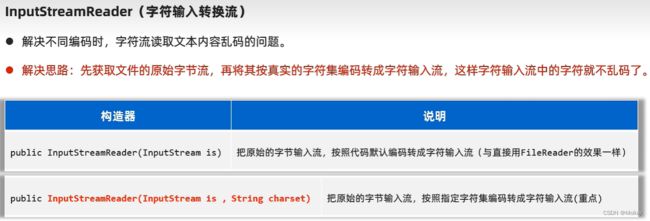
- 字符输入转换流
package transform;

import java.io.*;

public class HeyInputStreamReader {
    public static void main(String[] args){
        try(
                Reader isr = new InputStreamReader(new FileInputStream("IO\\src\\dir\\fileTestW.txt"), "GBK");
                BufferedReader bs = new BufferedReader(isr);
                ){
            String line;
            while((line = bs.readLine()) != null){
                System.out.println(line);
            }
        }catch(Exception e){

        }
    }
}
- 字符输出转换流

package transform;

import java.io.*;

public class HeyOutputStreamWriter {
    public static void main(String[] args){
        try(
                Writer w = new OutputStreamWriter(new FileOutputStream("IO\\src\\dir\\fileTestTrans.txt"), "GBK");
                BufferedWriter bw = new BufferedWriter(w);
                ){
            bw.write("I am English123");
            bw.write("我是中文456");
        }catch(Exception e){
            e.printStackTrace();
        }
    }
}

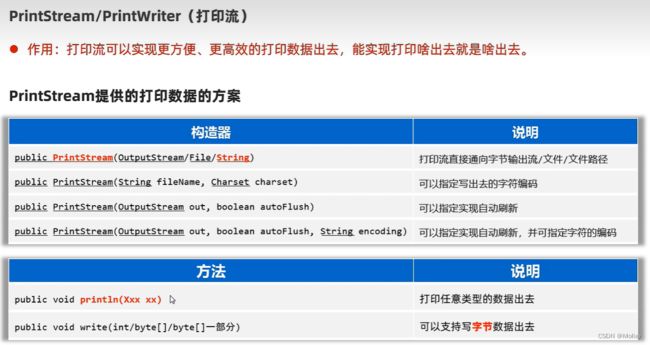
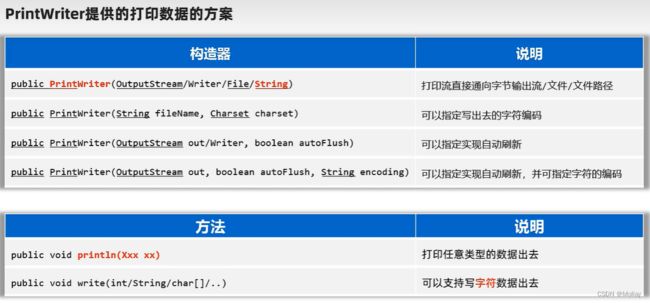
打印流

package printStream;
import java.io.PrintStream;
import java.nio.charset.Charset;
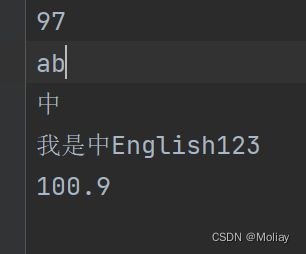
public class HelloPrintStream {
public static void main(String[] args){
try(
PrintStream ps = new PrintStream("IO\\src\\dir\\filePrint.txt", Charset.forName("GBK"));
){
ps.println(97);
ps.write(97);
ps.println('b');
ps.println('中');
ps.println("我是中English123");
ps.println(100.9);
}catch(Exception e){
e.printStackTrace();
}
}
}
package printStream;

import java.io.PrintStream;
import java.io.PrintWriter;
import java.nio.charset.Charset;

public class HelloPrintWriter {
    public static void main(String[] args){
        try(
                PrintWriter ps = new PrintWriter("IO\\src\\dir\\filePrint1.txt", Charset.forName("GBK"));
        ){
            ps.println(97);
            ps.write(97);
            ps.println('b');
            ps.println('中');
            ps.println("我是中English123");
            ps.println(100.9);
        }catch(Exception e){
            e.printStackTrace();
        }
    }
}
package printStream;

import java.io.FileOutputStream;
import java.io.PrintStream;
import java.io.PrintWriter;
import java.nio.charset.Charset;

public class HelloPrintWriter {
    public static void main(String[] args){
        try(//追加数据需要借助低级流实现
                PrintWriter ps = new PrintWriter(new FileOutputStream("IO\\src\\dir\\filePrint1.txt", true));
        ){
            ps.println(97);
            ps.write(97);
            ps.println('b');
            ps.println('中');
            ps.println("我是中English123");
            ps.println(100.9);
        }catch(Exception e){
            e.printStackTrace();
        }
    }
}


打印流的应用:输出语句的重定向
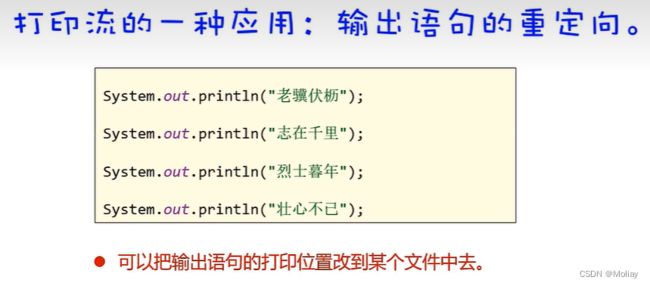
package printStream;

import java.io.PrintStream;

public class Apply {
    public static void main(String[] args) {
        System.out.println("生如夏花");
        try(
                PrintStream ps = new PrintStream("IO\\src\\dir\\filePrint2.txt");
                ){
            System.setOut(ps);
            System.out.println("直挂云帆济沧海");
        }catch(Exception e){
            e.printStackTrace();
        }
    }
}
数据流

package dataStream;

import java.io.DataOutputStream;
import java.io.FileOutputStream;

public class HeyDataOutputStream {
    public static void main(String[] args){
        try(DataOutputStream dos = new DataOutputStream(new FileOutputStream("IO\\src\\dir\\dataStreamW.txt"));){
            dos.writeInt(97);
            dos.writeBoolean(true);
            dos.writeUTF("字符串");
            dos.writeDouble(100.1);
        }catch(Exception e){
            e.printStackTrace();
        }
    }
}
下图文件内容可理解为一种特殊的存法


package dataStream;

import java.io.DataInputStream;
import java.io.FileInputStream;

public class HeyDataInputStream {
    public static void main(String[] args){
        try(DataInputStream dis = new DataInputStream(new FileInputStream("IO\\src\\dir\\dataStreamW.txt"))){
            System.out.println(dis.readInt());//97
            System.out.println(dis.readBoolean());//true
            System.out.println(dis.readUTF());//字符串
            System.out.println(dis.readDouble());//100.1
        }catch(Exception e){
            e.printStackTrace();
        }
    }
}
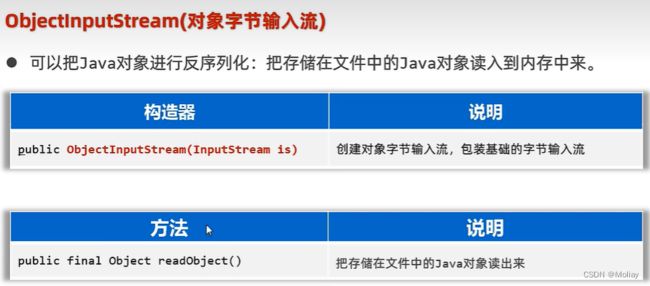
序列化流
- 对象序列化:把Java对象写入到文件中去
- 对象反序列化:把文件里的Java对象读出来
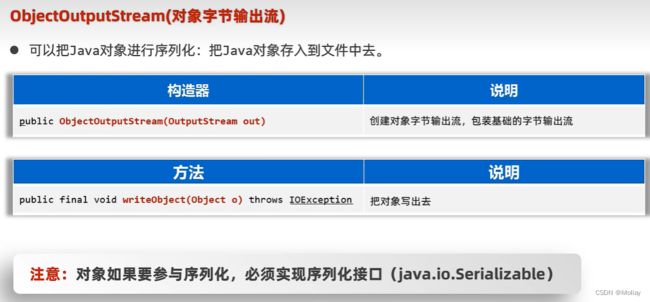
package objectStream;

import java.io.FileOutputStream;
import java.io.ObjectOutputStream;

public class HeyObjectOutputStream {
    public static void main(String[] args){
        try(ObjectOutputStream oos = new ObjectOutputStream(new FileOutputStream("IO\\src\\dir\\objectStream.txt"))){
            Student s = new Student("刘亦菲", 26, 100.1);
            oos.writeObject(s);
        }catch(Exception e){
            e.printStackTrace();
        }
    }
}
package objectStream;

import java.io.Serializable;

public class Student implements Serializable {
    private String name;
    private int age;
    private double score;

    public Student() {
    }

    public Student(String name, int age, double score) {
        this.name = name;
        this.age = age;
        this.score = score;
    }

    public String getName() {
        return name;
    }

    public void setName(String name) {
        this.name = name;
    }

    public int getAge() {
        return age;
    }

    public void setAge(int age) {
        this.age = age;
    }

    public double getScore() {
        return score;
    }

    public void setScore(double score) {
        this.score = score;
    }

    @Override
    public String toString() {
        return "Student{" +
                "name='" + name + '\'' +
                ", age=" + age +
                ", score=" + score +
                '}';
    }
}

package objectStream;

import java.io.FileInputStream;
import java.io.ObjectInputStream;

public class HeyObjectInputStream {
    public static void main(String[] args){
        try(ObjectInputStream ois = new ObjectInputStream(new FileInputStream("IO/src/dir/objectStream.txt"))){
//            Student s = (Student) ois.readObject();
//            System.out.println(s);//Student{name='刘亦菲', age=26, score=100.1}
            System.out.println(ois.readObject());//Student{name='刘亦菲', age=26, score=100.1}
        }catch(Exception e){
            e.printStackTrace();
        }
    }
}

 //transient修饰后,表示该成员变量不参与序列化
    private transient double score;


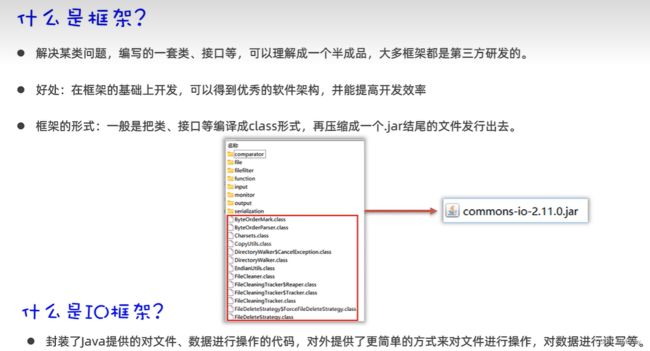
IO框架
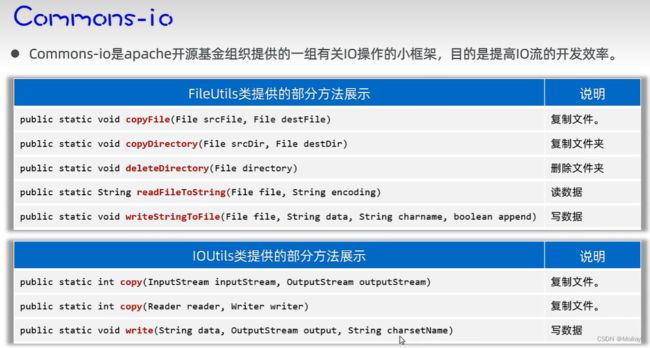

commons_IO下载地址
下载版本为:

package commonsIO;

import org.apache.commons.io.FileUtils;

import java.io.File;
import java.io.IOException;

public class Test {
    public static void main(String[] args) throws IOException {
        //复制文件
        FileUtils.copyFile(new File("IO/src/dir/fileTestCopy.txt"), new File("IO/src/dir/helloCommons.txt"));
        //复制文件夹
        FileUtils.copyDirectory(new File("IO/src/dir/aa"), new File("IO/src/dir/cc"));
        //删除文件夹(可直接删除非空文件夹)
        FileUtils.deleteDirectory(new File("IO/src/dir/aa"));
    }
}
package commonsIO;

import java.io.IOException;
import java.nio.file.Files;
import java.nio.file.Path;

public class TestJavaself {
    public static void main(String[] args) throws IOException {
        //Java提供的高效原生代码
        Files.copy(Path.of("IO/src/dir/bb/fileCopy.txt"), Path.of("IO/src/dir/cc/fileCopyC.txt"));
        System.out.println(Files.readString(Path.of("IO/src/dir/cc/fileTest.txt")));
    }
}
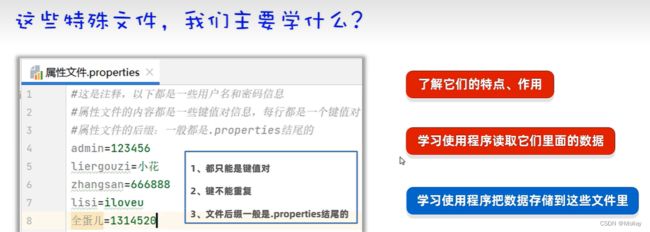
特殊文件
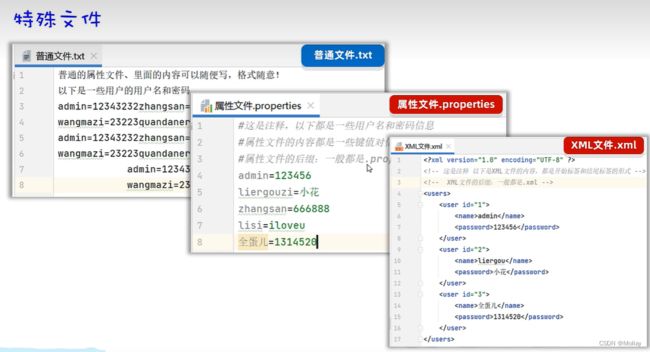
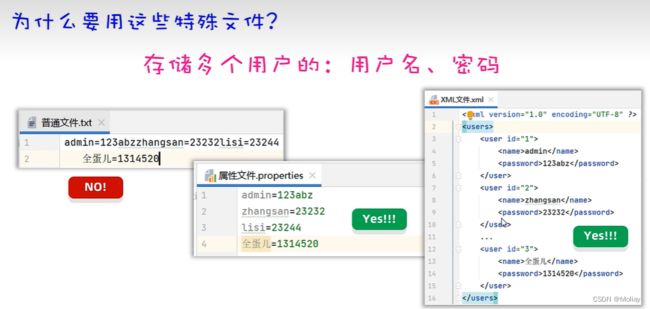

properties属性文件


package specialFile;
import java.io.FileNotFoundException;
import java.io.FileReader;
import java.io.IOException;
import java.util.Properties;
import java.util.Set;
public class HelloProperties {
public static void main(String[] args) throws IOException {
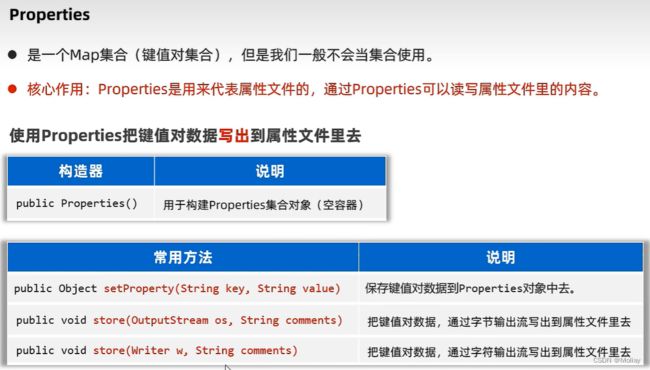
//创建Properties对象(键值对集合的空容器)
Properties p = new Properties();
System.out.println(p);
//加载属性文件中的键值对信息到Properties对象中
p.load(new FileReader("IO\\src\\users.properties"));
System.out.println(p);
//根据键 取值
System.out.println(p.getProperty("summer"));
System.out.println(p.getProperty("rick"));
//遍历全部的键和值
Set<String> users = p.stringPropertyNames();
for(String s : users){
String value = p.getProperty(s);
System.out.println(s + ":" + value);
}
System.out.println();
p.forEach((k, v) -> System.out.println(k + ":" + v));
}
}
package specialFile;

import java.io.FileWriter;
import java.io.IOException;
import java.util.Properties;

public class Properties1 {
    public static void main(String[] args) throws IOException {
        Properties p = new Properties();
        p.setProperty("jerry", "5555");
        p.setProperty("morty", "6666");
        //覆盖式存入
        p.store(new FileWriter("IO/src/users.properties"), "save more users");
    }
}
简单应用:
package specialFile;

import java.io.*;
import java.util.Properties;

public class Apply {
    public static void main(String[] args) throws IOException {
        Properties p = new Properties();
        p.load(new FileReader("IO\\src\\users.properties"));

        if(p.containsKey("jerry")){
            p.setProperty("jerry", "6666");
        }

        p.store(new FileWriter("IO/src/users.properties"), "modify jerry password");
    }
}
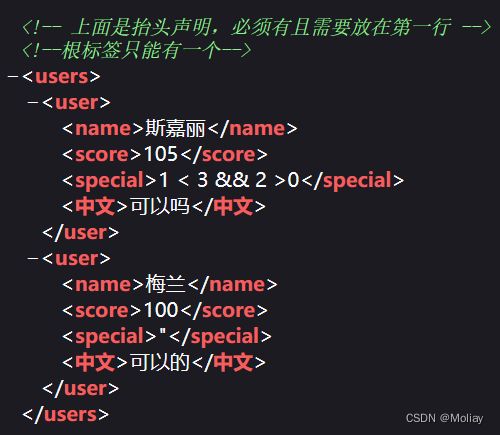
XML文件


<users>
    <user>
        <name>斯嘉丽name>
        <score>105score>
        <special>1 < 3 && 2 >0special>
        <中文>可以吗中文>
    user>
    <user>
        <name>梅兰name>
        <score>100score>
        <special>"special>
        <中文>可以的中文>
    user>
users>

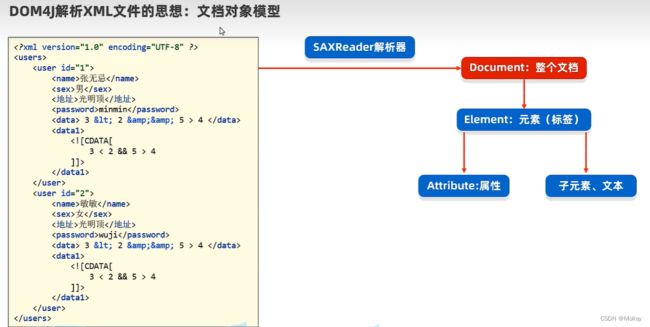
解析XML文件
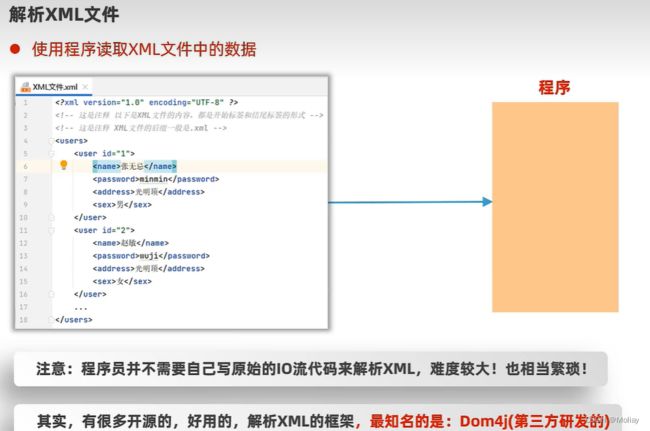
dom4j下载地址(下载首个jar包即可,若想了解源码则下载第二个source,若想了解使用说明则下载第三个)
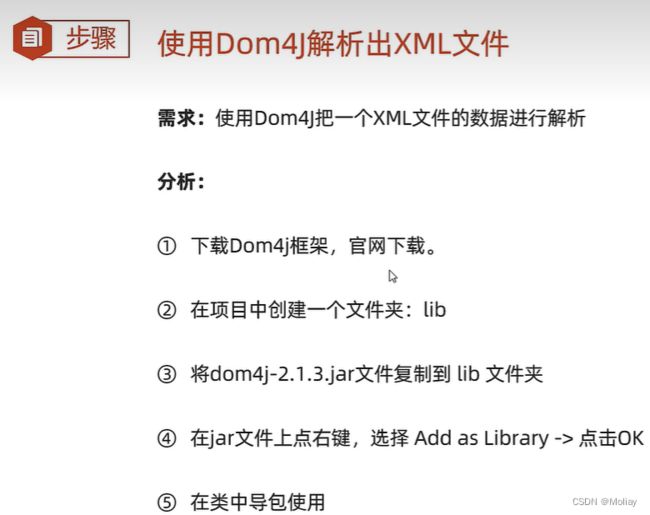
在idea中可以展开jar包即为导入成功


package dom4jTest;

import org.dom4j.Document;
import org.dom4j.DocumentException;
import org.dom4j.Element;
import org.dom4j.io.SAXReader;

import javax.xml.parsers.SAXParser;
import java.util.Arrays;
import java.util.List;

public class HelloSAX {
    public static void main(String[] args) throws DocumentException {
        //创建一个dom4j框架提供的解析器对象
        SAXReader saxReader = new SAXReader();

        //使用SAXReader对象把要解析的XMl文件读成一个document对象
        Document document = saxReader.read("IO\\src\\helloWorld.xml");

        //从Document对象中读取XML中的全部数据元素
        Element root = document.getRootElement();
        System.out.println(root.getName());//users

        //List elements()获取当前元素下的所有子元素
        List<Element> elements = root.elements();
        for (Element element : elements) {
            System.out.println(element.getName());
        }

        System.out.println();
        //List elements(String name)获取当前元素下 指定名字的子元素集合
        List<Element> elements1 = root.elements("user");
        elements1.forEach(o1 -> System.out.println(o1.getName()));

        //Element element(String name)获取当前元素下指定名字的子元素,若有重复则返回首次出现的
        //String getText()得到文本内容
        Element element = root.element("visitor");
        System.out.println(element.getText());//会话访问

        //String attributeValues(String name)通过属性名直接获得属性值
        System.out.println(root.attributeValue("num"));//4
    }
}
XML文件的生成

package xml;
import java.io.BufferedWriter;
import java.io.FileWriter;
public class WriteIn {
public static void main(String[] args){
//使用StringBuilder对象来拼接XML格式的数据
StringBuilder sb = new StringBuilder();
sb.append("\r\n");
sb.append("\r\n" );
sb.append("\t1 \r\n");
sb.append("\t乱世佳人 \r\n");
sb.append("");
try(
BufferedWriter bw = new BufferedWriter(new FileWriter("IO\\src\\testW.xml"))
){
bw.write(sb.toString());
}catch(Exception e){
e.printStackTrace();
}
}
}
约束XML文件的编写(简单了解)


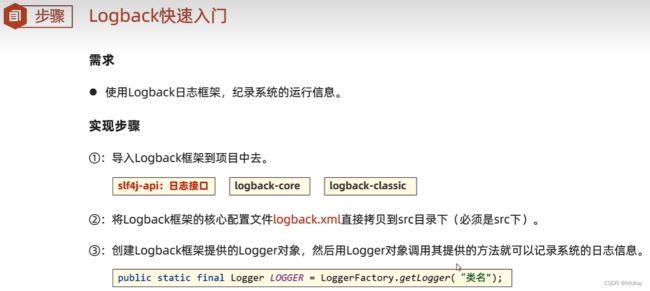
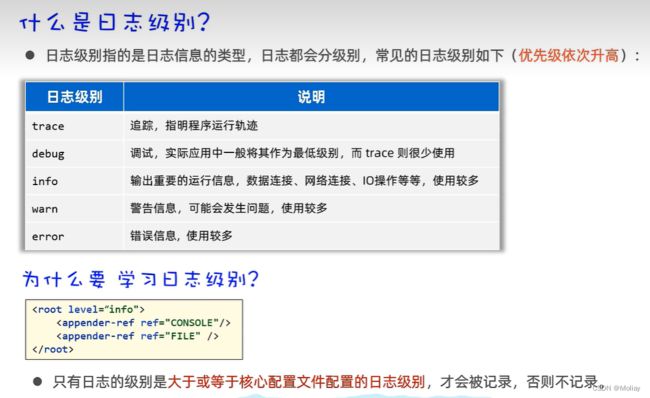
日志技术

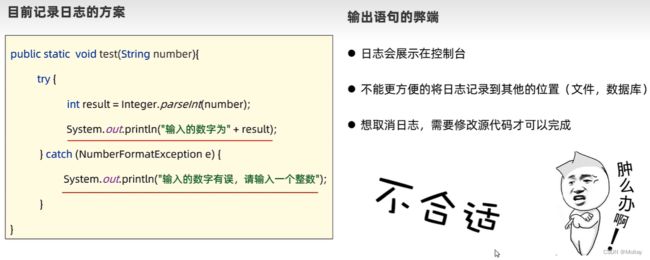

体系结构


Logback
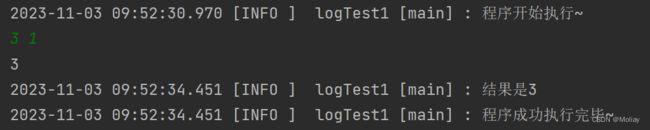
package log;

import org.slf4j.Logger;
import org.slf4j.LoggerFactory;

import java.util.Scanner;

public class Hello {
    public static final Logger LOGGER = LoggerFactory.getLogger("logTest1");

    public static void main(String[] args) {
        try {
            LOGGER.info("程序开始执行~");
            Scanner sc = new Scanner(System.in);
            int m = sc.nextInt(), n = sc.nextInt();
            divide(m, n);
            LOGGER.info("程序成功执行完毕~");
        } catch (Exception e) {
            LOGGER.error("程序执行异常");
        }
    }
    public static void divide(int m, int n){
        LOGGER.debug("参数m:" + m);
        LOGGER.debug("参数n" + n);
        System.out.println(m / n);
        LOGGER.info("结果是" + m / n);
    }
}
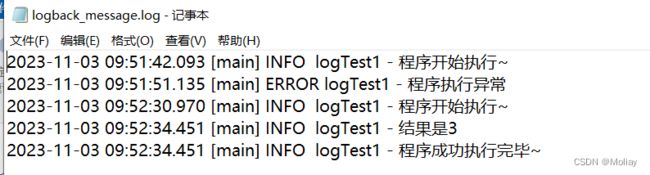
logback核心配置文件

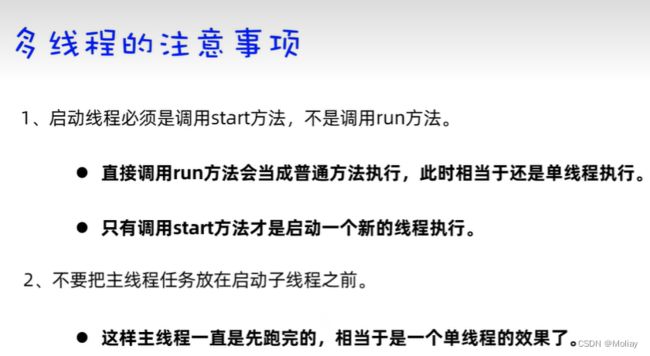
多线程

线程创建方式
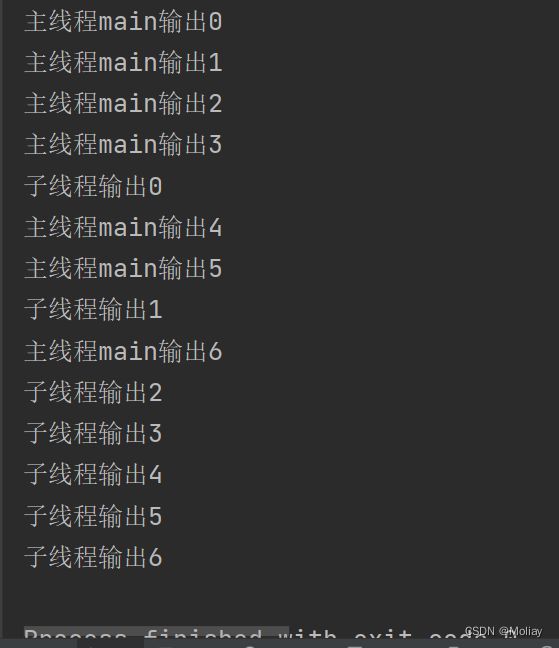
创建方式1:继承Thread类

java是单继承的
package thread;

public class HelloThread {
    //main()方法由默认的主线程负责执行
    public static void main(String[] args) {
        //创建一个MyThread线程类对象代表一个线程
        Thread thread = new MyThread();
        thread.start();//启动线程,自动执行run()方法
        for (int i = 0; i < 7; i++) {
            System.out.println("主线程main输出" + i);
        }
    }
}
package thread;

public class MyThread extends Thread{//子类继承Thread线程类
    @Override
    public void run(){//需要重写Thread类的run()方法
        //描述线程的执行任务
        for (int i = 0; i < 7; i++) {
            System.out.println("子线程输出" + i);
        }
    }
}
创建方式2:实现Runnable接口
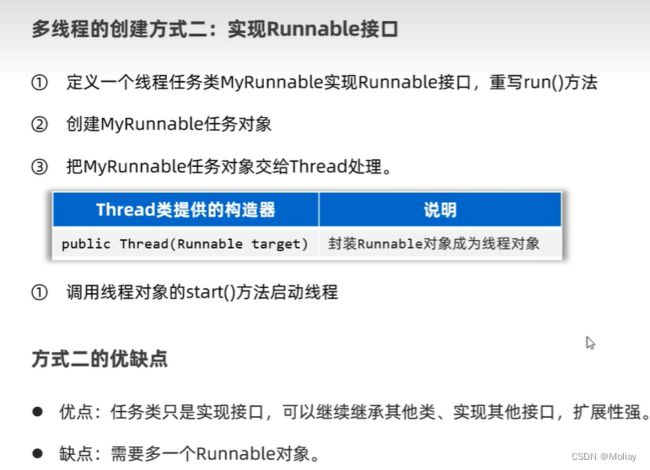
package thread;

public class HelloThread {
    //main()方法由默认的主线程负责执行
    public static void main(String[] args) {
        //创建任务对象
        MyRunnable myRunnable = new MyRunnable();
        new Thread(myRunnable).start();//把任务对象交给一个线程对象来处理
        for (int i = 0; i < 7; i++) {
            System.out.println("主线程main输出" + i);
        }
    }
}
package thread;

public class MyRunnable implements Runnable{

    @Override
    public void run() {
        //线程要执行的任务
        for (int i = 0; i < 7; i++) {
            System.out.println("子线程输出" + i);
        }
    }
}
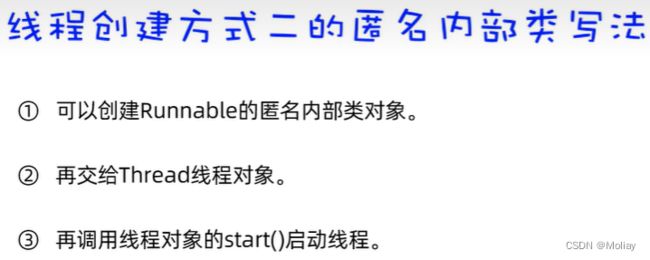
package thread;

public class HelloThread {
    //main()方法由默认的主线程负责执行
    public static void main(String[] args) {
        //简化1:匿名内部类写法
        Runnable runnable1 = new Runnable() {
            @Override
            public void run() {
                for (int i = 0; i < 7; i++) {
                    System.out.println("子线程1输出" + i);
                }
            }
        };
        new Thread(runnable1).start();
        //简化版本2
        new Thread(new Runnable() {
            @Override
            public void run() {
                for(int i = 0; i < 7; i++){
                    System.out.println("子线程2输出" + i);
                }
            }
        }).start();
        //简化版本3(Lambda表达式)
        new Thread(() ->
        {
            for (int i = 0; i < 7; i++) {
                System.out.println("子线程3输出" + i);
            }
        }).start();
        for (int i = 0; i < 7; i++) {
            System.out.println("主线程main输出" + i);
        }
    }
}
创建方式3:实现Callable接口
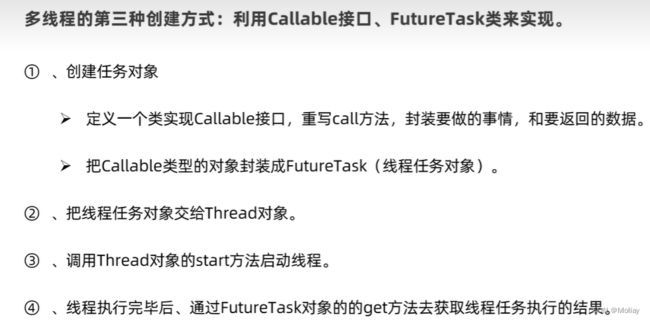

package thread;

import java.util.concurrent.Callable;
import java.util.concurrent.ExecutionException;
import java.util.concurrent.FutureTask;

public class HelloThread {
    //main()方法由默认的主线程负责执行
    public static void main(String[] args) throws ExecutionException, InterruptedException {
        Callable<String> call = new MyCallable(10);//创建Callable对象
        //FutureTask对象 :一个任务对象,实现了Runnable接口;在线程执行完后,用get方法获取线程执行结果
        FutureTask<String> futureTask = new FutureTask<>(call);//把Callable对象封装为FutureTask对象
        //把任务对象交给一个Thread对象
        new Thread(futureTask).start();
        //获取线程执行完毕的结果
        System.out.println(futureTask.get());
    }
}

Thread常用方法
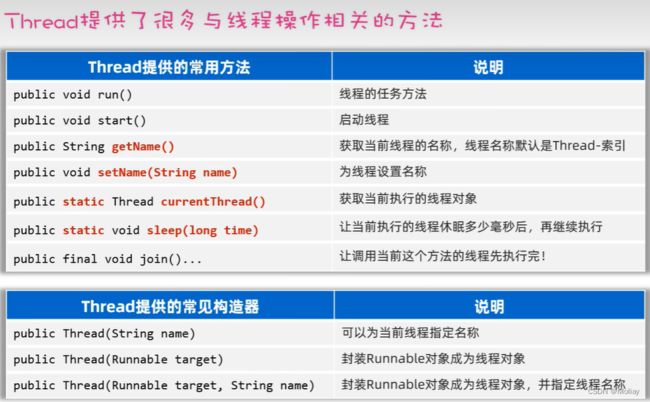
package thread;

public class HeyThread {
    public static void main(String[] args) {
        MyThread thread1 = new MyThread();
        thread1.start();
        //String getName()获取当前线程的名称,线程名默认是Thread-索引
        System.out.println(thread1.getName());//Thread-0

        MyThread thread2  = new MyThread();
        thread2.start();
        System.out.println(thread2.getName());//Thread-1

        MyThread thread3 = new MyThread();
        //void setName(String name)为线程设置名称
        thread3.setName("俺是三号");//俺是三号
        thread3.start();
        System.out.println(thread3.getName());
        Thread m = Thread.currentThread();
        System.out.println(m.getName());//main

        for(int i = 0; i < 7; i++){
            System.out.println(m.getName() + "输出了" + i);
        }
    }
}
package thread;

public class MyThread extends Thread{//子类继承Thread线程类
    @Override
    public void run(){//需要重写Thread类的run()方法
        Thread t = Thread.currentThread();
        //描述线程的执行任务
        for (int i = 0; i < 7; i++) {
            System.out.println(t.getName() + "子线程输出" + i);
        }
    }
}

package thread;

public class TestThread {
    public static void main(String[] args) throws InterruptedException {
        MyThread thread1 = new MyThread();
        thread1.start();
        //final void join()让调用该方法的线程先执行完(原理类似信号量机制)
        thread1.join();

        MyThread thread2 = new MyThread();
        thread2.start();
        thread2.join();

        MyThread thread3 = new MyThread();
        thread3.start();
        thread3.join();
    }
}
线程安全问题

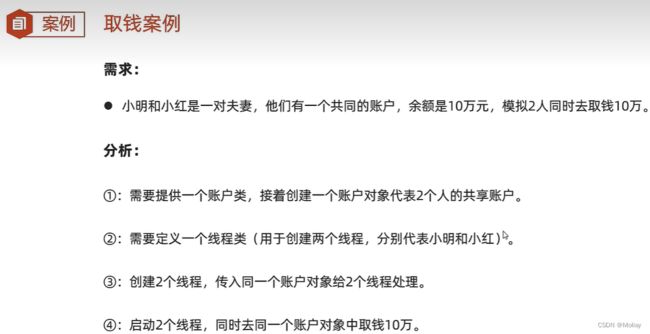
线程同步
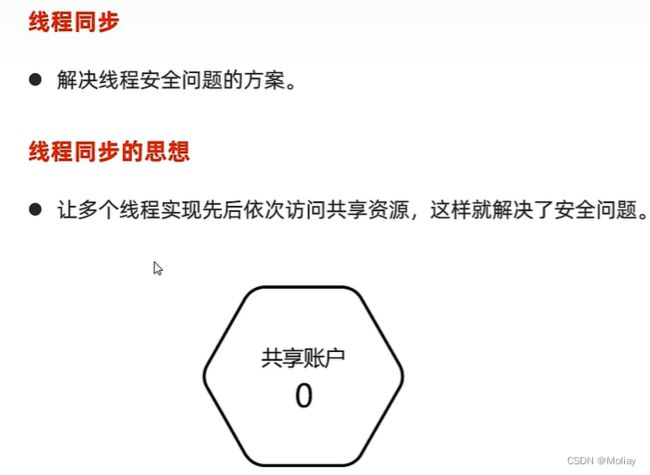

package thread;
public class Account {
private String name;
private double money;
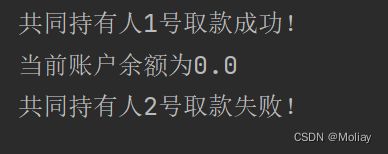
public void drawMoney(double draw){
String name = Thread.currentThread().getName();
if(this.money >= draw){
System.out.println(name + "取款成功!");
this.money -= draw;
System.out.println("当前账户余额为" + this.money);
}
else System.out.println(name + "取款失败!");
}
public Account() {
}
public Account(String name, double money) {
this.name = name;
this.money = money;
}
public String getName() {
return name;
}
public void setName(String name) {
this.name = name;
}
public double getMoney() {
return money;
}
public void setMoney(double money) {
this.money = money;
}
}
package thread;

public class DrawThread extends Thread{
    private Account acc;

    public DrawThread(Account acc, String name){
        super(name);
        this.acc = acc;
    }

    @Override
    public void run() {
        acc.drawMoney(10000);
    }
}
package thread;

public class ThreadTest {
    public static void main(String[] args) {
        Account acc = new Account("Shared_account", 10000);
        new DrawThread(acc, "共同持有人1号").start();
        new DrawThread(acc, "共同持有人2号").start();
    }
}

方式一:同步代码块

 public void drawMoney(double draw){
        String name = Thread.currentThread().getName();
        synchronized (this) {
            if(this.money >= draw){
                System.out.println(name + "取款成功!");
                this.money -= draw;
                System.out.println("当前账户余额为" + this.money);
            }
            else System.out.println(name + "取款失败!");
        }
    }
方式二:同步方法


public synchronized void drawMoney(double draw){
        String name = Thread.currentThread().getName();
        if(this.money >= draw){
            System.out.println(name + "取款成功!");
            this.money -= draw;
            System.out.println("当前账户余额为" + this.money);
        }
        else System.out.println(name + "取款失败!");
    }

方式三:Lock锁

package thread;

import java.util.concurrent.locks.Lock;
import java.util.concurrent.locks.ReentrantLock;

public class Account {
    private String name;
    private double money;
    private final Lock lock = new ReentrantLock();

    public synchronized void drawMoney(double draw){
        String name = Thread.currentThread().getName();
        lock.lock();
        try {
            if(this.money >= draw){
                System.out.println(name + "取款成功!");
                this.money -= draw;
                System.out.println("当前账户余额为" + this.money);
            }
            else System.out.println(name + "取款失败!");
        } catch (Exception e) {
            throw new RuntimeException(e);
        } finally {
            lock.unlock();
        }
    }

    public Account() {
    }

    public Account(String name, double money) {
        this.name = name;
        this.money = money;
    }

    public String getName() {
        return name;
    }

    public void setName(String name) {
        this.name = name;
    }

    public double getMoney() {
        return money;
    }

    public void setMoney(double money) {
        this.money = money;
    }
}
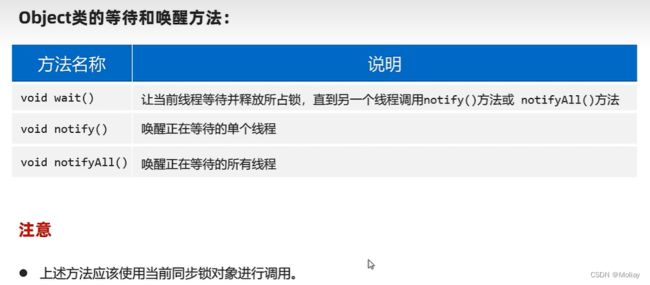
线程通信(简单了解)
思想同OS中的进程通信问题
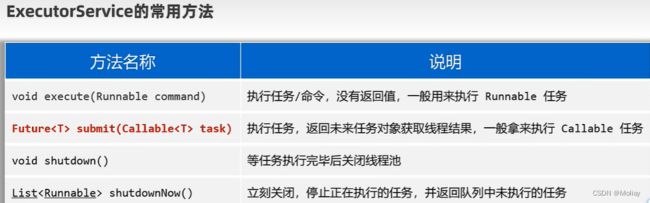
线程池
认识线程池

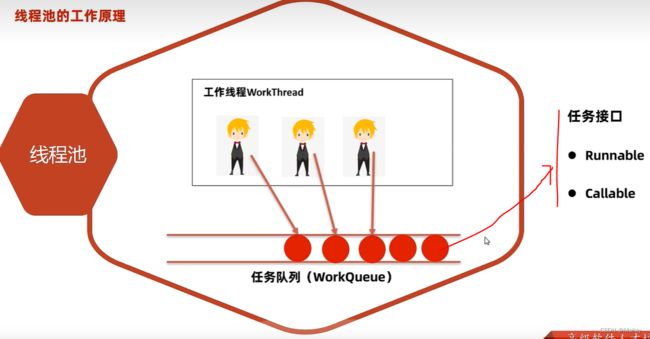
创建线程池

- 方式一

线程池处理Runnable任务

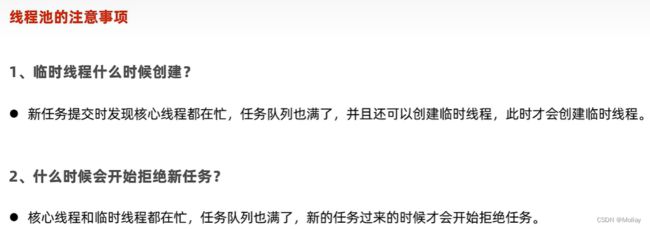
- 新任务拒绝错误
- AbortPolicy:拒绝并抛出异常。
- CallerRunsPolicy:使用当前调用的线程来执行此任务。
- DiscardOldestPolicy:抛弃队列头部(最旧)的一个任务,并执行当前任务。
- DiscardPolicy:忽略并抛弃当前任务。
package threadPool;

import java.util.concurrent.*;

public class Test {
    public static void main(String[] args) {
        ExecutorService pool = new ThreadPoolExecutor(3, 5,
                8, TimeUnit.SECONDS, new ArrayBlockingQueue<>(4)
                , Executors.defaultThreadFactory(), new ThreadPoolExecutor.AbortPolicy());

        Runnable target = new MyRunnable();
        pool.execute(target);
        pool.execute(target);
        pool.execute(target);//三个核心线程被占
        pool.execute(target);
        pool.execute(target);
        pool.execute(target);
        pool.execute(target);//任务队列共四个位置被占满
        pool.execute(target);//可创建临时线程(max-core)个
        pool.execute(target);

        pool.shutdown();//等全部线程执行完毕后,再关闭线程池
//        pool.shutdownNow();//直接关闭全部线程池,无论任务是否执行完毕
    }
}
package threadPool;

public class MyRunnable implements Runnable{
    @Override
    public void run() {
        System.out.println(Thread.currentThread().getName());
        try {
            Thread.sleep(1000);
        } catch (InterruptedException e) {
            throw new RuntimeException(e);
        }
    }
}
线程池处理Callable任务
package threadPool;

import java.util.concurrent.Callable;

public class MyCallable implements Callable<String> {
    private int n;
    public MyCallable(){}
    public MyCallable(int n){
        this.n = n;
    }

    @Override
    public String call() throws Exception {
        int sum = 0;
        for (int i = 1; i <= n; i++) {
            sum += i;
        }
        return Thread.currentThread().getName() + " test " + sum;
    }
}
Executors工具类实现线程池

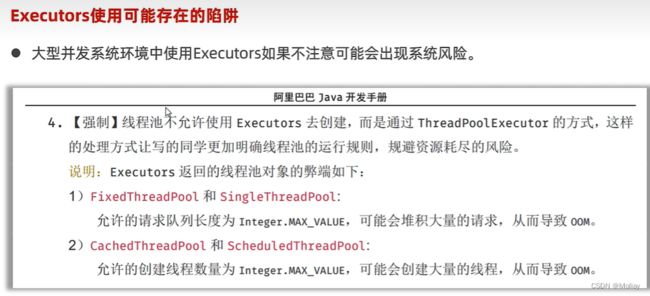
- 关于核心线程数量的设置:
- 计算密集型:CPU核数(逻辑上)+1
- IO密集型:CPU核数(逻辑上)*2
并发vs并行


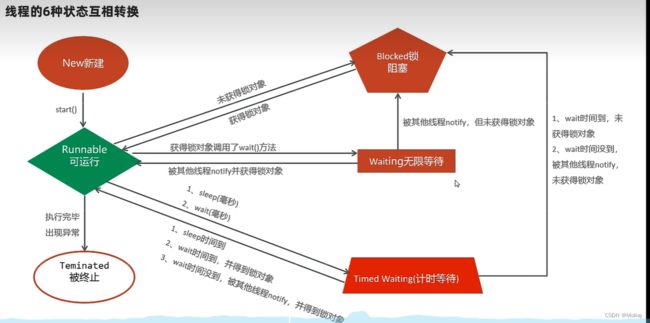
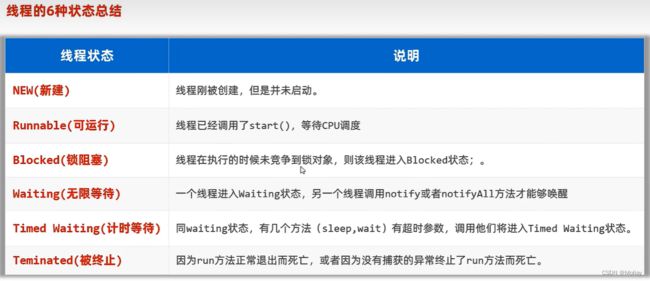
线程的生命周期
乐观锁
悲观锁
package lockThread;

public class MyRunnable implements  Runnable{
    private int count;//记录访问人数
    @Override
    public void run() {
        for (int i = 0; i < 100; i++) {
            synchronized (this) {
                System.out.println(Thread.currentThread().getName() + ":" + (++count));
            }
        }
    }
}
package lockThread;

public class PassiveLock {
    public static void main(String[] args) {
        Runnable target = new MyRunnable();

        for (int i = 0; i < 100; i++) {
            new Thread(target).start();
        }
    }
}
乐观锁
package lockThread;

public class Optimistic {
    public static void main(String[] args) {
        Runnable target = new MyRunnable1();

        for (int i = 0; i < 100; i++) {
            new Thread(target).start();
        }
    }
}
package lockThread;

import java.util.concurrent.atomic.AtomicInteger;

public class MyRunnable1 implements  Runnable{
    private AtomicInteger count = new AtomicInteger();//记录访问人数
    @Override
    public void run() {
        for (int i = 0; i < 100; i++) {
            synchronized (this) {
                System.out.println(Thread.currentThread().getName() + ":" + count.incrementAndGet());
            }
        }
    }
}
网络通信
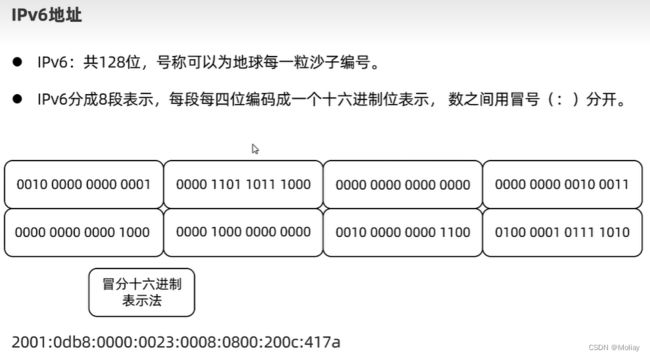
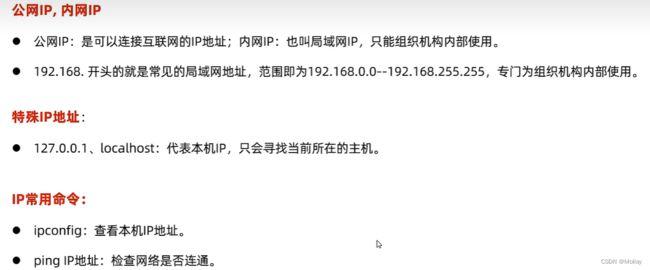
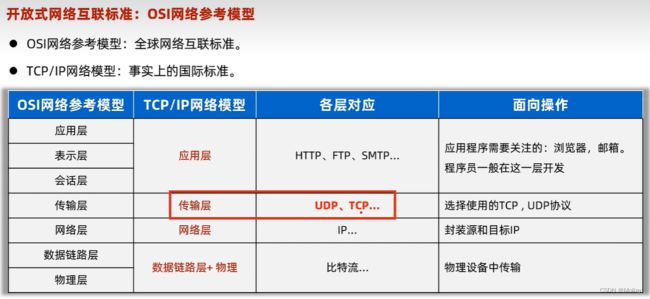
网络通信三要素:IP地址、端口号、协议


IP地址


package iNetAddress;

import java.io.IOException;
import java.net.InetAddress;
import java.net.UnknownHostException;

public class Test {
    public static void main(String[] args) throws IOException {
        InetAddress ip1 = InetAddress.getLocalHost();//获取本机IP
        System.out.println(ip1.getHostAddress());//获取该IP地址对象对应的IP地址
        System.out.println(ip1.getHostName());//获取该IP地址对象的主机名

        InetAddress ip2 = InetAddress.getByName("www.baidu.com");
        System.out.println(ip2.getHostAddress());
        System.out.println(ip2.getHostName());//www.baidu.com
        System.out.println(ip2.isReachable(5000));//true
    }
}
端口号

协议


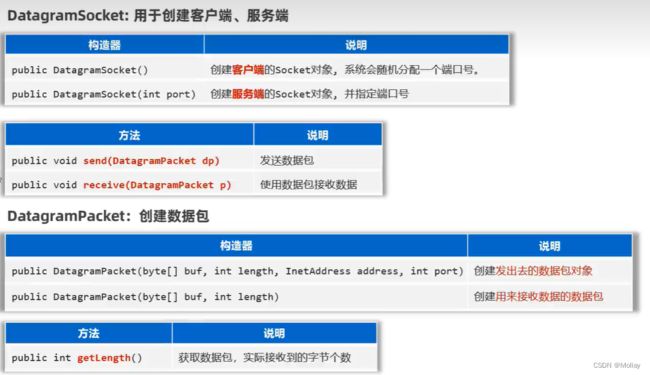
UDP通信
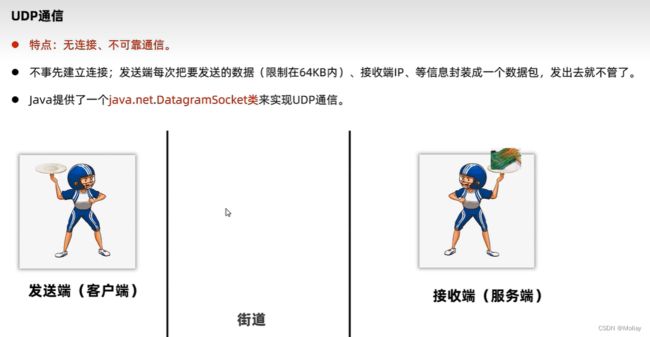

package UDP;
import java.io.IOException;
import java.net.*;
public class Client {
public static void main(String[] args) throws IOException {
//创建客户端对象
DatagramSocket socket = new DatagramSocket();
//创建数据包对象,用于发送数据
byte[] bytes = "我是客户端对象啊!".getBytes();
DatagramPacket packet = new DatagramPacket(bytes, bytes.length
, InetAddress.getLocalHost(), 7777);
//正式发送封装好的数据包
socket.send(packet);
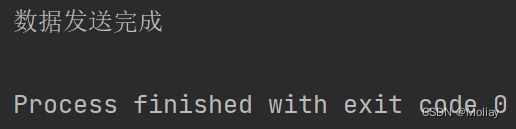
System.out.println("数据发送完成");
//释放资源
socket.close();
}
}
package UDP;

import java.io.IOException;
import java.net.DatagramPacket;
import java.net.DatagramSocket;
import java.net.SocketException;

public class Server {
    public static void main(String[] args) throws IOException {
        //创建一个服务端对象,需要注册端口
        DatagramSocket socket = new DatagramSocket(7777);
        //创建数据包对象,用于接受数据
        byte[] bytes = new byte[64 * 1024];
        DatagramPacket packet = new DatagramPacket(bytes, bytes.length);
        //使用数据包来接受客户端发送的数据
        socket.receive(packet);

        int len = packet.getLength();
        String data = new String(bytes, 0, len);
        System.out.println(data);
        System.out.println("客户端完成");
        socket.close();
    }
}


package UDP;

import java.io.IOException;
import java.net.DatagramPacket;
import java.net.DatagramSocket;

public class Server {
    public static void main(String[] args) throws IOException {
        System.out.println("----------服务端已启动---------");
        //创建一个服务端对象,需要注册端口
        DatagramSocket socket = new DatagramSocket(7777);
        //创建数据包对象,用于接受数据
        byte[] bytes = new byte[64 * 1024];
        DatagramPacket packet = new DatagramPacket(bytes, bytes.length);
        while (true) {
            //使用数据包来接受客户端发送的数据
            socket.receive(packet);
            int len = packet.getLength();
            String data = new String(bytes, 0, len);
            System.out.println(data);
            System.out.println(packet.getAddress().getHostAddress());
            System.out.println(packet.getAddress().getHostName());
            System.out.println();
        }
    }
}
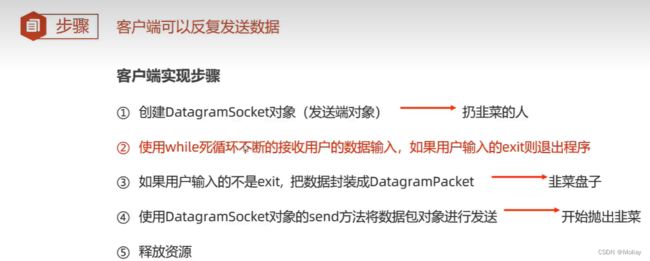
package UDP;

import java.io.IOException;
import java.net.*;
import java.util.Scanner;

public class Client {
    public static void main(String[] args) throws IOException {
        //创建客户端对象
        DatagramSocket socket = new DatagramSocket();
        Scanner sc = new Scanner(System.in);
        while (true) {
            //创建数据包对象,用于发送数据
            System.out.println("请输入待发送内容:");
            String msg = sc.next();
            if(msg.equals("exit")){
                System.out.println("您已成功退出!");
                //释放资源
                socket.close();
                break;
            }
            byte[] bytes = msg.getBytes();
            DatagramPacket packet = new DatagramPacket(bytes, bytes.length
                    , InetAddress.getLocalHost(), 7777);
            //正式发送封装好的数据包
            socket.send(packet);
        }
    }
}
TCP通信
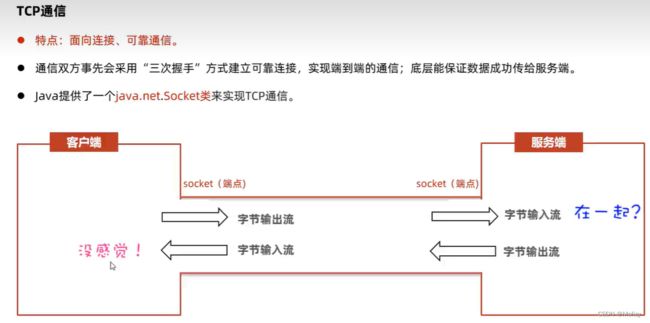


package tcp;

import java.io.DataInputStream;
import java.io.IOException;
import java.io.InputStream;
import java.net.ServerSocket;
import java.net.Socket;

public class Server {
    public static void main(String[] args) throws IOException {
        System.out.println("————————————————服务器端成功启动——————————————————");
        //创建ServerSocket对象,同时为服务器注册端口
        ServerSocket serverSocket = new ServerSocket(6666);
        //使用ServerSocket对象调用accept()方法,,等待客户端连接请求
        Socket socket = serverSocket.accept();
        //从Socket管道得到一个字节输入流
        InputStream is = socket.getInputStream();
        //字节输入流包装为数据输入流
        DataInputStream dis = new DataInputStream(is);
        //使用数据输入流读取客户端发过来的信息
        String data = dis.readUTF();
        System.out.println(data);
        //此时也能够获取客户端地址
        System.out.println(socket.getRemoteSocketAddress());

        dis.close();
        socket.close();
    }
}
package tcp;

import java.io.DataOutputStream;
import java.io.IOException;
import java.io.OutputStream;
import java.net.Socket;

public class Client {
    public static void main(String[] args) throws IOException {
        //创建Socket对象,同时请求与服务器端程序的连接
        Socket socket = new Socket("127.0.0.1", 6666);
        //从Socket管道获得一个字节输出流,来给服务端程序发送数据
        OutputStream os = socket.getOutputStream();
        //把低级的字节输出流包装为数据输出流
        DataOutputStream dos = new DataOutputStream(os);
        //开始写入数据
        dos.writeUTF("在吗,开连~");
        dos.close();
        socket.close();//释放连接资源
    }
}

package tcp1;

import java.io.DataOutputStream;
import java.io.IOException;
import java.io.OutputStream;
import java.net.Socket;
import java.util.Scanner;

public class Client {
    public static void main(String[] args) throws IOException {
        //创建Socket对象,同时请求与服务器端程序的连接
        Socket socket = new Socket("127.0.0.1", 6666);
        //从Socket管道获得一个字节输出流,来给服务端程序发送数据
        OutputStream os = socket.getOutputStream();
        //把低级的字节输出流包装为数据输出流
        DataOutputStream dos = new DataOutputStream(os);
        Scanner sc = new Scanner(System.in);
        //开始写入数据
        while (true) {
            System.out.println("请输入待发送内容:");
            String msg = sc.next();
            if(msg.equals("exit")) {
                System.out.println("已成功退出!");
                //释放连接资源
                dos.close();
                socket.close();
                break;
            }
            dos.writeUTF(msg);
            dos.flush();
        }
    }
}
package tcp1;

import java.io.DataInputStream;
import java.io.IOException;
import java.io.InputStream;
import java.net.ServerSocket;
import java.net.Socket;

public class Server {
    public static void main(String[] args) throws IOException {
        System.out.println("————————————————服务器端成功启动——————————————————");
        //创建ServerSocket对象,同时为服务器注册端口
        ServerSocket serverSocket = new ServerSocket(6666);
        //使用ServerSocket对象调用accept()方法,,等待客户端连接请求
        Socket socket = serverSocket.accept();
        //从Socket管道得到一个字节输入流
        InputStream is = socket.getInputStream();
        //字节输入流包装为数据输入流
        DataInputStream dis = new DataInputStream(is);
        while (true) {
            try {
                //使用数据输入流读取客户端发过来的信息
                String data = dis.readUTF();
                System.out.println(data);
            } catch (IOException e) {
                System.out.println(socket.getRemoteSocketAddress() + "已离线哦");
                dis.close();
                socket.close();
                break;
            }
        }
    }
}


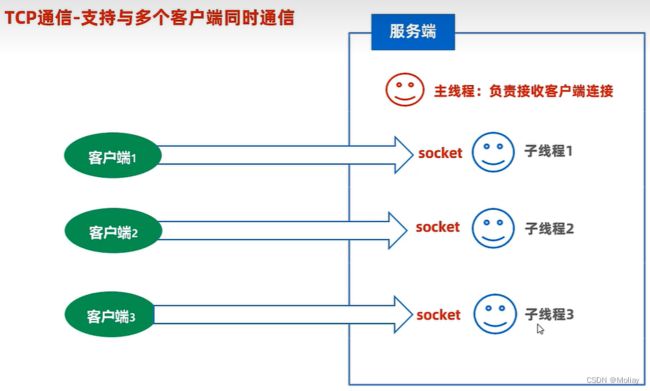
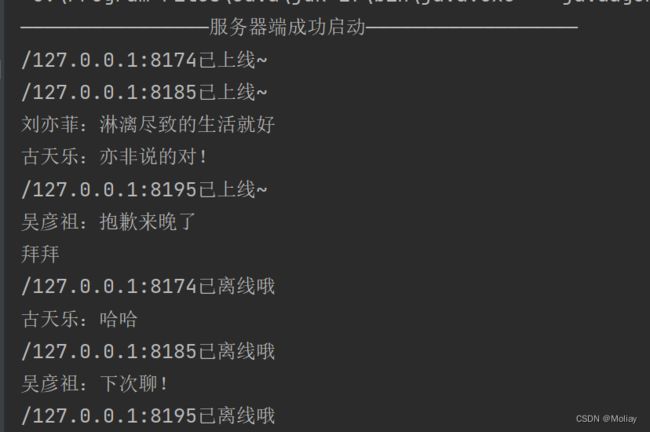
TCP:实现与多个客户端同时通信

package tcp1;

import java.io.DataOutputStream;
import java.io.IOException;
import java.io.OutputStream;
import java.net.Socket;
import java.util.Scanner;

public class Client {
    public static void main(String[] args) throws IOException {
        //创建Socket对象,同时请求与服务器端程序的连接
        Socket socket = new Socket("127.0.0.1", 6666);
        //从Socket管道获得一个字节输出流,来给服务端程序发送数据
        OutputStream os = socket.getOutputStream();
        //把低级的字节输出流包装为数据输出流
        DataOutputStream dos = new DataOutputStream(os);
        Scanner sc = new Scanner(System.in);
        //开始写入数据
        while (true) {
            System.out.println("请输入待发送内容:");
            String msg = sc.next();
            if(msg.equals("exit")) {
                System.out.println("已成功退出!");
                //释放连接资源
                dos.close();
                socket.close();
                break;
            }
            dos.writeUTF(msg);
            dos.flush();
        }
    }
}
package tcp1;

import java.io.DataInputStream;
import java.io.IOException;
import java.io.InputStream;
import java.net.ServerSocket;
import java.net.Socket;

public class Server {
    public static void main(String[] args) throws IOException {
        System.out.println("————————————————服务器端成功启动——————————————————");
        //创建ServerSocket对象,同时为服务器注册端口
        ServerSocket serverSocket = new ServerSocket(6666);
        while (true) {
            //使用ServerSocket对象调用accept()方法,,等待客户端连接请求
            Socket socket = serverSocket.accept();
            System.out.println(socket.getRemoteSocketAddress() + "已上线~");
            new ServerReadThread(socket).start();
        }

    }
}
package tcp1;

import java.io.DataInputStream;
import java.io.IOException;
import java.io.InputStream;
import java.net.Socket;
import java.util.Scanner;

public class ServerReadThread extends Thread{
    private Socket socket;

    public ServerReadThread(Socket socket){
        this.socket = socket;
    }
    @Override
    public void run() {
            try {
                InputStream is = socket.getInputStream();
                DataInputStream dis = new DataInputStream(is);
                while (true) {
                    try {
                        String msg = dis.readUTF();
                        System.out.println(msg);
                    } catch (IOException e) {
                        System.out.println(socket.getRemoteSocketAddress() + "已离线哦");
                        dis.close();
                        socket.close();
                        break;
                    }
                }
            } catch (IOException e) {
                throw new RuntimeException(e);
            }
    }
}


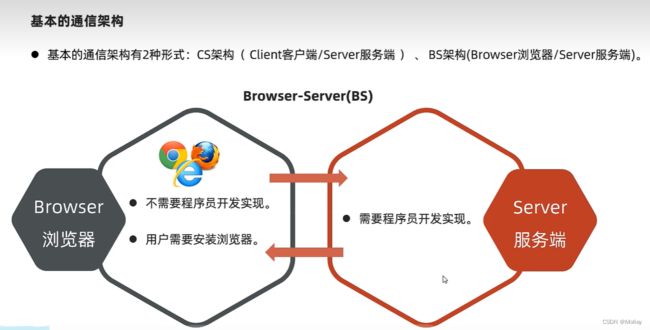
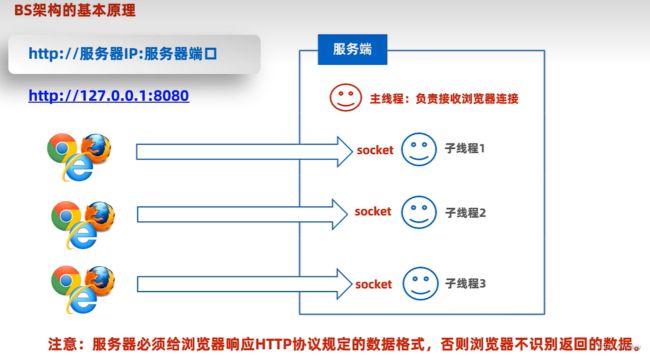
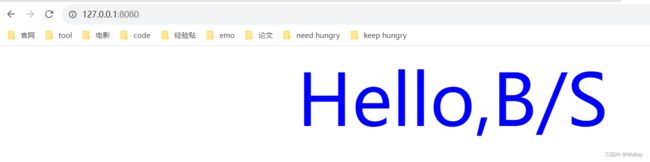
TCP:实现BS架构


package tcp3;

import java.io.IOException;
import java.net.ServerSocket;
import java.net.Socket;

public class Server {
    public static void main(String[] args) throws IOException {
        System.out.println("--------服务器已启动----------");
        //创建ServerSocket对象,同时为服务端注册端口
        ServerSocket serverSocket = new ServerSocket(8080);//8080端口是被用于WWW代理服务的,可以实现网页浏览
        while(true){
            //使用ServerSocket对象调用accept()方法
            Socket socket = serverSocket.accept();
            System.out.println(socket.getRemoteSocketAddress() + "已上线~");
            new ServerReadThread(socket).start();
        }
    }
}
package tcp3;

import java.io.DataOutputStream;
import java.io.OutputStream;
import java.io.PrintStream;
import java.net.Socket;

public class ServerReadThread extends Thread{
    private Socket socket;
    public ServerReadThread(Socket socket){
        this.socket = socket;
    }

    @Override
    public void run(){
        try{
            OutputStream os = socket.getOutputStream();
            PrintStream ps = new PrintStream(os);
            ps.println("HTTP/1.1 200 OK");
            ps.println("Content-Type:text/html;charset=UTF-8");
            ps.println();
            ps.println("Hello,B/S");
            ps.close();
            socket.close();
        }catch(Exception e){
            e.printStackTrace();
        }
    }
}

Java高级
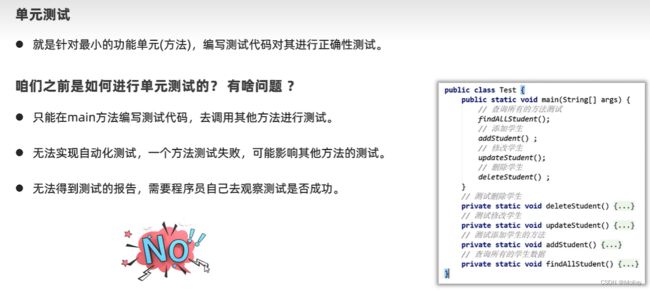
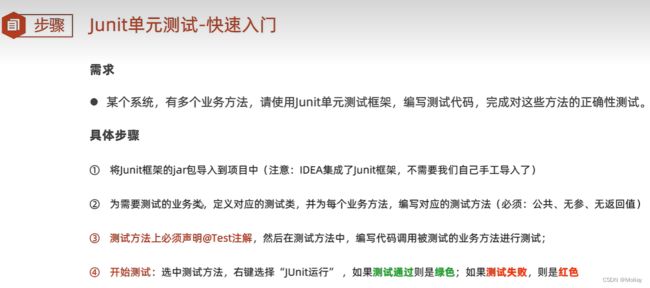
单元测试

package junit;

public class StringUtil {
    public static void printNum(String name){
        if(name == null){
            System.out.println(0);
            return;
        }
        System.out.println(name + "名字长度为" + name.length());
    }

    public static int getMaxIndex(String data){
        if(data == null) return -1;
        return data.length() - 1;
    }
}
package junit;
import org.junit.Assert;
import org.junit.Test;
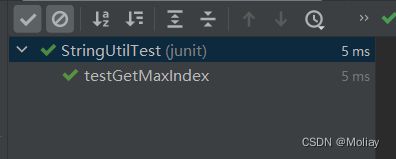
public class StringUtilTest {
@Test
public void testPrintNum(){
StringUtil.printNum("刘亦菲");
StringUtil.printNum(null);
}
@Test
public void testGetMaxIndex(){
int index2 = StringUtil.getMaxIndex(null);
System.out.println(index2);
int index1 = StringUtil.getMaxIndex("茜茜");
System.out.println(index1);
//断言机制:用于对测试需要满足的条件进行验证
Assert.assertEquals("error!", 1, index1);
}
}
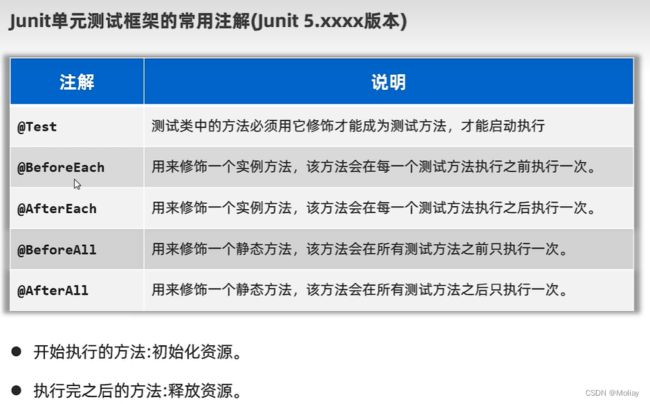
- 常用注解

package junit;
import org.junit.*;
public class StringUtilTest {
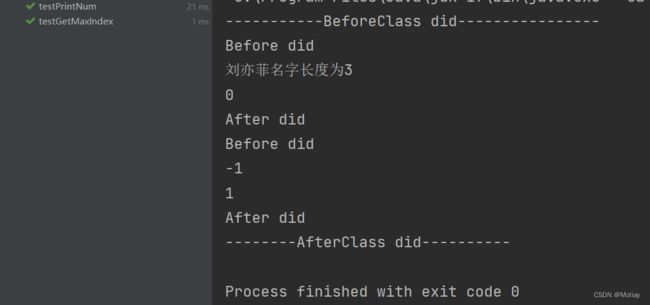
@Before
public void testBefore(){
System.out.println("Before did");
}
@BeforeClass
public static void testBeforeClass(){
System.out.println("-----------BeforeClass did----------------");
}
@After
public void testAfter(){
System.out.println("After did");
}
@AfterClass
public static void testAfterClass(){
System.out.println("--------AfterClass did----------");
}
@Test
public void testPrintNum(){
StringUtil.printNum("刘亦菲");
StringUtil.printNum(null);
}
@Test
public void testGetMaxIndex(){
int index2 = StringUtil.getMaxIndex(null);
System.out.println(index2);
int index1 = StringUtil.getMaxIndex("茜茜");
System.out.println(index1);
//断言机制:用于对测试需要满足的条件进行验证
Assert.assertEquals("error!", 1, index1);
}
}
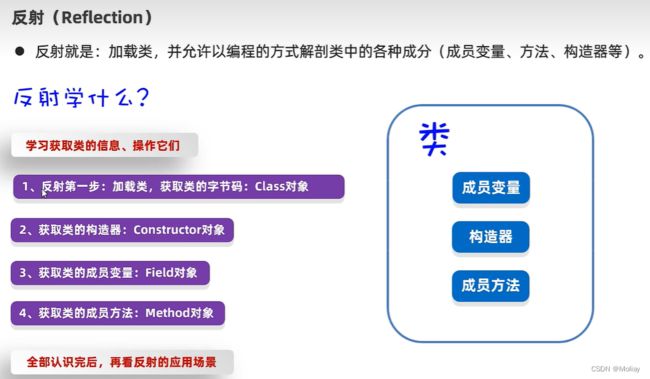
反射
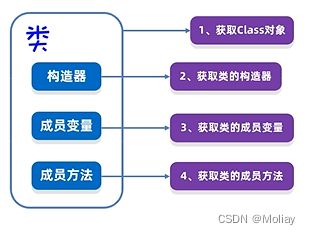
认识反射,获取类

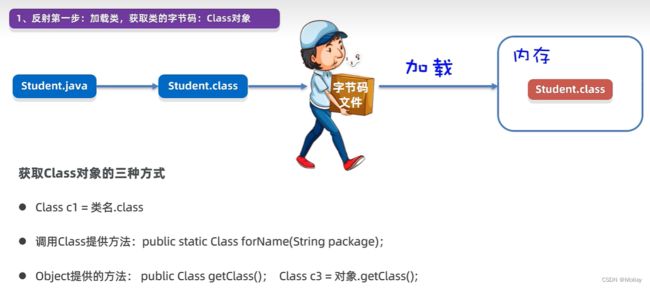
package reflect;

public class Hello {
    public static void main(String[] args) throws ClassNotFoundException {
        //方式一:Class c1 = 类名.class
        Class c1 = Student.class;
        System.out.println(c1.getName());//全类名 reflect.Student
        System.out.println(c1.getSimpleName());//简名(类名)Student

        //方式二:调用Class提供的方法:Class forName(String packet)
        Class c2 = Class.forName("reflect.Student");
        System.out.println(c1 == c2);//比较地址 true

        //方式三:调用Object提供的方法:Class getClass()
        Student student = new Student();
        Class c3 = student.getClass();
        System.out.println(c1 == c3);//true
    }
}
获取类的构造器
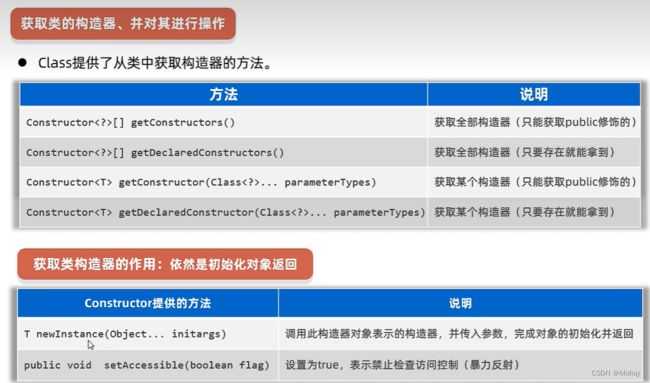
package reflect;

import org.junit.Test;

import java.lang.reflect.Constructor;
import java.lang.reflect.InvocationTargetException;

public class Hey {
    @Test
    public void testGetConstructors(){
        //拿到这个类的Class对象
        Class c = Student.class;
        //获取该类的全部构造器(只能获得public修饰的)
        Constructor[] constructors = c.getConstructors();
        for(Constructor constructor : constructors){
            System.out.println(constructor.getName() + ":" + constructor.getParameterCount());
        }

        System.out.println();
        //获取全部构造器,只要存在就能拿到
        Constructor[] constructors1 = c.getDeclaredConstructors();
        for(Constructor constructor : constructors1){
            System.out.println(constructor.getName() + ":" + constructor.getParameterCount());
        }
    }

    @Test
    public void testGetConstructor() throws NoSuchMethodException, InvocationTargetException, InstantiationException, IllegalAccessException {
        //先得到该类的Class
        Class c = Student.class;
        //获取某个构造器(只能获取public修饰的)
        Constructor constructor = c.getConstructor();
        System.out.println(constructor.getName() + ":" + constructor.getParameterCount());//reflect.Student:0
        //调用此构造器对象表示的构造器,可能需要传入参数(有参构造器),完成对象的初始化并返回
        Student student = (Student) constructor.newInstance();//无参构造器执行!
        System.out.println(student);//Student{name='null', age=0}

        //获取某个构造器(只要存在就能拿到)
        Constructor constructor1 = c.getDeclaredConstructor(String.class);
        //设置为true,表示禁止检查访问控制(暴力反射)
        constructor1.setAccessible(true);
        Student student1 = (Student)constructor1.newInstance("刘亦菲");//参数为String name的构造器执行!
        System.out.println(student1);//Student{name='刘亦菲', age=0}
        System.out.println(constructor1.getName() + ":" + constructor1.getParameterCount());//reflect.Student:1
    }
}
package reflect;

public class Student {
    private String name;
    private int age;

    public Student() {
        System.out.println("无参构造器执行!");
    }

    private Student(String name){
        System.out.println("参数为String name的构造器执行!");
        this.name = name;
    }

    public Student(String name, int age) {
        System.out.println("有参构造器执行!");
        this.name = name;
        this.age = age;
    }

    @Override
    public String toString() {
        return "Student{" +
                "name='" + name + '\'' +
                ", age=" + age +
                '}';
    }

    public String getName() {
        return name;
    }

    public void setName(String name) {
        this.name = name;
    }

    public int getAge() {
        return age;
    }

    public void setAge(int age) {
        this.age = age;
    }
}
获取类的成员变量

package reflect;

import org.junit.Test;

import java.lang.reflect.Field;

public class TestField {
    @Test
    public void testGetFields() throws NoSuchFieldException, IllegalAccessException {
        //反射第一步:先拿到该类的Class
        Class c = Worker.class;
        //获取类的全部成员变量(只要存在就能拿到)
        Field[] fields = c.getDeclaredFields();
        //遍历该成员变量数组
        for(Field f : fields){
            System.out.println(f.getName() + ":" + f.getType());
        }
        //定位某个成员变量
        Field field = c.getDeclaredField("salary");
        System.out.println(field.getName() + ":" + field.getType());//salary:double

        Field fName = c.getDeclaredField("name");
        System.out.println(fName.getName() + ":" + fName.getType());//name:class java.lang.String
        //赋值
        Worker worker = new Worker();//无参构造器执行!
        fName.setAccessible(true);
        fName.set(worker, "刘强东");
        System.out.println(worker);//Worker{name='刘强东', age=0}
        //取值
        String name = (String)fName.get(worker);
        System.out.println(name);//刘强东
    }
}
package reflect;

public class Worker {
    public static double salary;
    public static final String health = "keep";
    private String name;
    private int age;

    public Worker() {
        System.out.println("无参构造器执行!");
    }

    public Worker(String name, int age) {
        System.out.println("有参构造器执行!");
        this.name = name;
        this.age = age;
    }

    @Override
    public String toString() {
        return "Worker{" +
                "name='" + name + '\'' +
                ", age=" + age +
                '}';
    }

    public static double getSalary() {
        return salary;
    }

    public static void setSalary(double salary) {
        Worker.salary = salary;
    }

    public String getName() {
        return name;
    }

    public void setName(String name) {
        this.name = name;
    }

    public int getAge() {
        return age;
    }

    public void setAge(int age) {
        this.age = age;
    }
}
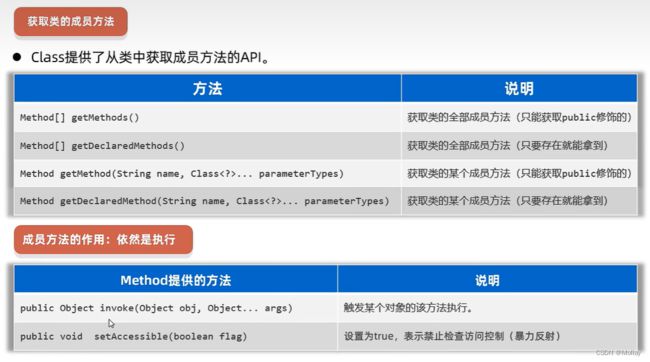
获取类的成员方法
package reflect;

import org.junit.Test;

import java.lang.reflect.InvocationTargetException;
import java.lang.reflect.Method;

public class TestMethod {
    @Test
    public void testGetMethods() throws NoSuchMethodException, InvocationTargetException, IllegalAccessException {
        //反射第一步:先得到Class对象
        Class c = Human.class;
        //获取类的全部成员方法(只要存在就能拿到)
        Method[] methods = c.getDeclaredMethods();
        //遍历该数组中的每个方法对象
        for(Method method : methods){
            System.out.println(method.getName() + " : " + method.getParameterCount()
            + "," + method.getReturnType());
        }

        System.out.println();
        //获取某方法对象
        Method mRun = c.getDeclaredMethod("pursue");
        System.out.println(mRun.getName() + " : " + mRun.getParameterCount()
                + "," + mRun.getReturnType());//pursue : 0,void
        Method mEat = c.getDeclaredMethod("eat", String.class);
        System.out.println(mEat.getName() + ":" + mEat.getParameterCount()
        + "," + mEat.getReturnType());//eat:1,class java.lang.String

        Human human = new Human();
        //设置为true,表示禁止检查访问控制(暴力反射)
        mRun.setAccessible(true);
        Object rs = mRun.invoke(human);//人可以追寻太阳
        System.out.println(rs);//null 该方法无返回值结果
        mEat.setAccessible(true);
        String rs1 = (String)mEat.invoke(human, "罗锅配煎饼");
        System.out.println(rs1);//人类爱吃罗锅配煎饼
    }
}
package reflect;

public class Human {
    public void see(){
        System.out.println("人可以看太阳");
    }

    private void pursue(){
        System.out.println("人可以追寻太阳");
    }

    public void eat(){
        System.out.println("人类爱吃");
    }

    private String eat(String food){
        return "人类爱吃" + food;
    }

    private String play(String activity){
        return "人类爱玩" + activity;
    }
}
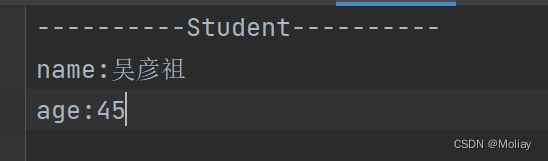
作用&应用场景

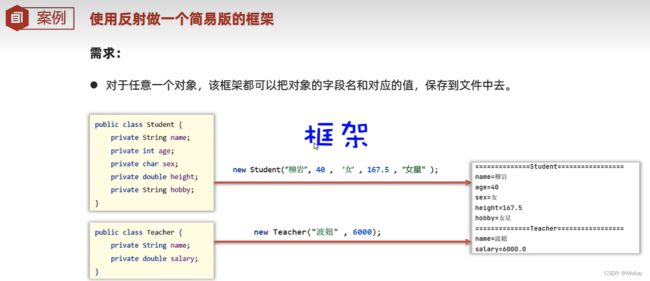
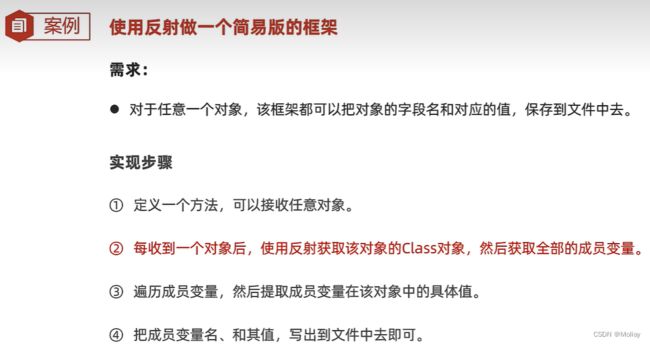
package reflect;

import java.io.FileNotFoundException;
import java.io.FileOutputStream;
import java.io.PrintStream;
import java.lang.reflect.Field;

public class ObjectFrame {
    //保存任意对象的字段和其数据到文件中
    public static void saveObject(Object obj) throws FileNotFoundException, IllegalAccessException {
        PrintStream ps = new PrintStream(new FileOutputStream("src\\reflect\\data.txt"));
        Class c = obj.getClass();
        ps.println("----------" + c.getSimpleName() + "----------");
        Field[] fields = c.getDeclaredFields();
        for(Field field : fields){
            String name = field.getName();
            field.setAccessible(true);
            String value = field.get(obj) + "";
            ps.println(name + ":" + value);
        }
        ps.close();
    }
}
package reflect;

import org.junit.Test;

import java.io.FileNotFoundException;

public class TestFrame {
    @Test
    public void testSave() throws FileNotFoundException, IllegalAccessException {
        ObjectFrame.saveObject(new Student("吴彦祖", 45));
        //ObjectFrame.saveObject(new Worker("刘强东", 55));
    }
}
注解
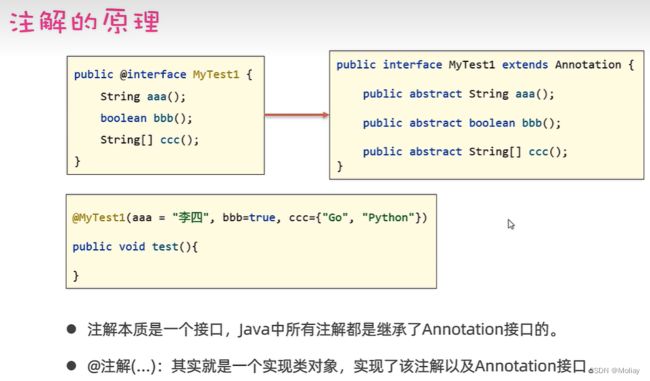
概述&自定义注解


package annotation;

public @interface MyAnnotation {
    String language();
    int version() default 11;
}
package annotation;
@MyAnnotation(language = "Java", version = 17)//也可以不使用默认值;可以用在类上
public class Hello {
    @MyAnnotation(language = "GO")//可以用在构造器上
    public Hello(){}

    @MyAnnotation(language = "Java")//可以直接用默认值;可以用在方法上
    public void test(){

    }
}
元注解


package annotation;

import java.lang.annotation.ElementType;
import java.lang.annotation.Retention;
import java.lang.annotation.RetentionPolicy;
import java.lang.annotation.Target;

@Target({ElementType.FIELD, ElementType.METHOD})//所修饰的注解只能用在成员变量和方法上
@Retention(RetentionPolicy.RUNTIME)//所修饰的注解一直保留到运行阶段
public @interface MyAnnotation1 {

}
package annotation;

//@MyAnnotation1() 报错'@MyAnnotation1' not applicable to type
public class Hey {
    @MyAnnotation1
    private int a;

    //@MyAnnotation1 报错'@MyAnnotation1' not applicable to constructor
    public Hey(){}

    @MyAnnotation1
    public void test(){}
}
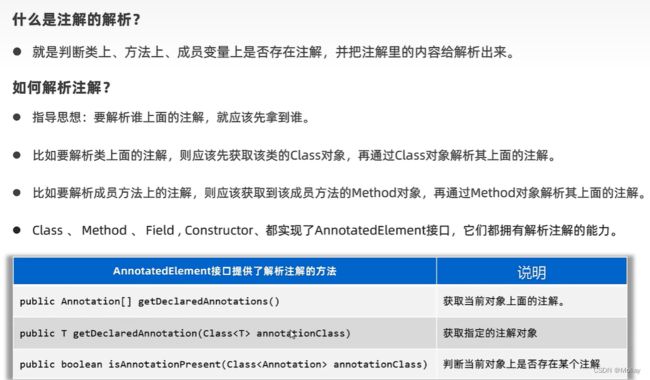
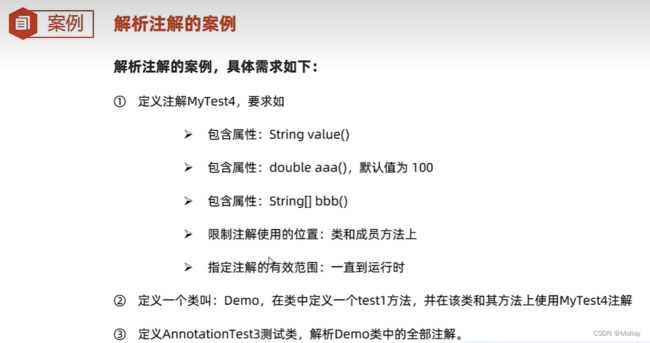
注解的解析
package annotation;

import org.junit.Test;

import java.lang.reflect.Method;
import java.util.Arrays;

public class TestAnnotation {
    @Test
    public void parseClass(){
        //得到Class对象
        Class c = Demo.class;
        //解析类上的注解
        if(c.isAnnotationPresent(MyAnnotation2.class)){//判断该类中是否包含某个注解
            MyAnnotation2 myAnnotation2 = (MyAnnotation2)c.getDeclaredAnnotation(MyAnnotation2.class);
            System.out.println(myAnnotation2.value());//JavaWeb
            System.out.println(myAnnotation2.score());//100.0
            System.out.println(Arrays.toString(myAnnotation2.pleasure()));//[语法, 高效]
        }
    }

    @Test
    public void parseMethod() throws NoSuchMethodException {
        //先得到Class对象
        Class c = Demo.class;
        //解析方法上的注解
        Method method = c.getDeclaredMethod("test");
        if(method.isAnnotationPresent(MyAnnotation1.class)){//判断方法对象是否包含了某个注解
            MyAnnotation1 myAnnotation1 = (MyAnnotation1) method.getDeclaredAnnotation(MyAnnotation1.class);
            System.out.println(myAnnotation1 + " exist");//@annotation.MyAnnotation1() exist
        }
    }
}
package annotation;

import java.lang.annotation.ElementType;
import java.lang.annotation.Retention;
import java.lang.annotation.RetentionPolicy;
import java.lang.annotation.Target;

@Retention(RetentionPolicy.RUNTIME)
@Target({ElementType.TYPE, ElementType.FIELD})
public @interface MyAnnotation2 {
    String value();
    double score() default 100.0;
    String[] pleasure();
}
package annotation;

@MyAnnotation2(value = "JavaWeb", pleasure = {"语法", "高效"})
@MyAnnotation(language = "SQL")
public class Demo {
    @MyAnnotation1()
    public void test(){

    }
}
应用场景

package annotation;

import java.lang.reflect.InvocationTargetException;
import java.lang.reflect.Method;

public class Apply {
    @MyAnnotation3
    public void test1(){
        System.out.println("test1 did");
    }

    //@MyAnnotation3
    public void test2(){
        System.out.println("test2 did");
    }

    @MyAnnotation3
    public void test3(){
        System.out.println("test3 did");
    }

    @MyAnnotation3
    public void test4(){
        System.out.println("test4 did");
    }

    //@MyAnnotation3
    public void test5(){
        System.out.println("test5 did");
    }

    public static void main(String[] args) throws InvocationTargetException, IllegalAccessException {
        Class c = Apply.class;
        Apply apply = new Apply();
        Method[] methods = c.getDeclaredMethods();
        for(Method method : methods){
            if(method.isAnnotationPresent(MyAnnotation3.class)){
                method.invoke(apply);
            }
        }
    }
}
package annotation;

import java.lang.annotation.ElementType;
import java.lang.annotation.Retention;
import java.lang.annotation.RetentionPolicy;
import java.lang.annotation.Target;

@Target(ElementType.METHOD)
@Retention(RetentionPolicy.RUNTIME)
public @interface MyAnnotation3 {
}
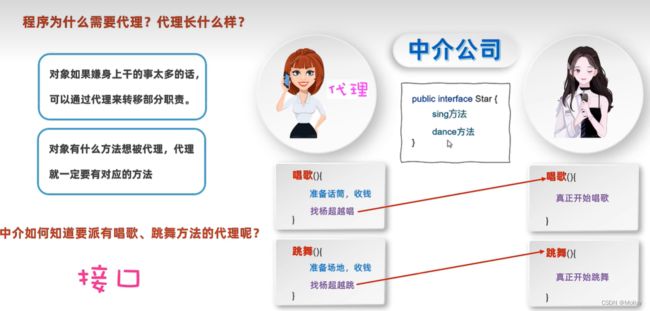
动态代理
快速入门