React Native项目配置路由和选项卡导航__React Navigation的使用
React Native 配置路由
在网上看了很多例子跟着写,发现都不行,发现之前的写法都已经弃用了,跟着官方一步步来吧。
参考官方文档:React Navigation
先创建好项目:
npx react-native init rnDemo
React Navigation是React Native是目前最主流的屏幕页面切换的导航方案。React Navigation 5.x版本是目前最新的稳定版本。
1、在React原生项目中安装所需的包:
yarn add @react-navigation/native 或 npm install @react-navigation/native
2、React Navigation是由一些核心工具组成的,导航器会使用这些工具在你的应用中创建导航结构。为了预先加载安装工作,我们还需要安装和配置大多数导航器使用的依赖项,然后我们可以开始编写一些代码。
我们现在要安装的库有react-native-gesture-handler、react-native-reanimated、react-nativescreens、react-native-safe-area-context和@react-native-community/ masamed -view。如果您已经安装了这些库,并且使用的是最新版本,那么就完成了这里的工作!否则,请继续阅读。
将依赖项安装到裸React原生项目中:
yarn add react-native-reanimated react-native-gesture-handler react-native-screens react-native-safe-area-context @react-native-community/masked-view
将依赖项安装到Expo管理的项目中:
expo install react-native-gesture-handler react-native-reanimated react-native-screens react-native-safe-area-context @react-native-community/masked-view
注:我写的是React原生项目。
安装navigator库
有三种导航模式可以选,分别是StackNavigator栈导航、TabNavigator标签导航、DrawerNavigator抽屉导航,后面会分别说一下怎么使用。
//StackNavigator
   npm install @react-navigation/stack
   //TabNavigator
   npm install @react-navigation/bottom-tabs
   //DrawerNavigator
   npm install @react-navigation/drawer
3、要完成react-native-gesture-handler的安装,在你的入口文件的顶部添加以下内容(确保它在顶部,在它之前没有其他东西),例如index.js或App.js:
import 'react-native-gesture-handler';
4、现在,我们需要将整个应用程序包装在NavigationContainer中。通常在入口文件中这样做,比如index。js或App.js:
import 'react-native-gesture-handler';
import * as React from 'react';
import { NavigationContainer } from '@react-navigation/native';

export default function App() {
  return (
    <NavigationContainer>{/* Rest of your app code */}</NavigationContainer>
  );
}
5、先写一个简单的demo
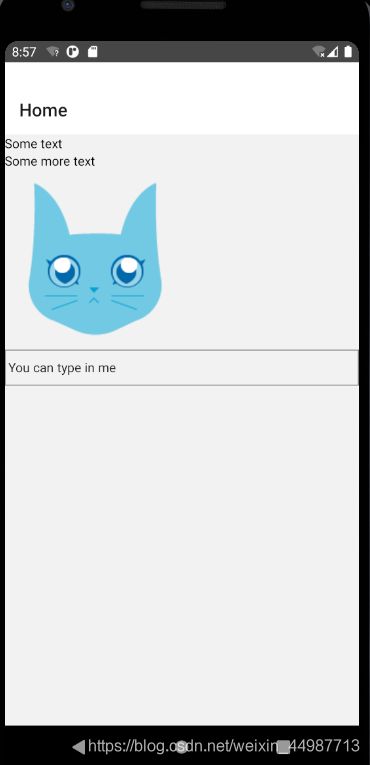
cd到项目中,新建src文件夹,在src文件夹里新建wen文件夹pages
在pages下新建home.js:
import * as React from 'react';
import { View, Text, Image, ScrollView, TextInput } from 'react-native';
const Home = () => {
  return (
    <ScrollView>
      <Text>Some text</Text>
      <View>
        <Text>Some more text</Text>
        <Image
          source={{
            uri: 'https://reactnative.dev/docs/assets/p_cat2.png',
          }}
          style={{ width: 200, height: 200 }}
        />
      </View>
      <TextInput
        style={{
          height: 40,
          borderColor: 'gray',
          borderWidth: 1
        }}
        defaultValue="You can type in me"
      />
    </ScrollView>
  );
}

export default Home;
App.js:
import 'react-native-gesture-handler';
import * as React from 'react'
import { createStackNavigator } from '@react-navigation/stack';
import { NavigationContainer } from '@react-navigation/native';
import Home from './src/pages/home'
// import MyStack from './src/route/MyStack'
const Stack = createStackNavigator();
export default function App() {
  return (
    <NavigationContainer>
      <Stack.Navigator>
        <Stack.Screen name="Home" component={Home} />
      </Stack.Navigator>
    </NavigationContainer>
  );
}
屏幕唯一需要的配置是
namme和component。您可以在堆栈导航器参考中阅读有关其他可用选项的更多信息.参考文档
createStackNavigator提供APP屏幕之间切换的能力,它是以栈的形式来管理屏幕之间的切换,新切换到的屏幕会放在栈的顶部。
详细参数与配置说明
- Stack.Navigator的配置选项:
- initialRouteName 首次加载名称
- screenOptions 屏幕的默认选项
如下示例。
<Stack.Navigator
initialRouteName="Page1"     //作为初始化页面、不写的话默认第一个screen为初始化页面
screenOptions={{                 //用来定制头部信息、根据自己需要更改
  title: '测试标题',
  headerStyle: {
    backgroundColor: '#ee7530'
  },
  headerTintColor: '#fff',
  headerTitleStyle: {
    fontWeight: 'bold',
    fontSize: 20
  }
}}>
3、keyboardHandlingEnabled
如果为false,则导航到新屏幕时,屏幕键盘不会自动关闭。默认为true
4、mode 定义渲染和过渡的样式
card:使用标准的iOS和Android屏幕过渡。这是默认值.
modal:这有两件事:设置headerMode到screen堆栈,除非指定使屏幕从 iOS底部的底部滑入,这是一种常见的iOS模式.
5、headerMode 指定标题的呈现方式
float:渲染停留在顶部的单个标题,并在更改屏幕时进行动画处理。iOS上的常见模式。
screen:每个屏幕都有一个附加的标题,标题随屏幕一起淡入和淡出。Android上的常见模式。
none :没有标题。
- Stack.Screen的配置选项
options
可用于配置导航器内的各个屏幕
title
头部标题
function StackScreen() {
  return (
    //  静态值
    <Stack.Navigator>
      <Stack.Screen
        name="Home"
        component={HomeScreen}
        options={{ title: 'My home' }}
      />
      // 动态获取
      <Stack.Screen
        name="Profile"
        component={HomeScreen}
        options={({ route }) => ({ title: route.params.name })}
      />
    </Stack.Navigator>
  );
}
/* 在组件中修改使用setOptions */
    <Button
      title="Update the title"
      onPress={() => navigation.setOptions({ title: 'Updated!' })}
    />
header
函数,返回一个React Element,显示为标题。如下示例。
    header: ({ scene, previous, navigation }) => {
          const { options } = scene.descriptor;
          const title =
            options.headerTitle !== undefined
              ? options.headerTitle
              : options.title !== undefined
              ? options.title
              : scene.route.name;

          return (
            <MyHeader
              title={title}
              leftButton={
                previous ? <MyBackButton onPress={navigation.goBack} /> : undefined
              }
              style={options.headerStyle}
            />
          );
        };
headerShown
是显示还是隐藏屏幕标题。默认情况下显示标题,除非将headerMode其设置为none。设置为 false隐藏标题。在特定屏幕上隐藏标题时,您可能还需要将headerModeprop 设置为screen。
headerTitle
字符串或返回标头要使用的React元素的函数。默认为 title 选项值.
路由跳转:
当你用一个navigator注册一个组件时,这个组件将会添加一个属性
navigation。 这个属性能够控制不同页面间的跳转。
在屏幕之间移动:
- 导航到新屏幕 :
navigation.navigate()
import * as React from 'react';
import { Button, View, Text } from 'react-native';
import { NavigationContainer } from '@react-navigation/native';
import { createStackNavigator } from '@react-navigation/stack';

function HomeScreen({ navigation }) {
  return (
    <View style={{ flex: 1, alignItems: 'center', justifyContent: 'center' }}>
      <Text>Home Screen</Text>
      <Button
        title="Go to Details"
        onPress={() => navigation.navigate('Details')}
      />
    </View>
  );
}

// ... other code from the previous section
-
多次导航到一条路线:
navigation.push()function DetailsScreen({ navigation }) { return ( <View style={{ flex: 1, alignItems: 'center', justifyContent: 'center' }}> <Text>Details Screen</Text> <Button title="Go to Details... again" onPress={() => navigation.navigate('Details')} /> </View> ); }如果你运行这段代码,你会注意到当你点击“Go to Details…”“它什么也做不了!”这是因为我们已经在Details路由上了。导航功能大致意思是“到这个屏幕”,如果你已经在那个屏幕上了,那么它什么都不做是有道理的。
让我们假设我们确实想要添加另一个details screen。在向每个路由传递一些唯一数据的情况下,这是非常常见的(稍后我们将讨论参数!)为此,我们可以将导航更改为push。这允许我们表达添加另一条路线的意图,而不考虑现有的导航历史。
<Button
  title="Go to Details... again"
  onPress={() => navigation.push('Details')}
/>
每次你调用push,我们都会添加一个新的路径到导航堆栈。当你调用navigate时,它首先尝试找到一个具有该名称的现有路由,并且只在堆栈上还没有一个新路由时才推送新路由。
-
返回 :
navigation.goBack()当可以从活动屏幕返回时,堆栈导航器提供的标题将自动包含一个后退按钮(如果导航堆栈中只有一个屏幕,那么您无法返回,因此也没有后退按钮)。
function DetailsScreen({ navigation }) {
  return (
    <View style={{ flex: 1, alignItems: 'center', justifyContent: 'center' }}>
      <Text>Details Screen</Text>
      <Button
        title="Go to Details... again"
        onPress={() => navigation.push('Details')}
      />
      <Button title="Go to Home" onPress={() => navigation.navigate('Home')} />
      <Button title="Go back" onPress={() => navigation.goBack()} />
    </View>
  );
}
完整例子:src下新建route文件夹,文件夹下新建MyStack.js
import * as React from 'react'
import { createStackNavigator } from '@react-navigation/stack';
import Home from '../pages/home'
import Project from '../pages/project'
const Stack = createStackNavigator();
function MyStack() {
    return (
      <Stack.Navigator
        initialRouteName="Home"
        headerMode="screen"
        screenOptions={{
          headerTintColor: 'white',
          headerStyle: { backgroundColor: 'green' },
        }}
      >
        <Stack.Screen
          name="Home"
          component={Home}
          options={{
            title: 'My Home',
          }}
        />
        <Stack.Screen
          name="Project"
          component={Project}
          options={{
            title: 'My Project',
          }}
        />
      </Stack.Navigator>
    );
  }
export default MyStack;
修改App.js
import 'react-native-gesture-handler';
import * as React from 'react'
import { NavigationContainer } from '@react-navigation/native';
import MyStack from './src/route/MyStack'
export default function App() {
  return (
    <NavigationContainer>
      <MyStack/>
    </NavigationContainer>
  );
}
修改pages下的home.js
import * as React from 'react';
import {Button,View} from 'react-native';

const Home = ({ navigation }) => {
  return (
    <View style={{ flex: 1, alignItems: 'center', justifyContent: 'center' }}>
      <Button title="Go to Project" onPress={() => navigation.navigate('Project')} />
   </View>

  );
}
export default Home;
pages下新增project.js
import * as React from "react";
import { StyleSheet, Text, View,Button} from "react-native";

const Separator = () => (
  <View style={styles.separator} />
);
const Project = ({ navigation }) => {
  return (
    <View style={{ flex: 1, alignItems: 'center', justifyContent: 'center' }}>
      <Text>Project Screen</Text>
      <Button
        title="Go to Project... again"
        onPress={() => navigation.push('Project')}
      />
       <Separator />
      <Button title="Go to Home" onPress={() => navigation.navigate('Home')} />
      <Separator />
      <Button title="Go back" onPress={() => navigation.goBack()} />
    </View>
  );
};

const styles = StyleSheet.create({
  separator: {
    marginVertical: 8,
    borderBottomColor: '#737373',
    borderBottomWidth: StyleSheet.hairlineWidth,
  },
});

export default Project;
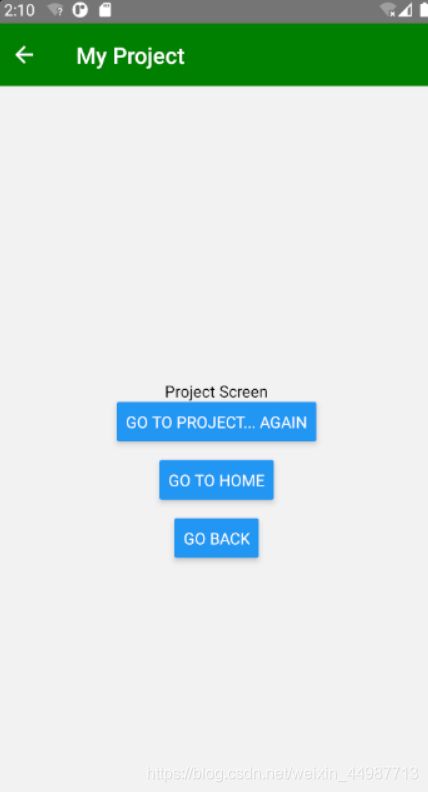
运行如图:点击按钮可以进行页面之间的跳转
总结
- navigator .navigate(‘RouteName’)将一个新的路由推送到堆栈导航器,如果它还没有在堆栈中,否则它会跳转到那个屏幕。
- 我们可以任意多次调用
navigation.push('RouteName'),它会继续推送路由。 - 标题栏将自动显示一个返回按钮,但您可以通过调用
navigation.goBack()以编程方式返回。 - 在Android上,硬件的后退按钮就像预期的那样工作您可以通过
navigation.navigate('RouteName')返回到堆栈中现有的屏幕。 - 你可以用
navigation.popToTop()返回到堆栈的第一个屏幕。 - navigation对所有屏幕组件都可用(在路由配置中定义为屏幕的组件,并由React navigation渲染为路由)。
向路由传递参数
这有两个步骤:
-
通过将参数放在一个对象中作为导航的第二个参数来传递给路由navigation.navigate。
navigation.navigate('RouteName', { /* params go here */ }) -
读取屏幕组件中的参数:
route.params
我们建议您传递的参数是json可序列化的。这样,您就能够使用状态持久性,并且您的屏幕组件将拥有实现深层链接的正确契约。
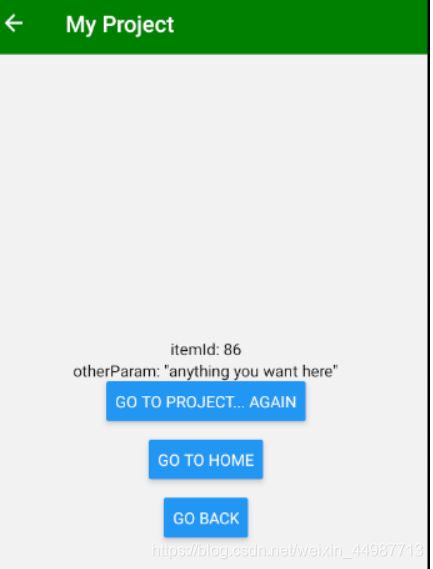
const Home = ({ navigation }) => {
  return (
    <View style={{ flex: 1, alignItems: 'center', justifyContent: 'center'}}>
      <Button title="Go to Project"
      onPress={() => {
        /* 1. 传递参数 */
        navigation.navigate('Project', {
          itemId: 86,
          otherParam: 'anything you want here',
        });
      }}
      />
   </View>
  );
}
const Project = ({ route,navigation }) => {
     /* 2. 接收参数 */
  const {itemId,otherParam}=route.params
  return (
    <View style={{ flex: 1, alignItems: 'center', justifyContent: 'center' }}>
       <Text>itemId: {JSON.stringify(itemId)}</Text>
      <Text>otherParam: {JSON.stringify(otherParam)}</Text>
      <Button
        title="Go to Project... again"
        onPress={() => navigation.push('Project')}
      />
       <Separator />
      <Button title="Go to Home" onPress={() => navigation.navigate('Home')} />
      <Separator />
      <Button title="Go back" onPress={() => navigation.goBack()} />
    </View>
  );
};
更新参数
屏幕也可以更新它们的参数,就像它们可以更新它们的状态一样。navigation.setParams方法可以更新屏幕的参数。有关setParams的更多细节,请参阅APl参考文档。
基础使用:
navigation.setParams({
  query: 'someText',
})
注意:避免使用setParams来更新屏幕选项,如title等。如果需要更新选项,请使用setoptions。
初始化参数
您还可以向屏幕传递一些初始参数。如果导航到此屏幕时没有指定任何参数,将使用初始参数。它们也会与你通过的任何参数浅合并。初始参数可以用initialParams来指定:
<Stack.Screen
  name="Details"
  component={DetailsScreen}
  initialParams={{ itemId: 42 }}
/>
向前一个屏幕传递参数
参数不仅在向新屏幕传递数据时有用,在向前一个屏幕传递数据时也很有用。例如,假设您有一个带有create post按钮的屏幕,而create post按钮打开一个新屏幕来创建一个帖子。创建post之后,您希望将post的数据传递回上一个屏幕。
要实现这一点,您可以使用navigate方法,如果屏幕已经存在,它的作用就像goBack。你可以通过params with navigate来返回数据:
const Home = ({ navigation,route }) => {
  React.useEffect(() => {
    if (route.params?.post) {
      // Post updated, do something with `route.params.post`
      // For example, send the post to the server
    }
  }, [route.params?.post]);
  return (
    <View style={{ flex: 1, alignItems: 'center', justifyContent: 'center'}}>
      <Button title="Go to Project"
      onPress={() => {
        /* 1. Navigate to the Details route with params */
        navigation.navigate('Project', {
          itemId: 86,
          otherParam: 'anything you want here',
        });
      }}
      />
       <Button
        title="Create post"
        onPress={() => navigation.navigate('CreatePost')}
      />
       <Text style={{ margin: 10 }}>Post: {route.params?.post}</Text>
   </View>
  );
}

const  CreatePostScreen=({ navigation, route })=> {
    const [postText, setPostText] = React.useState('');
    return (
      <>
        <TextInput
          multiline
          placeholder="What's on your mind?"
          style={{ height: 200, padding: 10, backgroundColor: 'white' }}
          value={postText}
          onChangeText={setPostText}
        />
        <Button
          title="Done"
          onPress={() => {
            // Pass params back to home screen
            navigation.navigate('Home', { post: postText });
          }}
        />
      </>
    );
  }
将参数传递给嵌套的导航器
如果您有嵌套的导航器,则需要以不同的方式传递参数。例如,假设 Account屏幕中有一个导航器,并希望将参数传递给该导航器中的Settings屏幕。然后你可以像这样传递参数: 参考文档
navigation.navigate('Account', {
  screen: 'Settings',
  params: { user: 'jane' },
});
参数应该包含什么?
理解什么样的数据应该出现在参数中是很重要的。参数就像是屏幕的选项。它们应该只包含用于配置屏幕上显示内容的信息。避免传递将在屏幕上显示的完整数据(例如传递一个用户id而不是用户对象)。也要避免传递被多个屏幕使用的数据,这样的数据应该在全局存储中。您还可以将route对象视为URL。如果你的屏幕上有一个URL, URL中应该有什么?参数个数不应该包含您认为不应该出现在URL中的数据。这通常意味着您应该保留尽可能少的数据,以确定屏幕是什么。想象一下访问一个购物网站,当您看到产品列表时,URL通常包含类别名称、分类类型、任何过滤器等,它不包含屏幕上显示的实际产品列表。例如,如果你有一个Profile屏幕。当导航到它时,你可能会在参数中传递user对象:
// Don't do this
navigation.navigate('Profile', {
  user: {
    id: 'jane',
    firstName: 'Jane',
    lastName: 'Done',
    age: 25,
  },
});
这看起来很方便,并且允许您使用route.params.user访问用户对象, 然而,这并不合理。
用户对象之类的数据应该放在全局存储中,而不是导航状态。否则,您将在多个位置复制相同的数据。这可能会导致错误,比如即使导航后用户对象改变了,配置文件屏幕也会显示过时的数据.
更好的方法是只在参数中传递用户的ID:
navigation.navigate('Profile', { userId: 'jane' });
现在,您可以使用传递的userId从全局存储中获取用户。这消除了许多问题,如过时的数据或有问题的url
总结
- navigate()和push()可以通过第二个参数向目标路由传递参数 。例如
navigation.navigate('RouteName', { paramName: 'value' }). - 通过
route.params读取传递过来的参数 - 可以通过
navigation.setParams更新参数 - 初始参数可以通过屏幕上的
initialParams属性传递 - 参数应该包含显示屏幕所需的最小数据
配置header bar(标题栏)
Screen组件接受options属性,这是一个对象或一个返回对象的函数,该对象包含各种配置选项。我们使用的标题是title,如下面的示例所示:
function StackScreen() {
  return (
    <Stack.Navigator>
      <Stack.Screen
        name="Home"
        component={HomeScreen}
        options={{ title: 'My home' }}
      />
    </Stack.Navigator>
  );
}
当我们需要在title中使用参数时,我们需要给options属性传递一个函数
<Stack.Screen
        name="Profile"
        component={ProfileScreen}
        options={({ route }) => ({ title: route.params.name })}
      />
传入options函数的参数是一个具有以下属性的对象:
navigation- The navigation prop for the screen.route- The route prop for the screen
多数情况下我们只使用route,当然也不排除使用navigation 的可能
使用setOptions更新options
通常有必要从安装的屏幕组件本身更新options的选项配置。我们可以使用navigation.setOptions来实现这一点
<Button
  title="Update the title"
  onPress={() => navigation.setOptions({ title: 'Updated!' })}
/>
调整header styles
在定制header样式时,需要使用三个关键属性:headerstyle、headerTintcolor和headerTitlestyle
- headerStyle:一个样式对象,它将被应用到包装header的视图中。如果你设置了backgroundColor,那将是你标题的颜色
- headerTintColor:back按钮和title都使用这个属性作为它们的颜色。在下面的例子中,我们设置浅色为白色(#fff),所以后退按钮和头部标题将是白色的。
- headerTitlestyle:如果我们想为标题定制fontFamily, fontWeight和其他文本样式属性,我们可以使用这个来实现。
function StackScreen() {
  return (
    <Stack.Navigator>
      <Stack.Screen
        name="Home"
        component={HomeScreen}
        options={{
          title: 'My home',
          headerStyle: {
            backgroundColor: '#f4511e',
          },
          headerTintColor: '#fff',
          headerTitleStyle: {
            fontWeight: 'bold',
          },
        }}
      />
    </Stack.Navigator>
  );
}
跨屏幕共享常见options
通常需要在多个屏幕上以类似的方式配置header。我们可以将配置移到stack navigator下的screenOptions中
function StackScreen() {
  return (
    <Stack.Navigator
      screenOptions={{
        headerStyle: {
          backgroundColor: '#f4511e',
        },
        headerTintColor: '#fff',
        headerTitleStyle: {
          fontWeight: 'bold',
        },
      }}
    >
      <Stack.Screen
        name="Home"
        component={HomeScreen}
        options={{ title: 'My home' }}
      />
    </Stack.Navigator>
  );
}
用自定义组件替换标题
有时您需要更多的控制,而不仅仅是更改标题的文本和样式——例如,您可能想要渲染一个图像来代替标题,或者将标题变成一个按钮。在这些情况下,您可以完全覆盖用于标题的组件,并提供自己的组件。
function LogoTitle() {
  return (
    <Image
      style={{ width: 50, height: 50 }}
      source={require('@expo/snack-static/react-native-logo.png')}
    />
  );
}
function StackScreen() {
  return (
    <Stack.Navigator>
      <Stack.Screen
        name="Home"
        component={HomeScreen}
        options={{ headerTitle: props => <LogoTitle {...props} /> }}
      />
    </Stack.Navigator>
  );
}
why headerTitle when we provide a component and not title 因为headerTitle 是 stack navigator一个特定的属性
headerTitle默认为一个显示标题的文本组件.
总结
options即可以是个对象也可以是个函数,当它是一个函数时,会被提供navigation and route 两个对象,可以接收参数。
可以自定义标题,也可以通过screenOptions共享一些设置。
header添加一个按钮
与标题交互最常见的方式是点击标题左侧或右侧的按钮。让我们在页眉的右侧添加一个按钮(这是整个屏幕上最难触摸的地方之一,取决于手指和手机的大小,但也是放置按钮的正常位置)。
function StackScreen() {
  return (
    <Stack.Navigator>
      <Stack.Screen
        name="Home"
        component={HomeScreen}
        options={{
          headerTitle: props => <LogoTitle {...props} />,
          headerRight: () => (
            <Button
              onPress={() => alert('This is a button!')}
              title="Info"
              color="#fff"
            />
          ),
        }}
      />
    </Stack.Navigator>
  );
}
header和屏幕组件的交互
在组件内部使用navigation.setOptions
function HomeScreen({ navigation }) {
  const [count, setCount] = React.useState(0);

  React.useLayoutEffect(() => {
    navigation.setOptions({
      headerRight: () => (
        <Button onPress={() => setCount(c => c + 1)} title="Update count" />
      ),
    });
  }, [navigation]);

  return <Text>Count: {count}</Text>;
}
TabNavigator导航
底部导航栏,有的app开发的时候需要用到底部导航栏切换。使用方法跟StackNavigator类似。
可能移动应用中最常见的导航风格是基于标签的导航。这可以是屏幕底部的标签页,也可以是标题下方的顶部标签页(甚至可以代替标题页)。
这个向导涵盖了createBottomTabNavigator。你也可以使用createaterialbottomtabnavigator和createaterialtoptabnavigator来添加标签到你的应用程序中。
首先安装依赖:
npm install @react-navigation/bottom-tabs
或yarn add @react-navigation/bottom-tabs
import * as React from 'react';
import { Text, View } from 'react-native';
import { NavigationContainer } from '@react-navigation/native';
import { createBottomTabNavigator } from '@react-navigation/bottom-tabs';

function HomeScreen() {
  return (
    <View style={{ flex: 1, justifyContent: 'center', alignItems: 'center' }}>
      <Text>Home!</Text>
    </View>
  );
}

function SettingsScreen() {
  return (
    <View style={{ flex: 1, justifyContent: 'center', alignItems: 'center' }}>
      <Text>Settings!</Text>
    </View>
  );
}

const Tab = createBottomTabNavigator();

function MyTabs() {
  return (
    <Tab.Navigator>
      <Tab.Screen name="Home" component={HomeScreen} />
      <Tab.Screen name="Settings" component={SettingsScreen} />
    </Tab.Navigator>
  );
}

export default function App() {
  return (
    <NavigationContainer>
      <MyTabs />
    </NavigationContainer>
  );
}
详细参数与配置说明
Tab.Navigator的配置
- initialRouteName
导航首次加载时要渲染的路线的名称。- screenOptions
导航中用于屏幕的默认选项。- backBehavior
后退按钮处理的行为。
- initialRoute: 返回初始标签
- order: 返回上一个标签页(按照标签页中显示的顺序)
- history: 返回上次访问的标签页
- none:不处理后退按钮
- lazy
默认为true。如果为false,则所有选项卡都将立即呈现。如果为true,则仅在首次使选项卡处于活动状态时才显示它们。注意:选项卡不会在后续访问时重新呈现。- tabBar
返回React元素以显示为选项卡栏的函数- tabBarOptions
包含选项卡栏组件的道具的对象。它可以包含以下属性:
- activeTintColor -活动标签的标签和图标颜色。
- activeBackgroundColor -活动标签的背景颜色。
- inactiveTintColor -非活动标签的标签和图标颜色。
- inactiveBackgroundColor -非活动标签的背景颜色。
- showLabel -是否显示标签标签,默认为true。
- showIcon -是否显示标签图标,默认为true。
- style -标签栏的样式对象。
- labelStyle -标签标签的样式对象。
- labelPosition-在何处显示与标签图标相关的标签标签。可用值为beside-icon和below-icon。默认为beside-icon。
- tabStyle -标签的样式对象。
- allowFontScaling -标签字体是否应缩放以符合“文本大小”辅助功能设置,默认为true。
- adaptive-标签图标和标签对齐方式是否应根据屏幕尺寸而改变?true对于iOS 11 false,默认值为。如果,标签图标和标签始终垂直对齐。当时true,标签图标和标签在平板电脑上水平对齐。
- safeAreaInset-覆盖forceInset道具。默认为{ bottom: ‘always’, top: ‘never’ }。可用的键top | bottom | left | right随值一起提供’always’ | ‘never’。
- keyboardHidesTabBar-默认为false。如果true在键盘打开时隐藏标签栏。
options 可用于配置导航内的各个屏幕。支持的选项有:
- title
通用标题可以用作备用headerTitle和tabBarLabel。- tabBarVisible
true或false显示或隐藏标签栏(如果未设置),则默认为true。- tabBarIcon
给定的函数{ focused: boolean, color: string, size: number }返回一个React.Node,以显示在选项卡栏中。- tabBarLabel
显示在选项卡栏中的选项卡的标题字符串或给定的函数将{ focused: boolean, color: string }返回React.Node,以显示在选项卡栏中。未定义时,使用场景title。- tabBarButton
该函数返回一个React元素以呈现为选项卡按钮。它包装图标和标签并实现onPress。TouchableWithoutFeedback默认情况下渲染。tabBarButton: props =>会TouchableOpacity改为使用。 - tabBarAccessibilityLabel
选项卡按钮的辅助功能标签。当用户点击选项卡时,屏幕阅读器会读取该内容。如果您没有标签的标签,建议您进行设置。- tabBarTestID
在测试中找到此选项卡按钮的ID。- unmountOnBlur
离开该屏幕时是否应卸载该屏幕。卸载屏幕将重置屏幕中的任何本地状态以及屏幕中嵌套导航器的状态。默认为false。
自定义选项卡外观
react-native-vector-icons使用方法:
yarn add react-native-vector-icons   ##安装

react-native link react-native-vector-icons  ##自动连接
要使用 ttf 里面的 iconfont ,首先要先知道里面有什么图标,到 node_modules\react-native-vector-icons\glyphmaps 里面可以看到很多 json 文件,里面都是图标的字符串对应表。
或者查看node_modules/react-native-vector-icons文件夹下面的.js.flow文件,
比如node_modules/react-native-vector-icons/Ionicons.js.flow
简单的使用:
import Ionicons from 'react-native-vector-icons/Ionicons';
<Ionicons name="fast-food-sharp" size={35} color="black" ></Ionicons>
function MyStack(){
  return(
      <Tab.Navigator  screenOptions={({ route }) => ({
        tabBarIcon: ({ focused, color, size }) => {
          let iconName;
          if (route.name === 'Home') {
            iconName = focused
              ? 'female'
              : 'file-tray-full-sharp';
          } else if (route.name === 'Project') {
            iconName = focused ? 'flame' : 'funnel-sharp';
          }

          // You can return any component that you like here!
          return <Ionicons name={iconName} size={size} color={color} />;
        },
      })}
      tabBarOptions={{
        activeTintColor: 'tomato',
        inactiveTintColor: 'gray',
      }}>
        <Tab.Screen name="Home" component={Home} />
        <Tab.Screen name="Project" component={Project} />
      </Tab.Navigator>
  )
}
tabBarIcon是底部标签导航器中支持的选项。所以可以在屏幕组件的options
prop中使用它,但在这种情况下,Tab.Navigator为了方便集中配置图标,我们选择把它放在screenOptions 属性中。tabBarIcon是一个函数,用于设置
focused状态,color, 和size
参数。如果您进一步查看配置,您将看到选项卡选项、activeTintColor和inactiveTintColor。这些默认为iOS平台的默认值,但你可以在这里更改。传递到tabBarIcon的颜色是活动的或不活动的,这取决于focused状态(focused是活动的)。size是标签栏所期望的图标的大小。阅读完整的APl参考以获得更多关于createBottomTabNavigator配置选项的信息。
在图标中添加徽章
<Tab.Screen name="Home" component={HomeScreen} options={{ tabBarBadge: 3 }} />

从Ul的角度来看,这个组件已经可以使用了,但是您仍然需要找到一些方法来正确地从其他地方传递徽章计数,比如使用React上下文、Redux、MobX或事件发射器。
tabs之间的跳转
从一个标签切换到另一个标签有一个熟悉的api:
navigation .navigate
const Project = ({ route,navigation }) => {
// const {itemId,otherParam}=route.params
return (
<View style={{ flex: 1, justifyContent: 'center', alignItems: 'center' }}>
<Text>Project!</Text>
<Button title="Go to Home" onPress={() => navigation.navigate('Home')} />
</View>
);
};
const Home = ({ navigation,route }) => {
return (
<View style={{ flex: 1, justifyContent: 'center', alignItems: 'center' }}>
<Text>Home!</Text>
{/* 组合使用
原生思维是TabNavigator中嵌套StackNavigator,但是这里建议StackNavigator中嵌套TabNavigator。因为可以避免控制TabNavigator的tabbar显示和隐藏问题。
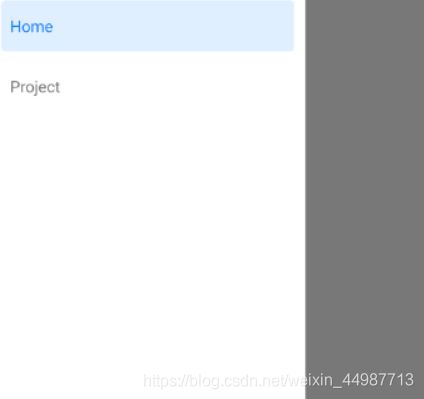
Drawer navigation
导航常用的模式是从左(有时是从右)的抽屉在屏幕之间导航。
安装依赖:
npm install @react-navigation/drawer
或 yarn add @react-navigation/drawer
import { createDrawerNavigator } from '@react-navigation/drawer';
const Drawer=createDrawerNavigator();
function MyStack(){
  return(
      <Drawer.Navigator initialRouteName="Home">
        <Drawer.Screen name="Home" component={Home} />
        <Drawer.Screen name="Project" component={Project} />
      </Drawer.Navigator>
  )
}
开合抽屉
navigation.openDrawer();
navigation.closeDrawer();
切换抽屉
navigation.toggleDrawer();
import { DrawerActions } from '@react-navigation/native';
import {
  createDrawerNavigator,
  DrawerContentScrollView,
  DrawerItemList,
  DrawerItem,
} from '@react-navigation/drawer';
import Ionicons from 'react-native-vector-icons/Ionicons';
import Home from '../pages/home'
import Project from '../pages/project'
const Drawer=createDrawerNavigator();
function CustomDrawerContent(props) {
  return (
    <DrawerContentScrollView {...props}>
      <DrawerItemList {...props} />
      <DrawerItem
        label="Close drawer"
        onPress={() => props.navigation.dispatch(DrawerActions.closeDrawer())}
      />
      <DrawerItem
        label="Toggle drawer"
        onPress={() => props.navigation.dispatch(DrawerActions.toggleDrawer())}
      />
    </DrawerContentScrollView>
  );
}

function MyStack(){
  return(
      <Drawer.Navigator initialRouteName="Home" drawerContent={props => <CustomDrawerContent {...props} />}>
        <Drawer.Screen name="Home" component={Home} />
        <Drawer.Screen name="Project" component={Project} />
      </Drawer.Navigator>
  )
}
如果想确定抽屉是打开的还是关闭的,可以做以下操作:
import { useIsDrawerOpen } from '@react-navigation/drawer';

// ...

const isDrawerOpen = useIsDrawerOpen();
身份验证流
大多数应用程序都要求用户以某种方式进行身份验证,才能访问与用户相关的数据或其他私人内容。通常,流程如下所示:
用户打开应用程序。应用程序从加密的持久存储加载一些身份验证状态(例如,Securestore)。当状态加载后,用户会看到身份验证 屏幕或主应用程序,这取决于是否加载了有效的身份验证状态当用户签出时,我们清除身份验证状态并将其发送回身份验证屏幕。
我们可以根据某些条件定义不同的屏幕。例如,如果用户已登录,我们可以定义Home Profile, Settings等。如果用户没有登录,我们可以定义 SignIn and SignUp屏幕。
例如:
isSignedIn ? (
  <>
    <Stack.Screen name="Home" component={HomeScreen} />
    <Stack.Screen name="Profile" component={ProfileScreen} />
    <Stack.Screen name="Settings" component={SettingsScreen} />
  </>
) : (
  <>
    <Stack.Screen name="SignIn" component={SignInScreen} />
    <Stack.Screen name="SignUp" component={SignUpScreen} />
  </>
)
在导航器中,可以有条件地定义适当的屏幕。
假设我们有三个页面:
SplashScreen-loading页面.SignInScreen- 没有登陆显示HomeScreen- 登陆显示
if (state.isLoading) {
  // We haven't finished checking for the token yet
  return <SplashScreen />;
}
return (
  <Stack.Navigator>
    {state.userToken == null ? (
      // No token found, user isn't signed in
      <Stack.Screen
        name="SignIn"
        component={SignInScreen}
        options={{
          title: 'Sign in',
          // When logging out, a pop animation feels intuitive
          // You can remove this if you want the default 'push' animation
          animationTypeForReplace: state.isSignout ? 'pop' : 'push',
        }}
      />
    ) : (
      // User is signed in
      <Stack.Screen name="Home" component={HomeScreen} />
    )}
  </Stack.Navigator>
);
在上面的代码片段中,isLoading意味着我们仍然在检查是否有令牌。这通常可以通过检查Securestore中是否有令牌并验证该令牌来实现。在我们获得令牌之后,如果它是有效的,我们需要设置userToken。我们还有另一个状态叫isSignout在注销时有不同的动画。
我们为每种情况有条件地定义一个屏幕。但是你也可以定义多个屏幕。例如,您可能希望在用户未登录时定义密码重置、注册等屏幕。类似地,对于登录后可访问的屏幕,您可能有多个屏幕。我们可以使用React.Fragment(其简写语法:<>。)定义多个屏幕:
state.userToken == null ? (
  <>
    <Stack.Screen name="SignIn" component={SignInScreen} />
    <Stack.Screen name="SignUp" component={SignUpScreen} />
    <Stack.Screen name="ResetPassword" component={ResetPassword} />
  </>
) : (
  <>
    <Stack.Screen name="Home" component={HomeScreen} />
    <Stack.Screen name="Profile" component={ProfileScreen} />
  </>
);
实现恢复令牌的逻辑
举个栗子: 三个状态
- isLoading:检测SecureStore是否有 token时设为true
- isSignout:user is signing out ,set true or set false
- userToken:非空为已登录,否则返回到登陆界面
We’ll use
React.useReducerandReact.useContext
首先先创建一个context :
import * as React from 'react';

const AuthContext = React.createContext();
import * as React from 'react';
import * as SecureStore from 'expo-secure-store';
import { Button, Text, TextInput, View } from 'react-native';
import { NavigationContainer } from '@react-navigation/native';
import { createStackNavigator } from '@react-navigation/stack';

const AuthContext = React.createContext();

function SplashScreen() {
  return (
    <View>
      <Text>Loading...</Text>
    </View>
  );
}

function HomeScreen() {
  const { signOut } = React.useContext(AuthContext);

  return (
    <View>
      <Text>Signed in!</Text>
      <Button title="Sign out" onPress={signOut} />
    </View>
  );
}

function SignInScreen() {
  const [username, setUsername] = React.useState('');
  const [password, setPassword] = React.useState('');

  const { signIn } = React.useContext(AuthContext);

  return (
    <View>
      <TextInput
        placeholder="Username"
        value={username}
        onChangeText={setUsername}
      />
      <TextInput
        placeholder="Password"
        value={password}
        onChangeText={setPassword}
        secureTextEntry
      />
      <Button title="Sign in" onPress={() => signIn({ username, password })} />
    </View>
  );
}

const Stack = createStackNavigator();

export default function App({ navigation }) {
  const [state, dispatch] = React.useReducer(
    (prevState, action) => {
      switch (action.type) {
        case 'RESTORE_TOKEN':
          return {
            ...prevState,
            userToken: action.token,
            isLoading: false,
          };
        case 'SIGN_IN':
          return {
            ...prevState,
            isSignout: false,
            userToken: action.token,
          };
        case 'SIGN_OUT':
          return {
            ...prevState,
            isSignout: true,
            userToken: null,
          };
      }
    },
    {
      isLoading: true,
      isSignout: false,
      userToken: null,
    }
  );

  React.useEffect(() => {
    // Fetch the token from storage then navigate to our appropriate place
    const bootstrapAsync = async () => {
      let userToken;
      try {
       userToken = await SecureStore.getItemAsync('userToken');
      } catch (e) {
        // Restoring token failed
      }

      dispatch({ type: 'RESTORE_TOKEN', token: userToken });
    };

    bootstrapAsync();
  }, []);

  const authContext = React.useMemo(
    () => ({
      signIn: async (data) => {
        dispatch({ type: 'SIGN_IN', token: 'dummy-auth-token' });
      },
      signOut: () => dispatch({ type: 'SIGN_OUT' }),
      signUp: async (data) => {

        dispatch({ type: 'SIGN_IN', token: 'dummy-auth-token' });
      },
    }),
    []
  );

  return (
    <AuthContext.Provider value={authContext}>
      <NavigationContainer>
        <Stack.Navigator>
          {state.isLoading ? (
            // We haven't finished checking for the token yet
            <Stack.Screen name="Splash" component={SplashScreen} />
          ) : state.userToken == null ? (
            // No token found, user isn't signed in
            <Stack.Screen
              name="SignIn"
              component={SignInScreen}
              options={{
                title: 'Sign in',
                // When logging out, a pop animation feels intuitive
                animationTypeForReplace: state.isSignout ? 'pop' : 'push',
              }}
            />
          ) : (
            // User is signed in
            <Stack.Screen name="Home" component={HomeScreen} />
          )}
        </Stack.Navigator>
      </NavigationContainer>
    </AuthContext.Provider>
  );
}
支持安全区域
虽然React Native导出了一个SafeAreaView组件,但它有一些固有的问题,例如,如果一个包含安全区的屏幕是动画的,它会导致跳跃行为。此外,该组件只支持ios 10+,不支持旧的ios版本或Android。我们建议使用react-native-safe-area-context库以更可靠的方式处理安全区。
yarn add react-native-safe-area-context
import { SafeAreaProvider, SafeAreaView } from 'react-native-safe-area-context';

function Demo() {
  return (
    <SafeAreaView
      style={{ flex: 1, justifyContent: 'space-between', alignItems: 'center' }}
    >
      <Text>This is top text.</Text>
      <Text>This is bottom text.</Text>
    </SafeAreaView>
  );
}
export default function App() {
  return (
    <SafeAreaProvider>
      <NavigationContainer>{/*(...) */}</NavigationContainer>
    </SafeAreaProvider>
  );
}
使用hook来获得更多的控制
import { useSafeAreaInsets } from 'react-native-safe-area-context';

function Demo() {
  const insets = useSafeAreaInsets();

  return (
    <View
      style={{
        paddingTop: insets.top,
        paddingBottom: insets.bottom,

        flex: 1,
        justifyContent: 'space-between',
        alignItems: 'center',
      }}
    >
      <Text>This is top text.</Text>
      <Text>This is bottom text.</Text>
    </View>
  );
}


