Java - 阻塞队列和定时器实现
阻塞队列和定时器
- 阻塞队列
-
- 什么是阻塞队列
- 生产者消费者模型
- 标准库中的阻塞队列
- 阻塞队列的实现
- 定时器
-
- 什么是定时器
- 标准库中的定时器
- 实现定时器
阻塞队列
什么是阻塞队列
阻塞队列是线程安全的数据结构,多个线程可以同时进行读写操作而不会导致数据损坏或不一致.
阻塞操作:
- 当队列为空时,尝试从队列中取出元素的操作会被阻塞,直到队列中有元素时才可用.
- 当队列为满时,尝试从队列中添加元素的操作也会被阻塞,直到队列中有足够的空间.
生产者消费者模型
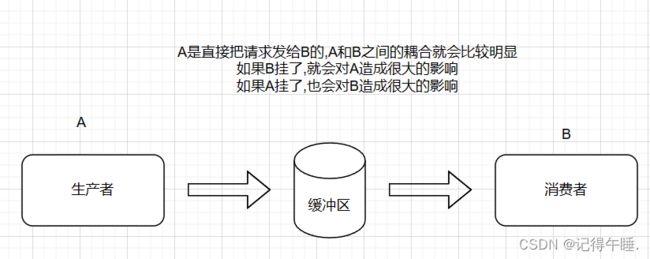
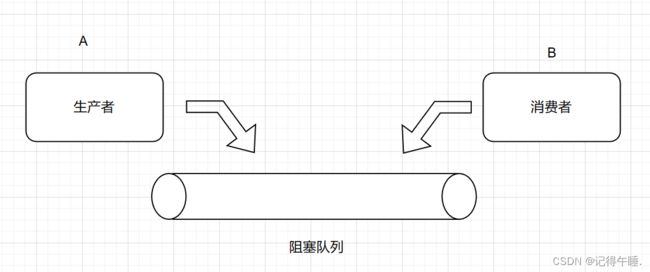
阻塞队列常用于实现生产者 - 消费者模型,其中生产者线程负责向队列中添加数据,而消费者线程负责从队列中取出数据,这种模型就有效地解耦了生产者和消费者之间的工作,提高了系统的并发性.
生产者-消费者模型的优势:
1.解耦合:降低模块之间的耦合,使他们能够独立进行工作
如果不使用阻塞队列降低模块之间的解耦合,那么生产者和消费者只见的耦合较差,因为需要直接交互和共享资源,会影响到线程之间的管理.
如果使用阻塞队列,生产者线程将生产的物品放入到阻塞队列中,而消费者线程从阻塞队列中取出物品进行消费,那么两者之间就不需要直接交互,就通过阻塞队列实现了解耦合.
2.削峰填谷:平衡生产者和消费者之间的速度差异
削峰:当生产者生产物品的速度远超消费者的处理速度时,多余的物品会存在于阻塞队列中,从而是实现了对生产者峰值的限制,避免资源的堆积和浪费
填谷:当消费者的消费速度大于生产者生产物品的速度时,阻塞队列中的物品会供给消费者进行处理,保证消费者始终都会有任务执行,从而提高了效率和资源利用.
标准库中的阻塞队列
在Java标准库中内置了阻塞队列,如果我们需要使用阻塞队列,可以使用标准库中阻塞队列
- BlockingQueue是一个接口,真正实现类的是LinkedBlockingQueue.
- put方法用来入队列,take用于出队列
- BlockingQueue也有offer,poll,peek方法,但是这些方法都不带有阻塞功能.
public class demo {
    public static void main(String[] args) throws InterruptedException {
        BlockingQueue<String> queue = new LinkedBlockingQueue<>();
        queue.put("hello");
        String elem = queue.take();
        System.out.println(elem);
        elem = queue.take();//队列中没有元素,会产生阻塞
        System.out.println(elem);
    }
}
阻塞队列的实现
//实现阻塞队列
class MyBlockingQueue {
    //使用数组,保存元素
    private String[] items = new String[4];
    //指向队列头部
    volatile private int head = 0;//加上volatile,保证内存可见性,线程修改时,其他线程可以观察到.
    //指向队列尾部,队列中的有效元素[head,tail)
    //当head和tail相等时,就是一个空的队列.
    volatile private int tail = 0;
    //表示元素个数
    volatile int size = 0;
    //入队列
    public void put(String elem) throws InterruptedException {
        //保证原子性,加上锁,此处的加锁,相当于把synchronized写到方法上了.
        synchronized (this) {
//            if (size >= items.length) {
//                //return;
//                //队列满了,阻塞
//                this.wait();
//            }
            //当多个线程等待同一个条件时,可能会出现虚假唤醒(没有明确的通知和中断)的情况,线程被唤醒,尽管条件没有被满足,
            //导致了线程在不应该的执行情况下执行,就破环了逻辑性,使数据丢失或损坏
            //当线程被唤醒后,再次检查条件是否满足
            while (size >= items.length) {
                //return;
                //队列满了,阻塞
                this.wait();
            }
            items[tail] = elem;//入队列
            tail++;
            //如果tail超过队列最大容量,将重新设置为0,实现循环队列效果.
            if (tail >= items.length) {
                tail = 0;
            }
            size++;
            //用来唤醒队列为空的阻塞情况
            this.notify();
        }
    }
    //出队列
    public String take() throws InterruptedException {
        synchronized (this) {
//            if (size == 0) {
//                //return null;
//                this.wait();
//            }
            while (size == 0) {
               this.wait();
            }
            String elem = items[head];
            head++;
            if (head >= items.length) {
                head = 0;
            }
            size--;
            //使用notify来唤醒队列满的阻塞情况
            this.notify();
            return elem;
        }
    }
}
public class dmeo1 {
    public static void main(String[] args) throws InterruptedException {
        MyBlockingQueue queue = new MyBlockingQueue();
        queue.put("aaa");
        queue.put("bbb");
        queue.put("ccc");
        String elem = queue.take();
        System.out.println(elem);
        elem = queue.take();
        System.out.println(elem);
        elem = queue.take();
        System.out.println(elem);
        elem = queue.take();
        System.out.println(elem);
    }
}
定时器
什么是定时器
定时器类似于"闹钟",当设置了一个指定的时间之后,就执行某个设定好的代码,比如网络通信,如果对方500ms没有返回数据,话就断开链接尝试重连.
标准库中的定时器
//定时器
public class demo4 {
    public static void main(String[] args) {
        Timer timer = new Timer();
        //给timer中注册的这个任务,不是在schedule的线程中执行的,而是通过Timer内部的线程,负责只执行.
        timer.schedule(new TimerTask() {
            @Override
            public void run() {
                System.out.println("定时任务执行");
            }
        },3000);
        System.out.println("开始运行");
    }
}
//开始运行
//定时任务执行
Timer内部有自己的线程,为了保证随时可以处理安排新的任务,这个线程会继续执行,并且这个线程是一个前台线程.
实现定时器
定时器构成:
- 要先有一个带有优先级的阻塞队列,因为阻塞队列中的任务都是有自己的执行时间的,要先找出时间最小时间.
- 队列中的每一个元素都是一个Task(任务)对象
- Task(任务)中带有一个时间属性,对手就是即将要执行的任务
4.需要有一个worker线程一直扫描队首元素,查看队首是否需要执行
1 ) 创建一个TimeTask类提供核心接口schedule,表示一个任务,并且执行任务的内容以及任务实际的执行时间(使用时间戳来表示,在schedule时候,先获取到当前的系统时间,在这个时间基础上,加上delay(延期)时间间隔,就可以获取到任务执行的时间.
2 )使用数据结构,把多个TimerTask组织起来,如果我们使用LIst(数组或者链表)组织TimerTask的话,如果说任务特别多,如何确定执行哪个任务,什么时候能够执行任务,这样的话就需要创建一个线程,不停的对上述List进行遍历,查看每个元素,是否到达了时间,时间到就执行,时间没到就跳过下一个.很显然,这样的思路并不好,如果任务的时间都还为时尚早,那么在时间到达之间,需要不停的反复扫描线程,及其消耗cpu.
使用堆(优先级队列)进行优化处理:1.不需要扫描所有的任务,只需要注意执行任务时间最短的任务,队首元素就是时间最小的任务.2.针对任务的扫描,也不必反复执行,只需要在获取队首元素的时候,和当前系统做个差值,根据这个差值来决定休眠或者等待时间,在任务到达之前,不会进行重复扫描.就提高了效率,减少了资源的利用率,避免了不必要的cpu浪费.
//创建一个类,描述定时器中的一个任务
class MyTimerTask implements Comparable<MyTimerTask>{
    //任务什么时候执行,毫米级的时间戳
    private long time;
    //任务具体是什么
    private Runnable runnable;

    public MyTimerTask(Runnable runnable, long delay) {
        //delay是一个相对的时间差,例如3000这样的数值
        //构造time根据当前系统时间和delay进行构造
        time = System.currentTimeMillis() + delay;
        this.runnable = runnable;
    }

    public long getTime() {
        return time;
    }

    public void setTime(long time) {
        this.time = time;
    }

    public Runnable getRunnable() {
        return runnable;
    }

    @Override
    public int compareTo(MyTimerTask o) {
        //认为时间小的,优先级高,时间小的,会放到队首
        //此处需要强转time是long类型
        return (int)(this.time-o.time);
    }
}

    //定时器类的本体
    class MyTimer {
        //使用优先级队列,描述任务
        private PriorityQueue<MyTimerTask> queue = new PriorityQueue<>();
        //定时器的核心方法,把要执行的任务添加到队列中.
        public void  schedule(Runnable runnable,long delay) {
            synchronized (this) {
                MyTimerTask task = new MyTimerTask(runnable, delay);
                queue.offer(task);
                //每次来新的任务,唤醒扫描线程
                this.notify();
            }
        }
        //构造一个"扫描线程",一方面负责监控队首元素是否到时间点,是否要执行,
        // 另外一方是到达时间点后,调用Runnable的Run方法完成任务
        public MyTimer() {
            Thread t = new Thread(() ->{
                while (true) {
                    try {
                  synchronized (this) {
//                      if (queue.isEmpty()) {
//                          //队列为空,不取元素
//                          continue;
//                      }
                      //队列为空不应该取元素,而应该等待,等到队列不为空,如果使用continue,这个线程while循环会一直运行,消耗cpu资源
                      while (queue.isEmpty()) {
                          this.wait();
                      }
                      MyTimerTask task = queue.peek();
                      //获取当前时间.
                      long curTime = System.currentTimeMillis();
                      //当前时间大于任务时间,执行任务.
                      if (curTime >= task.getTime()) {
                          queue.poll();
                          task.getRunnable().run();
                      } else {
                          //任务执行时间还没有到,让扫描线程休眠
                          //1.sleep进行休眠,不会释放锁,影响其他线程执行schedule
                          //2.sleep休眠过程中,不方便提前中断(可以使用interrupt中断,但是interrupt意味着线程应该要结束了)
                          //每次来新的任务,需要把休眠状态唤醒,根据当前最新的任务情况,重新进行判定
                          //Thread.sleep(task.getTime() - curTime);
                          this.wait(task.getTime() - curTime);
                      }
                  }
                        } catch (InterruptedException e) {
                        e.printStackTrace();
                        }
                    }
            });
            t.start();
        }
}
public class demo2 {
    public static void main(String[] args) {
        MyTimer myTimer = new MyTimer();
        myTimer.schedule(new Runnable() {
            @Override
            public void run() {
                System.out.println("hello 3");
            }
        },3000);
        myTimer.schedule(new Runnable() {
            @Override
            public void run() {
                System.out.println("hello 2");
            }
        },2000);
        myTimer.schedule(new Runnable() {
            @Override
            public void run() {
                System.out.println("hello 1");
            }
        },1000);
        System.out.println("定时器任务开始");
    }
}
注意要点:
1.线程安全问题:需要给queue的操作,进行加锁
2.sleep休眠是否合适
3.优先级队列,实现Comparable或者Compartor接口,定义任务之间的比较规则

