1-前后端分离的权限脚手架项目
1.项目介绍和后台项目搭建
本项目是基于springboot + vue的前后端分离权限项目,适合做毕设项目和个人学习,手把手搭建。
后端技术栈:springboot,MySQL,redis,Maven
前端技术栈:vue,Vuex,Vue-Router,Echarts,elementUI
通用的权限管理项目,可以在本系统的基础上开发大部分的管理系统。
需要项目资料可以私聊我,免费提供,可以无偿辅导java和前端到就业水平
视频链接:1.项目介绍和后台搭建_哔哩哔哩_bilibili
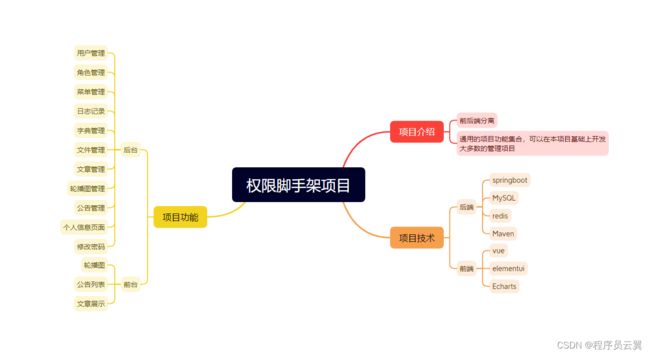
导图:
创建springboot项目,如视频操作
pom.xml文件
    4.0.0

        org.springframework.boot
        spring-boot-starter-parent
        2.5.9


    com.example
    base-authority
    0.0.1-SNAPSHOT
    base-authority
    Demo project for Spring Boot

        1.8


            org.springframework.boot
            spring-boot-starter


            org.springframework.boot
            spring-boot-starter-test
            test


            io.springfox
            springfox-swagger2
            2.9.2


            io.springfox
            springfox-swagger-ui
            2.9.2


            org.springframework.boot
            spring-boot-starter-web


            mysql
            mysql-connector-java
            runtime


            org.projectlombok
            lombok
            true


            com.baomidou
            mybatis-plus-boot-starter
            3.5.1


            org.mybatis.spring.boot
            mybatis-spring-boot-starter
            2.2.1


            org.springframework.boot
            spring-boot-starter-data-redis


            com.alibaba
            fastjson
            1.2.69


            commons-codec
            commons-codec


            com.auth0
            java-jwt
            3.10.3


                org.springframework.boot
                spring-boot-maven-plugin
创建数据库,在创建sys_user表
CREATE TABLE `sys_user` (
  `id` int(11) NOT NULL AUTO_INCREMENT COMMENT 'id主键',
  `username` varchar(255) DEFAULT NULL COMMENT '用户名',
  `password` varchar(255) DEFAULT NULL COMMENT '密码',
  `nickname` varchar(255) DEFAULT NULL COMMENT '昵称',
  `address` varchar(255) DEFAULT NULL COMMENT '地址',
  `email` varchar(255) DEFAULT NULL COMMENT '邮箱',
  `phone` varchar(18) DEFAULT NULL COMMENT '联系方式',
  `role_id` int(11) DEFAULT NULL COMMENT '角色id',
  `create_time` timestamp NULL DEFAULT CURRENT_TIMESTAMP COMMENT '创建时间',
  `header_url` varchar(255) DEFAULT NULL COMMENT '用户头像',
  PRIMARY KEY (`id`)
) ENGINE=InnoDB AUTO_INCREMENT=31 DEFAULT CHARSET=utf8mb4;
创建user的后端代码,entity,mapper,service,controller层代码,如视频操作,代码太多就不复制粘贴了。
2.前端项目首页搭建
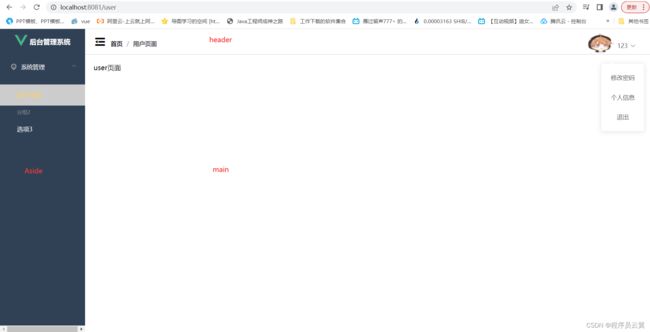
效果图
Aside.vue
Header.vue
首页
{{currentPathName}}
 张三
张三
个人信息
修改密码
退出
Manage.vue
VUEX的index.js
import Vue from 'vue'
import Vuex from 'vuex'

Vue.use(Vuex)

export default new Vuex.Store({
  state: {
    currentPathName:''
  },
  getters: {
  },
  mutations: {
    setPath(state){
      state.currentPathName = localStorage.getItem('currentPathName');
    }
  },
  actions: {
  },
  modules: {
  }
})
Router的index.js
import Vue from 'vue'
import VueRouter from 'vue-router'
import store from '../store'
Vue.use(VueRouter)

const routes = [
  {
    path: '/',
    name: 'manage',
    component: () => import(/* webpackChunkName: "about" */ '../views/Manage.vue'),
    children:[
      {
        path: 'user',
        name: '用户管理',
        component: () => import(/* webpackChunkName: "about" */ '../views/User.vue'),
      },
      {
        path: 'role',
        name: '角色管理',
        component: () => import(/* webpackChunkName: "about" */ '../views/Role.vue'),
      }
    ]
  }
]

const router = new VueRouter({
  mode: 'history',
  base: process.env.BASE_URL,
  routes
})

router.beforeEach((to,from,next) => {
  localStorage.setItem('currentPathName',to.name);
  store.commit('setPath')
  next();
})
export default router
3.用户管理
补充
sys_user表添加 hearer_url 头像字段
去掉Aside侧边栏的底部滚动条
安装axios
npm install axios -S封装axios的请求文件
import axios from 'axios'
import { Notification, MessageBox, Message, Loading } from 'element-ui'
import ElementUI from 'element-ui'
import router from "@/router";

const request = axios.create({
    baseURL:'http://localhost:8899/',
    timeout:5000
})

request.interceptors.request.use(config => {
    config.headers['Content-Type'] = 'application/json;charset=UTF-8'
    let user = localStorage.getItem("user") ? JSON.parse(localStorage.getItem("user")) : null
    if(user){
        config.headers["token"] = user.token;
    }
    return config;
},error => {
    return Promise.reject(error)
})

request.interceptors.response.use(
    response => {
        let res = response.data;
        if(response.config.responseType === 'blob'){
            return res;
        }
        if(typeof res === 'string'){
            res = res ? JSON.parse(res) : res
        }
        // 当权限验证不通过的时候给出提示
        if (res.code === '401') {
            ElementUI.Message({
                message: res.msg,
                type: 'error'
            });
            console.log('router.currentRoute.fullPath ')
            console.log(router.currentRoute.fullPath )
            // if (router.currentRoute.fullPath  !== '/login') {
            //     router.push('/login')
            // }
        }
        return res;
    },
    error => {
        if(error.code === '401'){
            router.push("/login")
        }
        Message.error(error)
        return Promise.reject(error);
    }
)

export default request
编写User.vue的界面,五部分组成:
1.搜索栏
2.加新增和批量删除按钮
3.table表格
4.新增和编辑的弹出框
5.分页
生命周期介绍
//created:在模板渲染成html前调用,即通常初始化某些属性值,然后再渲染成识图
//mounted:在模板渲染成html后调用,通常初始化页面完成后,再对html的dom节点进行一些需要的操作。
跨域
当一个请求url的协议、域名、端口三者之间任意一个与当前页面url不同即为跨域。
报错显示:
解决方法:
package com.example.authority.config;

import org.springframework.context.annotation.Bean;
import org.springframework.context.annotation.Configuration;
import org.springframework.web.cors.CorsConfiguration;
import org.springframework.web.cors.UrlBasedCorsConfigurationSource;
import org.springframework.web.filter.CorsFilter;

@Configuration
public class CorsConfig {

    // 当前跨域请求最大有效时长。这里默认1天
    private static final long MAX_AGE = 24 * 60 * 60;

    @Bean
    public CorsFilter corsFilter() {
        UrlBasedCorsConfigurationSource source = new UrlBasedCorsConfigurationSource();
        CorsConfiguration corsConfiguration = new CorsConfiguration();
        corsConfiguration.addAllowedOrigin("*"); // 1 设置访问源地址
        corsConfiguration.addAllowedHeader("*"); // 2 设置访问源请求头
        corsConfiguration.addAllowedMethod("*"); // 3 设置访问源请求方法
        corsConfiguration.setMaxAge(MAX_AGE);
        source.registerCorsConfiguration("/**", corsConfiguration); // 4 对接口配置跨域设置
        return new CorsFilter(source);
    }
}
完成的User.vue页面
搜索
重置
新增
批量删除
编辑
删除
4.角色管理
补充:删除数据的分页显示
创建角色表
CREATE TABLE `sys_role` (
  `id` int(11) NOT NULL AUTO_INCREMENT COMMENT 'id',
  `name` varchar(255) COLLATE utf8mb4_unicode_ci DEFAULT NULL COMMENT '角色名称',
  `code` varchar(255) COLLATE utf8mb4_unicode_ci DEFAULT NULL COMMENT '唯一标识',
  `description` varchar(255) COLLATE utf8mb4_unicode_ci DEFAULT NULL COMMENT '角色描述',
  PRIMARY KEY (`id`)
) ENGINE=InnoDB AUTO_INCREMENT=7 DEFAULT CHARSET=utf8mb4 COLLATE=utf8mb4_unicode_ci;
创建角色管理后台代码
如视频操作,代码较多,不发出来了
创建角色页面
搜索
重置
新增
批量删除
编辑
删除
搜索
重置
新增
批量删除
编辑
删除
完善用户页面的角色部分
集成git,把代码提交git仓库
5.登录注册页面
5.1 验证码组件
5.2 编写Login.vue页面
权限脚手架项目
5.4 编写Register.vue页面
权限脚手架项目
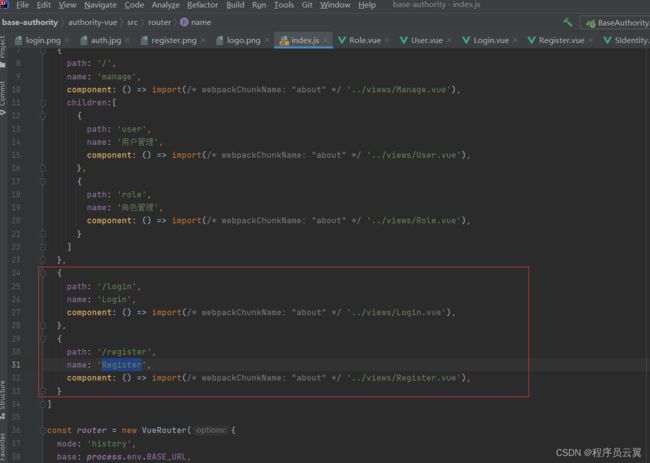
5.4 添加两个路由到index.js文件
6.登录注册接口
创建UserDto类
package com.example.authority.dto;

import lombok.Data;

import java.util.Date;

@Data
public class UserDto {

    private Integer id;

    private String username;

    private String password;

    private String nickname;

    private String headerUrl;

    private String token;
}
编写两个接口代码,看视频
JwtUtils的代码
package com.example.authority.utils;

import com.auth0.jwt.JWT;
import com.auth0.jwt.algorithms.Algorithm;
import org.springframework.stereotype.Component;

import java.util.Date;

@Component
public class JwtUtils {

    public static String generateToken(String userId,String sign){
        return JWT.create().withAudience(userId)
                .withExpiresAt(new Date(System.currentTimeMillis() + 3600 * 24 * 1000))
                .sign(Algorithm.HMAC256(sign));
    }
}
7.菜单管理
用户管理的bug:
新增和修改用户名的时候加一下判断条件:用户名不能重复
角色管理的bug:
删除角色的时候先判断角色是否被使用了
RBAC:RBAC(Role-Based Access control) ,也就是基于角色的权限分配解决方案,相对于传统方案,RBAC提供了中间层Role(角色),其权限模式是给用户分配角色,给角色分配权限
菜单表:
CREATE TABLE `sys_menu` (
  `id` int(11) NOT NULL AUTO_INCREMENT,
  `name` varchar(255) COLLATE utf8mb4_unicode_ci DEFAULT NULL COMMENT '菜单名称',
  `path` varchar(255) COLLATE utf8mb4_unicode_ci DEFAULT NULL COMMENT '菜单路径',
  `icon` varchar(255) COLLATE utf8mb4_unicode_ci DEFAULT NULL COMMENT '菜单图标',
  `description` varchar(255) COLLATE utf8mb4_unicode_ci DEFAULT NULL COMMENT '描述',
  `pid` int(11) DEFAULT NULL COMMENT '菜单父id',
  `page_path` varchar(255) COLLATE utf8mb4_unicode_ci DEFAULT NULL COMMENT '页面路径',
  `sort_num` int(11) DEFAULT NULL COMMENT '排序',
  PRIMARY KEY (`id`)
) ENGINE=InnoDB AUTO_INCREMENT=23 DEFAULT CHARSET=utf8mb4 COLLATE=utf8mb4_unicode_ci;字典管理,如视频操作
菜单后台代码,如视频操作
菜单页面:
搜索
重置
新增
批量删除
新增子菜单
编辑
删除
{{dict.name}}
8.角色分配权限
添加swagger配置类
package com.example.authority.config;

import org.springframework.context.annotation.Bean;
import org.springframework.context.annotation.Configuration;
import springfox.documentation.builders.ApiInfoBuilder;
import springfox.documentation.builders.PathSelectors;
import springfox.documentation.builders.RequestHandlerSelectors;
import springfox.documentation.service.ApiInfo;
import springfox.documentation.service.Contact;
import springfox.documentation.spi.DocumentationType;
import springfox.documentation.spring.web.plugins.Docket;
import springfox.documentation.swagger2.annotations.EnableSwagger2;

@Configuration
public class SwaggerConfig {
    @Bean
    public Docket createRestApi() {
        return new Docket(DocumentationType.SWAGGER_2)
                .pathMapping("/")
                .select()
                .apis(RequestHandlerSelectors.basePackage("com.example.authority.controller"))  //controller类所在的路径
                .paths(PathSelectors.any())
                .build().apiInfo(new ApiInfoBuilder()
                        .title("SpringBoot整合Swagger")
                        .description("SpringBoot整合Swagger,详细信息......")
                        .version("9.0")
                        .contact(new Contact("111","blog.csdn.net","[email protected]"))
                        .license("hello")
                        .licenseUrl("http://www.baidu.com")
                        .build());
    }
}
启动类添加 :@EnableSwagger2
package com.example.authority;

import org.mybatis.spring.annotation.MapperScan;
import org.springframework.boot.SpringApplication;
import org.springframework.boot.autoconfigure.SpringBootApplication;
import springfox.documentation.swagger2.annotations.EnableSwagger2;

@SpringBootApplication
@MapperScan("com.example.authority.mapper")
@EnableSwagger2
public class BaseAuthorityApplication {

    public static void main(String[] args) {
        SpringApplication.run(BaseAuthorityApplication.class, args);
    }

}
常用注解
@Api(tags = "用户管理"):加在controller类上做说明@ApiOperation(value = "新增/修改用户信息"):加在接口方法上
全局异常处理
处理类
package com.example.authority.exception;


import com.example.authority.common.Result;
import org.springframework.web.bind.annotation.ControllerAdvice;
import org.springframework.web.bind.annotation.ExceptionHandler;
import org.springframework.web.bind.annotation.ResponseBody;

/**
 * @author wangjy
 * @version 1.0
 * @date 2023/6/30 15:29
 * 全局异常处理器
 */
@ControllerAdvice
public class GlobalExceptionHandler {

    @ExceptionHandler(AuthException.class)
    @ResponseBody
    public Result handle(AuthException ex){
        return Result.error(ex.getCode(),ex.getMessage());
    }


    @ExceptionHandler(Exception.class)
    @ResponseBody
    public Result handle(Exception ex){
        return Result.error("500",ex.getMessage());
    }

}
自定义异常
package com.example.authority.exception;

import lombok.Data;

@Data
public class AuthException extends RuntimeException{

    private String code;

    public AuthException( String code,String msg) {
        super(msg);
        this.code = code;
    }
}
在角色页面增加分配菜单功能,如视频操作
9.动态菜单和动态路由
动态菜单:根据角色分配的菜单在Aside页面动态显示
动态路由:动态路由,动态即不是写死的,是可变的。我们可以根据自己不同的需求加载不同的路由,做到不同的实现及页面的渲染。动态的路由存储可分为两种,一种是将路由存储到前端。另一种则是将路由存储到数据库。动态路由的使用一般结合角色权限控制一起使用。
具体代码看视频
10.后端拦截器
解决路由显示问题
import Vue, {set} from 'vue'
import VueRouter from 'vue-router'
import store from '../store'
Vue.use(VueRouter)
import { Notification, MessageBox, Message, Loading } from 'element-ui'
import ElementUI from 'element-ui'

const routes = [
  {
    path: '/login',
    name: 'Login',
    component: () => import(/* webpackChunkName: "about" */ '../views/Login.vue'),
  },
  {
    path: '/register',
    name: 'Register',
    component: () => import(/* webpackChunkName: "about" */ '../views/Register.vue'),
  },
  {
    path: '/404',
    name: '404',
    component: () => import(/* webpackChunkName: "about" */ '../views/404.vue'),
  }
]

const router = new VueRouter({
  mode: 'history',
  base: process.env.BASE_URL,
  routes
})

export const setRoutes  = () => {
  //获取浏览器缓存的菜单数据
  const localMenus = localStorage.getItem("menus") ;
  if(localMenus){
   const currentRoutes =  router.getRoutes().map(v => v.name);
   if(!currentRoutes.includes('manage')){
     //当前Router不包含manage,在拼装
     const manageRoute =  {
           path: '/',
           name: 'manage',
           component: () => import(/* webpackChunkName: "about" */ '../views/Manage.vue'),
           children:[]
         };
     const menus = JSON.parse(localMenus);
     menus.forEach(item => {
       if(item.path){
         const itemMenu = {
           path:item.path.replace("/",""),
           name:item.name,
           component: () => import(/* webpackChunkName: "about" */ '../views/' + item.pagePath + '.vue'),
         };
         manageRoute.children.push(itemMenu);
       }else if(item.children.length){
         item.children.forEach(item => {
           const itemMenu = {
             path:item.path.replace("/",""),
             name:item.name,
             component: () => import(/* webpackChunkName: "about" */ '../views/' + item.pagePath + '.vue'),
           };
           manageRoute.children.push(itemMenu);
         })
       }
     })
     router.addRoute(manageRoute);
     console.log(router.getRoutes())
   }
  }
}

setRoutes()

router.beforeEach((to,from,next) => {
  localStorage.setItem('currentPathName',to.name);
  store.commit('setPath')
  const localMenus = localStorage.getItem("menus");
  if(!to.matched.length){
    //没有匹配到路由(也就是未找到路由)
    if(localMenus){
      //用户登录了
      next('/404')
    }else{
      ElementUI.Message({
        message: '请先登录',
        type: 'warning'
      });
      next('/login')
    }
  }
  next();
})
export default router
后端拦截器代码:看视频,详细教导。
11.AOP记录日志
添加依赖:
            org.springframework.boot
            spring-boot-devtools
            true


            org.springframework.boot
            spring-boot-starter-aop
获取request对象
HttpServletRequest request = ((ServletRequestAttributes) RequestContextHolder.getRequestAttributes()).getRequest();
剩下的代码看视频
12.日志前端页面,退出登录
12.1.补充配置拦截器里面放行swagger
@Override
    public void addInterceptors(InterceptorRegistry registry) {
        registry.addInterceptor(jwtInterceptor).addPathPatterns("/**").excludePathPatterns(
                "/swagger-resources/**"
                ,"/webjars/**"
                ,"/v2/**"
                ,"/swagger-ui.html/**"
        );
    }
12.2.退出登录
看视频操作
12.3.重置路由器的路由集合
看视频操作
12.4.日志页面
搜索
重置
13.文件管理
13.1.文件表:
CREATE TABLE `sys_file` (
  `id` int(11) NOT NULL AUTO_INCREMENT COMMENT '主键',
  `name` varchar(255) DEFAULT NULL COMMENT '文件名称',
  `type` varchar(255) DEFAULT NULL COMMENT '文件类型',
  `size` bigint(20) DEFAULT NULL COMMENT '文件大小(kb)',
  `url` varchar(255) DEFAULT NULL COMMENT '下载链接',
  `md5` varchar(255) DEFAULT NULL COMMENT '文件md5,判断文件唯一的标识',
  `is_delete` tinyint(1) DEFAULT '0' COMMENT '0:不删除,1:已经删除',
  `enable` tinyint(4) DEFAULT '1' COMMENT '是否启用,0:不启用,1:启用',
  PRIMARY KEY (`id`)
) ENGINE=InnoDB AUTO_INCREMENT=9 DEFAULT CHARSET=utf8mb4;
13.2上传文件,下载文件接口
package com.example.authority.controller;

import com.baomidou.mybatisplus.core.conditions.query.QueryWrapper;
import com.baomidou.mybatisplus.core.toolkit.CollectionUtils;
import com.baomidou.mybatisplus.core.toolkit.StringUtils;
import com.baomidou.mybatisplus.extension.plugins.pagination.Page;
import com.example.authority.annotation.Log;
import com.example.authority.annotation.NoAuth;
import com.example.authority.common.Result;
import com.example.authority.entity.SysFile;
import com.example.authority.service.SysFileService;
import org.apache.commons.codec.digest.DigestUtils;
import org.springframework.beans.factory.annotation.Autowired;
import org.springframework.beans.factory.annotation.Value;
import org.springframework.web.bind.annotation.*;
import org.springframework.web.multipart.MultipartFile;

import javax.servlet.ServletOutputStream;
import javax.servlet.http.HttpServletResponse;
import java.io.File;
import java.io.FileInputStream;
import java.io.IOException;
import java.net.URLEncoder;
import java.util.List;
import java.util.UUID;

@RestController
@RequestMapping("/sysFile")
public class SysFileController {

    @Autowired
    private SysFileService sysFileService;

    @Value("${files.upload.path}")
    private String fileUploadPath;

    /**
     * 批量删除文件
     * @param idList
     * @return
     */
    @PostMapping("/deleteBatch")
    @Log(record = "批量删除文件",type = "删除")
    public Result deleteBatch(@RequestBody List idList){
        for (Integer id : idList) {
            SysFile sysFile = sysFileService.getById(id);
            sysFile.setIsDelete(1);
            sysFileService.updateById(sysFile);
        }
        return Result.success();
    }
    /**
     * 改变启用状态
     * @param sysFile
     * @return
     */
    @PostMapping("/updateEnable")
    @Log(record = "updateEnable",type = "修改")
    public Result updateEnable(@RequestBody SysFile sysFile){
        boolean b = sysFileService.updateById(sysFile);
        if(b){
            return Result.success();
        }else{
            return Result.error();
        }
    }

    /**
     * 根据id删除
     * @param id
     * @return
     */
    @DeleteMapping("/deleteById/{id}")
    @Log(record = "根据id删除文件",type = "删除")
    public Result deleteById(@PathVariable Integer id){
        SysFile sysFile = sysFileService.getById(id);
        sysFile.setIsDelete(1);
        boolean b = sysFileService.updateById(sysFile);
        if(b){
            return Result.success();
        }else{
            return Result.error();
        }
    }

    /**
     * 上传文件
     * @param file
     * @return
     */
    @PostMapping("/upload")
    @Log(record = "上传文件",type = "新增")
    @NoAuth
    public String upload(@RequestParam MultipartFile file) throws IOException {
        String md5 = DigestUtils.md5Hex(file.getBytes());
        String originalFilename = file.getOriginalFilename();  //文件的名称
        String type = originalFilename.substring(originalFilename.lastIndexOf(".") + 1);//文件类型
        long size = file.getSize();
        File uploadParentFile = new File(fileUploadPath);
        if(!uploadParentFile.exists()){
            uploadParentFile.mkdirs();
        }
        List existFileList = sysFileService.getByMD5(md5);
        String url = null;
        if(CollectionUtils.isNotEmpty(existFileList)){
            //文件已经存在上传目录
            url = existFileList.get(0).getUrl();
        }else{
            //文件不存在上传目录
            String uuid = UUID.randomUUID().toString().replaceAll("-", "");
            String fileUUID = uuid + "." + type;
            File uploadFile = new File(fileUploadPath + fileUUID);
            url = "http://localhost:8888/sysFile/" + fileUUID;
            file.transferTo(uploadFile);
        }

        //存储数据库
        SysFile sysFile = new SysFile();
        sysFile.setName(originalFilename);
        sysFile.setSize(size / 1024);
        sysFile.setType(type);
        sysFile.setUrl(url);
        sysFile.setMd5(md5);
        sysFileService.save(sysFile);
        return url;
    }

    /**
     * 下载文件
     * @param fileUUID
     */
    @GetMapping("/{fileUUID}")
    @NoAuth
    public void download(@PathVariable String fileUUID, HttpServletResponse response){
        File downloadFile = new File(fileUploadPath + fileUUID);
        try {
            FileInputStream fileInputStream = new FileInputStream(downloadFile);
            // 设置输出流的格式
            response.setCharacterEncoding("UTF-8");
            response.addHeader("Content-Disposition", "attachment;filename=" + URLEncoder.encode(fileUUID, "UTF-8"));
            //作用是使客户端浏览器区分不同种类的数据,并根据不同的MIME调用浏览器内不同的程序嵌入模块来处理相应的数据。
            response.setContentType("application/octet-stream");  //.*( 二进制流,不知道下载文件类型)
            ServletOutputStream outputStream = response.getOutputStream();
            int len = 0;
            byte[] bytes = new byte[1024];
            while((len = fileInputStream.read(bytes)) != -1){
                outputStream.write(bytes,0,len);
                outputStream.flush();
            }
            outputStream.flush();
            outputStream.close();
            fileInputStream.close();
        } catch (IOException e) {
            e.printStackTrace();
        }

    }
    /**
     * 查询全部数据
     * @return
     */
    @GetMapping("/findAll")
    @Log(record = "查询全部文件",type = "查询")
    public Result findAll(@RequestParam(name = "type",defaultValue = "") String type){
        QueryWrapper queryWrapper = new QueryWrapper<>();
        if(StringUtils.isNotBlank(type)){
            queryWrapper.eq("type",type);
        }
        return Result.success(sysFileService.list(queryWrapper));
    }

    /**
     * 分页查询
     * @param pageNum:页码
     * @param pageSize:每页条数
     * @param name:角色名称
     * @return
     */
    @GetMapping("/findPage")
    @Log(record = "查询文件分页",type = "查询")
    public Result findPage(@RequestParam Integer pageNum,
                           @RequestParam Integer pageSize,
                           @RequestParam(name = "name",defaultValue = "") String name){
        Page page = new Page<>(pageNum,pageSize);
        QueryWrapper queryWrapper = new QueryWrapper<>();
        queryWrapper.eq("is_delete",0);
        if(StringUtils.isNotBlank(name)){
            queryWrapper.like("name",name);
        }
        Page sysFilePage = sysFileService.page(page, queryWrapper);
        return Result.success(sysFilePage);
    }
}
13.3前端页面
搜索
重置
上传文件
批量删除
预览
下载
删除
![图片]()
网页显示图片的配置,
InterceptorConfig类
/**
 * 映射路径修改:这段代码意思就配置一个拦截器, 如果访问路径是addResourceHandler中的filepath 这个路径
 * 那么就 映射到访问本地的addResourceLocations 的参数的这个路径上,
 * 这样就可以让别人访问服务器的本地文件了,比如本地图片或者本地音乐视频什么的。
 * @param registry
 */
@Override
public void addResourceHandlers(ResourceHandlerRegistry registry) {
    registry.addResourceHandler("/sysFile/show/**").addResourceLocations("file:D:\\temp\\files\\");
}
14.文章管理
文章表:
CREATE TABLE `article` (
  `id` int(11) NOT NULL AUTO_INCREMENT COMMENT '主键',
  `name` varchar(255) DEFAULT NULL COMMENT '文章名称',
  `content` text COMMENT '文章内容',
  `type` varchar(255) DEFAULT NULL COMMENT '文章类型',
  `user` varchar(255) DEFAULT NULL COMMENT '创建用户名称',
  `create_time` timestamp NULL DEFAULT CURRENT_TIMESTAMP COMMENT '创建时间',
  PRIMARY KEY (`id`)
) ENGINE=InnoDB AUTO_INCREMENT=3 DEFAULT CHARSET=utf8mb4;
后端代码,参考视频
安装npm依赖包
npm install mavon-editor --s
main.js
// main.js全局注册
import mavonEditor from 'mavon-editor'
import 'mavon-editor/dist/css/index.css'
// use
Vue.use(mavonEditor)
// 绑定@imgAdd event imgAdd(pos, $file) { let $vm = this.$refs.md // 第一步.将图片上传到服务器. const formData = new FormData(); formData.append('file', $file); axios({ url: 'http://localhost:8899/file/upload', method: 'post', data: formData, headers: {'Content-Type': 'multipart/form-data'}, }).then((res) => { // 第二步.将返回的url替换到文本原位置 ->  $vm.$img2Url(pos, res.data); }) }展示富文本
富文本编辑
前端页面
搜索
重置
新增
批量删除
查看内容
编辑
删除
15.公告和轮播图管理
公告表,轮播图表
CREATE TABLE `lunbo` (
  `id` int(11) NOT NULL AUTO_INCREMENT COMMENT '主键',
  `name` varchar(255) DEFAULT NULL COMMENT '轮播图名称',
  `url` varchar(255) DEFAULT NULL COMMENT '轮播图路径',
  `description` varchar(255) DEFAULT NULL COMMENT '图片描述',
  PRIMARY KEY (`id`)
) ENGINE=InnoDB AUTO_INCREMENT=2 DEFAULT CHARSET=utf8mb4;

CREATE TABLE `notice` (
  `id` int(11) NOT NULL AUTO_INCREMENT COMMENT '主键',
  `title` varchar(255) DEFAULT NULL COMMENT '公告标题',
  `content` varchar(1000) DEFAULT NULL COMMENT '公告内容',
  `user` varchar(255) DEFAULT NULL COMMENT '创建者',
  `create_time` timestamp NULL DEFAULT CURRENT_TIMESTAMP,
  PRIMARY KEY (`id`)
) ENGINE=InnoDB AUTO_INCREMENT=3 DEFAULT CHARSET=utf8mb4;
后端代码
前端页面
看视频操作,代码较多
16.个人信息页面和修改密码页面
参考视频
17.整合Echarts搭建后台首页
Home页面
权限项目
毕设项目
前后端分离
脚手架系统
18.前台首页搭建
app.vue中不但可以当做是网站首页,也可以写所有页面中公共需要的动画或者样式。
app.vue是vue页面资源的首加载项,是主组件,页面入口文件,所有页面都是在App.vue下进行切换的;也是整个项目的关键,app.vue负责构建定义及页面组件归集。
index.html---主页,项目入口
App.vue---根组件
main.js---入口文件
Front.vue和Home.vue页面,实现轮播图和项目介绍,头部展示基本信息
19.前台文章列表显示和文章详情
看视频操作,代码较多不复制了
20.前台公告列表和项目总结
看视频操作,代码较多不复制了


