【性能测试】一文读懂Jmeter
文章目录
- 一、常用压力测试工具对比
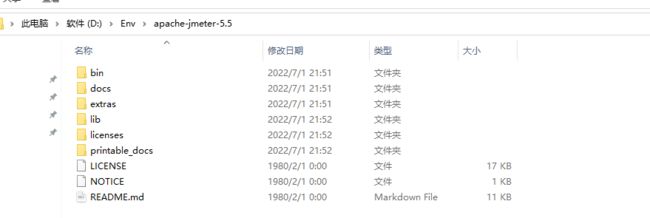
- 二、Jmeter安装和目录讲解
- 三、Jmeter核心组件
-
- 1、测试计划
- 2、线程组
- 3、采样器
- 4、添加结果树
- 5、断言
- 6、聚合报告
- 四、Jmeter自定义变量和可变参数
-
- CSV可变参数压测
- 五、Jmeter数据库压测实操
-
- 1、添加线程组
- 2、创建JDBC请求
- 3、为此次请求添加一个配置元件
- 4、添加全局数据库连接jar
- 5、编写指定的JDBC 语句
- JDBC请求中的一些参数说明
- 六、分布式压测
-
- 为什么要做分布式压测
- 如何做分布式压测
- Jmeter命令行启动方式,参数详解
- 分布式压测实战
-
- Jmeter分布式压测准备工作
- 七、如何提高压测质量
- 八、测试报告详解
-
- 查看其他地方的jtl文件
- Jmeter图形化HTML压测报告dashboard
- Jmeter图形化HTML压测报告Charts报表
- 九、相关问题总结
官网下载链接:https://jmeter.apache.org/download_jmeter.cgi
一、常用压力测试工具对比
- LoadRunner
性能稳定,压测结果及细粒度大,可以自定义脚本进行压测,但是太过于重大,功能比较繁多。 - apache ab
模拟多线程并发请求,ab命令对发出负载的计算机要求很低,既不会占用很多CPU,也不会占用太多内存,但却会给目标服务器造成巨大的负载,简单的DDOS攻击等 - webbench
webbench首先fork出多个子进程,每个子进程都循环做web访问测试。子进程把访问的结果通过pipe告诉父进程,父进程做最终的统计结果。
二、Jmeter安装和目录讲解
需要JDK环境:8以上,JDK安装教程
- Jmeter.bat文件:windows启动文件
- Jmeter:mac或linux启动文件
- Jmeter-server:mac或linux分布式压测使用的启动文件
- jmeter.properties:核心配置文件
- shutdown:关闭程序
- report-template:聚合报告的生成模板
docs目录:文档目录,存放它的使用文档
extras目录:插件目录,做二次开发的目录
lib目录:核心工具类junit和一些核心包ext
licenses目录:
printable_docs目录:
- 如何调整Jmeter的语言版本
Options - Choose Language - English/Chinese(Simplify)
也可以直接修改bin目录下 的jmeter.properties配置文件中
# language = en
language=zh
类似的,还可以修改一些主题等等
三、Jmeter核心组件
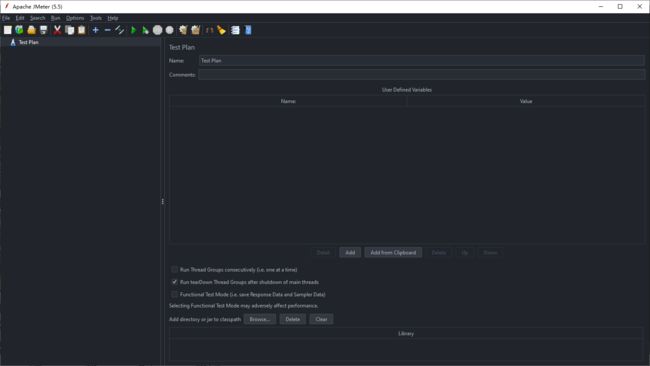
1、测试计划
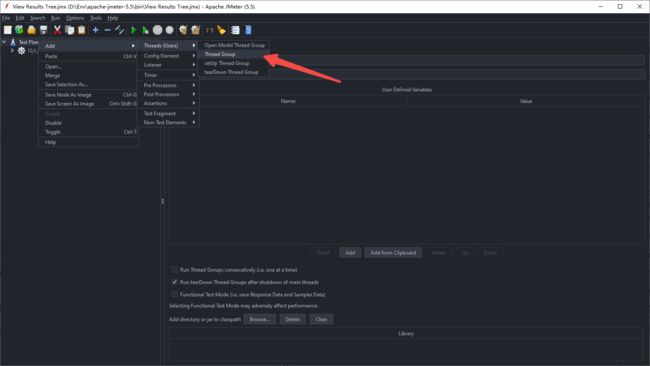
2、线程组
测试计划中Add - threads -> 线程组(控制总体并发)

Number of Threads:线程数 ,虚拟用户数。一个虚拟用户占用一个线程
Ramp-up period(秒):全部进程启动的时长。100个线程20s,表示20s内100个线程都会慢慢被启动,每秒启动5个
Loop Count:循环次数。每个线程发送的次数。如设置为5,100个线程
3、采样器
线程组 - 添加 - Sampler(采样器) - Http/…
web服务器:默认协议是http,默认端口是80,目标服务器名称或ip地址
路径:服务器URL
Use multipart/form-data for HTTP POST:当发送POST请求时,使用use multipart/form-data方法发送,默认不选中
4、添加结果树
线程组 - 添加 - 监听器 - 查看结果树
5、断言
右键request - add - 断言 - 选择对应需要的断言(响应断言…)
6、聚合报告
四、Jmeter自定义变量和可变参数
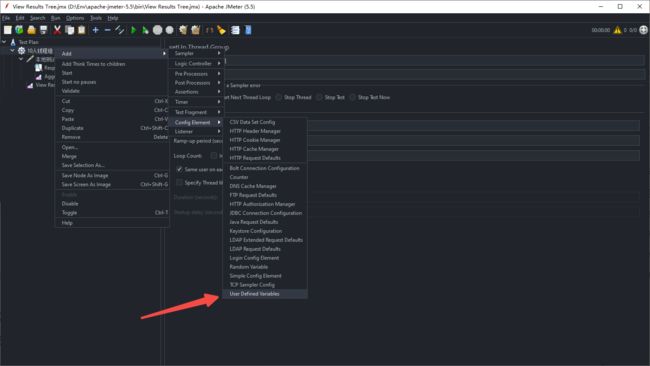
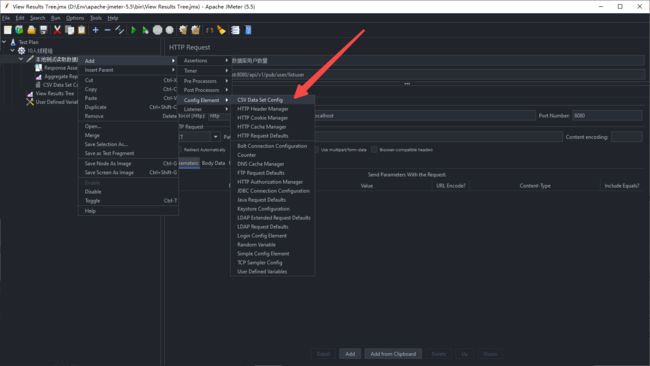
测试计划 - 添加 - 配置元件 - 用户自定义变量
可以添加配置一些ip地址或者其他信息
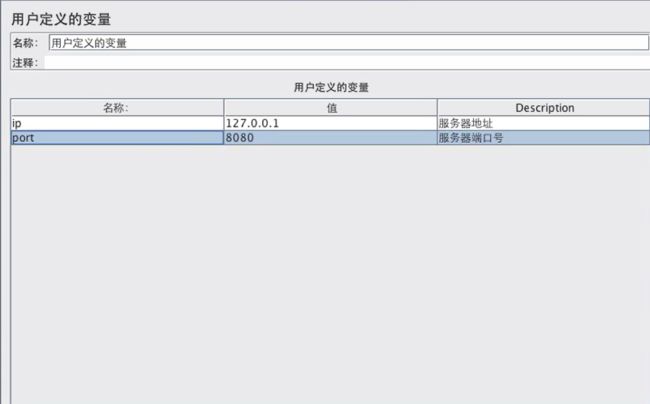
取值的地方使用${变量名}即可
CSV可变参数压测
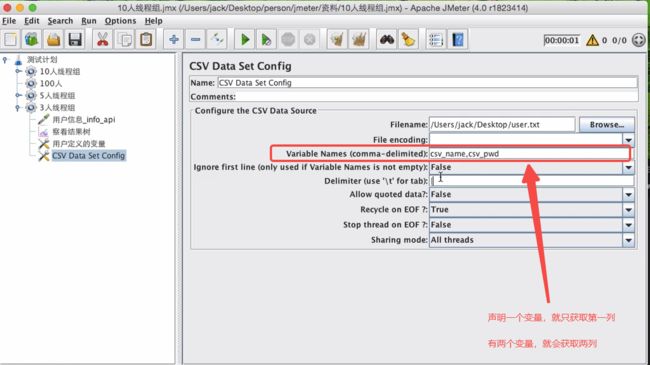
配置信息说明

这边csv或者txt文件都可以的
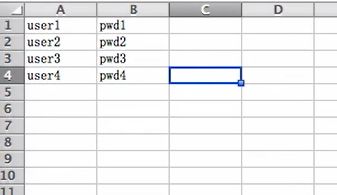
如果有两列,却只有一个参数使用,会默认获取第一列有效数据
五、Jmeter数据库压测实操
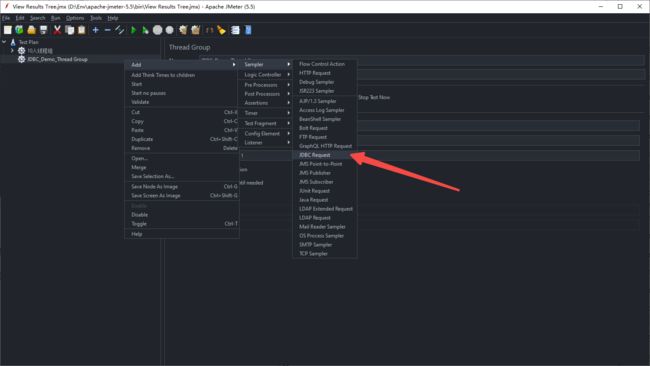
1、添加线程组
2、创建JDBC请求
3、为此次请求添加一个配置元件
配置相关数据库信息等

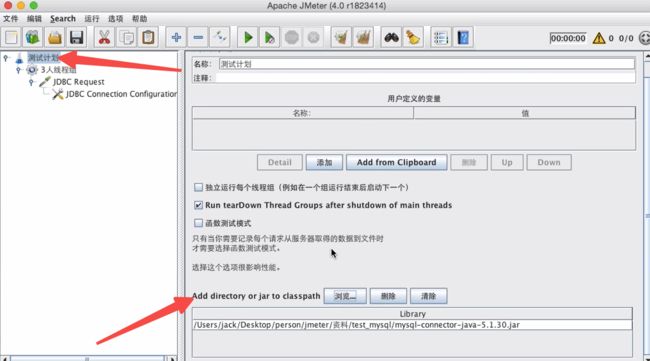
需要先将第4步的jar添加全局,才可以填写所有的信息
4、添加全局数据库连接jar
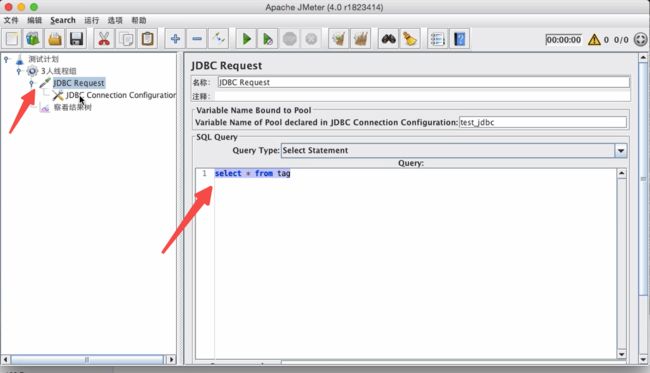
5、编写指定的JDBC 语句
JDBC请求中的一些参数说明
Max Number of connections:最大连接数
MAX wait:最大等待时间
Auto Commit:是否自动提交事务
注:这里的sql语句不要写;结尾

Variable names:sql执行结果的变量名
Result variable name:此处填写一个变量,可以将所有的查询结果封装为这个对象
线程组 - 添加 - Debug Sampler
执行后就可以看到Debug 采样器中显示的结果信息
Handle ResultSet:处理结果集
六、分布式压测
为什么要做分布式压测
普通压测:单台机对目标机器产生的压力比较小,受限因素包括CPU、网络和IO等
分布式压测:利用多台机器向目标机器产生压力,模拟几万用户并发访问
如何做分布式压测
简单原理说明
- 总控的机器节点叫做master,其他产生压力的机器叫“肉鸡” server
- master会把压测脚本发送到server上面
- 只需要将Jmeter的Jmeter-server打开就可以了,不用启动Jmeter
- 结束后,server会把压测数据回传给master,然后master汇总输出报告
- 配置详情
Jmeter命令行启动方式,参数详解
官方教程:https://jmeter.apache.org/usermanual/index.html#get-started
-h 帮助
-n 非GUI模式
-t 指定要运行的Jmeter测试脚本文件
-l 记录结果的文件,每次运行之前(要确保之前没有运行过,即xxxx.jtl不存在,不然报错)
-r Jmeter.properties文件中指定的所有远程服务器
-e 在脚本运行结束后生成html报告
-o 用于存放html报告的目录(目录要唯恐,不然报错)

jmeter -n -t linux_user_api.jmx result.jtl -e -o /usr/local/software/jmeter/temp/ResultReport

jmeter -n -t linux_user_api.jmx -l result.jtl -e -o /usr/local/software/jmeter/temp/ResultReport
分布式压测实战
Jmeter分布式压测准备工作
压测注意事项:
the firewalls on the systems are turned off or correct ports are opened.
系统上的防火墙被关闭或正确的端口被打开。
all the clients are on the same subnet.
所有的客户端都在同一个子网上。
the server is in the same subnet, if 192.x.x.x or 10.x.x.x IP addresses are used. If the server doesn’t use 192.xx or 10.xx IP address, there shouldn’t be any problems.
如果使用192.x.x.x或10.x.x.x IP地址,则服务器位于同一子网中。 如果服务器不使用192.xx或10.xx IP地址,则不应该有任何问题。
Make sure JMeter can access the server.
确保JMeter可以访问服务器。
Make sure you use the same version of JMeter and Java on all the systems. Mixing versions will not work correctly.
确保在所有系统上使用相同版本的JMeter和Java。 混合版本将无法正常工作。
You have setup SSL for RMI or disabled it.
您已为RMI设置SSL或将其禁用。
官网地址 http://jmeter.apache.org/usermanual/jmeter_distributed_testing_step_by_step.html
- 压测注意事项:一定要用内网IP,不用用公网IP,用ping去检查
master:司令
slave:奴隶
target:目标
地址:http://jmeter.apache.org/images/screenshots/distributed-names.svg
地址:http://jmeter.apache.org/images/screenshots/distributed-jmeter.svg
- 远程拷贝(内网地址)
scp -r /usr/local/software/jdk-8u141-linux-x64.tar.gz [email protected]:/usr/local/software

scp -r /usr/local/software/jmeter/apache-jmeter-4.0.tgz [email protected]:/usr/local/software/jmeter

启动
./jmeter-server   或者 nohup ./jmeter-server &
- 检查启动是否成功
ps -ef|grep jmeter-server
ps aux|grep jmeter-server
- 关注CPU和内存使用
本地非GUI分布式压测 -r
jmeter -n -t /Users/jack/Desktop/remote.jmx -r -l /Users/jack/Desktop/jtl/result.jtl -e -o /Users/jack/Desktop/result

压测结果
./jmeter -n -t /Users/jack/Desktop/remote.jmx -r -l /Users/jack/Desktop/jtl/result.jtl -e -o /Users/jack/Desktop/result

Creating summariser <summary>
Created the tree successfully using /Users/jack/Desktop/remote.jmx
Configuring remote engine: 172.20.10.3:8899
Using local port: 8899
Configuring remote engine: 172.20.10.11:8899
Starting remote engines
Starting the test @ Thu Mar 29 23:21:13 CST 2018 (1522336873931)
Remote engines have been started
Waiting for possible Shutdown/StopTestNow/Heapdump message on port 4445
summary =      4 in 00:00:22 =    0.2/s Avg:  5582 Min:    94 Max: 21006 Err:     1 (25.00%)
Tidying up remote @ Thu Mar 29 23:21:36 CST 2018 (1522336896842)
... end of run
- 压测修改master节点信息
jemeter.properties 值是slave机器的ip+端口号,如果有多个,用逗号分隔
remote_hosts=192.168.0.102:8899,192.168.0.101:8899
server.rmi.ssl.disable=true (前面有说到)
- 启动slave机器,注意要同个网段,ip地址用内网ip
./jmeter-server
Using local port: 8899
Created remote object: UnicastServerRef2 [liveRef: [endpoint:[192.168.0.102:8899](local),objID:[3a585a4d:162724586ab:-7fff, 3963132813614033916]]]
相关资料:
https://www.cnblogs.com/Fine-Chan/p/6233823.html
https://blog.csdn.net/liujingqiu/article/details/52635289
https://www.cnblogs.com/puresoul/p/4844539.html
七、如何提高压测质量
-
使用非GUI模式:jmeter -n -t test.jmx -l result.jtl
-
减少使用Listener,如果使用-l 参数,他们都可以被删除或者禁用
-
在加载测试期间不要使用“查看结果树”或者“查看结果”表监听器,只能在脚本阶段使用它们来调试
-
包含控制器在这里没有帮助,因为他们它是将文件中的所有测试元素添加到测试计划中
-
不要使用功能模式,使用csv输出而不是xml
-
只保存你需要的数据,尽可能减少使用断言
-
如果测试需要大量数据,可以提前将测试数据保存在数据文件中,以csv·Read方式进行读取
-
用内网压测,减少其他带宽影响压测效果
-
如果压测大流量,尽可能使用多节点以非GUI模式向服务器压测
官方推荐:https://jmeter.apache.org/usermanual/best-practices.html#lean_mean
八、测试报告详解
查看其他地方的jtl文件
利用软件从阿里云Centos服务器下载压测报告,讲解Jtl文件,并怎么查看文件
可以通过打开jmeter,新建线程组->summary report->浏览文件 进行查看
简介:把Jmtere压测结果转换为Html
指令
jmeter -n -t /usr/local/software/jmeter/temp/linux_users_api.jmx -l
/usr/local/software/jmeter/temp/jtl/result.jtl -e -o
/usr/local/software/jmeter/temp/result
Jmeter图形化HTML压测报告dashboard
压测报告 html里面Dashboard的核心指标
	1)Test and Report informations
			Source file:jtl文件名
			Start Time :压测开始时间
			End Time :压测结束时间
			Filter for display:过滤器
			Lable:sampler采样器名称

	2)APDEX(Application performance Index)
		apdex:应用程序性能指标,范围在0~1之间,1表示达到所有用户均满意
		T(Toleration threshold):可接受阀值
		F(Frustration threshold):失败阀值

	3)Requests Summary
		OK:成功率
		KO:失败率

	4)Statistics 统计数据
		lable:sampler采样器名称

		samples:请求总数,并发数*循环次数
		KO:失败次数
		Error%:失败率

		Average:平均响应时间
		Min:最小响应时间
		Max:最大响应时间
		90th pct: 90%的用户响应时间不会超过这个值(关注这个就可以了)
		2ms,3ms,4,5,2,6,8,3,9

		95th pct: 95%的用户响应时间不会超过这个值
		99th pct: 99%的用户响应时间不会超过这个值 (存在极端值)
		throughtput:Request per Second吞吐量 qps

		received:每秒从服务器接收的数据量
		send:每秒发送的数据量
Jmeter图形化HTML压测报告Charts报表
1、Over Time(随着时间的变化)
	Response Times Over Time:响应时间变化趋势
	Response Time Percentiles Over Time (successful responses):最大,最小,平均,用				 户响应时间分布
	Active Threads Over Time:并发用户数趋势
	Bytes Throughput Over Time:每秒接收和请求字节数变化,蓝色表示发送,黄色表示接受
	Latencies Over Time:平均响应延时趋势
	Connect Time Over Time	:连接耗时趋势

2、Throughput
	Hits Per Second (excluding embedded resources):每秒点击次数
	Codes Per Second (excluding embedded resources):每秒状态码数量
	Transactions Per Second:即TPS,每秒事务数
	Response Time Vs Request:响应时间和请求数对比
	Latency Vs Request:延迟时间和请求数对比

3、Response Times
		Response Time Percentiles:响应时间百分比
		Response Time Overview:响应时间概述
		Time Vs Threads:活跃线程数和响应时间
		Response Time Distribution:响应时间分布图
九、相关问题总结
配置元件=》前置处理器=》定时器=》采样器=》后置处理器=》断言=》监听器
问题:
[root@iZwz95j86y235aroi85ht0Z bin]# ./jmeter-server
	Created remote object: UnicastServerRef2 [liveRef: [endpoint:[:39308](local),objID:[24e78a63:16243c70661:-7fff, 7492480871343944173]]]
	Server failed to start: java.rmi.RemoteException: Cannot start. Unable to get local host IP address.; nested exception is:
	java.net.UnknownHostException: iZwz95j86y235aroi85ht0Z: iZwz95j86y235aroi85ht0Z: Name or service not known
	An error occurred: Cannot start. Unable to get local host IP address.; nested exception is:
	java.net.UnknownHostException: iZwz95j86y235aroi85ht0Z: iZwz95j86y235aroi85ht0Z: Name or service not known
解决:
hostname  命令获取机器名称,追加一个映射  iZwz95j86y235aroi85ht0Z
vim /etc/hosts
  		127.0.0.1   localhost localhost.localdomain localhost4 localhost4.localdomain4
  		::1         localhost localhost.localdomain localhost6 localhost6.localdomain6
  		120.79.160.143 iZwz95j86y235aroi85ht0Z

windows用户 修改c:\windows\system32\drivers\etc\hosts文件,增加一条域名 与IP的映射
问题
[root@iZwz95j86y235aroi85ht0Z bin]# ./jmeter-server
	Server failed to start: java.rmi.server.ExportException: Listen failed on port: 0; nested exception is:
	java.io.FileNotFoundException: rmi_keystore.jks (No such file or directory)
	An error occurred: Listen failed on port: 0; nested exception is:
	java.io.FileNotFoundException: rmi_keystore.jks (No such file or directory)
解决:
拥有RMI over SSL的有效密钥库,或者禁用了SSL。
1、禁用SSL
jmeter.property里面 server.rmi.ssl.disable 改为 true,表示禁用
问题:
[root@iZ949uw2xehZ bin]# ./jmeter
		Java HotSpot(TM) 64-Bit Server VM warning: INFO: os::commit_memory(0x00000000c0000000, 1073741824, 0) failed; error='Cannot allocate memory' (errno=12)
		#
		# There is insufficient memory for the Java Runtime Environment to continue.
		# Native memory allocation (mmap) failed to map 1073741824 bytes for committing reserved memory.
		# An error report file with more information is saved as:
		# /usr/local/jmeter/apache-jmeter-4.0/bin/hs_err_pid5855.log
解决:
编辑jmeter
搜索 : "${HEAP:="-Xms1g -Xmx1g -XX:MaxMetaspaceSize=256m"}"
改变初始堆内存和最大堆内存
- 仅修改 server_port 即可,下面两者一样
server.rmi.localport=8899 表示slave server启动显示的端口
server_port=8899 表示master机器要远程连接的端口 即 remote_hosts=xxxx:8899
我们要在多网卡的服务器上开启RMI服务的话必须指定IP,使他们能够在同一个网段内。
需要以下几步(假定所有机器都在10.120.11.*网段,agent服务器为linux,controller服务器为windows):
1、 修改agent服务器,指定agent机器的IP
修改jmeter-server文件

# vi jmeter-server

修改RMI_HOST_DEF=-Djava.rmi.server.hostname=xxx.xxx.xxx.xxx(需要连接的IP)

2、修改server服务器,指定server机器的IP

修改jmeter.bat文件

新增set rmi_host=-Djava.rmi.server.hostname=10.120.11.214

修改set ARGS=%DUMP% %HEAP% %NEW% %SURVIVOR% %TENURING% %PERM% %DDRAW% %rmi_host%
-
确定在controller机器上安装jdk,版本和jmeter一致,配置环境变量:Java_home等
在Agent机器上安装jdk,配置环境变量:Java_home和JMeter_home 安装目录不要带空格,最好都是简短的英文路径 -
master机器启动后会拷贝jmx文件到slave机器
所以不需要在每台slave机器上也上传一份jmx,只需要在master机器上上传一份jmx脚本即可。 如果使用csv进行参数化,则需要把参数文件在每台slave上拷一份且路径需要设置成一样的。 总样本数 = 线程数 * 循环次数 * 执行机总数 -
连接失败原因排查
以下步骤进行排查:
1. jmeter-server是否启动;
2. 是否联网
3. ping 服务器IP是否畅通.
4. telnet 端口 192.168.3.10 1099
5. 检查服务器的防火墙是否关闭。
6. 阿里云安全策略是否正常
-
“could not find ApacheJmeter_core.jar”
解决:在Agent机器安装jdk,并设置环境变量 -
”Bad call to remote host"
解决:检查被控制机器上的jmeter-server有没有启动,或者remote_hosts的配置是否正确。
