Gradio App生产环境部署教程
如果机器学习模型没有投入生产供人们使用,就无法充分发挥其潜力。 根据我们的经验,将模型投入生产的最常见方法是为其创建 API。 然而,我们发现这个过程对于 ML 开发人员来说可能相当令人畏惧,特别是如果他们不熟悉 Web 开发的话。
在这篇文章中,我们将向你展示如何使用 FastAPI 和 Gradio 将模型公开为 API,然后创建一个 Docker 映像,该映像已准备好部署到容器实例中。
在线工具推荐: Three.js AI纹理开发包 - YOLO合成数据生成器 - GLTF/GLB在线编辑 - 3D模型格式在线转换 - 可编程3D场景编辑器
1、技术栈概述
我们使用 nq-distilbert-base-v1,这是一个在 Natural Questions 数据集上训练过的sentence-transformer模型。 该数据集包含来自 Google 搜索的真实问题以及来自维基百科的注释数据,提供了答案。 对于段落,我们将维基百科文章标题与各个文本段落一起编码。 我们使用的是简单英语维基百科,它仅包含 17 万篇文章,因此它要小得多,并且可以装入内存。
该模型还支持 GPU,因此可以在 Nvidia CUDA 设备上运行。
1.1 FastAPI
FastAPI 是一个现代、快速的 Web 框架,用于基于标准 Python 类型提示在 Python 中构建 API。 它开箱即用,支持通过 Swagger UI 使用 OpenAPI 标准自动生成 API 文档。
1.2 Gradio
Gradio 是一个 Python 库,用于为 ML 模型快速创建 Web 界面。 它构建在 Streamlit 之上,旨在易于使用和部署。 这对于向其他人展示你的模型并获得反馈非常有用且有趣。
1.3 Docker
Docker 是一个用于以容器形式构建、运行和运输应用程序的平台。 它是虚拟机的轻量级替代方案,是将应用程序及其依赖项打包到单个单元中的好方法。 可以说,它已经成为将应用程序投入生产的事实上的标准。
2、构建 API
我们将使用 FastAPI 来构建我们的 API,并使用 uvicorn 来运行它。 Gradio 将用于创建演示 Web 界面,并将其安装在 FastAPI 应用程序上。
理想情况下,你应该使用 python 3.7 及更高版本。 首先安装这些依赖项:
pip install fastapi uvicorn gradio sentence-transformers在使用 FastAPI 之前,我们需要编写一个预测函数,该函数接受问题(模型的输入)并返回答案(模型的输出):
# main.py

from sentence_transformers import SentenceTransformer, util

bi_encoder = SentenceTransformer('nq-distilbert-base-v1')

### Create corpus embeddings containing the wikipedia passages
### To keep things summaraized, we are not going to show the code for this part

def predict(question):
    # Encode the query using the bi-encoder and find potentially relevant passages
    question_embedding = bi_encoder.encode(query, convert_to_tensor=True)
    hits = util.semantic_search(question_embedding, corpus_embeddings, top_k=top_k)
    hits = hits[0]  # Get the hits for the first query

    # transform hits into a list of dictionaries, and obtain passages with corpus_id
    results = [
        {
            "score": hit["score"],
            "title": passages[hit["corpus_id"]][0],
            "text": passages[hit["corpus_id"]][1],
        }
        for hit in hits
    ]

    return results
在 Github 上查看此文件的完整代码。
3、使用 Gradio 测试预测函数
为了快速测试预测功能,我们可以使用 Gradio 为其创建一个 Web 界面。 但首先,创建一个函数,从 Gradio 读取输入,调用预测函数,并以 Gradio 可以理解的格式返回输出。
# main.py

import gradio as gr

def gradio_predict(question: str):
    results = predict(question) # results is a list of dictionaries

    best_result = results[0]

    # return a tuple of the title and text as a string, and the score as a number
    return f"{best_result['title']}\n\n{best_result['text']}", best_result["score"]
我们现在可以为 gradio_predict 函数创建一个 Gradio 接口:
# main.py

demo = gr.Interface(
    fn=gradio_predict,
    inputs=gr.Textbox(
        label="Ask a question", placeholder="What is the capital of France?"
    ),
    outputs=[gr.Textbox(label="Answer"), gr.Number(label="Score")],
    allow_flagging="never",
)

demo.launch()
现在运行 python main.py 来启动 Gradio 演示,它现在可以在 localhost:7860 上使用。 由于下载和加载模型,因此初始化可能需要一段时间:
尝试发送问题,你应该会看到答案和分数。
4、创建 FastAPI 应用
现在,我们使用 FastAPI 在 /predict 创建一个 POST 请求端点,该端点接收带有问题键的 JSON 对象,并返回预测函数的结果。
# main.py

from fastapi import FastAPI
from pydantic import BaseModel

app = FastAPI()


class Request(BaseModel):
    question: str


class Result(BaseModel):
    score: float
    title: str
    text: str


class Response(BaseModel):
    results: typing.List[Result] # list of Result objects


@app.post("/predict", response_model=Response)
async def predict_api(request: Request):
    results = predict(request.question)
    return Response(
        results=[
            Result(score=r["score"], title=r["title"], text=r["text"])
            for r in results
        ]
    )
让我们来分解一下。
from fastapi import FastAPI
from pydantic import BaseModel

app = FastAPI()
这将创建一个 FastAPI 应用程序,我们现在可以向其添加端点。
class Request(BaseModel):
    question: str


class Result(BaseModel):
    score: float
    title: str
    text: str


class Response(BaseModel):
    results: typing.List[Result] # list of Result objects
这些是我们用来定义 API 预期输入和输出的 pydantic 模型。 定义这些模型是可选的,但这样做是一个很好的做法,因为它允许 FastAPI 自动生成 API 文档。
@app.post("/predict", response_model=Response)
async def predict_api(request: Request):
    results = predict(request.question)
    return Response(
        results=[
            Result(score=r["score"], title=r["title"], text=r["text"])
            for r in results
        ]
    )
这是我们添加到 FastAPI 应用程序的 POST 请求端点。 它接受一个请求模型,并返回一个我们之前定义的响应模型。 本质上,它运行我们编写的预测函数,并返回结果。
5、测试 FastAPI 应用程序
现在,我们可以通过运行 uvicorn main:app --reload 来测试 FastAPI 应用程序,然后使用包含问题键的 JSON 正文向 localhost:8000/predict 发送 POST 请求:
curl -X POST "http://localhost:8000/predict" \
-H "accept: application/json" \
-H "Content-Type: application/json" \
-d "{\"question\":\"What is the capital of France?\"}"
应该收到一个结果列表作为问题的答案:
{
  "results": [
    {
      "score": 0.8317935466766357,
      "title": "Capital of France",
      "text": "The capital of France is Paris. In the course of history, the national capital has been in many locations other than Paris."
    },
    {
      "score": 0.7517948150634766,
      "title": "Versailles, Yvelines",
      "text": "Versailles is a French city. It is in the western suburbs of Paris, 17.1 km. (10.6 miles) from the center of Paris. It is the \"capital\" of the Yvelines département. This city is very important for the History of France because it was formerly the capital of the kingdom of France."
    },
    {
      "score": 0.7379363775253296,
      "title": "Arrondissement of Sarlat-la-Canéda",
      "text": "The arrondissement of Sarlat-la-Canéda is an arrondissement of France. It is part of the Dordogne \"département\" in the Nouvelle-Aquitaine region. Its capital is the city of Sarlat-la-Canéda."
    },
    {
      "score": 0.7338694334030151,
      "title": "Arrondissement of Figeac",
      "text": "The arrondissement of Figeac is an arrondissement of France. It is part of the Lot \"département\" in the Occitanie region. Its capital is the city of Figeac."
    },
    {
      "score": 0.7309824228286743,
      "title": "Arrondissement of Confolens",
      "text": "The arrondissement of Confolens is an arrondissement of France, in the Charente department, Nouvelle-Aquitaine region. Its capital is the city of Confolens."
    }
  ]
}
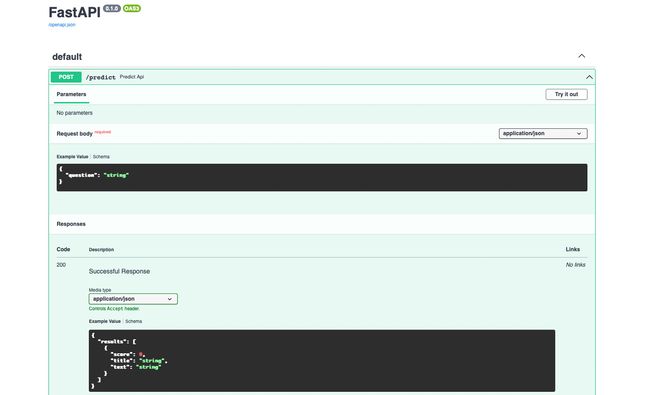
6、浏览 FastAPI 文档
现在在浏览器中打开 localhost:8000/docs,你应该会看到 FastAPI 文档。
这对于其他开发人员了解如何使用你的 API 非常有用。
7、将 Gradio 演示安装为应用程序
要使用 FastAPI 应用程序和我们创建的 Gradio 演示构建统一的服务器,我们只需将 Gradio 演示安装到 FastAPI 应用程序中即可:
# main.py

# mounting at the root path
app = gr.mount_gradio_app(app, demo, path="/")
就这样,我们可以使用 uvicorn main:app --reload 重新启动应用程序,Gradio 演示现在应该可以在 localhost:8000 上使用。
8、构建 Docker 镜像
现在我们有了一个可以运行的应用程序,我们可以为其构建一个 Docker 镜像。
我们将使用 Docker Hub 上提供的 pytorch 基础镜像。 具体来说,我们将使用 pytorch/pytorch:1.13.1-cuda11.6-cudnn8-runtime 镜像,它是 PyTorch 1.13.1 启用 CUDA 的映像。
在构建图像之前,我们需要一个 Entrypoint.sh 脚本来使用 uvicorn 运行应用程序。 它还需要一个 PORT 环境变量,以便我们可以指定运行应用程序的端口:
# entrypoint.sh

#!/bin/bash

uvicorn --host 0.0.0.0 --port $PORT app:app
之后,我们在 Dockerfile 中编写一组用于构建映像的指令:
# Dockerfile

# Base image
FROM pytorch/pytorch:1.13.1-cuda11.6-cudnn8-runtime

# Set environment variables
ENV PORT=8000

# Install python dependencies
RUN pip install sentence-transformers fastapi uvicorn gradio

# Set working directory
WORKDIR /model

# Copy files to /model
COPY . .

# Make entrypoint.sh executable
RUN chmod +x ./entrypoint.sh

# Run entrypoint.sh when container starts
ENTRYPOINT [ "/model/entrypoint.sh" ]
为了构建镜像,我们运行:
docker build -t wiki-qa .现在我们完成了! 我们可以运行镜像:
docker run -it --rm -p 8000:8000 wiki-qa该应用程序应该再次在 localhost:8000 上可用。
该映像现在已准备好部署到任何容器服务。 它可以在 CPU 或 GPU 上运行,具体取决于你希望预测的速度。 例如,你可以使用 Deploifai 部署此映像,并在几分钟内获得生产就绪的 API 端点:
10、生产环境性能
我们在 Deploifai 上创建了 2 个测试部署,一个在 CPU 上,一个在 GPU (K80) 上,以比较模型在 CPU 与 GPU 上的性能:
| 部署 | vCPU | RAM | API响应时间 |
|---|---|---|---|
| CPU | 2 | 8 GB | 2 - 4 秒 |
| GPU (K80) | 2 | 8 GB | 0.5 - 1 秒 |
原文链接:Gradio App生产部署 - BimAnt


