四层负载均衡(haproxy实现)
文章目录
-
- haproxy
-
- 安装
- 使用
- 效果
- 日志管理
-
- 效果
- 管理页面
- 调度算法
-
- 效果
- acl访问控制
- 动静分离
- 读写分离
- 结合keepalived实现高可用
-
- 安装
- 测试VIP
- 设置脚本检查haproxy状态
- 效果
- haproxy + pacemaker
-
- 配置PCSD
haproxy
haproxy是一种web服务解决方案,HAProxy提供高可用性、负载均衡以及基于TCP和HTTP应用的代理,支持虚拟主机,它是免费、快速并且可靠的一种解决方案。HAProxy特别适用于那些负载特大的web站点, 这些站点通常又需要会话保持或七层处理。HAProxy运行在当前的硬件上,完全可以支持数以万计的并发连接。并且它的运行模式使得它可以很简单安全的整合进您当前的架构中, 同时可以保护你的web服务器不被暴露到网络上。
安装
haproxy是系统自带的软件 只要运行 yum install haproxy 就可以安装了
使用
编辑/etc/haproxy/haproxy.cfg
 1 #---------------------------------------------------------------------
  2 # Example configuration for a possible web application.  See the
  3 # full configuration options online.
  4 #
  5 #   http://haproxy.1wt.eu/download/1.4/doc/configuration.txt
  6 #
  7 #---------------------------------------------------------------------
  8
  9 #---------------------------------------------------------------------
 10 # Global settings
 11 #---------------------------------------------------------------------
 12 global
 13     # to have these messages end up in /var/log/haproxy.log you will
 14     # need to:
 15     #
 16     # 1) configure syslog to accept network log events.  This is done
 17     #    by adding the '-r' option to the SYSLOGD_OPTIONS in
 18     #    /etc/sysconfig/syslog
 19     #
 20     # 2) configure local2 events to go to the /var/log/haproxy.log
 21     #   file. A line like the following can be added to
 22     #   /etc/sysconfig/syslog
 23     #
 24     #    local2.*                       /var/log/haproxy.log
 25     #
 26     log         127.0.0.1 local2
 27
 28     chroot      /var/lib/haproxy
 29     pidfile     /var/run/haproxy.pid
 30     maxconn     4000
 31     user        haproxy
 32     group       haproxy
 33     daemon
 34
 35     # turn on stats unix socket
 36     stats socket /var/lib/haproxy/stats
 37
 38 #---------------------------------------------------------------------
 39 # common defaults that all the 'listen' and 'backend' sections will
 40 # use if not designated in their block
 41 #---------------------------------------------------------------------
 42 defaults
 43     mode                    http
 44     log                     global
 45     option                  httplog
 46     option                  dontlognull
 47     option http-server-close
 48     option forwardfor       except 127.0.0.0/8
 49     option                  redispatch
 50     retries                 3
 51     timeout http-request    10s
 52     timeout queue           1m
 53     timeout connect         10s
 54     timeout client          1m
 55     timeout server          1m
 56     timeout http-keep-alive 10s
 57     timeout check           10s
 58     maxconn                 3000
 59
 60 #---------------------------------------------------------------------
 61 # main frontend which proxys to the backends
 62 #---------------------------------------------------------------------
 63 frontend  main *:80	##端口号设置成80
 64     #acl url_static       path_beg       -i /static /images /javascript /stylesheets
 65     #acl url_static       path_end       -i .jpg .gif .png .css .js
 66
 67     #use_backend static          if url_static
 68     default_backend             app
 69
 70 #---------------------------------------------------------------------
 71 # static backend for serving up images, stylesheets and such
 72 #---------------------------------------------------------------------
 73 #backend static
 74 #   balance     roundrobin
 75 #  server      static 127.0.0.1:4331 check
 76
 77 #---------------------------------------------------------------------
 78 # round robin balancing between the various backends
 79 #---------------------------------------------------------------------
 80 backend app
 81     balance     roundrobin
 82     server  app1 172.25.254.203:80 check  ##这是后端RS
 83     server  app2 172.25.254.204:80 check
效果
轮循访问
[root@server1 ~]# curl 172.25.254.202
hello server4
[root@server1 ~]# curl 172.25.254.202
hello server3
[root@server1 ~]# curl 172.25.254.202
hello server4
[root@server1 ~]# curl 172.25.254.202
hello server3
[root@server1 ~]#
日志管理
- 1 在 /etc/sysconfig/syslog里加上"-r"参数
- 2 在/etc/sysconfig/syslog加一行
local2.* /var/log/haproxy.log - 3 编辑rsyslog配置 /etc/rsyslog.conf
取消注释
15 $ModLoad imudp
16 $UDPServerRun 514
修改/etc/rsyslog/rsyslog.cfg
54*.info;mail.none;authpriv.none;cron.none:local2.none /var/log/messages
74 local2.* /var/log/haproxy.log
效果
[root@server2 ~]# cat /var/log/messages
[root@server2 ~]# cat /var/log/haproxy.log
Aug 10 00:57:59 localhost haproxy[13871]: 172.25.254.201:52996 [10/Aug/2020:00:57:59.691] main app/app1 0/0/1/9/10 200 291 - - ---- 1/1/0/1/0 0/0 "GET / HTTP/1.1"
Aug 10 00:58:00 localhost haproxy[13871]: 172.25.254.201:52998 [10/Aug/2020:00:58:00.354] main app/app2 0/0/1/2/3 200 291 - - ---- 1/1/0/0/0 0/0 "GET / HTTP/1.1"
[root@server2 ~]#
管理页面
编辑/etc/haproxy/haproxy.cfg
58 timeout check 10s
59 maxconn 3000
60 stats uri /status ##开启管理界面
61 stats auth admin:westos ##设置管理用户
62 stats refresh 5s ## 设置刷新时间


调度算法
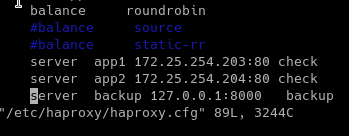
 84     #balance     roundrobin  ## 轮循机制
 85     #balance     source		## 根据源ip分配服务 相同的ip只会访问一台服务器 但如果存在cdn网络 会造成某一台服务器过载宕掉
 86     #balance     static-rr  ## 权重机制
 87     server  app1 172.25.254.203:80 check # weight 1
 88     server  app2 172.25.254.204:80 check # weight 2
 89     #server  backup 127.0.0.1     backup # 如果RS都宕掉 会使用这个server
效果
source 机制

权重机制

应急服务
配置httpd服务
此时要注意httpd的开启的是8000 避免和haproxy80 冲突


可以看到客户访问的是172.25.254.202:80端口 返回的是http的8000的端口 实际上利用了haproxy的端口转发功能
acl访问控制

禁止访问test页面


重定向test页面


而curl是文本格式不支持重定向
总结
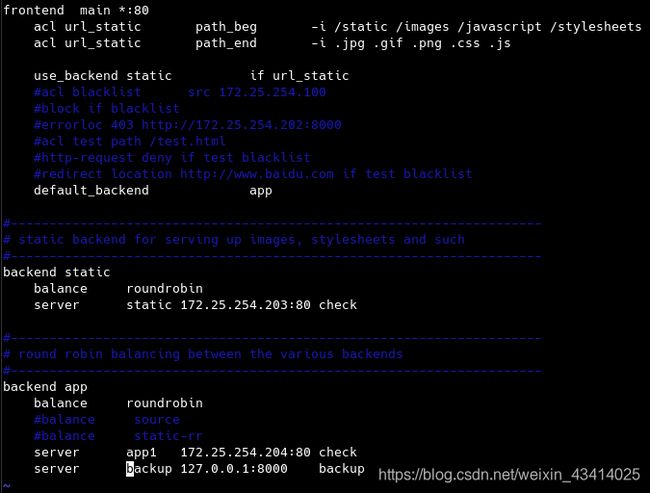
acl语句定义了资源类型 比方说(blacklist test ) 而if是条件判断
动静分离
读写分离
要求:
在server3 和 server4上 部署相同的上传图片 但在上传时上传到server4
- 1 部署上传页面
index.php
<html>
<body>

<form action="upload_file.php" method="post"
enctype="multipart/form-data">
<label for="file">Filename:</label>
<input type="file" name="file" id="file" />
<br />
<input type="submit" name="submit" value="Submit" />
</form>

</body>
</html>
~
upload_load.php
if ((($_FILES["file"]["type"] == "image/gif")
|| ($_FILES["file"]["type"] == "image/jpeg")
|| ($_FILES["file"]["type"] == "image/pjpeg"))
&& ($_FILES["file"]["size"] < 20000))
  {
  if ($_FILES["file"]["error"] > 0)
    {
    echo "Return Code: " . $_FILES["file"]["error"] . "
";
    }
  else
    {
    echo "Upload: " . $_FILES["file"]["name"] . "
";
    echo "Type: " . $_FILES["file"]["type"] . "
";
    echo "Size: " . ($_FILES["file"]["size"] / 1024) . " Kb
";
    echo "Temp file: " . $_FILES["file"]["tmp_name"] . "
";

    if (file_exists("upload/" . $_FILES["file"]["name"]))
      {
      echo $_FILES["file"]["name"] . " already exists. ";
      }
    else
      {
      move_uploaded_file($_FILES["file"]["tmp_name"],
      "upload/" . $_FILES["file"]["name"]);
      echo "Stored in: " . "upload/" . $_FILES["file"]["name"];
      }
    }
  }
else
  {
  echo "Invalid file";
  }
?>
~
结合keepalived实现高可用
安装
在server1和server2上安装keepalived
并配置/etc/keepalived/keepalived.conf
! Configuration File for keepalived

global_defs {
bal_defs {
   notification_email {
     root@localhost
   }
   notification_email_from keepalived@localhost
   smtp_server 127.0.0.1
   smtp_connect_timeout 30
   router_id LVS_DEVEL
   vrrp_skip_check_adv_addr
   vrrp_garp_interval 0
   vrrp_gna_interval 0
}
vrrp_instance VI_1 {
    state MASTER ##根据主备选择
    interface eth0
    virtual_router_id 51
    priority 100 ##主必须比备大
    advert_int 1
    authentication {
        auth_type PASS
        auth_pass 1111
    }
    virtual_ipaddress {
        172.25.254.150
    }
}
}
~
启用keepalived并把修改haproxy配置
66 frontend  main 172.25.254.150:80
## 可以不改但改了比较合理
开启server1 并执行上述操作配置文件相同
测试VIP
设置脚本检查haproxy状态
编辑/etc/keepalived/keepalived.conf
#!/bin/bash
systemctl status haproxy &> /dev/null || systemctl start haproxy &> /dev/null ## 先尝试重启
systemctl status haproxy &> /dev/null&&{										## 如果重启成功返回0 否则返回1
        exit 0
}||{
        exit 1
}
在/etc/keepalived/keepalived.conf设置使用脚本进行健康检查
  1 ! Configuration File for keepalived
  2
  3 global_defs {
  4    notification_email {
  5      [email protected]
  6    }
  7    notification_email_from keepalived@localhost
  8    smtp_server 127.0.0.1
  9    smtp_connect_timeout 30
 10    router_id LVS_DEVEL
 11    vrrp_skip_check_adv_addr
 12    #vrrp_strict
 13    vrrp_garp_interval 0
 14    vrrp_gna_interval 0
 15 }
 16 vrrp_script check_haproxy {
 17    script "/opt/check_haproxy" ##检测haproxy是否存在 并尝试重启
 18    interval 2
 19    weight -60
 20 }
 21 vrrp_instance VI_1 {
 22     state MASTER
 23     interface eth0
 24     virtual_router_id 51
 25     priority 100
 26     advert_int 1
 27     authentication {
 28         auth_type PASS
 29         auth_pass 1111
 30     }
 31     track_script {
 32         check_haproxy
 33     }
 34     virtual_ipaddress {
 35         172.25.254.250
server2 除了状态设定为BACKUP 初始权重设为50其他相同
效果


可以看到 server1 haproxy服务起不来以后 vip转交给了server2
ps: 要注意只有在状态为master的主机上有VIP 如果haproxy设置成只监听VIP的话 backup主机上的hapoxy不能启动
haproxy + pacemaker
配置PCSD
server1 172.25.254.201 server2 172.25.254.202
- 安装
yum install -y pacemaker pcs psmisc policycoreutils-python
- 启用 并认证用户
systemctl enable --now pcsd.service
echo redhat1 | passwd --stdin hacluster
pcs cluster auth server1 server2 #输入用户名密码
pcs cluster setup --name mycluster server1 server2
- 部署haproxy和vip并绑定
[root@server1 haproxy]# pcs resource create VIP ocf:heartbeat:IPaddr2 \
> ip=172.25.254.250 op monitor interval=30s
[root@server1 haproxy]# pcs resource create haproxy systemd:haproxy op monitor interval=1min
[root@server1 haproxy]# pcs resource group add webgroup VIP haproxy
[root@server1 haproxy]#


