Tensorflow object detection API 搭建属于自己的物体识别模型(超级详细)
一、Tensorflow object detection API 搭建属于自己的物体识别模型(1)——环境搭建与测试
https://blog.csdn.net/dy_guox/article/details/79111949
后续博客地址(附带视频教程)
-------------------------------------------------------------------------------
最近对深度学习比较感兴趣,看了网上很多资料,尝试了一下Tensorflow object detection API,想要在自己的数据集上调用API完成识别,积累了不少经验,记录下来,以后给需要的人。
1.开发环境搭建
在自己笔记本上完成。
操作系统:windows 10 64位
内存:8G
GPU:Nvidia MX 150
Tensorflow: 1.4
(1) 安装python
建议选择 Anaconda3-5.0.1 版本,已经集成大多数库,并将其作为默认python版本(3.6.3),配置好环境变量(Anaconda安装则已经配好)
(2)安装Tensorflow
Tensorflow有CPU版本与GPU版本,首先安装CPU版本。采用pip原生安装。“开始-Anaconda3-Anaconda Prompt”调出命令行。
pip install --upgrade tensorflow然后安装GPU版本。此过程中有报错,先运行conda install pip更新pip程序即可。pip install --upgrade tensorflow-gpu
当然也可以在Anaconda中新建一个虚拟环境进行安装,详见https://www.tensorflow.org/install/install_windows
对于GPU版本,需要安装如下软件:
1)CUDA® Toolkit 8.0, 需要注意最新版9.1不支持tensorflow 1.4版本;
2) cuDNN v6.0,7.0不支持tensorflow 1.4版本,现在cuDNN需要先注册成为NVIDIA开发者,下载后将cuDNN中对应文件夹下的.dll文件分别复制到CUDA安装目录对应文件夹下;
3) 对应的显卡驱动,如果驱动较新,在安装CUDA的时候会有提示可能不兼容,可以无视。
要测试Tensorflow 是否安装成功,打开命令行,首先激活python
开始-Anaconda3-Anaconda Prompt,输入'python',然后逐行输入下面的文字
>>> import tensorflow as tf
>>> hello = tf.constant('Hello, TensorFlow!')
>>> sess = tf.Session()
>>> print(sess.run(hello))
当输出下面这行字,说明安装成功。
Hello, TensorFlow!(3)下载Tensorflow object detection API
https://github.com/tensorflow/models
从github上下载项目(右上角“Clone or download”-"DownloadZIP"),下载到本地目录(避免中文),解压。
(4)Protobuf 安装与配置
在 https://github.com/google/protobuf/releases 网站中选择windows 版本(最下面),解压后将bin文件夹中的【protoc.exe】放到C:\Windows
在models\research\目录下打开命令行窗口,输入:
# From tensorflow/models/protoc object_detection/protos/*.proto --python_out=.在这一步有时候会出错,可以尝试把/*.proto 这部分改成文件夹下具体的文件名,一个一个试,每运行一个,文件夹下应该
出现对应的.py结尾的文件。不报错即可。
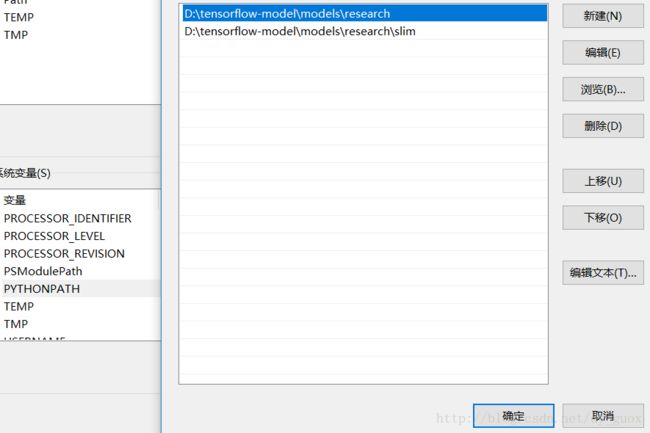
(5)PYTHONPATH 环境变量设置
在 ‘此电脑’-‘属性’- ‘高级系统设置’ -‘环境变量’-‘系统变量’ 中新建名为‘PYTHONPATH’的变量,将
models/research/ 及 models/research/slim 两个文件夹的完整目录添加,分号隔开,效果如下图:
接下来可以测试API,在models/research/ 文件夹下运行命令行:
python object_detection/builders/model_builder_test.py不报错说明运行成功。
2.测试自带案例
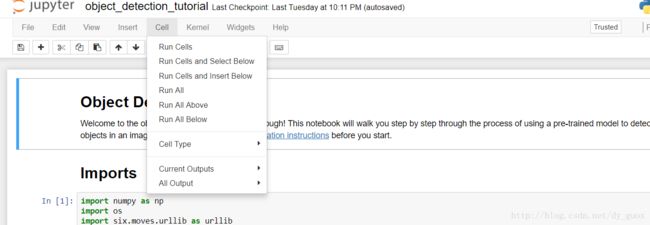
“开始-Anaconda3-Anaconda Prompt”调出命令行,改变工作目录至 models\research\object_detection
 然后输入jupyter notebook,就会调用浏览器(Chrome)打开当前文件夹,点开object_detection_tutorial.ipynb,
在新标签页中打开 Object Detection Demo,点击上方的 “Cell”-"Run All",
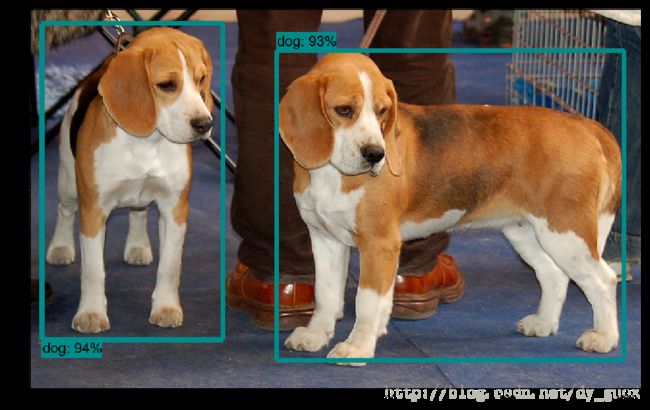
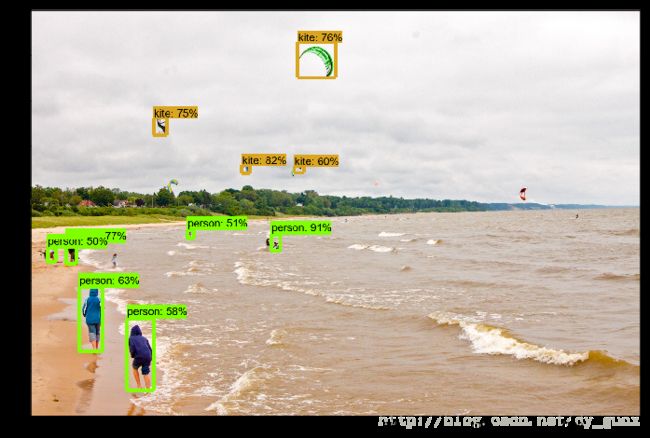
 就可以直接看到结果,最后输出的是两张图片的识别结果,分别是狗,以及沙滩。第一次运行由于需要下载训练好的模型,耗时较长。第二次之后可以将 .ipynb文件中 Download Model 即 in[5]部分的代码注释掉,以加快运行速度。
如果在notebook中运行有问题,可以将.ipynb中in[]的代码复制到.py中,然后在开始-Anaconda3-spyder 中运行。
至此Tensorflow object detection API 的环境搭建与测试工作完成。
下一步我们可以在此基础上对代码进行适当的修改,可以用已有的模型来检测自己的图片,甚至视频,并输出结果。
在进一步,可以用自己标注的数据集进行训练与评估。这些内容将在后续的博客中呈现。
################################################################################################
###################################################################################################
二、(更新视频教程)Tensorflow object detection API 搭建属于自己的物体识别模型(2)——训练并使用自己的模型
本人时差党,有时候回复不及时。创建了一个QQ群,方便大家互相学习交流。
-------------------------------------------------------------------------------2群号:902067304

-------------------------------------------------------------------------------
(1群人已满)点击链接加入群聊【Tensorflow学习交流群】:https://jq.qq.com/?_wv=1027&k=55j9V1r

-------------------------------------------------------------------------------
2018.05.04更新!
如何将训练好的模型移植到Android手机上:
https://blog.csdn.net/dy_guox/article/details/80192343
视频演示:
https://www.bilibili.com/video/av22957279/
-------------------------------------------------------------------------------
2018.04.02更新!
https://www.bilibili.com/video/av21539370/
系列操作视频已经上传,请有需要的读者自行前往。写博客的时候Tensorflow是1.4版本,视频里更新的是1.7版本,这中间遇到非常多的问题,加上第一次做视频,难免有很多问题,感谢理解!
https://blog.csdn.net/dy_guox/article/details/80139981
另外一个博客里更新了常见问题汇总,大家可以去看一下,欢迎分享或纠正!
-------------------------------------------------------------------------------
在上一篇博客中(http://blog.csdn.net/dy_guox/article/details/79081499),我们成功安装了Tensorflow Object Detection API所需的开发环境,并在官方的Demo上成功进行了测试,接下来尝试运用自己的数据进行训练与测试。
项目代码汇总:
https://github.com/XiangGuo1992/Screen-Vehicle-Detection-using-Tensorflow-API
一、分析代码结构
仍然打开object_detection文件夹中的 object_detection_tutorial.ipynb ,分析代码结构。
第一部分Imports导入需要的包,不需要做更改。
- import numpy as np
- import os
- import six.moves.urllib as urllib
- import sys
- import tarfile
- import tensorflow as tf
- import zipfile
- from collections import defaultdict
- from io import StringIO
- from matplotlib import pyplot as plt
- from PIL import Image
- if tf.__version__ < '1.4.0':
- raise ImportError('Please upgrade your tensorflow installation to v1.4.* or later!')
第二部分Env setup 设置系统环境,不必更改。
- # This is needed to display the images.
- %matplotlib inline
- # This is needed since the notebook is stored in the object_detection folder.
- sys.path.append("..")
第三部分Object detection imports 导入Object detection 需要的模块,如果报错,说明工作目录设置不对,或者.../research以及.../research/slim 的环境变量没有设置好。
- from utils import label_map_util
- from utils import visualization_utils as vis_util
第四部分为设置模型的对应参数。
- # 下载模型的名字
- MODEL_NAME = 'ssd_mobilenet_v1_coco_2017_11_17'
- MODEL_FILE = MODEL_NAME + '.tar.gz'
- DOWNLOAD_BASE = 'http://download.tensorflow.org/models/object_detection/'
- # Path to frozen detection graph. This is the actual model that is used for the object detection.
- PATH_TO_CKPT = MODEL_NAME + '/frozen_inference_graph.pb'
- # List of the strings that is used to add correct label for each box.
- PATH_TO_LABELS = os.path.join('data', 'mscoco_label_map.pbtxt')
- NUM_CLASSES = 90
github上有对应官方的各种模型(地址摸我),这些都是基于不用的数据集事先训练好的模型,下载好以后就可以直接调用。下载的文件以 '.tar.gz'结尾。'PATH_TO_CKPT'为‘.pb’文件的目录,'.pb'文件是训练好的模型(frozen detection graph),即用来预测时使用的模型。‘PATH_TO_LABELS’为标签文件,记录了哪些标签需要识别,'NUM_CLASSES'为类别的数目,根据实际需要修改。

见上图,第一列是模型名字,第二列是速度,第三列是精度。这里需要注意几点:
1、Model name上的名字与代码中“MODEL_NAME”后面变量的名字不一样,可以发现后者还有日期,在写代码的时候需要像后者那样将名字写完整,想得到完整的名字,可以直接在网站上点击对应的模型,弹出“另存为”对话框时就能够发现完整的“MODEL_NAME”,如下图所示。
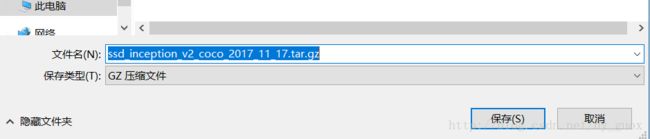
2、列表中速度快的模型,一般自己训练也会快,但是精度高的不一定使用自己的数据集时精度也高,因为训练的数据集及模型参数可能本身就存在差异,建议先用Demo中的‘ssd_mobilenet_v1_coco_2017_11_17’,速度最快。
第五部分Download Model 为下载模型,通过向对应网站发送请求进行下载解压操作。第六部分Load a (frozen) Tensorflow model into memory 将训练完的模型载入内存,第六部分Loading label map将标签map载入,这几个部分都不用修改,直接复制即可。
- opener = urllib.request.URLopener()
- opener.retrieve(DOWNLOAD_BASE + MODEL_FILE, MODEL_FILE)
- tar_file = tarfile.open(MODEL_FILE)
- for file in tar_file.getmembers():
- file_name = os.path.basename(file.name)
- if 'frozen_inference_graph.pb' in file_name:
- tar_file.extract(file, os.getcwd())
- detection_graph = tf.Graph()
- with detection_graph.as_default():
- od_graph_def = tf.GraphDef()
- with tf.gfile.GFile(PATH_TO_CKPT, 'rb') as fid:
- serialized_graph = fid.read()
- od_graph_def.ParseFromString(serialized_graph)
- tf.import_graph_def(od_graph_def, name='')
- label_map = label_map_util.load_labelmap(PATH_TO_LABELS)
- categories = label_map_util.convert_label_map_to_categories(label_map, max_num_classes=NUM_CLASSES, use_display_name=True)
- category_index = label_map_util.create_category_index(categories)
- def load_image_into_numpy_array(image):
- (im_width, im_height) = image.size
- return np.array(image.getdata()).reshape(
- (im_height, im_width, 3)).astype(np.uint8)
接下来Detection 部分,首先设置检测目标文件夹:
- # For the sake of simplicity we will use only 2 images:
- # image1.jpg
- # image2.jpg
- # If you want to test the code with your images, just add path to the images to the TEST_IMAGE_PATHS.
- PATH_TO_TEST_IMAGES_DIR = 'test_images'
- TEST_IMAGE_PATHS = [ os.path.join(PATH_TO_TEST_IMAGES_DIR, 'image{}.jpg'.format(i)) for i in range(1, 3) ]
- # Size, in inches, of the output images.
- IMAGE_SIZE = (12, 8)
在此代码中目标文件夹为object_detection文件夹下的test_images夹中 'images1.jpg' 与 'images2.jpg' ,可以直接改成自己需要的文件夹与文件名,如想要检测object_detection文件夹下的test_images2夹中' frame1.jpg' 到 'frame10.jpg',可以直接改成:
- PATH_TO_TEST_IMAGES_DIR = 'test_images2'
- TEST_IMAGE_PATHS = [ os.path.join(PATH_TO_TEST_IMAGES_DIR, 'frame{}.jpg'.format(i)) for i in range(1, 11) ]
test_images2'
TEST_IMAGE_PATHS = [ os.path.join(PATH_TO_TEST_IMAGES_DIR, 'frame{}.jpg'.format(i)) for i in range(1, 11) ]
最后一部分,运行代码,也不需要更改。
- with detection_graph.as_default():
- with tf.Session(graph=detection_graph) as sess:
- # Definite input and output Tensors for detection_graph
- image_tensor = detection_graph.get_tensor_by_name('image_tensor:0')
- # Each box represents a part of the image where a particular object was detected.
- detection_boxes = detection_graph.get_tensor_by_name('detection_boxes:0')
- # Each score represent how level of confidence for each of the objects.
- # Score is shown on the result image, together with the class label.
- detection_scores = detection_graph.get_tensor_by_name('detection_scores:0')
- detection_classes = detection_graph.get_tensor_by_name('detection_classes:0')
- num_detections = detection_graph.get_tensor_by_name('num_detections:0')
- for image_path in TEST_IMAGE_PATHS:
- image = Image.open(image_path)
- # the array based representation of the image will be used later in order to prepare the
- # result image with boxes and labels on it.
- image_np = load_image_into_numpy_array(image)
- # Expand dimensions since the model expects images to have shape: [1, None, None, 3]
- image_np_expanded = np.expand_dims(image_np, axis=0)
- # Actual detection.
- (boxes, scores, classes, num) = sess.run(
- [detection_boxes, detection_scores, detection_classes, num_detections],
- feed_dict={image_tensor: image_np_expanded})
- # Visualization of the results of a detection.
- vis_util.visualize_boxes_and_labels_on_image_array(
- image_np,
- np.squeeze(boxes),
- np.squeeze(classes).astype(np.int32),
- np.squeeze(scores),
- category_index,
- use_normalized_coordinates=True,
- line_thickness=8)
- plt.figure(figsize=IMAGE_SIZE)
- plt.imshow(image_np)
弄清楚代码结构以后,就可以准备数据输入了。
二、创建训练/测试数据集
对于具体的任务,需要具体分析。
对于我个人,我的输入是一系列实验视频,想要在视频中识别特定的物体。
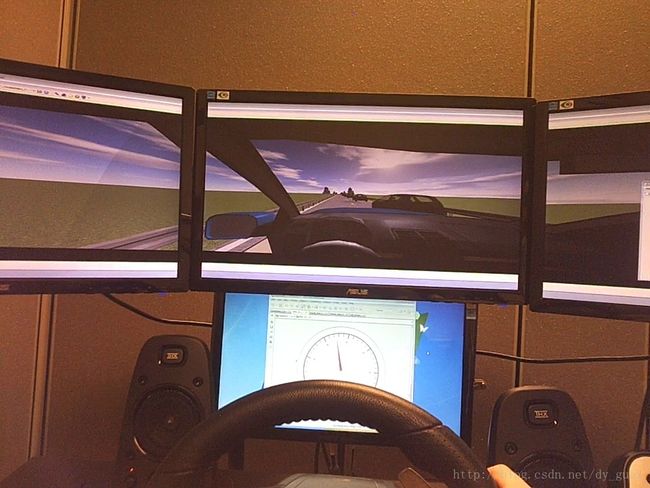
如上图,我想要识别中间的屏幕,以及屏幕内的车辆。对于机器学习来说,训练数据应该是标注好物体位置的文件。
使用LabelImg这款小软件,选出100张图片进行人工标注(时间充裕的话越多越好),如下图所示。
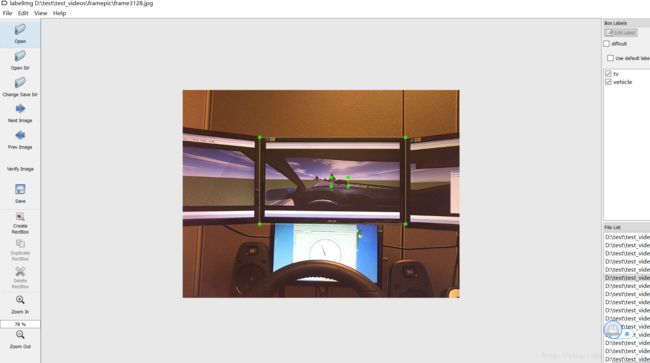
标注完成后保存为同名的xml文件。
对于Tensorflow,需要输入专门的TFRecords Format格式。
写两个小python脚本文件,第一个将文件夹内的xml文件内的信息统一记录到.csv表格中(xml_to_csv.py),第二个从.csv表格中创建TFRecords格式(generate_tfrecord.py),见我的github。
附上对应代码:
- # -*- coding: utf-8 -*-
- """
- Created on Tue Jan 16 00:52:02 2018
- @author: Xiang Guo
- 将文件夹内所有XML文件的信息记录到CSV文件中
- """
- import os
- import glob
- import pandas as pd
- import xml.etree.ElementTree as ET
- os.chdir('D:\\test\\test_images\\frame2')
- path = 'D:\\test\\test_images\\frame2'
- def xml_to_csv(path):
- xml_list = []
- for xml_file in glob.glob(path + '/*.xml'):
- tree = ET.parse(xml_file)
- root = tree.getroot()
- for member in root.findall('object'):
- value = (root.find('filename').text,
- int(root.find('size')[0].text),
- int(root.find('size')[1].text),
- member[0].text,
- int(member[4][0].text),
- int(member[4][1].text),
- int(member[4][2].text),
- int(member[4][3].text)
- )
- xml_list.append(value)
- column_name = ['filename', 'width', 'height', 'class', 'xmin', 'ymin', 'xmax', 'ymax']
- xml_df = pd.DataFrame(xml_list, columns=column_name)
- return xml_df
- def main():
- image_path = path
- xml_df = xml_to_csv(image_path)
- xml_df.to_csv('tv_vehicle_labels.csv', index=None)
- print('Successfully converted xml to csv.')
- main()
- # -*- coding: utf-8 -*-
- """
- Created on Tue Jan 16 01:04:55 2018
- @author: Xiang Guo
- 由CSV文件生成TFRecord文件
- """
- """
- Usage:
- # From tensorflow/models/
- # Create train data:
- python generate_tfrecord.py --csv_input=data/tv_vehicle_labels.csv --output_path=train.record
- # Create test data:
- python generate_tfrecord.py --csv_input=data/test_labels.csv --output_path=test.record
- """
- import os
- import io
- import pandas as pd
- import tensorflow as tf
- from PIL import Image
- from object_detection.utils import dataset_util
- from collections import namedtuple, OrderedDict
- os.chdir('D:\\tensorflow-model\\models\\research\\object_detection\\')
- flags = tf.app.flags
- flags.DEFINE_string('csv_input', '', 'Path to the CSV input')
- flags.DEFINE_string('output_path', '', 'Path to output TFRecord')
- FLAGS = flags.FLAGS
- # TO-DO replace this with label map
- #注意将对应的label改成自己的类别!!!!!!!!!!
- def class_text_to_int(row_label):
- if row_label == 'tv':
- return 1
- elif row_label == 'vehicle':
- return 2
- else:
- None
- def split(df, group):
- data = namedtuple('data', ['filename', 'object'])
- gb = df.groupby(group)
- return [data(filename, gb.get_group(x)) for filename, x in zip(gb.groups.keys(), gb.groups)]
- def create_tf_example(group, path):
- with tf.gfile.GFile(os.path.join(path, '{}'.format(group.filename)), 'rb') as fid:
- encoded_jpg = fid.read()
- encoded_jpg_io = io.BytesIO(encoded_jpg)
- image = Image.open(encoded_jpg_io)
- width, height = image.size
- filename = group.filename.encode('utf8')
- image_format = b'jpg'
- xmins = []
- xmaxs = []
- ymins = []
- ymaxs = []
- classes_text = []
- classes = []
- for index, row in group.object.iterrows():
- xmins.append(row['xmin'] / width)
- xmaxs.append(row['xmax'] / width)
- ymins.append(row['ymin'] / height)
- ymaxs.append(row['ymax'] / height)
- classes_text.append(row['class'].encode('utf8'))
- classes.append(class_text_to_int(row['class']))
- tf_example = tf.train.Example(features=tf.train.Features(feature={
- 'image/height': dataset_util.int64_feature(height),
- 'image/width': dataset_util.int64_feature(width),
- 'image/filename': dataset_util.bytes_feature(filename),
- 'image/source_id': dataset_util.bytes_feature(filename),
- 'image/encoded': dataset_util.bytes_feature(encoded_jpg),
- 'image/format': dataset_util.bytes_feature(image_format),
- 'image/object/bbox/xmin': dataset_util.float_list_feature(xmins),
- 'image/object/bbox/xmax': dataset_util.float_list_feature(xmaxs),
- 'image/object/bbox/ymin': dataset_util.float_list_feature(ymins),
- 'image/object/bbox/ymax': dataset_util.float_list_feature(ymaxs),
- 'image/object/class/text': dataset_util.bytes_list_feature(classes_text),
- 'image/object/class/label': dataset_util.int64_list_feature(classes),
- }))
- return tf_example
- def main(_):
- writer = tf.python_io.TFRecordWriter(FLAGS.output_path)
- path = os.path.join(os.getcwd(), 'images')
- examples = pd.read_csv(FLAGS.csv_input)
- grouped = split(examples, 'filename')
- for group in grouped:
- tf_example = create_tf_example(group, path)
- writer.write(tf_example.SerializeToString())
- writer.close()
- output_path = os.path.join(os.getcwd(), FLAGS.output_path)
- print('Successfully created the TFRecords: {}'.format(output_path))
- if __name__ == '__main__':
- tf.app.run()
对于训练集与测试集分别运行上述代码即可,得到train.record与test.record文件。
三、配置文件与模型
在上一步我们已经获得了训练与测试数据集,为了进一步工作,我们进行文件的归总,在object_dection文件夹下,我们有如下的文件结构:
Object-Detection
-data/
--test_labels.csv
--test.record
--train_labels.csv
--train.record
-images/
--test/
---testingimages.jpg
--train/
---testingimages.jpg
--...yourimages.jpg
-training
接下来需要设置配置文件, 进入 Object Detection github 对应页面 寻找 配置文件的Sample。
以ssd_mobilenet_v1_coco.config为例,在object_dection文件夹下,解压 ssd_mobilenet_v1_coco_2017_11_17.tar.gz,
将ssd_mobilenet_v1_coco.config 放在training 文件夹下,用文本编辑器打开(我用的sublime 3),进行如下操作:
1、搜索其中的PATH_TO_BE_CONFIGURED ,将对应的路径改为自己的路径,注意不要把test跟train弄反了;
2、将num_classes 按照实际情况更改,我的例子中是2;
3、batch_size原本是24,我在运行的时候出现显存不足的问题,为了保险起见,改为1,如果1还是出现类似问题的话,建议换电脑……
4、fine_tune_checkpoint: "ssd_mobilenet_v1_coco_11_06_2017/model.ckpt"
from_detection_checkpoint: true
这两行是设置checkpoint,我开始也设置,但是一直出现显存不足的问题,我的理解是从预先训练的模型中寻找checkpoint,可能是因为原先的模型是基于较大规模的公开数据集训练的,因此配置到本地的时候出现了问题,后来我选择删除这两行,相当于自己从头开始训练,最后正常了,因此如果是自己从头开始训练,建议把这两行删除。
# SSD with Mobilenet v1 configuration for MSCOCO Dataset.
# Users should configure the fine_tune_checkpoint field in the train config as
# well as the label_map_path and input_path fields in the train_input_reader and
# eval_input_reader. Search for "PATH_TO_BE_CONFIGURED" to find the fields that
# should be configured.
model {
ssd {
num_classes: 2
box_coder {
faster_rcnn_box_coder {
y_scale: 10.0
x_scale: 10.0
height_scale: 5.0
width_scale: 5.0
}
}
matcher {
argmax_matcher {
matched_threshold: 0.5
unmatched_threshold: 0.5
ignore_thresholds: false
negatives_lower_than_unmatched: true
force_match_for_each_row: true
}
}
similarity_calculator {
iou_similarity {
}
}
anchor_generator {
ssd_anchor_generator {
num_layers: 6
min_scale: 0.2
max_scale: 0.95
aspect_ratios: 1.0
aspect_ratios: 2.0
aspect_ratios: 0.5
aspect_ratios: 3.0
aspect_ratios: 0.3333
}
}
image_resizer {
fixed_shape_resizer {
height: 300
width: 300
}
}
box_predictor {
convolutional_box_predictor {
min_depth: 0
max_depth: 0
num_layers_before_predictor: 0
use_dropout: false
dropout_keep_probability: 0.8
kernel_size: 1
box_code_size: 4
apply_sigmoid_to_scores: false
conv_hyperparams {
activation: RELU_6,
regularizer {
l2_regularizer {
weight: 0.00004
}
}
initializer {
truncated_normal_initializer {
stddev: 0.03
mean: 0.0
}
}
batch_norm {
train: true,
scale: true,
center: true,
decay: 0.9997,
epsilon: 0.001,
}
}
}
}
feature_extractor {
type: 'ssd_mobilenet_v1'
min_depth: 16
depth_multiplier: 1.0
conv_hyperparams {
activation: RELU_6,
regularizer {
l2_regularizer {
weight: 0.00004
}
}
initializer {
truncated_normal_initializer {
stddev: 0.03
mean: 0.0
}
}
batch_norm {
train: true,
scale: true,
center: true,
decay: 0.9997,
epsilon: 0.001,
}
}
}
loss {
classification_loss {
weighted_sigmoid {
anchorwise_output: true
}
}
localization_loss {
weighted_smooth_l1 {
anchorwise_output: true
}
}
hard_example_miner {
num_hard_examples: 3000
iou_threshold: 0.99
loss_type: CLASSIFICATION
max_negatives_per_positive: 3
min_negatives_per_image: 0
}
classification_weight: 1.0
localization_weight: 1.0
}
normalize_loss_by_num_matches: true
post_processing {
batch_non_max_suppression {
score_threshold: 1e-8
iou_threshold: 0.6
max_detections_per_class: 100
max_total_detections: 100
}
score_converter: SIGMOID
}
}
}
train_config: {
batch_size: 1
optimizer {
rms_prop_optimizer: {
learning_rate: {
exponential_decay_learning_rate {
initial_learning_rate: 0.004
decay_steps: 800720
decay_factor: 0.95
}
}
momentum_optimizer_value: 0.9
decay: 0.9
epsilon: 1.0
}
}
# Note: The below line limits the training process to 200K steps, which we
# empirically found to be sufficient enough to train the pets dataset. This
# effectively bypasses the learning rate schedule (the learning rate will
# never decay). Remove the below line to train indefinitely.
num_steps: 200000
data_augmentation_options {
random_horizontal_flip {
}
}
data_augmentation_options {
ssd_random_crop {
}
}
}
train_input_reader: {
tf_record_input_reader {
input_path: "data/train.record"
}
label_map_path: "data/tv_vehicle_detection.pbtxt"
}
eval_config: {
num_examples: 4
# Note: The below line limits the evaluation process to 10 evaluations.
# Remove the below line to evaluate indefinitely.
max_evals: 10
}
eval_input_reader: {
tf_record_input_reader {
input_path: "data/test.record"
}
label_map_path: "data/tv_vehicle_detection.pbtxt"
shuffle: false
num_readers: 1
num_epochs: 1
}
上一个config文件中 label_map_path: "data/tv_vehicle_detection.pbtxt" 必须始终保持一致。
此时在对应目录(/data)下,创建一个 tv_vehicle_detection.pbtxt的文本文件(可以复制一个其他名字的文件,然后用文本编辑软件打开修改),写入我们的标签,我的例子中是两个,id序号注意与前面创建CSV文件时保持一致,从1开始。
item {
id: 1
name: 'tv'
}
item {
id: 2
name: 'vehicle'
}
保存完毕,万事俱备,只欠东风!
四、训练模型
这里只讨论本地用GPU训练,想在Google cloud上训练,请参考这里。
Anaconda Prompt 定位到 models\research\object_detection文件夹下,运行如下命令:
python train.py --logtostderr --train_dir=training/ --pipeline_config_path=training/ssd_mobilenet_v1_coco.config
------------------------------------------
注意,在Tensorflow Object Detection API最新版本中,训练文件已经改为
model_main.py
因此命令也需要更改为如下形式(注意把对应的${}里的内容改为对应的路径的文件),设置训练步数50000,评估步数2000:
- # From the tensorflow/models/research/ directory
- python object_detection/model_main.py \
- --pipeline_config_path=object_detection/training/ssd_mobilenet_v1_coco.config \
- --model_dir=object_detection/training \
- --num_train_steps=50000 \
- --num_eval_steps=2000 \
- --alsologtostderr
正常的话,稍等片刻。如果看到类似的界面,恭喜,训练正在有条不紊地进行。
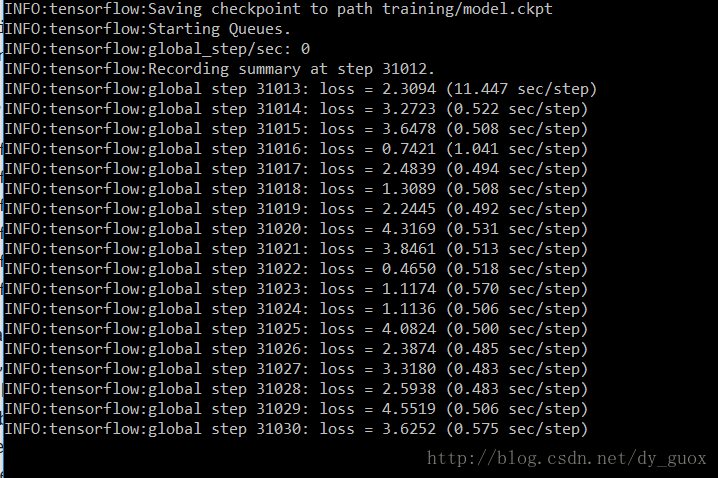
中途打断也不要紧,可以再次运行上述Python命令,会从上次的checkpoint继续。
Tensorflow还提供功能强大的Tensorboard来可视化训练过程。
Anaconda Prompt 定位到 models\research\object_detection 文件夹下,运行tensorboard --logdir='training'

可以看到返回的网址,在浏览器中打开(最好是Chrome或Firefox),
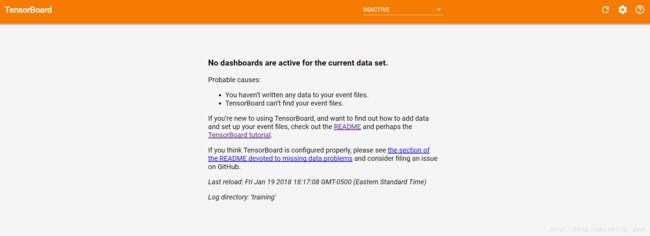
发现并没有出现图像,这个问题困扰了我非常久,搜遍了网上各种方法都不管用,后来发现,至少在我的电脑上,应该运行下面这行命令:tensorboard --logdir=training
没错!去掉引号,这看起来很难理解,而且也没有在网上看到其他的例子,但是我个人的情况确实如此。而且需要注意的是,--logdir= 后面没有空格。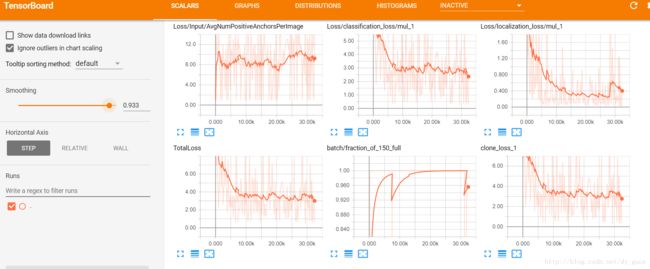
终于出现了最新的图表,由于我的数据集过小,可以看到后面Loss下降的不明显,那么实际效果如何呢,还有待评估。
我们可以先来测试一下目前的模型效果如何,关闭命令行。在 models\research\object_detection 文件夹下找到 export_inference_graph.py 文件,要运行这个文件,还需要传入config以及checkpoint的相关参数。
Anaconda Prompt 定位到 models\research\object_detection 文件夹下,运行
python export_inference_graph.py \ --input_type image_tensor \ --pipeline_config_path training/ssd_mobilenet_v1_coco.config \ --trained_checkpoint_prefix training/model.ckpt-31012 \ --output_directory tv_vehicle_inference_graph
--trained_checkpoint_prefix training/model.ckpt-31012 这个checkpoint(.ckpt-后面的数字)可以在training文件夹下找到你自己训练的模型的情况,填上对应的数字(如果有多个,选最大的)。
--output_directory tv_vehicle_inference_graph 改成自己的名字
运行完后,可以在tv_vehicle_inference_graph (这是我的名字)文件夹下发现若干文件,有saved_model、checkpoint、frozen_inference_graph.pb等。 .pb结尾的就是最重要的frozen model了,还记得第一大部分中frozen model吗?没错,就是我们在后面要用到的部分。
训练的部分也完成了,接下来就是最后的test部分了,excited!
5、测试模型并输出
回到第一部分的代码结构分析,现在已有对应的训练模型,只需要根据自己的实际情况改一些路径之类的参数即可。直接上完整代码:
- # -*- coding: utf-8 -*-
- """
- Created on Thu Jan 11 16:55:43 2018
- @author: Xiang Guo
- """
- #Imports
- import time
- start = time.time()
- import numpy as np
- import os
- import six.moves.urllib as urllib
- import sys
- import tarfile
- import tensorflow as tf
- import zipfile
- import cv2
- from collections import defaultdict
- from io import StringIO
- from matplotlib import pyplot as plt
- from PIL import Image
- import pandas as pd
- if tf.__version__ < '1.4.0':
- raise ImportError('Please upgrade your tensorflow installation to v1.4.* or later!')
- os.chdir('E:\\tensorflow_models\\models\\research\\object_detection\\')
- #Env setup
- # This is needed to display the images.
- #%matplotlib inline
- # This is needed since the notebook is stored in the object_detection folder.
- sys.path.append("..")
- #Object detection imports
- from object_detection.utils import label_map_util
- from object_detection.utils import visualization_utils as vis_util
- #Model preparation
- # What model to download.
- #MODEL_NAME = 'tv_vehicle_inference_graph'
- #MODEL_NAME = 'tv_vehicle_inference_graph_fasterCNN'
- MODEL_NAME = 'tv_vehicle_inference_graph_ssd_mobile'
- #MODEL_NAME = 'ssd_mobilenet_v1_coco_2017_11_17' #[30,21] best
- #MODEL_NAME = 'ssd_inception_v2_coco_2017_11_17' #[42,24]
- #MODEL_NAME = 'faster_rcnn_inception_v2_coco_2017_11_08' #[58,28]
- #MODEL_NAME = 'faster_rcnn_resnet50_coco_2017_11_08' #[89,30]
- #MODEL_NAME = 'faster_rcnn_resnet50_lowproposals_coco_2017_11_08' #[64, ]
- #MODEL_NAME = 'rfcn_resnet101_coco_2017_11_08' #[106,32]
- '''
- MODEL_FILE = MODEL_NAME + '.tar.gz'
- DOWNLOAD_BASE = 'http://download.tensorflow.org/models/object_detection/'
- '''
- # Path to frozen detection graph. This is the actual model that is used for the object detection.
- PATH_TO_CKPT = MODEL_NAME + '/frozen_inference_graph.pb'
- # List of the strings that is used to add correct label for each box.
- PATH_TO_LABELS = os.path.join('training', 'tv_vehicle_detection.pbtxt')
- NUM_CLASSES = 2
- '''
- #Download Model
- opener = urllib.request.URLopener()
- opener.retrieve(DOWNLOAD_BASE + MODEL_FILE, MODEL_FILE)
- tar_file = tarfile.open(MODEL_FILE)
- for file in tar_file.getmembers():
- file_name = os.path.basename(file.name)
- if 'frozen_inference_graph.pb' in file_name:
- tar_file.extract(file, os.getcwd())
- '''
- #Load a (frozen) Tensorflow model into memory.
- detection_graph = tf.Graph()
- with detection_graph.as_default():
- od_graph_def = tf.GraphDef()
- with tf.gfile.GFile(PATH_TO_CKPT, 'rb') as fid:
- serialized_graph = fid.read()
- od_graph_def.ParseFromString(serialized_graph)
- tf.import_graph_def(od_graph_def, name='')
- # Loading label map
- label_map = label_map_util.load_labelmap(PATH_TO_LABELS)
- categories = label_map_util.convert_label_map_to_categories(label_map, max_num_classes=NUM_CLASSES, use_display_name=True)
- category_index = label_map_util.create_category_index(categories)
- # Helper code
- def load_image_into_numpy_array(image):
- (im_width, im_height) = image.size
- return np.array(image.getdata()).reshape(
- (im_height, im_width, 3)).astype(np.uint8)
- #Detection
- # For the sake of simplicity we will use only 2 images:
- # image1.jpg
- # image2.jpg
- # If you want to test the code with your images, just add path to the images to the TEST_IMAGE_PATHS.
- PATH_TO_TEST_IMAGES_DIR = 'PATH_TO_TEST_IMAGES_DIR'
- os.chdir(PATH_TO_TEST_IMAGES_DIR)
- TEST_IMAGE_DIRS = os.listdir(PATH_TO_TEST_IMAGES_DIR)
- # Size, in inches, of the output images.
- IMAGE_SIZE = (12, 8)
- output_image_path = ("\输出\识别结果\图片\的\路径\")
- # 另外加了输出识别结果框的坐标,保存为.csv表格文件
- output_csv_path = ("\输出\识别结果\表格\的\路径\")
- for image_folder in TEST_IMAGE_DIRS:
- with detection_graph.as_default():
- with tf.Session(graph=detection_graph) as sess:
- # Definite input and output Tensors for detection_graph
- image_tensor = detection_graph.get_tensor_by_name('image_tensor:0')
- # Each box represents a part of the image where a particular object was detected.
- detection_boxes = detection_graph.get_tensor_by_name('detection_boxes:0')
- # Each score represent how level of confidence for each of the objects.
- # Score is shown on the result image, together with the class label.
- detection_scores = detection_graph.get_tensor_by_name('detection_scores:0')
- detection_classes = detection_graph.get_tensor_by_name('detection_classes:0')
- num_detections = detection_graph.get_tensor_by_name('num_detections:0')
- TEST_IMAGE_PATHS = os.listdir(os.path.join(image_folder))
- os.makedirs(output_image_path+image_folder)
- data = pd.DataFrame()
- for image_path in TEST_IMAGE_PATHS:
- image = Image.open(image_folder + '//'+image_path)
- width, height = image.size
- # the array based representation of the image will be used later in order to prepare the
- # result image with boxes and labels on it.
- image_np = load_image_into_numpy_array(image)
- # Expand dimensions since the model expects images to have shape: [1, None, None, 3]
- image_np_expanded = np.expand_dims(image_np, axis=0)
- # Actual detection.
- (boxes, scores, classes, num) = sess.run(
- [detection_boxes, detection_scores, detection_classes, num_detections],
- feed_dict={image_tensor: image_np_expanded})
- # Visualization of the results of a detection.
- vis_util.visualize_boxes_and_labels_on_image_array(
- image_np,
- np.squeeze(boxes),
- np.squeeze(classes).astype(np.int32),
- np.squeeze(scores),
- category_index,
- use_normalized_coordinates=True,
- line_thickness=8)
- #write images
- #保存识别结果图片
- cv2.imwrite(output_image_path+image_folder+'\\'+image_path.split('\\')[-1],image_np)
- s_boxes = boxes[scores > 0.5]
- s_classes = classes[scores > 0.5]
- s_scores=scores[scores>0.5]
- #write table
- #保存位置坐标结果到 .csv表格
- for i in range(len(s_classes)):
- newdata= pd.DataFrame(0, index=range(1), columns=range(7))
- newdata.iloc[0,0] = image_path.split("\\")[-1].split('.')[0]
- newdata.iloc[0,1] = s_boxes[i][0]*height #ymin
- newdata.iloc[0,2] = s_boxes[i][1]*width #xmin
- newdata.iloc[0,3] = s_boxes[i][2]*height #ymax
- newdata.iloc[0,4] = s_boxes[i][3]*width #xmax
- newdata.iloc[0,5] = s_scores[i]
- newdata.iloc[0,6] = s_classes[i]
- data = data.append(newdata)
- data.to_csv(output_csv_path+image_folder+'.csv',index = False)
- end = time.time()
- print("Execution Time: ", end - start)
上述的代码是对图片的结果,在我的github上还有应用到视频上的,方法类似,网址如下:
https://github.com/XiangGuo1992/Screen-Vehicle-Detection-using-Tensorflow-API
欢迎star,folk!
经过一段时间的运行(由数据大小及电脑配置决定),输出结果,打开对应图片查看效果。
图片中的数字代表score模型对预测的信度,越高代表越确定性越高(但不等于准确性!),默认是高于50%的框才会显示,最多同时显示20个框,这些都是可以根据需求自己调整的,如何调整输出的框图数量与质量?
方法:object_detection文件夹下的eval_util.py文件打开,visualize_detection_results函数里面min_score_thresh=.5, 可以把这个改小一点,会输出分数更低的框。max_num_predictions=20 调整最多输出的个数。其他具体细节就不再介绍了。希望进一步探索的朋友,欢迎加群跟大家一起交流学习!
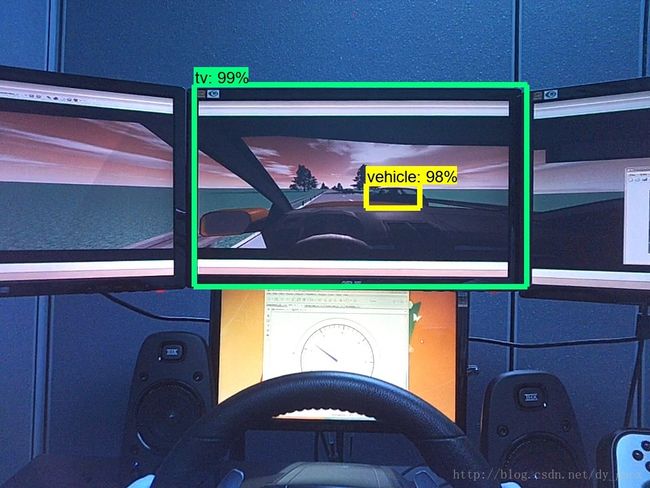
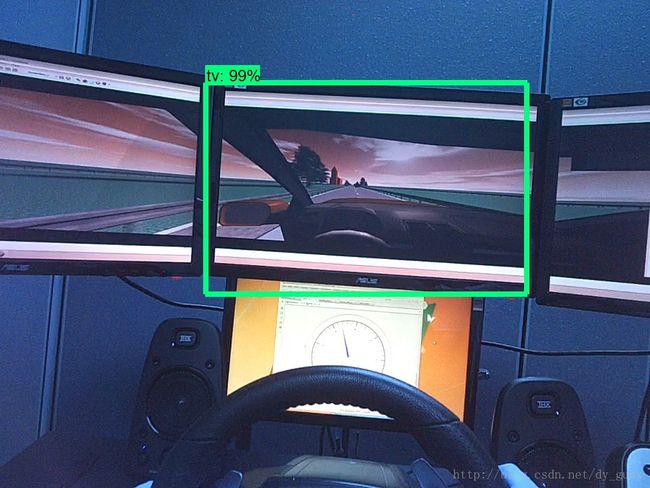
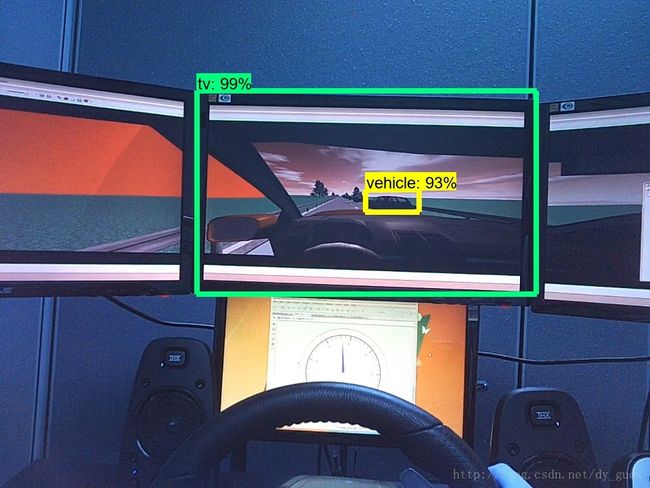
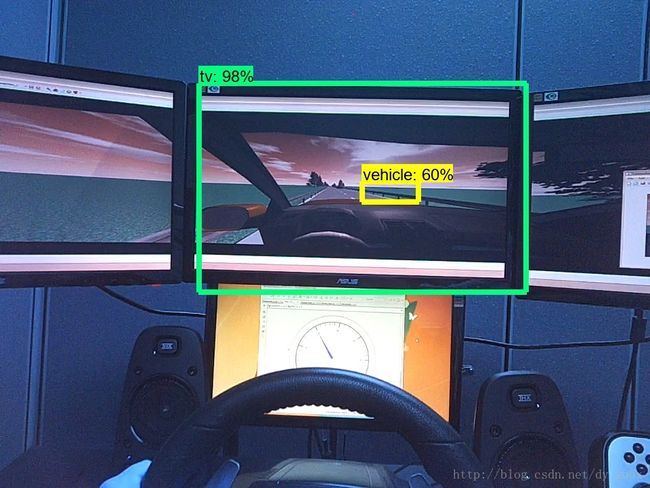
Amazing!可以看到尽管也有像最后一张图片那样的误判(False Positive),但是考虑到非常有限的训练集(不到100张)情况下,有如此效果已经非常给力了,尤其是对于需要大量数据才能发挥强大威力的深度学习来说,目前的效果完全能够接受。可以期待在更多数据以及更精确模型的帮助下,可以达到非常好的效果。
总结
用Tensor Flow object detection API实现了对实验视频的特定移动物体的追踪。
这是本人的深度学习首次尝试,难免有疏漏之处,有任何问题欢迎指正,转载请注明。
参考:
1. https://github.com/tensorflow/models/tree/master/research/object_detection
2. https://github.com/datitran/raccoon_dataset
3. How to train your own Object Detector with TensorFlow’s Object Detector API,
https://towardsdatascience.com/how-to-train-your-own-object-detector-with-tensorflows-object-detector-api-bec72ecfe1d9
########################################################################################
#############################################################################################
三、Tensorflow object detection API 搭建属于自己的物体识别模型(3)——将自己的模型迁移到手机上运行
2018年05月04日 13:05:57 dy_guox 阅读数:5663
上一篇博客中介绍了如何使用Tensorflow object detection API 搭建属于自己的物体识别模型(https://blog.csdn.net/dy_guox/article/details/79111949),由于我们的模型是基于ssd_mobilenet训练,这个模型本身是相对较为轻量级的,也可以在手机上使用,因此,这篇博客将介绍如何将Tensorflow object detection API 训练的模型迁移导入到手机中使用。
首先需要确认,已经训练好了自己的模型(以 .pb结尾)。即在object_detection\tv_vehicle_inference_graph文件夹下的 frozen_inference_graph.pb 文件。接下来将以我在视频教程中的例子(检测武大靖)进行示范。(参考之前博客教程的视频地址:https://www.bilibili.com/video/av21539370/)
首先,将 frozen_inference_graph.pb 文件重命名为 WDJ_frozen_inference_graph.pb, 这样便于跟其他模型区分开来。
我的测试将在Android系统进行,IOS系统没有测试。
运行效果视频:
https://www.bilibili.com/video/av22957279/?p=1
如果你觉得有点帮助,欢迎投币支持。
1、安装配置 TensorFlow on Android
https://www.tensorflow.org/mobile/android_build
上述网址有详细的教程,考虑到国内可能被墙,继续重复一遍。
首先先根据提示把Demo跑起来,后面的工作在此基础上进行。
1)安装 Android Studio
去官网下载安装即可。
2)在Github上 clone TensorFlow
如果电脑上安装了Git,那么在特定目录下,运行git 命令
git clone https://github.com/tensorflow/tensorflow
如果连Git都没有,那就到
https://github.com/tensorflow/tensorflow
右上方绿色“clone or download”下载 zip到本地,解压。
3)搭建 Android Studio环境
打开Android Studio,选择 “Open an existing Android Studio project”,在“Open File or Project ”,选择在2)中对应的 tensorflow/examples/android 文件夹,OK。如果需要“Gradle Sync”,选择OK。第一次启动可能需要安装或更新很多模块,耐心等待。
4) 在 build.gradle 文件中(在左侧 1:Project 面板 Android 下面 Gradle Scripts ),找到 nativeBuildSystem 这个变量,设置等于 “none”:
- // set to 'bazel', 'cmake', 'makefile', 'none'
- def nativeBuildSystem = 'none'
5) 点击上方菜单 Run -> Run 'android' 命令, 在弹出菜单选择 右侧的 Proceed Without Instant Run。
6)同时,打开手机的开发者模式与USB调试,用USB连接电脑。不同手机方法不同,自行百度。
成功连接后运行命令时会识别对应手机型号,选择后继续,将会在手机上安装4个不同的APP,期间注意查看手机,允许安装(默认会拒绝)。
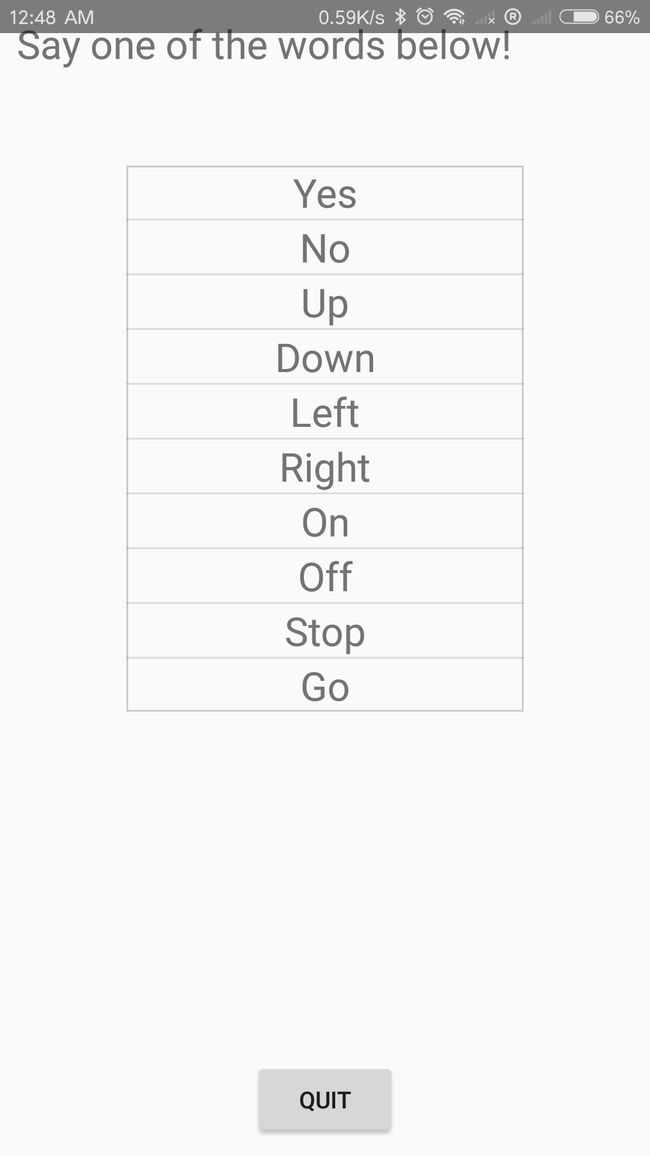
7)4个不同APP有不同的功能,大概就是深度学习的几个重要的研究方向:
TF Classify. 物体识别,识别图中有什么物体;
TF Detect. 物体检测,除了识别有什么物体,还能检测物体的位置,跟上一篇博客的目的一致,也是本博客模型迁移的目标;

TF Stylize. 实时风格变换,将摄像头拍摄到的图片自动转换成不同的风格,类似前段时间很火的模仿梵高作画;
TF Speech. 选择单词说出来,软件能识别。
Demo视频如下:
https://www.bilibili.com/video/av22957279/?p=1
2.配置模型
1)将之前训练好的识别武大靖的模型 WDJ_frozen_inference_graph.pb 放在 Android文件夹中的 assets
文件夹下。
2)继续在当前文件夹下,能发现数个 ‘...labels.txt’ 文件,复制其中任意一个,重命名为 “WDJ_labels.txt”用于储存标签,名字随意起,只要你自己能理解就行。打开 “WDJ_labels.txt”,建议用 Sublime Text,直接用记事本打开所有标签会挤在同一行。在Sublime text中,发现第一行是“???”,不用管,后面每一行是一个标签,由于我的任务只有一个,就是“WDJ”,注意标签跟之前训练模型时候保持一致。保存退出。
3) 查找 “DetectorActivity.java”文件,用Sublime text 打开,找到 TF_OD_API_MODEL_FILE 与 TF_OD_API_LABELS_FILE 这两个变量,前一个改成自己模型的路径,如 ".../assets/WDJ_frozen_inference_graph.pb",后一个改成标签 .txt文件的路径,如 “.../assets/WDJ_labels.txt”
4 )“DetectorActivity.java” 文件中MINIMUM_CONFIDENCE_TF_OD_API 变量,决定最低多少置信度画识别的框,如果发现移植到手机上的模型效果不理想,可以把这个值调低,就会更容易识别出物体(但是也更容易误识别),根据自己的实际运行效果测试修改。
3. Run
跟第1步中一样的运行步骤,等待安装。完成后在手机上打开 TF Detect ,发现跟Demo不一样了(我们不一样!)。
具体效果视频:
https://www.bilibili.com/video/av22957279/?p=2
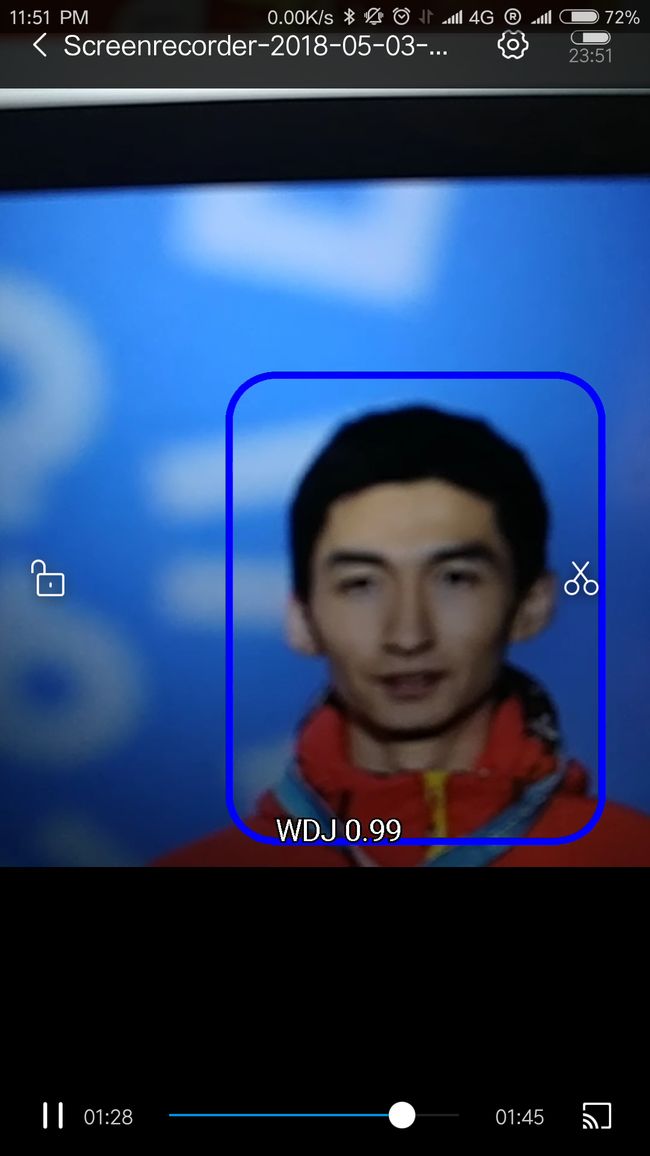
当然,因为之前的模型训练的效果就很一般,所以在手机上的效果也是半斤八两甚至还要差,但是至少能跑了。对比之前视频里的效果,这样的结果也在预期之内,如果想追求完美,那就多训练数据,用更好的模型,比如mobile net V2,这就有待读者自己探索了。
参考资料:
https://towardsdatascience.com/detecting-pikachu-on-android-using-tensorflow-object-detection-15464c7a60cd
https://www.tensorflow.org/mobile/android_build