vscode 配合wsl做linux下的开发
vscode 配合wsl做linux下的开发
安装wsl
直接在商店里面搜索wsl

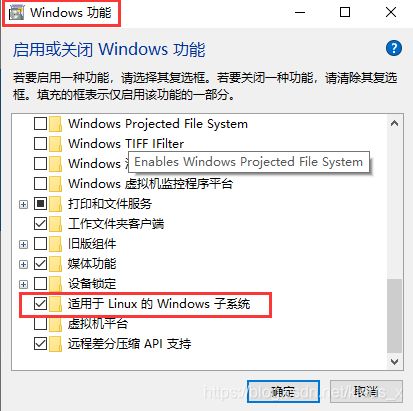
记住在windows功能项里面勾选 适用于Linux的Windows子系统

配置wsl
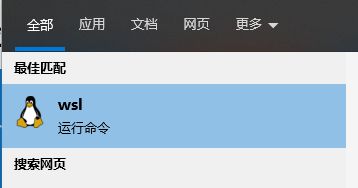
安装完成之后输入wsl

进入刚刚安装的wsl
1.更换阿里云镜像
sudo sed -i s@/archive.ubuntu.com/@/mirrors.aliyun.com/@g /etc/apt/sources.list
sudo apt update -y
sudo apt upgrade -y
2.安装ssh服务
这里刚刚进去我也是被坑了一下 ps -aux | grep ssh什么都没有,重启一下直接报错
-> # service ssh restart
Could not load host key: /etc/ssh/ssh_host_rsa_key
Could not load host key: /etc/ssh/ssh_host_ecdsa_key
Could not load host key: /etc/ssh/ssh_host_ed25519_key
* Restarting OpenBSD Secure Shell server sshd
Could not load host key: /etc/ssh/ssh_host_rsa_key
Could not load host key: /etc/ssh/ssh_host_ecdsa_key
Could not load host key: /etc/ssh/ssh_host_ed25519_key
然后重新安装一下
apt remove openssh-server
apt install openssh-server
这里需要改一下配置 sudo vim /etc/ssh/sshd_config改下面2个点
13 Port 22
......
55 # To disable tunneled clear text passwords, change to no here!
56 PasswordAuthentication yes
57 #PermitEmptyPasswords no
port改成22, 56行的密码认证打开,之前no好像还需要一个认证文件
vscode连接wsl
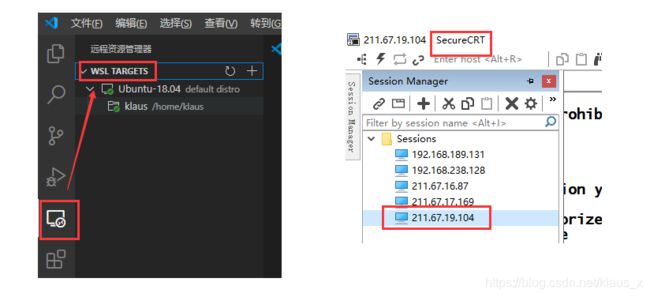
然后根据自己的ip就可以连上去了
vscode就直接连上去了,我另外一个用SecureCRT也很方便

安装c/c++环境,连接到github上面的项目
sudo apt-get install gdb
sudo apt-get install g++
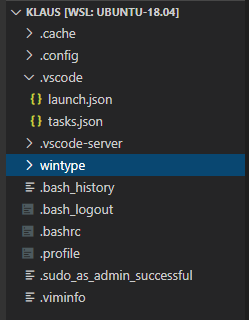
vscode的很神奇,好像直接都配置好了,我进去也是直接的好的配置信息

然后launch.json好像直接生成
{
    "version": "0.2.0",
    "configurations": [
        {
            "name": "g++ - 生成和调试活动文件",
            "type": "cppdbg",
            "request": "launch",
            "program": "${fileDirname}/${fileBasenameNoExtension}",
            "args": [],
            "stopAtEntry": false,
            "cwd": "${workspaceFolder}",
            "environment": [],
            "externalConsole": false,
            "MIMode": "gdb",
            "setupCommands": [
                {
                    "description": "为 gdb 启用整齐打印",
                    "text": "-enable-pretty-printing",
                    "ignoreFailures": true
                }
            ],
            "preLaunchTask": "C/C++: g++ build active file",
            "miDebuggerPath": "/usr/bin/gdb"
        }
    ]
}
另外一个tasks.json
{
    "tasks": [
        {
            "type": "shell",
            "label": "C/C++: g++ build active file",
            "command": "/usr/bin/g++",
            "args": [
                "-g",
                "${file}",
                "-o",
                "${fileDirname}/${fileBasenameNoExtension}"
            ],
            "options": {
                "cwd": "/usr/bin"
            },
            "problemMatcher": [
                "$gcc"
            ],
            "group": "build",
            "detail": "Generated task by Debugger"
        }
    ],
    "version": "2.0.0"
}
新建一个hello.cpp按下F5按要求好像没有什么卡壳的,很顺利,我遇到一个生成的可执行hello与hello.cpp不在一个路径,生成的hello和.vscode一个目录,老是报错后来我重启又好了,奇怪
上传GitHub
然后就是自己的github仓库
自己的clone到本地,配置一下自己的数据仓库信息
*** Please tell me who you are.
Run

  git config --global user.email "[email protected]"
  git config --global user.name "Your Name"

to set your account's default identity.
Omit --global to set the identity only in this repository.

fatal: empty ident name (for <[email protected]>) not allowed
然后配置完成之后,输入自己的账号密码完成更新,一句话完成更新
git add -A && git commit -m “refresh” && git push
详细内容如下:
klaus@DESKTOP-1J0SU5A:~/wintype/Daily-algorithm$ git config --global user.email *****@outlook.com
klaus@DESKTOP-1J0SU5A:~/wintype/Daily-algorithm$ git config --global user.name *******
klaus@DESKTOP-1J0SU5A:~/wintype/Daily-algorithm$ git add -A && git commit -m "refresh" && git push
[master d695eb9] refresh
1 file changed, 9 insertions(+)
create mode 100644 hello/hello1.cpp
Username for 'https://github.com': **********
Password for 'https://***********@github.com': **********
Counting objects: 8, done.
Delta compression using up to 8 threads
github上就完成更新了。
同步的时候出现了一个每次都要输入账号和密码的问题
按网上说的一点用都没有,真正原因是没有一个密钥!
klaus@DESKTOP-1J0SU5A:~/wintype/Daily-algorithm$ git config  credential.helper store
klaus@DESKTOP-1J0SU5A:~/wintype/Daily-algorithm$ git remote -v
origin  https://github.com/klauscf/Daily-algorithm.git (fetch)
origin  https://github.com/klauscf/Daily-algorithm.git (push)
klaus@DESKTOP-1J0SU5A:~/wintype/Daily-algorithm$ git remote rm origin
klaus@DESKTOP-1J0SU5A:~/wintype/Daily-algorithm$ git remote add origin [email protected]:klauscf/Daily-algorithm.git
klaus@DESKTOP-1J0SU5A:~/wintype/Daily-algorithm$ git remote -v
origin  [email protected]:klauscf/Daily-algorithm.git (fetch)
origin  [email protected]:klauscf/Daily-algorithm.git (push)
klaus@DESKTOP-1J0SU5A:~/wintype/Daily-algorithm$ git push origin master
The authenticity of host 'github.com (192.30.255.113)' can't be established.
RSA key fingerprint is SHA256:nThbg6kXUpJWGl******omTxdCARLviKw6E5SY8.
Are you sure you want to continue connecting (yes/no)? yes
Warning: Permanently added 'github.com,192.30.255.113' (RSA) to the list of known hosts.
[email protected]: Permission denied (publickey).
fatal: Could not read from remote repository.

Please make sure you have the correct access rights
and the repository exists.
这里需要生成一个ssh-key
klaus@DESKTOP-1J0SU5A:~/wintype/Daily-algorithm$ ssh-keygen -t rsa -C "******@outlook.com"
Generating public/private rsa key pair.
Enter file in which to save the key (/home/****/.ssh/id_rsa): /home/*****/.ssh/id_rsa
Enter passphrase (empty for no passphrase):
Enter same passphrase again:
Your identification has been saved in /home/*****/.ssh/id_rsa.
Your public key has been saved in /home/*****/.ssh/id_rsa.pub.
The key fingerprint is:
SHA256:4AXCEcp2UyMCSRNj1UXgysG+*****/NnIJ9oz/RtI ******@outlook.com
The key's randomart image is:
+---[RSA 2048]----+
|oO++B+Bo         |
|o.=+oB o         |
.....
| . .    +        |
|         o       |
|        .        |
+----[SHA256]-----+
klaus@DESKTOP-1J0SU5A:~/wintype/Daily-algorithm$
klaus@DESKTOP-1J0SU5A:~/wintype/Daily-algorithm$ cat ~/.ssh/id_rsa.pub
然后把生成的密钥拷贝到github里面
有个小技巧就是取个别名,在.bashrc里面,win版的bash 在/etc/profile文件里面修改
alias gitpush='git add -A && git commit -m "refresh" && git push'