django:Django Rest Framework——序列化
记录一次DRF复习过程。
1,API
需要先了解API,即应用编程接口。
开发者角度:网站开发人员开发的允许其他软件调用的数据接口,本质就是封装好一系列操作来返回某些数据或提供某些功能的函数。
使用者角度:使用者通过GET或POST等方法进行访问API,就能获取所需的JSON或字符串格式的数据或者所需的服务,就不用重复造轮子。
(参考文章)
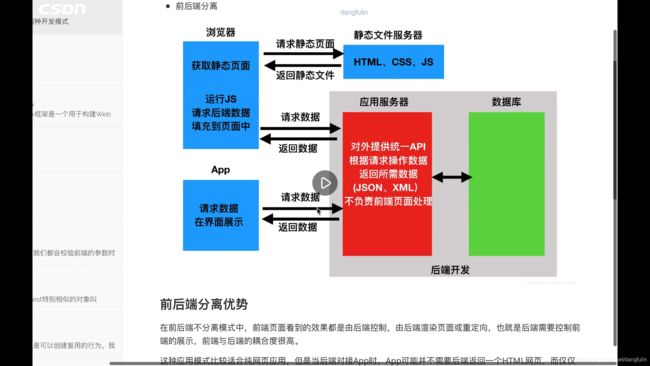
普通的django项目是基于MVT模式的,而django的前后端分离项目基于MVVM模式,前后端耦合度进一步降低,

这就需要用到API了,而且是遵循RESTful规范(参考文章)编写的的API,这就需要Django Rest Framework,它提供的多个组件能完成绝大多数django前后端分离的开发需求。其实django本身也是提供序列化功能的,但第三方的DRF更加强大。
1,必要的配置:
创建项目MyDjango与应用index;
安装Django Rest Framework:pip install djangorestframework;
setting.py添加内容如下:
INSTALLED_APPS = [
    'django.contrib.admin',
    'django.contrib.auth',
    'django.contrib.contenttypes',
    'django.contrib.sessions',
    'django.contrib.messages',
    'django.contrib.staticfiles',
    'index',
    'rest_framework'
]

# Django Rest Framework框架设置信息
# 分页设置
REST_FRAMEWORK = {
    'DEFAULT_PAGINATION_CLASS': 'rest_framework.pagination.PageNumberPagination',
    'PAGE_SIZE': 2
}
补充知识:DRF序列化器
序列化器就是DRF体现前后端分离的核心所在。
从后向前:序列化器可以将queryset和model.instance这种数据类型的内容转换为可以由前端渲染成JSON,XML等数据类型的内容,让前端容易解析出数据内容。
从前向后:反序列化器在验证前端传入过来的数据之后,将它们转换成Django使用的模型实例等复杂数据类型,从而使用ORM与数据库进行交互,也就是CRUD。
(参考博客)
2,序列化类Serializer
查看源码:MyDjango\venv\Scripts\pyton.exe\Scripts\python\Lib\site-packages\rest_framework\serializers.py可知:Serializer继承自BaseSerializer,设置SerializerMetaclass初始化元类,BaseSerializer继承自Field。
查看Field源码MyDjango\venv\Scripts\pyton.exe\Scripts\python\Lib\site-packages\rest_framework\fields.py可知,使用Serializer进行序列化的字段的数据类型和字段参数与表单字段的数据类型相似。此外,序列化的字段还允许添加额外的参数(官方文档),核心参数说明如下:
Each serializer field class constructor takes at least these arguments. Some Field classes take additional, field-specific arguments, but the following should always be accepted:

read_only
Read-only fields are included in the API output, but should not be included in the input during create or update operations. Any 'read_only' fields that are incorrectly included in the serializer input will be ignored.

Set this to True to ensure that the field is used when serializing a representation, but is not used when creating or updating an instance during deserialization.

Defaults to False

write_only
Set this to True to ensure that the field may be used when updating or creating an instance, but is not included when serializing the representation.

Defaults to False

required
Normally an error will be raised if a field is not supplied during deserialization. Set to false if this field is not required to be present during deserialization.

Setting this to False also allows the object attribute or dictionary key to be omitted from output when serializing the instance. If the key is not present it will simply not be included in the output representation.

Defaults to True.

default
If set, this gives the default value that will be used for the field if no input value is supplied. If not set the default behaviour is to not populate the attribute at all.

The default is not applied during partial update operations. In the partial update case only fields that are provided in the incoming data will have a validated value returned.

May be set to a function or other callable, in which case the value will be evaluated each time it is used. When called, it will receive no arguments. If the callable has a set_context method, that will be called each time before getting the value with the field instance as only argument. This works the same way as for validators.

When serializing the instance, default will be used if the the object attribute or dictionary key is not present in the instance.

Note that setting a default value implies that the field is not required. Including both the default and required keyword arguments is invalid and will raise an error.

allow_null
Normally an error will be raised if None is passed to a serializer field. Set this keyword argument to True if None should be considered a valid value.

Note that, without an explicit default, setting this argument to True will imply a default value of null for serialization output, but does not imply a default for input deserialization.

Defaults to False

source
The name of the attribute that will be used to populate the field. May be a method that only takes a self argument, such as URLField(source='get_absolute_url'), or may use dotted notation to traverse attributes, such as EmailField(source='user.email'). When serializing fields with dotted notation, it may be necessary to provide a default value if any object is not present or is empty during attribute traversal.

The value source='*' has a special meaning, and is used to indicate that the entire object should be passed through to the field. This can be useful for creating nested representations, or for fields which require access to the complete object in order to determine the output representation.

Defaults to the name of the field.

validators
A list of validator functions which should be applied to the incoming field input, and which either raise a validation error or simply return. Validator functions should typically raise serializers.ValidationError, but Django's built-in ValidationError is also supported for compatibility with validators defined in the Django codebase or third party Django packages.

error_messages
A dictionary of error codes to error messages.

label
A short text string that may be used as the name of the field in HTML form fields or other descriptive elements.

help_text
A text string that may be used as a description of the field in HTML form fields or other descriptive elements.

initial
A value that should be used for pre-populating the value of HTML form fields. You may pass a callable to it, just as you may do with any regular Django Field:
	import datetime
	from rest_framework import serializers
	class ExampleSerializer(serializers.Serializer):
	    day = serializers.DateField(initial=datetime.date.today)

style
A dictionary of key-value pairs that can be used to control how renderers should render the field.
	Two examples here are 'input_type' and 'base_template':

	# Use  for the input.
	password = serializers.CharField(
	    style={'input_type': 'password'}
	)

	# Use a radio input instead of a select input.
	color_channel = serializers.ChoiceField(
	    choices=['red', 'green', 'blue'],
	    style={'base_template': 'radio.html'}
	)
	For more details see the HTML & Forms documentation.
关于序列化字段还有一点要说的就是“关系字段”(序列器关系),在使用ForeignKey、ManyToManyField 和 OneToOneField 关系、以及反向关系和自定义关系 (例如:GenericForeignKey)表关联的情况下,需要使用如PrimaryKeyRelatedField 等来控制其序列化。如下:
官方示例:
class Album(models.Model):
    album_name = models.CharField(max_length=100)
    artist = models.CharField(max_length=100)

class Track(models.Model):
    album = models.ForeignKey(Album, related_name='tracks', on_delete=models.CASCADE)
    order = models.IntegerField()
    title = models.CharField(max_length=100)
    duration = models.IntegerField()

    class Meta:
        unique_together = ('album', 'order')
        ordering = ['order']

    def __unicode__(self):
        return '%d: %s' % (self.order, self.title)

使用PrimaryKeyRelatedField:
# PrimaryKeyRelatedField may be used to represent the target of the relationship using its primary key.
class AlbumSerializer(serializers.ModelSerializer):
    tracks = serializers.PrimaryKeyRelatedField(many=True, read_only=True)

    class Meta:
        model = Album
        fields = ['album_name', 'artist', 'tracks']

序列化效果:
{
    'album_name': 'Undun',
    'artist': 'The Roots',
    'tracks': [
        89,
        90,
        91,
        ...
    ]
}
接下来写我们自己的例子:
“
*************************MyDjango\settings.py**
INSTALLED_APPS = [
'django.contrib.admin',
'django.contrib.auth',
'django.contrib.contenttypes',
'django.contrib.sessions',
'django.contrib.messages',
'django.contrib.staticfiles',
'index',
# 添加Django Rest Framework框架
'rest_framework'
]
# Django Rest Framework框架设置信息
# 分页设置
REST_FRAMEWORK = {
'DEFAULT_PAGINATION_CLASS': 'rest_framework.pagination.PageNumberPagination',
# 每页显示多少条数据
'PAGE_SIZE': 2
}
****************************index\models.py:**
from django.db import models
# 完成数据迁移后,手动添加四条数据
class PersonInfo(models.Model):
id = models.AutoField(primary_key=True)
name = models.CharField(max_length=20)
age = models.IntegerField()
hireDate = models.DateField()
def __str__(self):
return self.name
class Meta:
verbose_name = '人员信息'
class Vocation(models.Model):
id = models.AutoField(primary_key=True)
job = models.CharField(max_length=20)
title = models.CharField(max_length=20)
payment = models.IntegerField(null=True, blank=True)
name = models.ForeignKey(PersonInfo, on_delete=models.Case)
def __str__(self):
return str(self.id)
class Meta:
verbose_name = '职业信息'
****************************index\serializers.py:**
from rest_framework import serializers
from index.models import PersonInfo, Vocation
# 设置模型Vocation的字段name的下拉内容
nameList = PersonInfo.objects.values('name').all()
NAME_CHOICES = [item['name'] for item in nameList]
class MySerializer(serializers.Serializer):
id = serializers.IntegerField(read_only=True)
job = serializers.CharField(max_length=100)
title = serializers.CharField(max_length=100)
payment = serializers.CharField(max_length=100)
# name = serializers.ChoiceField(choices=NAME_CHOICES, default=1)
# 模型Vocation的字段name是外键字段,它指向模型PersonInfo
# 因此外键字段可以使用PrimaryKeyRelatedField
name = serializers.PrimaryKeyRelatedField(queryset=nameList)
# 如果我们希望能够返回基于验证数据的完整对象实例,我们需要实现 .create() 和 update() 方法中的一个或全部。
# 重写create函数,将API数据保存到数据表index_vocation
def create(self, validated_data):
return Vocation.objects.create(**validated_data)
# 重写update函数,将API数据更新到数据表index_vocation
def update(self, instance, validated_data):
return instance.update(**validated_data)
***************************MyDjango\urls.py**
from django.contrib import admin
from django.urls import path, include
urlpatterns = [
path('admin/', admin.site.urls),
path('example.com/api/v1/', include(('index.urls', 'index'), namespace='index')),
]
****************************index\urls.py:**
from django.urls import path
from .views import *
# 分别用视图函数与视图类的方式实现序列化
urlpatterns = [
# 视图函数
path('def/', vocationDef, name='myDef'),
# 视图类
path('cla/', vocationClass.as_view(), name='myClass'),
****************************index\views.py**
from index.models import PersonInfo, Vocation
from index.serializers import MySerializer
from rest_framework.views import APIView
from rest_framework.response import Response
from rest_framework import status
from rest_framework.pagination import PageNumberPagination
from rest_framework.decorators import api_view
# REST framework 还允许您使用常规的基于函数的视图。它提供了一套简单的装饰器来包装你的基于函数的视图,以确保它们接收 Request (而不是通常的 Django HttpRequest)实例并允许它们返回 Response (而不是 Django HttpResponse ),并允许你配置该请求的处理方式。
# 核心是 api_view 装饰器,它接受你的视图应该响应的 HTTP 方法列表。默认情况下,只有 GET 方法会被接受。其他方法将以“405 Method Not Allowed”进行响应。要改变这种行为,请指定视图允许的方法,如下所示:
#
@api_view(['GET', 'POST'])
# REST framework 的 Request 类扩展了标准的 HttpRequest,增加了对 REST framework 灵活的请求解析和请求认证的支持。
def vocationDef(request):
# request.method 返回大写字符串表示的请求 HTTP 方法。
if request.method == 'GET':
q = Vocation.objects.all()
# 分页查询,需要在settings.py设置REST_FRAMEWORK属性
pg = PageNumberPagination()
p = pg.paginate_queryset(queryset=q, request=request)
# 将分页后的数据传递MySerializer,生成JSON数据对象
serializer = MySerializer(instance=p, many=True)
# 返回对象Response由Django Rest Framework实现.由于 Response 类使用的渲染器不能处理复杂的数据类型,例如 Django 模型实例,所以需要在创建 Response 对象之前将数据序列化为基本数据类型。
return Response(serializer.data)
elif request.method == 'POST':
# 获取请求数据
data = request.data
id = data['name']
data['name'] = PersonInfo.objects.filter(id=id).first()
instance = Vocation.objects.filter(id=data.get('id', 0))
if instance:
# 修改数据
MySerializer().update(instance, data)
else:
# 创建数据
MySerializer().create(data)
return Response('Done', status=status.HTTP_201_CREATED)
# 使用 APIView 类与使用常规 View 类几乎是一样的,像往常一样,传入的请求被分派到适当的处理程序方法,如 .get() 或 .post() 。另外,可以在控制 API 策略的各个方面的类上设置多个属性。
class vocationClass(APIView):
# GET请求
def get(self, request):
q = Vocation.objects.all()
# 分页查询,需要在settings.py设置REST_FRAMEWORK属性
pg = PageNumberPagination()
p = pg.paginate_queryset(queryset=q, request=request, view=self)
serializer = MySerializer(instance=p, many=True)
# 返回对象Response由Django Rest Framework实现
return Response(serializer.data)
# POST请求
def post(self, request):
data = request.data
id = data['name']
data['name'] = PersonInfo.objects.filter(id=id).first()
instance = Vocation.objects.filter(id=data.get('id', 0))
if instance:
# 修改数据
MySerializer().update(instance, data)
else:
# 创建数据
MySerializer().create(data)
return Response('Done', status=status.HTTP_201_CREATED)
运行开发服务器可能会遇到错误 :
“OverflowError: Python int too large to convert to C long”
环境:python 3.7
django 2.2.14
pycharm 2020.1.1(Professional Edition)
同环境下曾多次遇到这个报错。
解决办法:参考博客
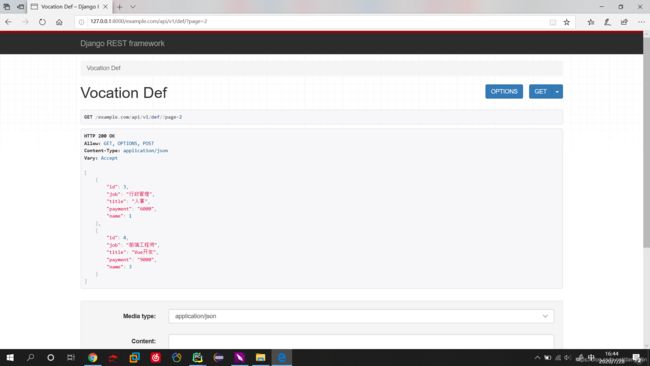
访问http://127.0.0.1:8000/example.com/api/v1/def,如下:

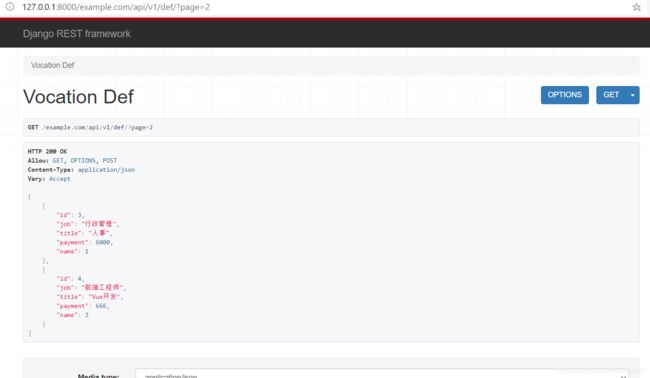
访问http://127.0.0.1:8000/example.com/api/v1/def/?page=2,如下:

访问http://127.0.0.1:8000/example.com/api/v1/cla/,也是一样的效果。
3,模型序列化类ModelSerializer
使用Serializer,需将定义的字段与模型字段完全匹配,否则容易出问题,为了简化这种定义过程,django提供序列化类ModelSerializer,使用时仅需绑定到模型即可。简单来说,ModelSerializer是可以自动创建具有与模型字段对应的字段的Serializer类
官方例程:
声明:
class AccountSerializer(serializers.ModelSerializer):
    class Meta:
        model = Account
        fields = ('id', 'account_name', 'users', 'created')

实例化:
from myapp.serializers import AccountSerializer
serializer = AccountSerializer()
print(repr(serializer))
打印结果:AccountSerializer():
    id = IntegerField(label='ID', read_only=True)
    name = CharField(allow_blank=True, max_length=100, required=False)
    owner = PrimaryKeyRelatedField(queryset=User.objects.all())
接下来写我们自己的例子:
****************************index\serializers.py:**
class VocationSerializer(serializers.ModelSerializer):
    class Meta:
        model = Vocation
        fields = '__all__'


****************************index\views.py**

from index.models import PersonInfo, Vocation
from index.serializers import MySerializer, AlbumSerializer, VocationSerializer
from rest_framework.views import APIView
from rest_framework.response import Response
from rest_framework import status
from rest_framework.pagination import PageNumberPagination
from rest_framework.decorators import api_view


@api_view(['GET', 'POST'])
def vocationDef(request):
    if request.method == 'GET':
        q = Vocation.objects.all().order_by('id')
        pg = PageNumberPagination()
        p = pg.paginate_queryset(queryset=q, request=request)
        seializer = VocationSerializer(instance=p, many=True)
        return Response(seializer.data)
    elif request.method == 'POST':
        id = request.data.get('id', 0)
        operation = Vocation.objects.filter(id=id).first()
        serializer = VocationSerializer(data=request.data)
        if serializer.is_valid():
            if operation:
                data = request.data
                id = data['name']
                data['name'] = PersonInfo.objects.filter(id=id).first()
                serializer.update(operation, data)
            else:
                serializer.save()
            return Response(serializer.data)
        return Response(serializer.errors, status=404)


class vocationClass(APIView):
    # GET请求
    def get(self, request):
        q = Vocation.objects.all().order_by('id')
        # 分页查询,需要在settings.py设置REST_FRAMEWORK属性
        pg = PageNumberPagination()
        p = pg.paginate_queryset(queryset=q, request=request, view=self)
        serializer = VocationSerializer(instance=p, many=True)
        # 返回对象Response由Django Rest Framework实现
        return Response(serializer.data)

    # POST请求
    def post(self, request):
        # 获取请求数据
        id = request.data.get('id', 0)
        operation = Vocation.objects.filter(id=id).first()
        # 数据验证
        serializer = VocationSerializer(data=request.data)
        if serializer.is_valid():
            if operation:
                serializer.update(operation, request.data)
            else:
                # 保存到数据库
                serializer.save()
            # 返回对象Response由Django Rest Framework实现
            return Response(serializer.data)
        return Response(serializer.errors, status=404)
访问http://127.0.0.1:8000/example.com/api/v1/def/?page=2,如下:

根据程序可以知道,使用ModelSerializer与Serializer实现了相同的逻辑功能:
发送GET请求时:
- 查询Vocation模型中的数据,并进行分页处理。
- 将分页后的数据传递给序列化类,转为JSON数据,再由DRF的Response完成响应。
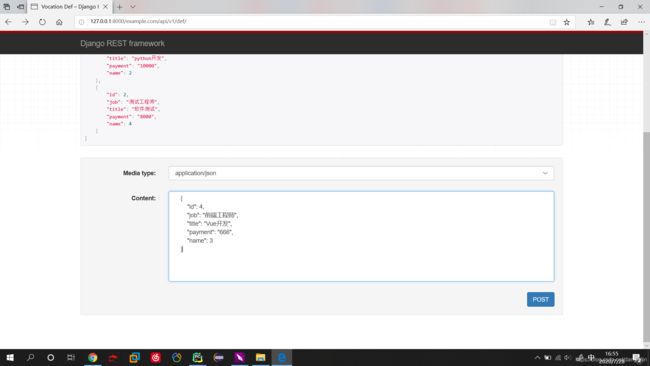
发送POST请求时:
- 获取请求参数id,作为查询条件查询Vocation模型中的数据。
- 如果数据存在,修改数据
- 如果数据不存在,添加数据
4,嵌套的序列化
在前面的使用中,两个模型的数据通过外键进行了关联,但并没有进行该字段相关的序列化,而实际中,需要将这些数据进行嵌套展示,DRF提供这种功能。
正是因为模型之间的数据关系有一对一、一对多、多对多三种,所以才能进行序列嵌套,不同关系嵌套方法不同。
index/serializers.py:
from rest_framework import serializers
from .models import Vocation, PersonInfo


# 定义ModelSerializer类
class PersonInfoSerializer(serializers.ModelSerializer):
    class Meta:
        model = PersonInfo
        fields = '__all__'


# 定义ModelSerializer类
class VocationSerializer(serializers.ModelSerializer):
    name = PersonInfoSerializer() # 这里是关键
    class Meta:
        model = Vocation
        fields = ('id', 'job', 'title', 'payment', 'name')

    def create(self, validated_data):
        # 从validated_data获取模型PersonInfo的数据
        name = validated_data.get('name', '')
        id = name.get('id', 0)
        p = PersonInfo.objects.filter(id=id).first()
        if not p:
            p = PersonInfo.objects.create(**name)
        data = validated_data
        data['name'] = p
        v = Vocation.objects.create(**data)
        return v

    def update(self, instance, validated_data):
        # 从validated_data获取模型PersonInfo的数据
        name = validated_data.get('name', '')
        id = name.get('id', 0)
        p = PersonInfo.objects.filter(id=id).first()
        if p:
            PersonInfo.objects.filter(id=id).update(**name)
            data = validated_data
            data['name'] = p
            id = validated_data.get('id', '')
            v = Vocation.objects.filter(id=id).update(**data)
            return v
嵌套功能最关键的就是一句name = PersonInfoSerializer()。
index/views.py:
from .models import Vocation
from .serializers import VocationSerializer
from rest_framework.views import APIView
from rest_framework.response import Response
from rest_framework.pagination import PageNumberPagination
from rest_framework.decorators import api_view


@api_view(['GET', 'POST'])
def vocationDef(request):
    if request.method == 'GET':
        q = Vocation.objects.all().order_by('id')
        pg = PageNumberPagination()
        p = pg.paginate_queryset(queryset=q, request=request)
        serializer = VocationSerializer(instance=p, many=True)
        return Response(serializer.data)
    elif request.method == 'POST':
        id = request.data.get('id', 0)
        operation = Vocation.objects.filter(id=id).first()
        serializer = VocationSerializer(data=request.data)
        if serializer.is_valid():
            if operation:
                serializer.update(operation, request.data)
            else:
                serializer.save()
            return Response(serializer.data)
        return Response(serializer.errors, status=404)


class vocationClass(APIView):
    def get(self, request):
        q = Vocation.objects.all().order_by('id')
        pg = PageNumberPagination()
        p = pg.paginate_queryset(queryset=q, request=request, view=self)
        serializer = VocationSerializer(instance=p, many=True)
        return Response(serializer.data)

    def post(self, request):
        id = request.data.get('id', 0)
        operation = Vocation.objects.filter(id=id).first()
        serializer = VocationSerializer(data=request.data)
        if serializer.is_valid():
            if operation:
                serializer.update(operation, request.data)
            else:
                serializer.save()
            return Response(serializer.data)
        return Response(serializer.errors, status=404)


