k8s 用kubeadm 实现高可用,keepalived+haproxy实现apiserver负载均衡
使用版本:1.16.2
官方文档:https://kubernetes.io/docs/setup/production-environment/tools/kubeadm/high-availability/
先为apiserver做一个负载均衡器,这里使用keepalived+haproxy,架构图如下。
每个master节点上运行一个apiserver和etcd,每个节点的etcd只与本节点的apiserver通信。
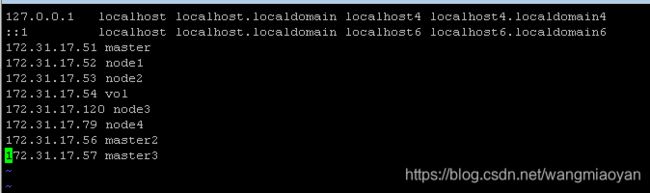
集群资源3个master,4个node,vip为172.31.17.49,注意vip需要跟你的主机节点在同一网段
以下架构图来源于参考文章

加上keepalived和haproxy后的架构图如下:
haproxy将流量转发给apiserver,而keepalived则提供虚拟ip,谁抢到虚拟ip谁就提供服务。keepalived由一个master和多个backup组成,master可以使用vip提供服务,如果master宕机,则由剩余节点中优先级较高的担任master,继续提供服务,从而实现高可用。

本文使用docker部署haproxy及keepalived。
下载haproxy及keepalived,修改配置文件。
部署haproxy
#所有master下载haproxy及keepalived
yum install -y haproxy keepalived
#修改配置文件,所有master节点的配置都一样
vim /etc/haproxy/haproxy.cfg
#---------------------------------------------------------------------
# Example configuration for a possible web application. See the
# full configuration options online.
#
# https://www.haproxy.org/download/2.1/doc/configuration.txt
# https://cbonte.github.io/haproxy-dconv/2.1/configuration.html
#
#---------------------------------------------------------------------
#---------------------------------------------------------------------
# Global settings
#---------------------------------------------------------------------
global
# to have these messages end up in /var/log/haproxy.log you will
# need to:
#
# 1) configure syslog to accept network log events. This is done
# by adding the '-r' option to the SYSLOGD_OPTIONS in
# /etc/sysconfig/syslog
#
# 2) configure local2 events to go to the /var/log/haproxy.log
# file. A line like the following can be added to
# /etc/sysconfig/syslog
#
# local2.* /var/log/haproxy.log
#
log 127.0.0.1 local2
# chroot /var/lib/haproxy
pidfile /var/run/haproxy.pid
maxconn 4000
# user haproxy
# group haproxy
# daemon
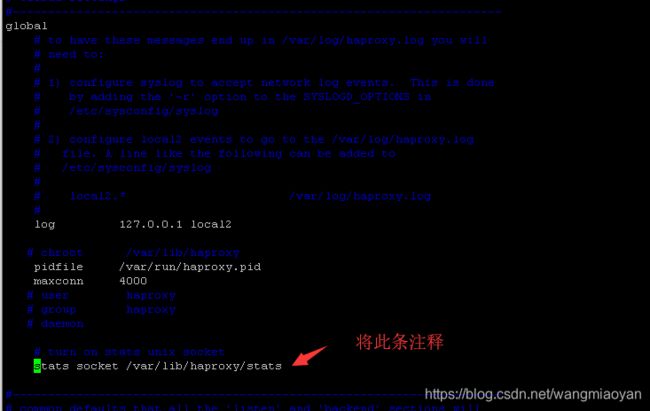
# turn on stats unix socket
#stats socket /var/lib/haproxy/stats
#---------------------------------------------------------------------
# common defaults that all the 'listen' and 'backend' sections will
# use if not designated in their block
#---------------------------------------------------------------------
defaults
mode http
log global
option httplog
option dontlognull
option http-server-close
option forwardfor except 127.0.0.0/8
option redispatch
retries 3
timeout http-request 10s
timeout queue 1m
timeout connect 10s
timeout client 1m
timeout server 1m
timeout http-keep-alive 10s
timeout check 10s
maxconn 3000
#---------------------------------------------------------------------
# main frontend which proxys to the backends
#---------------------------------------------------------------------
frontend kubernetes-apiserver
mode tcp
bind *:9443 ## 监听9443端口
# bind *:443 ssl # To be completed ....
acl url_static path_beg -i /static /images /javascript /stylesheets
acl url_static path_end -i .jpg .gif .png .css .js
default_backend kubernetes-apiserver
#---------------------------------------------------------------------
# round robin balancing between the various backends
#---------------------------------------------------------------------
backend kubernetes-apiserver
mode tcp # 模式tcp
balance roundrobin # 采用轮询的负载算法
# k8s-apiservers backend # 配置apiserver,端口6443
server master-172.31.17.51 172.31.17.51:6443 check
server master-172.31.17.56 172.31.17.56:6443 check
server master-172.31.17.57 172.31.17.57:6443 check
主要功能:监听9443端口,一旦收到请求就转发给到apiserver
运行haproxy容器
docker run -d --name haproxy --net=host --restart=always -v /etc/haproxy:/usr/local/etc/haproxy:ro haproxy:2.1.4
部署keepalived
#修改配置文件,注意state 只设置一个MASTER其他都为BACKUP
vim /etc/keepalived/keepalived.conf
global_defs {
   script_user root
   enable_script_security

}

vrrp_script chk_haproxy {
    script "/bin/bash -c 'if [[ $(netstat -nlp | grep 9443) ]]; then exit 0; else exit 1; fi'"  # haproxy 检测
    interval 2  # 每2秒执行一次检测
    weight 11 # 权重变化
}

vrrp_instance VI_1 {
  interface ens160

  state MASTER # backup节点设为BACKUP
  virtual_router_id 51 # id设为相同,表示是同一个虚拟路由组
  priority 100 #初始权重
  nopreempt #可抢占

  unicast_peer {

  }

  virtual_ipaddress {
    172.31.17.49  # vip
  }

  authentication {
    auth_type PASS
    auth_pass password
  }

  track_script {
      chk_haproxy
  }

  notify "/container/service/keepalived/assets/notify.sh"
}
运行keepalived容器
docker run --name=keepalived --restart=always --cap-add=NET_ADMIN --cap-add=NET_BROADCAST --cap-add=NET_RAW --net=host --volume /etc/keepalived/keepalived.conf:/container/service/keepalived/assets/keepalived.conf -d osixia/keepalived:2.0.19 --copy-service
测试haproxy及keepalived的高可用
将keeplived的master上的haproxy停掉
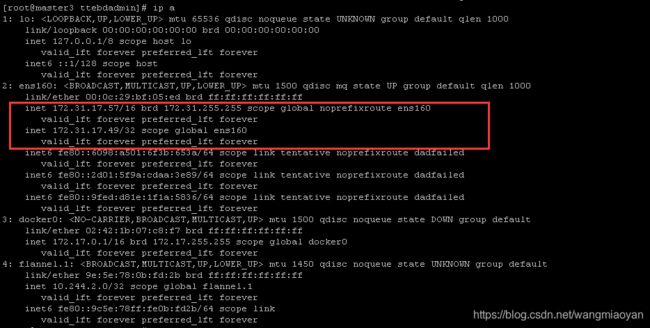
未停之前,查看ip
docker stop haproxy
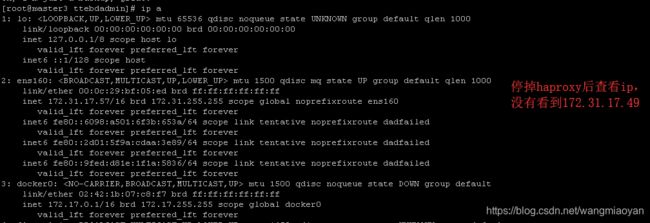
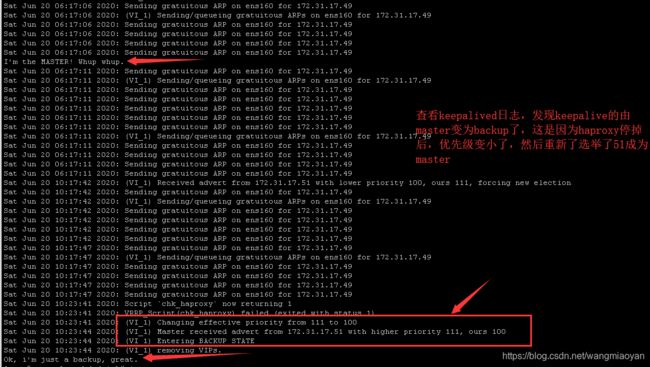


由上面的实验可以得知,如果挂掉一台master,keepalived就会重新选举master,由另一台master节点来提供服务,由此实现高可用。
初始化集群
[root@master ~]# kubeadm init --apiserver-advertise-address=172.31.17.51 --kubernetes-version=v1.16.2 --service-cidr=10.1.0.0/16 --pod-network-cidr=10.244.0.0/16 --control-plane-endpoint=172.31.17.49:9443 --upload-certs
[init] Using Kubernetes version: v1.16.2
[preflight] Running pre-flight checks
        [WARNING IsDockerSystemdCheck]: detected "cgroupfs" as the Docker cgroup driver. The recommended driver is "systemd". Please follow the guide at https://kubernetes.io/docs/setup/cri/
[preflight] Pulling images required for setting up a Kubernetes cluster
[preflight] This might take a minute or two, depending on the speed of your internet connection
[preflight] You can also perform this action in beforehand using 'kubeadm config images pull'
[kubelet-start] Writing kubelet environment file with flags to file "/var/lib/kubelet/kubeadm-flags.env"
[kubelet-start] Writing kubelet configuration to file "/var/lib/kubelet/config.yaml"
[kubelet-start] Activating the kubelet service
[certs] Using certificateDir folder "/etc/kubernetes/pki"
[certs] Generating "ca" certificate and key
[certs] Generating "apiserver" certificate and key
[certs] apiserver serving cert is signed for DNS names [master kubernetes kubernetes.default kubernetes.default.svc kubernetes.default.svc.cluster.local] and IPs [10.1.0.1 172.31.17.51 172.31.17.49]
[certs] Generating "apiserver-kubelet-client" certificate and key
[certs] Generating "front-proxy-ca" certificate and key
[certs] Generating "front-proxy-client" certificate and key
[certs] Generating "etcd/ca" certificate and key
[certs] Generating "etcd/server" certificate and key
[certs] etcd/server serving cert is signed for DNS names [master localhost] and IPs [172.31.17.51 127.0.0.1 ::1]
[certs] Generating "etcd/peer" certificate and key
[certs] etcd/peer serving cert is signed for DNS names [master localhost] and IPs [172.31.17.51 127.0.0.1 ::1]
[certs] Generating "etcd/healthcheck-client" certificate and key
[certs] Generating "apiserver-etcd-client" certificate and key
[certs] Generating "sa" key and public key
[kubeconfig] Using kubeconfig folder "/etc/kubernetes"
[endpoint] WARNING: port specified in controlPlaneEndpoint overrides bindPort in the controlplane address
[kubeconfig] Writing "admin.conf" kubeconfig file
[endpoint] WARNING: port specified in controlPlaneEndpoint overrides bindPort in the controlplane address
[kubeconfig] Writing "kubelet.conf" kubeconfig file
[endpoint] WARNING: port specified in controlPlaneEndpoint overrides bindPort in the controlplane address
[kubeconfig] Writing "controller-manager.conf" kubeconfig file
[endpoint] WARNING: port specified in controlPlaneEndpoint overrides bindPort in the controlplane address
[kubeconfig] Writing "scheduler.conf" kubeconfig file
[control-plane] Using manifest folder "/etc/kubernetes/manifests"
[control-plane] Creating static Pod manifest for "kube-apiserver"
[control-plane] Creating static Pod manifest for "kube-controller-manager"
[control-plane] Creating static Pod manifest for "kube-scheduler"
[etcd] Creating static Pod manifest for local etcd in "/etc/kubernetes/manifests"
[wait-control-plane] Waiting for the kubelet to boot up the control plane as static Pods from directory "/etc/kubernetes/manifests". This can take up to 4m0s
[apiclient] All control plane components are healthy after 32.006697 seconds
[upload-config] Storing the configuration used in ConfigMap "kubeadm-config" in the "kube-system" Namespace
[kubelet] Creating a ConfigMap "kubelet-config-1.16" in namespace kube-system with the configuration for the kubelets in the cluster
[upload-certs] Storing the certificates in Secret "kubeadm-certs" in the "kube-system" Namespace
[upload-certs] Using certificate key:
ca9d8eb80c4bb6fe1181e0c6ac1e96f6552f98986872d45ba79e47cd87deb0d6
[mark-control-plane] Marking the node master as control-plane by adding the label "node-role.kubernetes.io/master=''"
[mark-control-plane] Marking the node master as control-plane by adding the taints [node-role.kubernetes.io/master:NoSchedule]
[bootstrap-token] Using token: ftq4yl.uamut896ijwpea7s
[bootstrap-token] Configuring bootstrap tokens, cluster-info ConfigMap, RBAC Roles
[bootstrap-token] configured RBAC rules to allow Node Bootstrap tokens to post CSRs in order for nodes to get long term certificate credentials
[bootstrap-token] configured RBAC rules to allow the csrapprover controller automatically approve CSRs from a Node Bootstrap Token
[bootstrap-token] configured RBAC rules to allow certificate rotation for all node client certificates in the cluster
[bootstrap-token] Creating the "cluster-info" ConfigMap in the "kube-public" namespace
[addons] Applied essential addon: CoreDNS
[endpoint] WARNING: port specified in controlPlaneEndpoint overrides bindPort in the controlplane address
[addons] Applied essential addon: kube-proxy

Your Kubernetes control-plane has initialized successfully!

To start using your cluster, you need to run the following as a regular user:

  mkdir -p $HOME/.kube
  sudo cp -i /etc/kubernetes/admin.conf $HOME/.kube/config
  sudo chown $(id -u):$(id -g) $HOME/.kube/config

You should now deploy a pod network to the cluster.
Run "kubectl apply -f [podnetwork].yaml" with one of the options listed at:
  https://kubernetes.io/docs/concepts/cluster-administration/addons/

You can now join any number of the control-plane node running the following command on each as root:

  kubeadm join 172.31.17.49:9443 --token ftq4yl.uamut896ijwpea7s \
    --discovery-token-ca-cert-hash sha256:dcadd5b87024c304e5e396ba06d60a4dbf36509a627a6a949c126172e9c61cfb \
    --control-plane --certificate-key ca9d8eb80c4bb6fe1181e0c6ac1e96f6552f98986872d45ba79e47cd87deb0d6

Please note that the certificate-key gives access to cluster sensitive data, keep it secret!
As a safeguard, uploaded-certs will be deleted in two hours; If necessary, you can use
"kubeadm init phase upload-certs --upload-certs" to reload certs afterward.

Then you can join any number of worker nodes by running the following on each as root:

kubeadm join 172.31.17.49:9443 --token ftq4yl.uamut896ijwpea7s \
    --discovery-token-ca-cert-hash sha256:dcadd5b87024c304e5e396ba06d60a4dbf36509a627a6a949c126172e9c61cfb
最后面有两个kebeadm join令牌,第一个是给到master加入时使用,第二个是给到节点加入时使用
最终集群搭建结果如下:
[root@master 1.16.2]# kubectl get nodes
NAME      STATUS   ROLES    AGE     VERSION
master    Ready    master   3h52m   v1.16.2
master2   Ready    master   3h51m   v1.16.2
master3   Ready    master   3h51m   v1.16.2
node1     Ready    <none>   3h51m   v1.16.2
node2     Ready    <none>   119m    v1.16.2
node3     Ready    <none>   118m    v1.16.2
node4     Ready    <none>   118m    v1.16.2
碰到的问题:
1、haproxy容器启动失败,查看日志后发现是找不到配置文件,修改文件挂载路径解决。
一开始使用命令为docker run -d --name=diamond-haproxy --net=host -v /etc/haproxy:/etc/haproxy:ro haproxy:2.1.4
查看容器运行情况
[root@master3 ttebdadmin]# docker ps -a
CONTAINER ID IMAGE COMMAND CREATED STATUS PORTS NAMES
bb659c451ac0 haproxy:2.1.4 “/docker-entrypoint.…” 3 seconds ago Exited (1) 2 seconds ago diamond-haproxy
#查看日志
[root@master3 ttebdadmin]# docker logs diamond-haproxy
[ALERT] 171/105251 (1) : Cannot open configuration file/directory /usr/local/etc/haproxy/haproxy.cfg : No such file or directory
#修改挂载路径
docker run -d --name haproxy --net=host -v /etc/haproxy:/usr/local/etc/haproxy:ro haproxy:2.1.4
2、启动haproxy报错[ALERT] 171/105848 (1) : Starting frontend GLOBAL: cannot bind UNIX socket [/var/lib/haproxy/stats]
修改配置文件,将stats socket /var/lib/haproxy/stats注释解决。
3、启动keeplived报错(Line 14) WARNING - interface eth0 for vrrp_instance VI_1 doesn’t exist
查看本机ip,发现没有eth0网卡,改为ens160即可。
4、想要查看etcd是否为集群,进入etcd容器后,报错error #1: dial tcp 127.0.0.1:4001: connect: connection refused
这是一个比较低级的错误,但是对于小白来说还是值得记录走过来的每一步。
[root@master3 ttebdadmin]# kubectl exec -it etcd-master -n kube-system sh
# /usr/local/bin/etcdctl cluster-health
cluster may be unhealthy: failed to list members
Error:  client: etcd cluster is unavailable or misconfigured; error #0: EOF
; error #1: dial tcp 127.0.0.1:4001: connect: connection refused

error #0: EOF
error #1: dial tcp 127.0.0.1:4001: connect: connection refused
当时查看很多资料,有的说是没有配置本地链路,也就是ETCD_LISTEN_CLIENT_URLS参数没有配置http://127.0.0.1:2379而导致的,也是查看etcd配置文件,发现是是有配置的,然后看到下面有个http,以为是http的问题,于是把http改为https,结果发现其他组件老是重启,后来查看每个master节点的etcd文件配置,发现initial-cluster配置不太一样,有的配一个有的配两个有的配三个,于是改为全部三个,集群没出现什么异常,但还是报错连接不上,还查看了https://github.com/etcd-io/etcd/blob/master/Documentation/op-guide/clustering.md,一个一个对配置,看是否有漏配什么。
还纳闷为啥别人报的是getsockopt: connection refused而我的是connect: connection refused

最终,脑子转过来了,是因为我的集群是开始认证授权的,直接访问etcd是不行的,,必须带上证书。
#查看集群健康状态
# /usr/local/bin/etcdctl --ca-file=/etc/kubernetes/pki/etcd/ca.crt --cert-file=/etc/kubernetes/pki/etcd/server.crt --key-file=/etc/kubernetes/pki/etcd/server.key --endpoints=https://172.31.17.51:2379 cluster-health
member a7660c1c5ea85750 is healthy: got healthy result from https://172.31.17.56:2379
member bfee443ebe27f676 is healthy: got healthy result from https://172.31.17.57:2379
member ca24dc1ff29d5b69 is healthy: got healthy result from https://172.31.17.51:2379
cluster is healthy
#查看集群成员
# /usr/local/bin/etcdctl --ca-file=/etc/kubernetes/pki/etcd/ca.crt --cert-file=/etc/kubernetes/pki/etcd/server.crt --key-file=/etc/kubernetes/pki/etcd/server.key --endpoints=https://172.31.17.51:2379 member list
a7660c1c5ea85750: name=master2 peerURLs=https://172.31.17.56:2380 clientURLs=https://172.31.17.56:2379 isLeader=false
bfee443ebe27f676: name=master3 peerURLs=https://172.31.17.57:2380 clientURLs=https://172.31.17.57:2379 isLeader=false
ca24dc1ff29d5b69: name=master peerURLs=https://172.31.17.51:2380 clientURLs=https://172.31.17.51:2379 isLeader=true
参考文章:
https://www.kubernetes.org.cn/6964.html
https://kubernetes.io/docs/setup/production-environment/tools/kubeadm/high-availability/
https://github.com/etcd-io/etcd/blob/master/Documentation/op-guide/clustering.md