【coderwhy前端笔记 - 阶段一 HTML+CSS】(二) CSS
CSS
- 1 字体
-
- 1.1 font-size 大小
- 1.2 font-family 字体
- 1.3 font-weight 字体粗细
- 1.4 font-style 字体样式效果
- 1.5 font-variant 影响小写字母的显示形式
- 1.6 line-height 一行文本占据的高度
- 1.7 font 是一个缩写属性
- 1.8 web font 网络字体
- 1.9 字体图标
- 2 文本
-
- 2.1 text-decoration 装饰线
- 2.2 text-transform 文字大小写转换
- 2.3 text-indent 内容缩进: 2em
- 2.4 text-align 对齐方式
- 2.5 letter-spacing (word-spacing) 字母(单词)间距
- 2.6 a元素
- 3 选择器
-
- 3.1 简单选择器 p .class #id
- 3.2 属性选择器 [attr=val]{}
- 3.3 后代选择器 空格 >
- 3.4 兄弟选择器 + ~
- 3.5 交集选择器 div.class .class,.class
- 3.6 伪类 :hover
- 3.7 伪元素 ::before ::after ::first-line ::first-letter
- 3.8 结构伪类
-
- (1):nth-child 找孩子
- (2):nth-last-child 找孩子 - 从后往前数
- (3):nth-of-type 找孩子 - 根据类型
- (4):nth-last-of-type 找孩子 - 根据类型 - 从后往前数
- (5)其他类型
- (6)否定伪类 :not( )
- 4 继承 - 层叠 - 元素类型
-
- 4.1 继承 在父级元素设置样式
- 4.2 层叠 - !important
- 4.3 元素类型
-
- (1)display
- (2)元素隐藏的方法 display visibility rgba opacity
- (3)overflow 内容溢出
- (4)css不生效(优先级)
- 5 盒子
-
- 5.1 盒子的组成
- 5.2 content (内容)
-
- (1)宽高 width、height
- (2)内边距 padding
- (3)边框 border
- (4)圆角 border-radius
- (5)外边距 margin
- (6)外轮廓 outline
- (7)盒子阴影 box-shadow
- (8)文字阴影 text-shadow
- (9)行内非替换元素!注意事项
- (10)box-sizing 设置盒子模型中的宽高的行为
- 6 background 背景
-
- 6.1 background-image 背景图片
- 6.2 background-repeat 平铺
- 6.3 background-size 图片大小
- 6.4 background-position 图片位置
- 6.5 background-attachment 滚动效果
- 6.6 sprite 精灵图
- 6.7 背景颜色:background: #f5f5f5
- 7 position 定位
-
- 7.1 标准流布局
- 7.2 position 元素定位
-
- (1)static 默认
- (2)relative 相对定位
- (3)absolute 绝对定位
- (4)sticky 粘性定位
- (5)fixed 固定定位
- (6)绝对定位元素:fixed absolute 的特点
-
- (❤)绝对定位的值
- (❤)布局特点
- (❤)父子间的宽高关系
- (❤)垂直、水平居中
- (❤)父子宽高一致
- (❤)auto 知识补充
- (7)案例练习
- 7.6 z-index
- 8 float 浮动
-
- 8.1 认识浮动
- 8.2 浮动的规则
- 8.3 浮动的问题
-
- (1)span之间空隙的解决方案
- (2)多个元素排列问题
- (3)多元素带边框问题
- 8.4 清除浮动
-
- (1)line
- (2)::after ⭐
- 8.5 布局方案对比
- 9 flex 布局
-
- 9.1 认识flex布局
- 9.2 理解flex布局
- 9.3 flex-container
-
- (⭐)整体表格
- (1)flex-direction 主轴方向
- (2)flex-wrap 行数
- (3)flex-flow 主轴方向和行数的简写
- (4)justify-content 水平对齐方式
- (5)align-items 垂直对齐方式
- (6)align-content 多行的对齐方式
- 9.4 flex-item
-
- (⭐)整体表格
- (1)order 排布顺序
- (2)align-self 垂直对齐方向
- (3)flex-grow 拉伸items
- (4)flex-shrink 压缩items
- (5)flex-basis 基础尺寸
- (6)flex 简写:拉伸 压缩 或 基础尺寸
- 9.5 解决最后一行的 justify-content
- 10 transform 形变
-
- 10.1 平移 translate(x,y)
- 10.2 缩放 scale(x,y)
- 10.3 旋转 rotate(
deg) - 10.4 倾斜 skew(x,y)
- 10.5 原点位置 transform-origin
- 11 居中总结
-
- 11.1 水平居中
- 11.2 垂直居中
- 12 动画 transition animation
-
- 12.1 transition 过渡动画
- 12.2 animation 多帧动画
- 12.3 对比
- 13 vertical-align 垂直对齐
- 14 grid 二维布局
- 15 CSS 新增的元素
-
- 15.1 white-space 处理空白符和换行
- 15.2 text-overflow 文字溢出
- 15.3 css中的函数
-
- (1)var 定义变量
- (2)calc 计算
- (3)filter 滤镜
- (4)gradient 颜色渐变
- (5)浏览器前缀
- 16 css编写步骤
- CSS 随手记
-
- 1 单行显示省略号
- 2 网站的logo a 不展示文字
- 3 高度设置
-
- (1)设置具体的高度
- (2)行高的填充
- (3)定位的方式 ⭐
- 4 搜索 input 的设置
- 5 swiper / banner 轮播图
- 6 父设置flex、高度,子自动有高度
- 7 连接符:公共 _,区域 -
- 8 box-sizing: border-box 影响padding、border
- 9 链接跳转:路由跳转、打开新链接 window.open
- 10 边框图形:画三角形
- 11 cusor 手指指针显示样式
- 12 页面缩小出现滚动条
- 13 背景图保持在中间
- 14 cover 遮罩层
- css是一种语音,MDN:不是真正的编程语言,甚至不是标记语言,它是一门样式表语言。维基百科:是一种计算机语言,但是不算是一种编程语言。
- 1994年,哈肯·维姆·莱 和 伯特·波斯 合作设计CSS,1996年发布CSS1
- 1997年初,W3C组织专门成立CSS工作室,1998年5月发布CSS2
- 2006~2009年,流行DIV+CSS布局
- 从CSS 3开始,所有CSS分成了不同的模块,每个模块都有CSS2中额外增加的功能,以及向后兼容
- 2011年6月7日,CSS 3 Color Module终于发布为W3C Recommendation
写法
声明:color(属性) : red(属性的值);
方法
内联样式:
内部样式:
外部样式:css文件夹中的*.css,
导入多个样式表
index.html
<link rel="stylesheet" href="index.css">
index.css
@import url(01.css);   /* 方法一 */
@import "02.css";     /* 方法二 */
css 文档开头编写@charset
@charset "UTF-8"
常见的CSS样式
官方文档,推荐中文文档,css版本可用性,凹凸实验室规范
1 字体
1.1 font-size 大小
- 默认16px,默认最小12px,可在浏览器内设置
- 单位:em(相对于父元素的字体尺寸倍数)、px (常用)、百分比%(相对于父元素的字体尺寸百分比)
1.2 font-family 字体
- 文字类型,默认微软雅黑
- 可以设置一个或多个字体
@font-face设置网络字体
1.3 font-weight 字体粗细
- 100 | 200 | 300 | 400 | 500 | 600 | 700 | 800 | 900:每个数字表示一个重量
- bold = 700
- normal = 400
- h、strong、b等标签都默认bold
1.4 font-style 字体样式效果
- normal:正常
- italic:斜体,字体本身有斜体设计,运用该设计
- oblique:斜体,字体倾斜处理
- em、i、cite、address、var、dfn等元素的font-style默认就是italic
1.5 font-variant 影响小写字母的显示形式
1.6 line-height 一行文本占据的高度
- 当line-height = height 时,垂直居中显示,比较局限,多用于文本只有单行
1.7 font 是一个缩写属性
font-stylefont-variantfont-weightfont-size/line-heightfont-family- 斜体 小写字母的显示 粗细 字体大小 / 行高 字体
- 前三个可以随意调换顺序,也可以省略
/line-height可以省略,如不省略,必须跟在font-size后面font-size、font-family不可以调换顺序,不可以省略
div{font: 16px/1.5 serif;}
1.8 web font 网络字体
将下载好的 ttf 文件放到路径:html/css.javascript/font
通过@font-face来引入字体,并设置格式,注意:@font-face用于加载一个自定义字体
@font-face{ font-family: "myname"; src: url() }
body { font-family: "myname"}
字体下载网站:字体天下
在线设计字体
字体具备兼容性时,存在许多的格式,编写方式如下

加上 font-style:normal;font-weight:400;
如果压缩包有icon.css文件,打开直接复制上面的代码
1.9 字体图标
放大不失真,可切换颜色,文件相对图片较小
阿里图库 - 加入购物车 - 选择 - 下载代码
使用方法一:
css
@font-face{ font-family: ; src: url( "xxx.ttf" ) }
.iconfont { font-family: "icontfont"; font-style:normal; }
打开 demo_index.html 文件,查看icon的文字编码
html
<i class= "iconfont"> xe654 i>
使用方法二:
@font-face{ font-family: ; src: url( "xxx.ttf" ) }
.iconfont { font-family: "icontfont"; font-style:normal; }
.music::before { content: "\e664" }
before 之 前 ,after 之 后
html
<i class= "iconfont music"> i>
阿里图库文件的使用方法:
html
引入iconfont.css文件,直接使用
2 文本
2.1 text-decoration 装饰线
- none:无任务装饰,可去除a的下划线
- underline:下划线
- overline:上划线,基本不用
- line-through:中划线 (删除线)
2.2 text-transform 文字大小写转换
- capitalize:单词首字符大写
- uppercase:所有字符大写
- lowercase:所有字符小写
- none:没有任何影响
2.3 text-indent 内容缩进: 2em
2.4 text-align 对齐方式
定义行内内容相对于它的父级如何对齐(例如文字)
- left:左对齐
- right:右对齐
- center:居中
- justify:两端对齐,基本不用
- 只对行内元素起作用,div是块状元素,使用
display: inline-block,将div变为行内块状元素,即可使用text-align text-align-last: justify最后一行两端对齐- margin: 0 auto; 块状元素居中
2.5 letter-spacing (word-spacing) 字母(单词)间距
- 默认是0,可设置负数
cursor: pointer 鼠标 > 小手指
2.6 a元素
a 的重置(去除下划线):text-decoration: none;
3 选择器
通用选择器:* {} 不推荐该用法,body,p,div,h2,span {} 更推荐这种方法
普通选择器:元素选择器、类选择器、id选择器
权重:下面的优先执行
id 在文本中应是唯一的
连接方法:_、-、小驼峰boxOne、大驼峰BoxFirest
3.1 简单选择器 p .class #id
- 元素选择器:h1、p、div、span
- 类选择器:
.className{} - id选择器:
#idName{}
3.2 属性选择器 [attr=val]{}
[title] {color:red}
[title=tt]{background-color:blud}
<div title="tt">div>
其他,一般不用:
- [attr* = val]:属性值包含某一个值val
- [attr^ = val]:以val开头
- [attr$ = val]:以val结尾
- [attr| = val]:等于val或以val开头后面紧跟连接符-
- [attr~ = val]:属性值包含val,如果有其他值必须以空格和val分割
3.3 后代选择器 空格 >
.box span {} 后代选择(包括子代和其后代)
.box > span {} 子代选择
3.4 兄弟选择器 + ~
.box + div{} 相邻兄弟
.box ~ div{} 后面所有兄弟
3.5 交集选择器 div.class .class,.class
div.box {} 需要同时符合
.one,.two 给多个元素设置样式
3.6 伪类 :hover
(1)动态伪类
:link、:visited、:hover、active、focus、
3.7 伪元素 ::before ::after ::first-line ::first-letter
(1)::first-line,给第一行设置样式
(2)::first-letter,给第一个词设置样式
(3)::before,给元素前面设置样式
(4)::after,给元素后面设置样式
::before ::after
.div1::before {
	content:"文本内容";
}
.div2::before {
	content:url("aaa.svg")
}
.div3::after {
	content:" ";
	width:8px;
	height:8px;
}
content不能省略
3.8 结构伪类
(1):nth-child 找孩子
:nth-child(1)找第一个儿子
.
:nth-child(2n)找偶数- n代表任意正整数和0
- 是父元素中的第偶数个子元素(第2、4、6…个)
- 跟
:nth-child(even)同义
.
:nth-child(2n+1)找奇数
.
:nth-child(-n+2)查找前两个子元素
(2):nth-last-child 找孩子 - 从后往前数
使用方法同上
(3):nth-of-type 找孩子 - 根据类型
与nth-child 相似,区别在与 nth-of-type 会自动排除干扰项,专注于找某个类型
例:
-
.box>div:nth-child(3)含义为找box下第三个子元素,若该元素为div便生效,若不为div则不生效 -
.box>div:nth-of-type(3)含义为找第三个div,中间有span、p、h1 等干扰项都直接排除
(4):nth-last-of-type 找孩子 - 根据类型 - 从后往前数
使用方法同上
(5)其他类型
-
:first-child = :nth-child(1)
-
:last-child = :nth-last-child(1)
-
:first-of-type = :nth-of-type(1)
-
:last-of-type = :nth-last-of-type(1)
-
:only-child,父元素中只有一个子元素,使用时无括号()
-
:only-of-type,父元素中该类型只出现一次,使用时无括号()
-
:root,根元素,就是html元素
-
:empty,代表里面完全空白的元素
(6)否定伪类 :not( )
- :not() 的格式是 :not(X)
- x 是一个简单的选择器
- 元素选择器、通用选择器、属性选择器、类选择器、id选择器、伪类(除否定伪类)
- 如:
.box :not(.classname){},给.box下所有元素设置样式,除了.classname
4 继承 - 层叠 - 元素类型
4.1 继承 在父级元素设置样式
字体相关的属性具有继承性,需要注意 ↓
div{font-size:2em} /* 16px*2em=32px */
p{font-size:2em}   /* 32px*2em=64px */
<div><p>ascp>div>
4.2 层叠 - !important
- 一个css可多次设置
- 判断一:权重,优先级,所有权重累加
- 判断二:先后顺序
- 常见的选择器
!important= 10000- 内联 = 1000,
- id = 100,
#idname { } - 类、伪类、属性 = 10,
.classname{ } - 元素、伪元素 = 1,
div { } - 统配 = 0,
* { }
4.3 元素类型
(1)display
- 块状元素 >> div
- 行内级元素
- 行内级非替换元素
- 行内级替换元素 >> img/video
- 行内块状元素 >>inline-block
可使用display进行修改
display: block,设为块状元素,独占一行,可以设置宽度和高度,默认高度是内容的高度
display: inline,设为行内级元素,与其他行内级元素同一行显示,不能设置宽度和高度,宽高由内容决定
display: inline-block,和其他行内级元素在同一行显示,可以设置宽度和高度,默认宽高由内容决定
display: none,隐藏元素
(2)元素隐藏的方法 display visibility rgba opacity
-
display: none,不占据任何空间
-
visibility: hidden,仍会占据空间,默认为
visible,元素可见 -
rgba: alpha (0~1)
color: rgba(255,255,255,.5)
设置某个值
0看不到 ~ 1看到 -
opacity 设置透明度 (0~1)
所有子元素都同步该透明度
0看不到 ~ 1看到
(3)overflow 内容溢出
overflow: visible溢出可见overflow: hidden溢出内容裁剪overflow: scroll溢出内容裁剪,滚轮机制查看overflow: auto自动根据内容是否溢出决定是否提供滚轮机制
(4)css不生效(优先级)
- 优先级太低
- 内联样式 > ID 选择器 > 类选择器 = 属性选择器 = 伪类选择器 > 标签选择器 = 伪元素选择器
- "直接样式"比"祖先样式"优先级高。
- 最近的优先
- 没选中元素
- 形式不对
- 元素不支持此css属性,如:
span默认不支持width和height - 浏览器不支持此css属性,如:旧版浏览器不支持css module3的某些属性
- 被同类型的css 覆盖,如 font 覆盖 font-size
- 元素不支持此css属性,如:
5 盒子
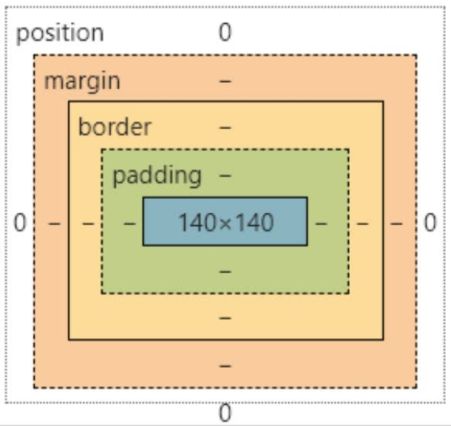
5.1 盒子的组成
5.2 content (内容)
(1)宽高 width、height
对于行内级非替换元素来说,设置宽高是无效的
display: inline,设为行内级元素,与其他行内级元素同一行显示,不能设置宽度和高度,宽高由内容决定
min-width 最小宽度,max-widht 最大宽度,min-width ≤ 实际宽度 ≤ max-width
min-height 最小高度,max-height 最大高度,min-height ≤ 实际高度 ≤ max-height
width默认值auto,交给浏览器决定
(2)内边距 padding
- padding:上 右 下 左
- padding:上(下) 右(左)
(3)边框 border
- 简写:
border:宽度 样式 颜色 - 代码:
border: 1px solid #ccc - 四个方向:上 右 下 左 border-top、border-right、border-bottom、border-left
- 详细:border-top-color、border-top-color、border-top-style
- 样式:
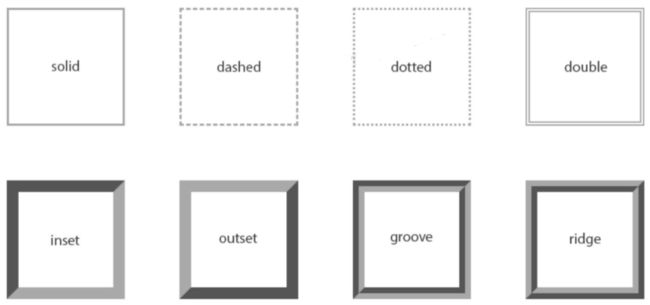
groove:凹槽,内陷,边框看上去像是雕刻再画布之内
ridge:山脊,凸出,和 groove 相反,边框看上去像是从画布中凸出来
跳转到《额外知识 - 边框图形:画三角形》
(4)圆角 border-radius
- 可设置数值(1px)、百分比(50%)
- 全写:
border-top-left-radius左上角 - 当元素为正方形时,设置
border-raduis: 50%;为圆形
(5)外边距 margin
margin:上 右 下 左
margin:上(下) 右(左)
传递:
- 子元素
margin-left: 100px;子元素左侧距离父元素100px - 子元素
margin-top: 100px;子元素上侧紧贴父元素,父元素距离浏览器上侧100px- 解决方法:
- 父元素设置 padding-top / padding-bottom
- 触发BFC:设置overflow: auto
- 父元素设置 border:子元素
margin-top: 100px;、父元素boder: 1px solid #ccc,子元素上侧紧贴父模块,父元素距离浏览器上侧100px
- 解决方法:
- 子元素
margin-bottom: 100px;子元素下侧紧贴父元素,margin-bootom未生效- 解决方法:父元素增加
height: auto
- 解决方法:父元素增加
- 建议:
- margin 一般用来设置兄弟间的间距
- padding 一般用来设置父子之间的间距
折叠:
- 两兄弟块级元素之间上下的 margin 折叠,取大的
- 父子块级元素之间上下的 margin 折叠,取大的
居中设置:
- 父:
text-align: center,子:display: inline-block(行内块元素)
text-align: center让行内元素居中,并设置到父级元素 - 子:
margin: 0 auto - margin是
- ⭐ flex 布局
(6)外轮廓 outline
- 不占用空间
- 显示在 border 的外面
- outline:宽度 样式(参考border) 颜色
outline: none,去除a元素、input元素的 focus 轮廓- 上下会重叠,左右会相加
(7)盒子阴影 box-shadow
盒子阴影 - 实验室
正常写法:box-shadow: x y 模糊 延伸 color
多个叠加:box-shadow: 第一个,第二个,第三个
(8)文字阴影 text-shadow
正常写法:box-shadow: x y 模糊 color,没有延伸值!
多个叠加:box-shadow: 第一个,第二个,第三个
文字阴影 - 实验室
(9)行内非替换元素!注意事项
行内非替换元素span、a、strong、i,设置以下css要么不生效,要么比较特殊:
- 内容 content width / height
- 内边距 padding
- 边框 border
- 外边距 margin
如:span
- 设置 width、height:不生效
- 设置 padding:左右增大,上下会被撑起来,实际上不占用空间
- 设置 border:左右有边框,上下会被撑起来,实际上不占用空间
- 设置 margin:左右生效,左右不生效
(10)box-sizing 设置盒子模型中的宽高的行为
- box-sizing: content-box
- padding、border都布置在width、height外边
- 元素的实际占用宽高 = border + padding + width / height
- box-sizing: brder-box
- padding、border都布置在width、height里边
- 元素的实际占用宽高 = width / height
重点使用 box-sizing: brder-box,边框属于盒子的一部分
当div为100 * 100,border为25
未设置时,div整体大小为150 * 150
已设置时,div整体大小为100*100,边框大小占据 25 25 25 25
当div为100*100,border为50时,div背景色不可见,可用此特性完成边框图形设计
额外知识 - 边框图形:画三角形
6 background 背景
必须有宽高才能使背景生效
background 缩写:颜色 图片 位置 大小 平铺 定位
6.1 background-image 背景图片
- 会盖(不是覆盖)在background-color上
- 如果设置了多张图片,设置的第一张显示在最上面,其他图片按顺序层叠在下面
6.2 background-repeat 平铺
- repeat 平铺
- norepeat 不平铺
- repeat-x
- repeat-y
6.3 background-size 图片大小
- auto 以背景图本身大小显示
- cover 缩放背景图,以完全覆盖铺满元素,可能背景图片部分看不见
- contain 缩放背景图,宽度或者高度铺满元素,但是图片保持宽高比
- < percentage > 百分比,相对于背景区(backg position area)
- length 具体的大小,如100px
6.4 background-position 图片位置
- background-position: x y
- 可以设置具体的数值,如 20px 30px
- 水平方向还可以设值:left、center、right
- 垂直方向还可以设值:top、center、bottom
- 如果只设置了一个方向,另一个方向默认是center
6.5 background-attachment 滚动效果
- 决定背景图像的位置是在视口内固定,或者随着包含它的区块滚动
- scroll 背景相对于元素本身固定,而不是随着它的内容滚动,位于模块固定位置
- local 随着元素内容的滚动而滚动,背景随着内容动
- fixed 相对于浏览器视口固定位置,位于浏览器固定位置,滑动至该背景不显示时,背景也不显示
例:
复制代码可查看效果
.box{
	width: 150px;
	height: 300px;
	background-color: #efefef;
	background-repeat: no-repeat;
	background-image: url(img/微信截图_20220622135852.png);
	overflow: scroll;
	display: inline-block;
	margin: 0 10px 0 0;
}
.yi {
	background-attachment: fixed;
}
.er {
	background-attachment: local;
}
.san {
	background-attachment: scroll;
}
<div class="box yi">
	fixed
div>
<div class="box er">
	local
div>
<div class="box san">
	scroll
div>
长文字
6.6 sprite 精灵图
是一种css图像合成技术,将各种小图片合并到一张图片上,然后利用css的背景定位来显示对应的图片部分,称为css雪碧、css精灵
目的:为减小图片总大小,减少网页的http请求数量,加快网页响应速度,减轻服务器压力,解决了图片命名的困扰
制作方法:Photoshop、toptal
使用方法
.topbar { background-image: url( ); background-repeat: no-repeat; display: inline-block }
.sprite { background-position: -192px 0; width: 26px; height: 13px; }
案例(复用率高的精灵图)
简介:使用的精灵图 具体图标位置 图标在网页的位置
公共css:设置样式 .topbar_sprite 公用一张图,.topbar_icon_hot 设置具体用哪个图标

index.css中使用样式 .icon-hot 来设置图标具体在页面的位置

快速获取图标位置工具
6.7 背景颜色:background: #f5f5f5
7 position 定位
7.1 标准流布局
默认为从上到下、从左到右排列,相互之间不存在层叠现象
- 在标准流中,可以使用margin、padding对元素进行定位,其中margin可以设置负数
- 比较明显的缺点是
- 设置一个元素的margin或者padding,通常会影响到标准流中其他元素的定位效果
- 不便于显示元素层叠的效果
- 可使用position属性来设置元素跳出标准量
position 使用案例:将一个元素放在另一个元素上面、始终保持在浏览器的同一个位置
7.2 position 元素定位
| 取值 | static | relative | absolute | sticky | fixed |
|---|---|---|---|---|---|
| 含义 | 静态定位(默认) | 相对定位 | 绝对定位 | 粘性定位 | 固定定位 |
| 对齐 | 无 | 元素原来的位置 | 最邻近的定位祖先元素(无时,变为视口) | 最近的滚动祖先(包含视口) | 视口 |
| 脱离标准流 | × | × | ✔ | ✔ | |
| 定位元素 | × | ✔ | ✔ | ✔ | |
| 绝对定位元素 | × | × | ✔ | ✔ |
⭐脱标后不再严格区分行内级/块状元素
(1)static 默认
静态定位,设置上下左右没有任何作用
(2)relative 相对定位
相对定位,在不影响其他元素的前提下,对当前元素位置进行微调
参照对象:自己原来的位置,如left50 top50,意为移动后的元素上侧距离原位置50,左侧距离原位置50

图片居中
方法一:
posotion: relative
left: 负(图片的一半)
margin-left: 50%
方法二:
position: relative
transform: translate(-50%) (以自身为标准 偏离-50%)
(3)absolute 绝对定位
- 元素脱离标准流
- 可以通过上右下左进行定位,参照对象是最邻近的定位祖先元素(relative),如没有该对象,则参照物为视口
- 定位元素position值不为 static(默认)的元素,也就是 position 值为relative、absolute、fixed的元素
子绝父相
父元素position: relative
子元素position: absolute
(4)sticky 粘性定位
新内容
相对定位和绝对定位的结合体。它允许被定位的元素表现得像相对定位一样,当它滚动到某个阈值点时,就会变成固定(绝对)定位
运用场景:导航栏,向下滑动到一定位置时,导航栏位置固定
代码:
div1、div2、div3、ul
.div2 { position: sticky; top: 0; }
当div2滚动到最上面时,div2保持在最上面
相对于最近的滚动祖先
代码:
div1 包裹(h1、div2、div3、ul)
.div1 { width 100; height 300; margin 300px auto 0; overflow scroll}
.div2 { position: sticky; top: 0; }
当div2滚动到div1最上面时,div2保持在div1内的最上面
(5)fixed 固定定位
固定定位,脱离标准流,通过上右下左进行定位
参照对象:浏览器视口
当画布滚动时,固定不动
视口:文档的可视区域
画布:整个文档,包括需要下拉的部分
画布 >= 视口
(6)绝对定位元素:fixed absolute 的特点
(❤)绝对定位的值
position:fixed / absolute
(❤)布局特点
- 宽高默认由内容决定,可以随意设置
. - 不再受标准流格式的约束
- 不再严格按照从上到下,从左到右排布
- 不再严格区分块级、行内级,块级、行内级的很多特性都会消失
.
- 不再给父级汇报宽高数据
. - 脱标元素内部默认还是按照标准流布局
(❤)父子间的宽高关系
父 width = 子 width(默认为 auto) + left + right + margin-left(默认为 0) + margin-right(默认为 0)
父 height = 子 height(默认为 auto) + top + bottom + margin-top(默认为 0) + margin-bottom(默认为 0)
.
案例一:子元素的 width 取值
父:position relative , width 300px ,height 800px
子:position absolute,不设置 width,height 100px,left 0,right 0
父 width = 子 width + left + right + margin-left + margin-right
300 = auto + 0 + 0 + 0 + 0 + 0
x = 300(子元素 与 父元素 同宽)
.
案例二:子元素 margin: auto取值
父:width 800,height 1000
子:width 100,height 100,margin auto
父 width = 子 width + margin-left + margin-right
800 = 100 + auto + auto
800 = 100 + 350 + 350(子元素居中于父元素)
.
(❤)垂直、水平居中
案例三:子元素是否居中
父:position relative , width 300px,height 800px
子:position absolute,width 100px,height 100px,left 0,right 0,margin auto
父 width = 子 width + left + right + margin-left + margin-right
300 = 100 + 0 + 0 + auto + auto
300 = 100 + 100 + 100(子元素居中于父元素)
.
案例四:使用 margin ,让子元素垂直居中和水平居中
代码:
父:position relative , width 300px,height 900px
子:position absolute,width 100px,height 100px, left 0,right 0,top 0,bottom 0,margin auto
计算方式:
父 width = 子 width + left + right + margin-left + margin-right
300 = 100 + 0 + 0 + 100 + 100 (水平居中)
父 height = 子 height + top + bottom + margin-top + margin-bottom
900 = 100 + 0 + 0 + 400 + 400(垂直居中)
注意:需要设置具体的宽高值,并小于定位参照对象的高度
.
(❤)父子宽高一致
案例五:绝对定位元素的宽高和定位参照对象一样
代码:left 0、right 0、top 0、bottom 0、margin 0
原因:width 和 height 默认为 auto
.
(❤)auto 知识补充
auto:交给浏览器决定
width:auto
1、行内非替换元素 > width:包裹内容
2、块级元素 > width:包含块的宽度
3、绝对定位元素 > width:包裹内容
(7)案例练习
7.6 z-index
用来设置定位元素(relative absolute fixed)的层叠顺序
取值:正整数、负整数、0(默认)
兄弟关系
- z-index 越大,层叠在越上面
- z-index 相等,写在后面的那个元素层叠在上面
非兄弟关系
- 从元素自己及祖先元素中,找出最邻近的2个定位元素进行比较
- 且这2个定位元素必须有设置z-index的具体数值
8 float 浮动
8.1 认识浮动
float:left / right / none
早期css没有很好的左右布局解决方案,所以float成为网页多列布局的最常用工具
8.2 浮动的规则
-
浮动后脱离标准流
-
浮动元素之间不能层叠
- 当1、2浮动,3 正常时,3显示在1、2下面
- 当1、2、3浮动,3不够位置时,3将下移到左下
-
浮动元素 不能与 行内元素 层叠,行内元素 将会被浮动元素推出
8.3 浮动的问题
(1)span之间空隙的解决方案
- 删除换行符(不推荐)
- 将父级元素的font-size设置为0,子元素将font-size设置回来
- float
- flex
(2)多个元素排列问题
⭐当排列的元素统一设置float left + margin-right时,会出现最后一个被挤压至下一行的情况
解决方案有:
- 设置每X个元素的 mr 为0,
li:nth-child(5n) { margin-right: 0; },存在兼容性问题 - 为每X个元素设置 class,比较麻烦
- 父级元素设置负的 margin
ul,li {
	margin: 0;
	padding: 0;
}
.content {
  width: 1190px;
  height: 800px;
  margin: 0 auto;
  background-color: bisque;

}
.box {
  margin-right: -10px;
  background-color: rgba(0,0,0,.2);
  height: 400px;
}
li {
  width: 230px; /* 230 x 5 = 1150px */
  height: 300px;
  margin-right: 10px;  /* 1150 + 50 = 1120px,无.box的margin-right时会下移 */
  background-color: darkorange;
  float: left;
  list-style: none;
}

/*
宽度解析:
content( width ) = box( width + ml + mr )
1190 = auto + (-10)
1190 = 1200 - 10
box的宽度为1220
 */
<div class="content">
  <div class="box">
    <ul>li{$}*5ul>
  div>
div>
(3)多元素带边框问题
    .content {
      width: 1100px;
      margin: 0 auto;
      height: 300px;
      background: #ccc;
    }

    .box {
      /* margin-left: 1px; */
    }

    .item {
      width: 221px;
      height: 168px;
      background: orange;
      color: #fff;

      float: left;

      border: 1px solid #000;
      margin-right: -1px;

      box-sizing: border-box;
    }

    .item.first {
      width: 220px;
    }
	/*
	.content( width ) = .box( width + ml + mr )= .item*5 ( width + ml + mr )
	1100 = auto = 221 * 4 + 220 +(-1 * 4)
	1100 = auto = 1100

	 */
  <div class="content">
    <div class="box">
      <div class="item first">1div>
      <div class="item">2div>
      <div class="item">3div>
      <div class="item">4div>
      <div class="item">5div>
    div>
  div>
8.4 清除浮动
(1)line
在结束浮动的元素后面加上 div.line,样式使用 .line { clear: both; }
(2)::after ⭐
.clear_fix>.item*5,父元素样式使用
/* 最终的解决方案 */
.clear_fix::after {
  content: "";
  clear: both;
  display: block;

  /* 浏览器兼容 */
  visibility: hidden;   /* 隐藏 content 元素 */
  height: 0;
}

.clear_fix {
  /* IE6/7 */
 /* 设置zoom:1可以在IE6下清除浮动、解决margin导致的重叠等问题。 */
  *zoom: 1;
}
8.5 布局方案对比
| 定位方案 | 应用场景 | 值 | 方向 |
|---|---|---|---|
| normal flow(标准流) | 垂直布局 | 无 | 垂直 |
| absolute positioning(绝对定位) | 层叠布局 | relative absolute fixed sticky | 上下左右 |
| float | 水平布局 | left right | 左右 |
| flex | 一维弹性 | ||
| grid | 二维 |
⭐ float不建议再用,已逐渐退出市场;目前常用 flex
9 flex 布局
9.1 认识flex布局
flexbox:弹性盒子
- 弹性盒子用于按
行或列进行布局的一维布局方法 - 元素可以
膨胀以填充额外的空间,收缩以适应更小的空间
flex布局是目前web开发中使用最多的布局方案,完全普及移动端与PC端,只有非常少数的网站依旧在用浮动来布局
为什么需要flex来布局呢?
- 长久以来,css布局中唯一可靠且跨浏览器兼容的布局工具只有 float 和 position
- 这两种方法存在很大的局限性,并且用他们来布局实在是无奈之举
痛点
- 垂直居中比较难
- 所有子元素 等分 可用宽高,而不管有多少宽高可用
- 多列布局中的所有列采用相同的高度,即使它们包含的内容量不同
9.2 理解flex布局
- 开启 flex 布局的元素叫做
flex container。即设置了display: flex的元素 flex container的直接子元素称为flex item
当 flex container 中的子元素变成了 flex item
flex item的布局将受flex container属性的设置来进行控制和布局flex item不在严格区分块级元素和行内级元素flex item默认情况下是包裹内容的,但是可以设置宽度和高度
成为 flex container 的方法
- display: flex,
flex container以 block-level 形式存在 - display: inline-flex,
flex container以inline-level 形式存在
9.3 flex-container
(⭐)整体表格
flex container (外盒子)属性
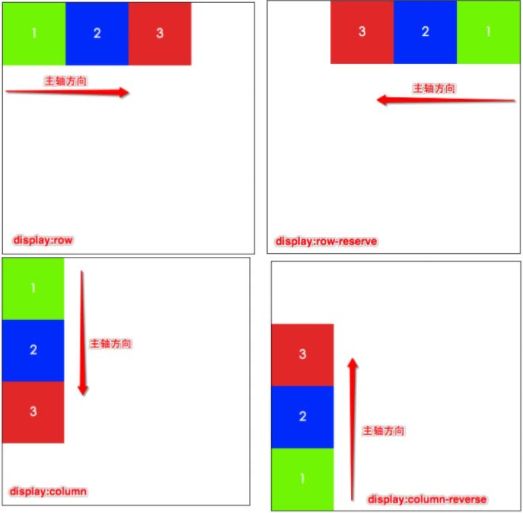
(1)flex-direction 主轴方向
决定主轴的方向
| 值 | 含义 |
|---|---|
| row(默认) | → |
| row-reverse | ← |
| column | ↓ |
| colimn | ↑ |
(2)flex-wrap 行数
决定 单行显示 或者是 多行显示
| 值 | 含义 |
|---|---|
| nowrap(默认) | 单行 |
| wrap | 多行 |
| wrap-reverse | 多行(wrap的cross start和cross end相反) |
(3)flex-flow 主轴方向和行数的简写
direction和wrap的简写,顺序任意,并且都可以省略
如:flex-flow: row wrap,从左到右,多行
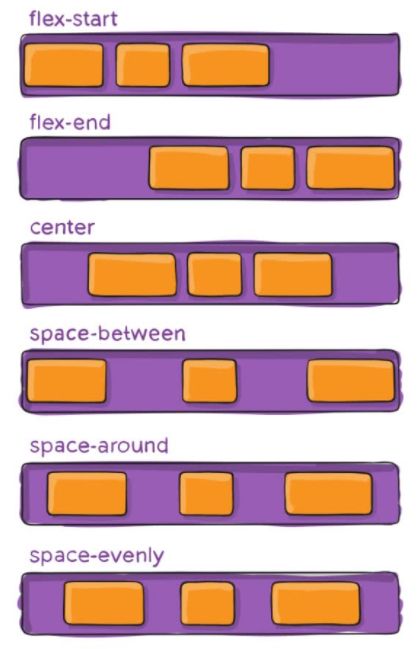
(4)justify-content 水平对齐方式
决定元素的水平对齐方式
| 值 | 含义 |
|---|---|
| flex-strat(默认) | 靠左对齐 |
| flex-end | 靠右对齐 |
| center | 居中对齐 |
| space-between | 两端对齐 |
| space-around | 元素(items)间距相等 最左最右的距离 = 1 2 \frac{1}2 21 元素间距 |
| space-evenly | 元素(items)间距相等 最左最右的距离 = 元素间距 |
(5)align-items 垂直对齐方式
决定在cross axis (↓) 上的对齐方式
| 值 | 含义 |
|---|---|
| normal(默认) | 与stretch一致 |
| stretch | 当元素在 cross axis 方向的 size 为 auto 时 会自动拉伸填满 flex container(与高度一致) |
| flex-start | 与 cross start 对齐 |
| flex-end | 与 cross end 对齐 |
| center | 居中对齐 |
| baseline | 文字基准线对齐 |
(6)align-content 多行的对齐方式
决定了元素在 cross axis (↓) 的对齐方式,用法与 justify-content 类似,高度有多余空间时才设置该属性,但一般无需设置 flex container 的高度
| 值 | 含义 |
|---|---|
| stretch(默认) | 当元素在 cross axis 方向的 size 为 auto (无高度) 时,会自动拉伸填满 |
| flex-strat | 靠上对齐 |
| flex-end | 靠下对齐 |
| center | 垂直对齐 |
| space-between | 元素(items)间距相等 垂直两端对齐 |
| space-around | 元素(items)间距相等 最上最下的距离 = 1 2 \frac{1}2 21 元素间距 |
| space-evenly | 元素(items)间距相等 最上最下的距离 = 元素间距 |
9.4 flex-item
(⭐)整体表格
flex items(元素)属性
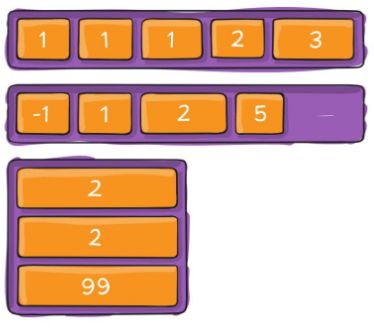
(1)order 排布顺序
决定items的排布顺序。可设置任意整数(正整数、负整数、0),值越小越排在前面,默认为 0
(2)align-self 垂直对齐方向
对item自身设置
- auto(默认值):遵从 flex container 的 align-items 设置
- stretch、flex-start、flex-end、center、baseline,效果跟align-items一致
(3)flex-grow 拉伸items
决定了items如何扩展(拉伸、成长)
- 可以设置任意非负数(正小数、正整数、0),默认值为0
- 当 flex container 在 main axis 方向上有剩余size时,flex-grow 属性才会生效
- 常给某元素设置:1,拉伸剩余空间,
flex:1 >> flex-grow: 1
计算方式 (flex container的 剩余 size) * flex-grow / sum- 如:
container(400) = 100 + 100 + 100 + 空余(100)
设置flex-grow:item2 、 item1 、 item1
item2 = 空余(100) * 2 / 4 = 50
item1 = 空余(100) * 1 / 4 = 25
得:
(100+50) + (100+25) + (100+25) + 空余(0)
400 = 150 + 125 + 125
- 如:
- flex items 扩展后最终 size 不能超过 max-width / max-height
(4)flex-shrink 压缩items
决定了items如何收缩
- 可以设置任意非负数(正小数、正整数、0),默认值:1
- 1(收缩),0(不收缩)
- 当flex items在main axis方向上超过了flex container的size,flex-shrink属性才有效
计算方式:
(flex items 超出 flex container 的 size) * 收缩比例 / 所有的 flex items 的收缩比例之和
- flex items 收缩后最终 size 不能小于 min-width / min-height
(5)flex-basis 基础尺寸
默认值为auto,该属性不常用
当设置 width: 100px,且英文单词很长时,超出部分隐藏

当设置 flex-basis: 100px,且英文单词很长时,items宽度增加,甚至会压缩其他的 items 宽度,甚至超出 flex container 的宽度,直至单词显示完整
(6)flex 简写:拉伸 压缩 或 基础尺寸
默认值 0,0,auto,flex(
单值(任选一个):
width,会被当做- 关键字
noneautoinitial
常用设置:flex: 1,意为flex:1 >> flex-grow: 1,拉伸剩余空间
双值:
- 第一个值:
- 第二个值:
三值(顺序固定):
- 第一个值:
- 第二个值:
- 第三个值:
9.5 解决最后一行的 justify-content
设置 justify-content:space-between,把 8 放到中间的位置上
解决方案:
在 item8 后面添加 (或), 的个数为列数-2,设置 的宽度与items同宽
原理: 占了宽度,但未设置高度,占满最后一行后,多出来的span没有高度也不生效
10 transform 形变
可设置多个 transform-function :平移、旋转、缩放、倾斜等
- 平移:
translate(x,y) - 缩放:
scale(x,y) - 旋转:
rotate(deg) - 倾斜:
skew(deg,deg)
代码案例:transform: translate(100px) scale(0.5) rotate(45deg)
解读:x轴平移100px,缩小一半,旋转45°
注意:
语法
语法
对行内非替换元素(a、span)无效
形变 - 实验室
10.1 平移 translate(x,y)
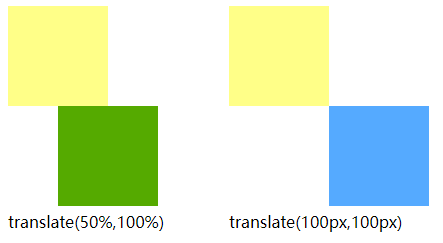
为translateX、translateY的缩写,平移位置参照元素本身
单值为 x,双值为 (x,y),可写数字、百分比,(百分比参照自身宽高),位移方向为:
注意:box-sizing:border-box,影响的是padding和border的值
利用 translate 完成水平垂直居中,下为垂直居中:
.box {
	position: relative;
	top:50%; /* 向下移动外框的一半 */
	transform:translate(0,-50%) ; /* 向上位移自身的一半 */
	width: 100px;
	height: 100px;
	background-color: purple;
}
translate vs flex:translate兼容性更好,flex更普及好用
10.2 缩放 scale(x,y)
为scaleX和scaleY的缩写,单值为 x,双值为 (x,y)
原点为左上
值类型:数字,百分比
0~1 对元素进行缩小
1 不变
大于1 对元素进行方大
一般会用来做元素的经过放大/缩小
10.3 旋转 rotate(deg)
仅有一个值,表示旋转的角度,正数为顺时针,负数为逆时针
默认的旋转中心在中间
补充:
- 直角: 90 deg = 100grad = 0.25turn ≈ 1.5708rad
- 平角:180deg = 200grad = 0.5 turn ≈
10.4 倾斜 skew(x,y)
用的很少
文字也会倾斜
单值为 x,双值为 (x,y),值类型:
- deg:倾斜角度
- 正数为顺时针
- 负数为逆时针
注意倾斜原点受 transform-origin 影响
10.5 原点位置 transform-origin
单值为 x,双值为 (x,y)
默认原点为中间(50% 50% 0)
值类型:
- 关键字:left、center、right、top、bottom
- length(数字):从左上角开始计算
- 百分比:参考元素本身大小
动图示意
11 居中总结
11.1 水平居中
(1)行内级元素:父元素,设置 text-align: center
(2)块级元素:当前块级元素,有宽度,设置 margin: 0 auto
(3)绝对定位:元素有宽度,设置 left 0; right: 0; margin: 0 auto,(垂直居中同理)
(4)flex布局:父元素,设置 justify-conter: center
11.2 垂直居中
(1)绝对定位:元素有高度,设置 top: 0; bottom: 0; margin: auto 0
(2)flex布局:父元素,设置 align-items: center
(3)top + transform,设置:top: 50%; transform: translate(0,-50%)
绝对定位的弊端:1. 会脱离标准流;2. 必须设置高度
flex布局的弊端:所有的元素都会垂直居中
12 动画 transition animation
12.1 transition 过渡动画
transition =
#:间隔为,
可以设置:
- transition-property:哪些属性发生动画效果
- transition-duration:持续多久
- transition-timing-function:如何动画
- transition-delay:开始(等待)时间
12.2 animation 多帧动画
优先考虑:transition > animation > js
transition VS animation:animation 可以设置多帧动画
步骤:
@keyframes name {}
@keyframes name {
  0% {    /* 或使用  from {} */
    width: 100px
  }
  50% {
    width: 200px
  }
  100% {  /* 或使用  to {} */
    width: 50px
  }
}
- 在元素css中引用
.box {
  animation: name 持续时间 动画曲线 延迟 执行次数 方向 停留位置
}
animation的属性
12.3 对比
transition
div { width: 100px; },div:hover { width: 300px }
| transition | 效果图 | 描述 |
|---|---|---|
| 放在 div 内 | 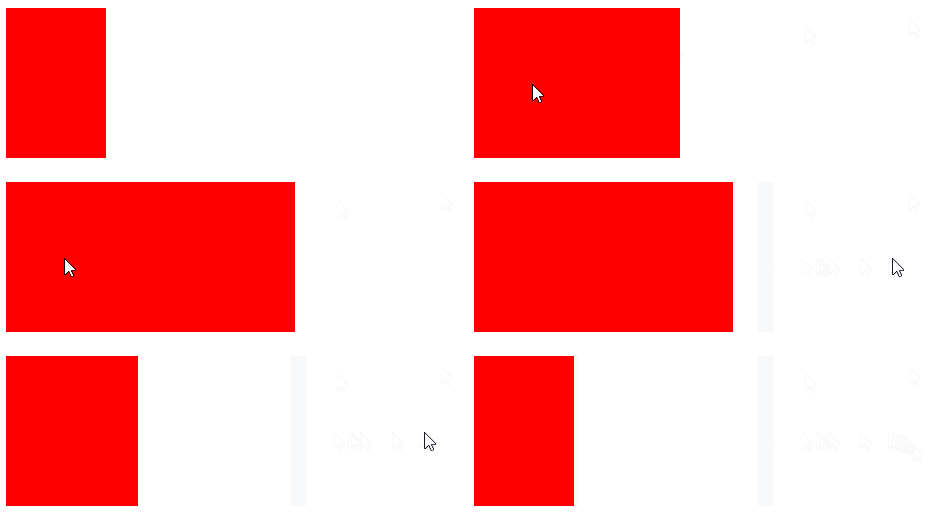 |
移入移出都有动画效果 有回弹动画 |
| 放在 hover 内 | 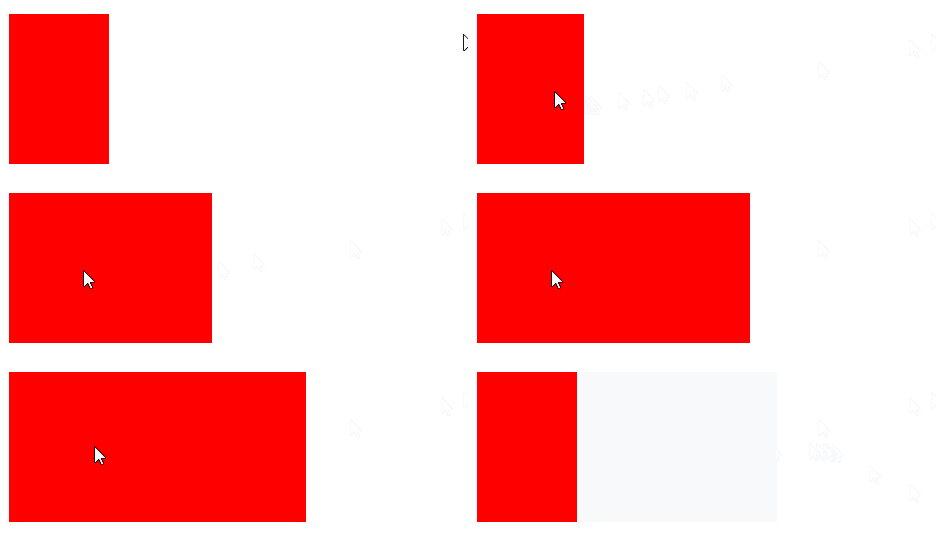 |
仅有移入效果 |
有回弹动画这一特性,适用于元素的形变,不适用于元素的隐藏显示
因为设置 display: none>>block 会没有(transition、animation)动画效果
设置opacity: 0>>1,元素只是隐藏,实际上仍占有位置
设置opacity0、width0、height0,
animation
将 animation 放在 div 内,直接运行动画
将 animation 放在 hover 内,经过才运行动画
13 vertical-align 垂直对齐
影响 行内块状元素 (display: inline-block)在一个 行盒 中垂直方向的位置
高度问题:
- 有内容,被内容撑起来的高度
当内容高度不一致时,一定是以高度最高的元素为标准; - 无内容,无高度
值:
- baseline:默认,机械对齐
- top:行内级盒子的顶部跟line boxes 顶部对齐
- middle:行内级盒子的中心点与父盒基线加上x-height一半的线对齐,
一般不用middle来做子元素垂直居中,基线不是在父元素的中心线,会稍微往下沉一点,放上图片后,图片上方会多出一点,下方会少一点点 - bottom:行内级盒子的底线line box底部对齐
baseline 对齐的标准:
- 文本的baseline是字母下方
- inline-block 默认的 baseline 是 margin-bottom 的底部(没有就是盒子的底部)
- inline-block 有文本时,baseline是最后一行文本的x下方
案例1:块级元素嵌套img
img 与 父级 div 为机械对齐方式
(如img字母,图片对齐着 im,g的弯钩部分在图片下方,图片下会有部分超出)
案例2:存在span、img、文字,其中span的高度最高
解决 底部露出父元素 方案:
-
img加上样式:
display: block或vertical-align: middle / top / bottom -
一般在重置样式时直接加上
img {vertical-align: top}
注意:设置top或其他时,在保证行盒包裹内容时,内部仍按机械对齐,比较难理解,下图设置为top

span 有文本后

14 grid 二维布局
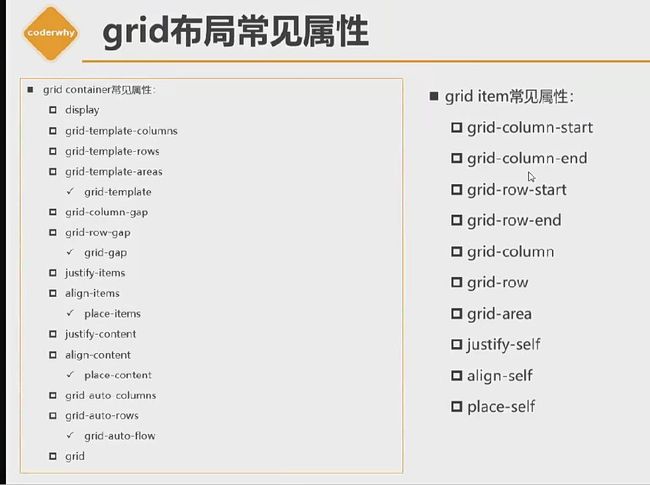
学习路径
flex 为一维布局,grid 为二维布局,目前兼容比 flex 布局差一些,建议目前还是以flex 布局为主
display: grid
grid item,单元格称之为 gird cell。grid container 的直接子项
grid line,构成网格结构的分割线
grid track,两条网格线之间的空间,可以是行或列
grid area,四条网格线包围的空间,可以是一个单元格或任意数量的单元格
15 CSS 新增的元素
15.1 white-space 处理空白符和换行
| 值 | 空白 | 换行 |
|---|---|---|
| normal(默认) | 合并 | 换行 |
| nowrap | 合并 | 不换行 |
| pre | 不合并 | 不换行 |
| pre-wrap | 不合并 | 换行 |
| pre-line | 合并,但保留换行符 | 换行 |
15.2 text-overflow 文字溢出
clip:直接裁剪
ellipsis:用省略号表示,前提是 overflow 不为 visible
省略号的常见组合:
overflow: hidden
text-overflow: ellipsis
white-space: nowrap
15.3 css中的函数
常用的:
rgba / rgb / translate / rotate / scale
颜色 / 颜色 / 位移 / 旋转 / 缩放
其他:
(1)var 定义变量
以 -- 开头,值:可以是任意的css属性值,调用为:var(--名称)
定义一个主题色,!只有其后代属性可以使用
html也可以写:root
html{
--main-color: #FA6069;
}
.box {
color: var(--main-color);
}
(2)calc 计算
计算css值,常用于计算元素的大小或位置
calculate计算,支持加减乘除,运算符两边需加上空格
.box {
width: calc(100% - 100px)
}
(3)filter 滤镜
blur(radius) 毛玻璃效果,radius:半径,值越大越模糊
grayscale(100%) 灰度,⭐⭐
filter
应用于图片或div,应用到div时是给所有的子元素加上模糊:
img或者div {
	filter:blur(10px)
}
backdrop-filter
为元素后面的区域添加模糊或其他效果
.cover {
	background-color: rgba(0,0,0,.2)
	backdrop-filter: blur(10px);
}
(4)gradient 颜色渐变
是一种
- css的
background-image、list-style-image、border-image、content等
(5)浏览器前缀
过渡方案。css属性刚开始并没有成为标准,为了防止后续会修改名称给新的属性,才添加了浏览器前缀
-o-、-xv-:Opera
-ms-、-mso-:IE
-moz-:Firefox
-webkit-:Safari、Chrome
16 css编写步骤
| 顺序 | 步骤 | 具体内容 |
|---|---|---|
| 1 | 确定盒子布局 | position:absolute float:left / right display:flex |
| 2 | 盒子的特性和可见性 | display:block / inline-block / inline / none visibility / opacity |
| 3 | 盒子模型 | width / heigh box-sizing margin / border / padding / content box-shadow / text-shadow |
| 4 | 内部文本文字 | font / text |
| 5 | background | background-image / background-size / background-position / background-color |
| 6 | 其他 | transform 形变 transition 动画 overflow 溢出 white-space 换行 |
CSS 随手记
1 单行显示省略号
基础代码:
overflow: hidden; /* 溢出隐藏 */
text-overflow: ellipsis; /* 省略号 */

不换行:
white-space: nowrap; /* 不换行 */

仅显示2行:
display: -webkit-box;
-webkit-line-clamp: 2;     /* 限制两行 */
-webkit-box-orient: vertical;     /* 垂直布置元素*/
当父级div设置了 flex: 1 >> flex-grow: 1 时,会与子元素设置省略号冲突,(不显示省略号,反而将内容超出父元素),解决方案 overflow:hidden
2 网站的logo a 不展示文字
精灵图用background-img,包裹方式 h1(bgi) -> a (网站名称),有利于seo搜索
隐藏网站名称,运用csstext-indent: -9999px(内容缩进)和 display: block/inline-block(转化为块状元素,因text-indent对行内非替换无效)
注意:
关于 a 无文字显示背景图,需要将 a 标签设置具体宽高,加上 display: block/inline-block,转换为块状元素,才能将背景图显示
多个 a 标签并列,且都使用精灵图做背景时,可设置 a 具体宽高时,在父级元素上使用 display: flex,
3 高度设置
(1)设置具体的高度
(2)行高的填充
line-height 使用在块状元素(div)时,未设置高度,仍能将元素撑高至行高的值
如:line-height: 50px,div的行高和高度为50px
注意:
line-height 使用在行内非替换元素(span、a)时,元素的行高生效,但元素仍只有文字的高度
如:line-height: 500px,span的行高为500px,但高度仍只有一行
(3)定位的方式 ⭐
一:设置 position 定位,css设置 top 0 bottom 0 width 100px,自动将 height 拉伸 ⭐
4 搜索 input 的设置
/* 重置 */
input {
	outline: none;
	border: none;
}
/* 具体设置 */
.search {
	display: flex;
	justify-content: flex-end; /* 左右居中:右对齐 */
	align-items: center; /* 上下居中:居中 */
	width: 159px;
	height: 32px;
	box-sizing: border-box;
	padding-right: 10px;
	border-radius: 38px;
	background: url() 0 0; 搜索图标
}
.search input {
	width: 100px;
	font-size: 14px;
}
5 swiper / banner 轮播图
div>(ul.轮播图>li*4>a>img)+(ul.定位点>li*4>a)
div {
	position: relative;
	width: 框架宽度;
}

/* 轮播图 */
ul {
	display: flex;

	overflow: hidden;
}
li {
	flex-shrink: 0; /* 不压缩 */
	width: 100%;
}
a {
	display: block; /* 占据整个宽度 */
}
img {
	width: 100%;
	height: 具体高度;
}

/* 定位点 */
ul {
	display: flex;
	justify-content: center; /* 居中 */
	position: absolute;
	bottom: 5px;
}
li {
	margin: 0 2px;
}
a {
	display: inline-block;
	width: 20px;
	height: 20px;
	background-image: url(./img/xxx.png) 0px 0px;
}
a.active,a:hover {
	background-position: 10px 0; /* 同一张图 */
}
6 父设置flex、高度,子自动有高度
父元素设置 flex,高度设置 100px
子元素会自动撑起 100px
原因:默认 >> align-items: normal = align-items: stretch
此时文字仍在最上面,文字垂直居中最合理的设置为行高,line-height: 100px
7 连接符:公共 _,区域 -
公共用 _ ,单个使用用 -
8 box-sizing: border-box 影响padding、border
影响的是 padding 和 border 的值,需要设置具体的宽高
另外:父 div 有具体宽高;子 div 无具体宽高,设置border;子 div 宽度压缩,同时也起到了设置 box-sizing: border-box 的效果

注意默认值:width、height:auto;margin:0
9 链接跳转:路由跳转、打开新链接 window.open
链接跳转:路由跳转、打开新链接 window.open
10 边框图形:画三角形
运用到的知识:border、box-sizing
画三角形:
- div大小 60 * 60
- border上为 30,设置颜色,(隐藏另外三边的颜色:
border-right-color: transparent;) - 旋转角度:
transform: rotate(180deg),旋转轴心:transform: center 25%
图形库
11 cusor 手指指针显示样式
- auto 根据上下文决定指针的显示样式,根据文本和非文本切换指针样式
- default 有操作系统决定,一般为小箭头
- pointer 手指,鼠标指针移动到链接上方时的样式
- text 文本竖线
- none 没有任何指针显示在元素上面
12 页面缩小出现滚动条
在《公共样式表》给 body 设置最小宽度,如:min-width: 1300px (参考网页最大的宽度)
13 背景图保持在中间
background: url() no-repeat center top /100% auto
设置了背景图的position位置:中间、上面。宽度与div保持一致,高度自动
14 cover 遮罩层
.wrapper {
  position: relative;
  display: inline-block;
}
.wrapper .box {
  position: absolute;
  t0+b0+l0+r0
  background-color: rgba(0,0,0,.8)
}


