springboot整合阿里云oss实现文件上传
通过阿里云oss进行文件上传,首先需要开通相关的服务,这边就不在具体说明,不懂的可以百度看一下。
阿里云oss有几个关键的参数,这也是后续通过java进行上传所需要的参数,分别是endpoint(域结点)、AccessKey ID(秘钥id)、AccessKey secret(秘钥)、bucket name(bucket域名)。
通过这几个关键字段才能过连接上阿里云的oss,可以通过配置文件来进行连接,具体配置如下:
pom:
    4.0.0

        org.springframework.boot
        spring-boot-starter-parent
        2.2.1.RELEASE


    com.example
    demooss
    0.0.1-SNAPSHOT
    demooss
    Demo project for Spring Boot

        1.8


            org.springframework.boot
            spring-boot-starter-web


            org.springframework.boot
            spring-boot-devtools
            runtime
            true


            org.springframework.boot
            spring-boot-starter-test
            test


            com.aliyun.oss
            aliyun-sdk-oss
            3.1.0


            joda-time
            joda-time
            2.10.1


            io.springfox
            springfox-swagger2
            2.7.0


            io.springfox
            springfox-swagger-ui
            2.7.0


            org.projectlombok
            lombok
            1.18.24
            compile


                org.springframework.boot
                spring-boot-maven-plugin
# 服务端口
server.port=8888

# 环境设置:dev、test、prod
spring.profiles.active=dev

#阿里云oss
#不同的服务器,地址不同
aliyun.oss.file.endpoint=oss-cn-shanghai.aliyuncs.com
aliyun.oss.file.keyid=LTAI5tMYCr1pxcx4vz2o7riE
aliyun.oss.file.keysecret=vtAZaFH4CqJcqFj5oyyuRobivPNK8p

#bucket可以在控制台创建,也可以在java代码创建
aliyun.oss.file.bucketname=aaa-1010
然后创建相应的包service, controller, utils等。
utils工具类代码:
@Component
public class Utils implements InitializingBean {

    //读取配置文件内容  value注解读取属性值
    @Value("${aliyun.oss.file.endpoint}")
    private String endpoint;

    @Value("${aliyun.oss.file.keyid}")
    private String keyId;

    @Value("${aliyun.oss.file.keysecret}")
    private String keySecret;

    @Value("${aliyun.oss.file.bucketname}")
    private String bucketName;


    //定义公开静态常量
    public static String END_POINT;
    public static String ACCESS_KEY_ID;
    public static String ACCESS_KEY_SECRET;
    public static String BUCKET_NAME;

    @Override
    public void afterPropertiesSet() throws Exception {
        END_POINT = endpoint;
        ACCESS_KEY_ID = keyId;
        ACCESS_KEY_SECRET = keySecret;
        BUCKET_NAME = bucketName;
    }
}
通过value注解获取配置中的结果,注意value引用的包是spring里面的org.springframework.beans.factory.annotation.Value,不能引错。再设置几个公共静态常量,将value注解得到的配置结果给到这几个静态常量,后续就可以通过方法直接调用。
swagger配置:参考上篇文章(注意相关的注解)
@Configuration
@EnableSwagger2
public class SwaggerConfig {

    @Bean
    public Docket webApiConfig(){
        return new Docket(DocumentationType.SWAGGER_2)
                .groupName("webApi")
                .apiInfo(webApiInfo())
                .select()
                .paths(Predicates.not(PathSelectors.regex("/admin/.*")))
                .paths(Predicates.not(PathSelectors.regex("/error.*")))
                .build();

    }
    private ApiInfo webApiInfo(){
         return new ApiInfoBuilder()
         .title("API文档")
         .description("接口定义")
         .version("1.0")
         .contact(new Contact("mzz", "http://www.baidu.com",
                "[email protected]"))
         .build();
         }
}
service接口以及实现类
public interface OssService {
    String uploadFile(MultipartFile file);
}
@Service
public class OssServiceImpl implements OssService {
@Override
public String uploadFile(MultipartFile file) {
String endpoint = Utils.END_POINT;
String accessKeyId = Utils.ACCESS_KEY_ID;
String accessKeySecret = Utils.ACCESS_KEY_SECRET;
String bucketName = Utils.BUCKET_NAME;
try {
// 创建OSSClient实例。
OSS ossClient = new OSSClientBuilder().build(endpoint, accessKeyId, accessKeySecret);
InputStream inputStream =file.getInputStream();
//获取文件名称
String fileName = file.getOriginalFilename();
//1 在文件名称里面添加随机唯一值
String uuid = UUID.randomUUID().toString().replaceAll("-","");
fileName=uuid+fileName;
//2 文件按照日期分类
String datePath = new DateTime().toString("yyyy/MM/dd");
//拼接
fileName = datePath+"/"+fileName;
//oss方法实现上传
//第一个参数 bucket名称
//第二个参数 上传到oss文件路径和名称 fileName
//第三个参数 上传文件输入流
ossClient.putObject(bucketName, fileName, inputStream);
ossClient.shutdown();
//把上传之后文件路径返回
//需要把上传到阿里云oss路径手动拼接出来
String url = "https://"+bucketName+"."+endpoint+"/"+fileName;
return url;
} catch (Exception e){
e.printStackTrace();
return null;
}
}
}
这边需要注意一下,因为不同的用户可能上传相同的文件,所以需要通过uuid生成一个随机唯一值,不加的话可能会导致第二次上传相同的文件覆盖掉前一次的文件。并且将文件按照日期分类,可以通过拼接完成。
controller代码:
@RestController
@RequestMapping("/fileoss")
public class OssController {

    @Resource
    private OssService ossService;

    @PostMapping
    public R uploadOssFile(MultipartFile file){
        //获取上传文件 MultipartFile
        String url = ossService.uploadFile(file);  //返回上传到oss的路径
        return R.ok().data("url",url);
    }

}
启动类:
@SpringBootApplication(exclude = DataSourceAutoConfiguration.class)
@ComponentScan(basePackages = {"com.example"})
public class DemoossApplication {

    public static void main(String[] args) {
        SpringApplication.run(DemoossApplication.class, args);
    }

}
启动类需要注意,不涉及数据库的话有可能会报错
1.@SpringBootApplication(exclude = DataSourceAutoConfiguration.class)括号里面的exclude = DataSourceAutoConfiguration.class需要加上,因为我这边没有用的数据库的东西,如果不加会报错。
2.注解用@SpringBootApplication,在application.properties中加上数据库的配置信息。
一般我们通过第一种方式实现。
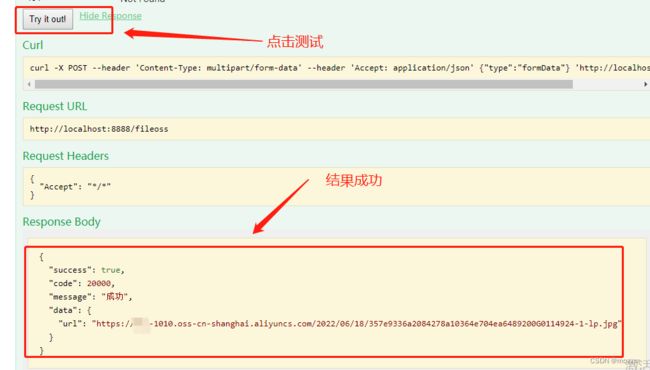
最后进行swagger测试
这是看一下阿里云oss里面就有记录了


