arthas的webconsole操作详细搭建步骤说明
之前给大家介绍了使用 arthas 排查生产环境中那些令人头疼的问题,如 cpu 飙升、接口响应慢等。在不重启服务的情况下实时对问题进行跟踪排查、反编译分析,有兴趣的小伙伴可以猛戳 用它调试线上 bug,真得劲!查看
本文主要介绍用本地浏览器连接远程服务器进行bug调试的两种方法
webconsole
webconsole 是 arthas 提供的 web 页面,它可以让用户在自己的电脑上,连接远程服务器的 arthas 执行命令,命令的执行方式和在服务器直接操作没有任何区别
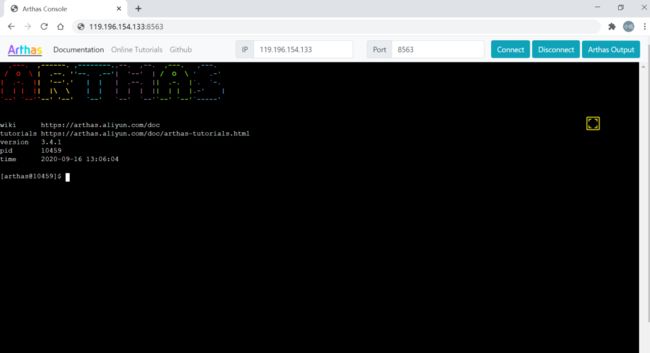
webconsole 连接远程服务器成功后是这样的,是不是和服务器的界面一样
因为需要访问远程服务器,所以要在远程服务器上对本地网络开放 ip 和端口策略,否则无法使用 webconsole
在远程服务器上启动 arthas,启动时要指定 ip 和端口
java -jar arthas-boot.jar --target-ip 119.196.154.133 --http-port 8563 31178
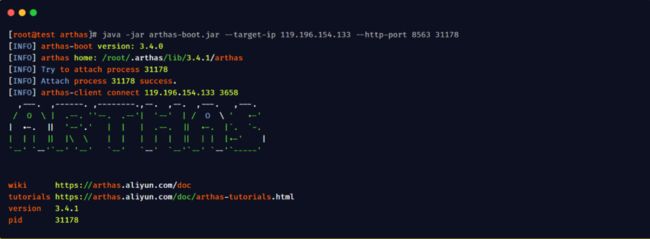
java -jar arthas.jar:启动命令
--target-ip:指定 webconsole 连接的 ip,也就是服务器的外网ip
--http-port:指定 webconsole 连接的端口,也就是服务器对外暴露的端口
31178:要监听的 java 程序的进程 id
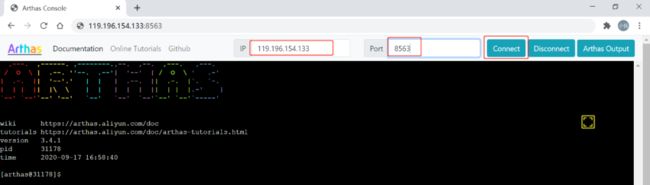
远程服务器上 arthas 启动成功后,打开本地浏览器,在地址栏输入对应的 ip 和端口即可打开 webconsole 页面
 第一次打开 webconsole 页面,默认会连接本机的 arthas,也就是 127.0.0.1:3658。需要改成远程服务器的 ip 和端口,然后点击 Connect 按钮,就可以连接到远程的 arthas 服务
其实,如果远程服务器开放了 ip 和端口策略,也可以在本地使用 telnet 命令进行远程连接,不需要使用浏览器
使用 telnet 连接,远程服务器启动 arthas 时需要使用 --telnet-port 参数指定端口
java -jar arthas-boot.jar --target-ip 119.196.154.133 --telnet-port 3658 31178
当然,也可以同时指定 telnet 端口和 http 端口,这样本机既可以通过 telnet 连接也可以通过 webconsole 连接。
java -jar arthas-boot.jar --target-ip 119.196.154.133 --http-port 8563 --telnet-port 3658 31178
webconsole 默认使用 8563 端口,--http-port 参数可以修改 webconsole 端口
telnet 默认使用 3658 端口,--telnet-port 可以修改 telnet 端口
注意:
webconsole 需要服务器暴露 ip 和端口,如果服务器是云端部署,需要考虑网络安全的问题,比如端口只开放给某一个来源 ip
使用 arthas tunnel servel 连接远程 arthas
除了直接使用浏览器连接 arthas 进行 webconsole 外,还有一种方式可以进行 webconsole,那就是 tunnel servel
tunnel servel 最大的优点在于支持分布式部署,它承担注册中心的功能,可以同时支持多个远程服务器的 arthas 注册到 tunnel-server,用户浏览器登录上 tunnel server 后,可以选择对 某一个arthas 进行监听
tunnel server 访问的原理如下
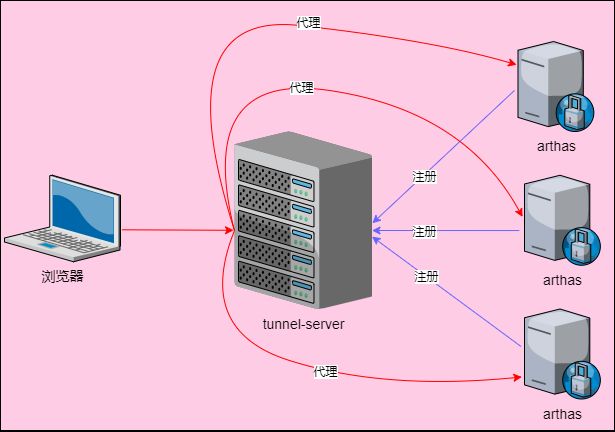
# 说明:
1.远程服务器的 arthas 会向 tunnel-server 注册服务,注册成功后每个 arthas 会得到一个 agentid
2.浏览器访问 tunnel-server 服务,选择 aegnt-id 后通过 tunnel-server 代理到对应的 arthas 服务
下面介绍 tunnel-server 服务的搭建。首先,需要下载 arthas-tunnel-server.jar,可以直接去 github 下载
# github下载地址
https://github.com/alibaba/arthas/releases
将 arthas-tunnel-server.jar 上传到服务器,该服务器需要和 arthas 所在的服务器集群网络互通。
arthas-tunnel-server.jar 是一个 spring-boot 项目,可以通过 java -jar 启动,启动成功后如下图
java -jar arthas-tunnel-server-3.4.1.jar

arthas-tunnel-server 默认使用 8080 和 7777 两个端口,如果启动报错端口被占用,可以对这两个端口进行修改
8080 是服务的 web 端口,浏览器通过该端口连接 tunnel-server 服务,启动时通过-Dserver.port 参数修改
// 将默认的8080端口修改为8081
java -jar -Dserver.port=8081 arthas-tunnel-server-3.4.1.jar
7777 是注册端口,远程服务器的 arthas 通过该端口注册到 tunnel-server。使用压缩工具打开arthas-tunnel-server.jar包,在application.properties配置文件中可以修改该端口
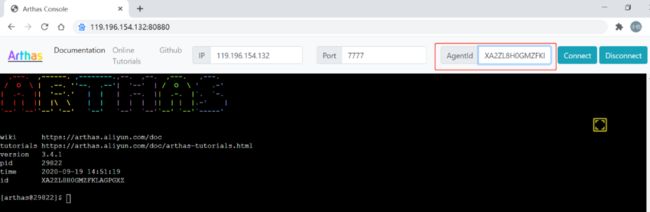
tunnel-server 启动成功后,打开本地浏览器输入 tunnel-server 的 ip 和端口进行连接,连接成功后如下图

此时,需要输入 AgentId 才能对远程 arthas 进行监控。每个 arthas 注册到 tunnel-server 成功后,会生成一个 AgentId,所以要拿到 AgentId 需要先启动 arthas 服务
在远程服务器上启动 arthas,并注册到 tunnel-server,使用 --tunnel-server 参数指定注册的地址
java -jar arthas-boot.jar --tunnel-server 'ws://119.196.154.132:7777/ws'
arthas 启动成功后日志中最后一行的 id 就是我们需要的 AgentId
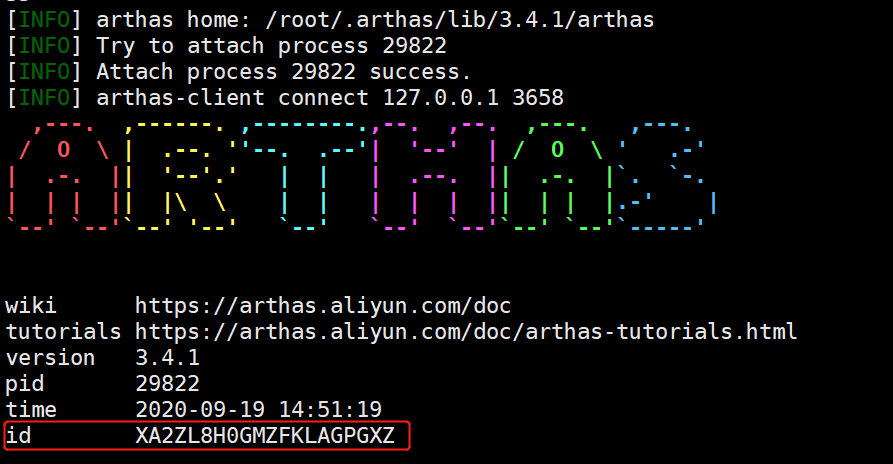
回到浏览器输入 AgentId,就可以连接远程 arthas 服务愉快的进行调试了
AgentId 是随机生成的,每次启动时都不相同,所以在浏览器中输入的时候需要到服务器上查看日志,比较麻烦。使用 --agent-id 参数可以指定 AgentId,建议把 arthas 所在服务器的 ip 作为 AgentId 来使用,方便记忆
java -jar arthas-boot.jar --tunnel-server 'ws://119.196.154.132:7777/ws' --agent-id 119.196.154.133
--赫连小伍原创,转载注明出处。微信搜索赫连小伍,获取演示demo