LINMP搭建wordpress-数据库不分离
目录
一、nginx部署
1.安装nginx前的系统依赖环境检查
2.下载nginx源代码包
3.解压缩源码包
4.创建普通的nginx用户
5.开始编译安装nginx服务
6.创建一个软连接以供集中管理
7.配置nginx环境变量
二、mysql
1.创建普通mysql用户
2.下载mysql二进制代码包
3.创建mysql的快捷方式
4.安全性的准备工作
5.设置环境变量
6.启动mysql的配置文件
7.检查mysql所依赖的环境
8.创建mysql数据文件夹
9.初始化mysql数据库
10.使用systemctl命令管理mysql数据库
11.登录mysql数据库
三、部署php
1.依赖环境
2.下载php源码
3.配置文件
4.cp模板配置文件
5.启动php服务指定fastcgi形式
6.修改nginx支持php代码
7.创建php的首页脚本文件
8.测试验证
四、测试php和MySQL链接
1.编写php脚本
五、lnmp环境搭建wordpress
1.创建用于wordpress博客的数据库
2.下载和安装源码
3.移动博客代码到首页
4.查看下
5.初始化配置
一、nginx部署
1.安装nginx前的系统依赖环境检查
yum install pcre pcre-devel openssl openssl-devel gcc -y2.下载nginx源代码包
wget http://nginx.org/download/nginx-1.16.0.tar.gz
3.解压缩源码包
tar -zxvf nginx-1.16.0.tar.gz mkdir /opt/nginx-1.16.0/4.创建普通的nginx用户
用于运行nginx的进程,降低nginx的系统权限
-M选项,不自动建立用户的家目录
-u,制定用户uid
useradd nginx -u 1111 -s /sbin/nologin -M5.开始编译安装nginx服务
cd nginx-1.16.0

./configure --user=nginx --group=nginx --prefix=/opt/nginx-1.16.0/ --with-http_stub_status_module --with-http_ssl_module

make && make install
这样就是成功了
6.创建一个软连接以供集中管理
mkdir -p /nginx/ngin116

ln -s /opt/nginx-1.16.0/ /nginx/ngin116/
7.配置nginx环境变量
添加nginx的sbin目录添加到path中
vim /etc/profile
PATH="$PATH:/nginx/ngin116/sbin"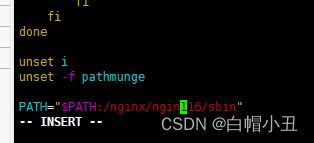
重新打开一个tty
二、mysql
1.创建普通mysql用户
降低程序运行权限
useradd -s /sbin/nologin mysql
2.下载mysql二进制代码包
注意提前下载好wget工具
wget https://dev.mysql.com/get/Downloads/MySQL-5.7/mysql-5.7.26-linux-glibc2.12-x86_64.tar.gz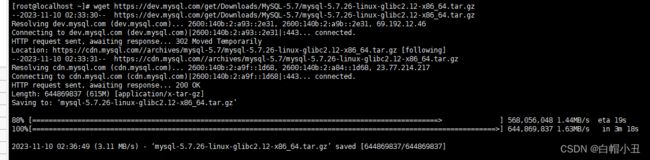
3.创建mysql的快捷方式
tar zxf mysql-5.7.26-linux-glibc2.12-x86_64.tar.gz -C /usr/local
cd /usr/local
ln -s mysql-5.7.26-linux-glibc2.12-x86_64 mysql
4.安全性的准备工作
卸载可能centos7存在的mariadb相关的依赖关系
rpm -e --nodeps mariadb-libs5.设置环境变量
echo "export PATH=$PATH:/usr/local/mysql/bin" >> /etc/profile source /etc/profile6.启动mysql的配置文件
[root@localhost local]# mkdir -pv /data/mysql
mkdir: created directory ‘/data’
mkdir: created directory ‘/data/mysql’
[root@localhost local]# chown mysql.mysql /data/mysql
[root@localhost local]# chmod go-rwx /data/mysql

vim /etc/my.cnf[mysqld]
basedir=/usr/local/mysql/
datadir=/usr/local/mysql/data
socket=/tmp/mysql.sock
server_id=1
port=3306
log_error=/usr/local/mysql/data/mysql_err.log
[mysql]
socket=/tmp/mysql.sock
7.检查mysql所依赖的环境
yum install libaio-devel -y8.创建mysql数据文件夹
用于初始化数据
mkdir -p /usr/local/mysql/data/
chown -R mysql.mysql /usr/local/mysql/
9.初始化mysql数据库
mkdir -p /usr/local/mysql/data/
chown -R mysql.mysql /usr/local/mysql/
10.使用systemctl命令管理mysql数据库
编写mysql启动脚本,定义一个mysqld.service
vim /etc/systemd/system/mysqld.service[Unit]
Description=MySQL server by nginx
Documentation=man:mysqld(8)
Documentation=http://dev.mysql.com/doc/refman/en/using-systemd.html
After=network.target
After=syslog.target
[Install]
WantedBy=multi-user.target
[Service]
User=mysql
Group=mysql
ExecStart=/usr/local/mysql/bin/mysqld --defaults-file=/etc/my.cnf
LimitNOFILE=5000
systemctl restart mysqld.service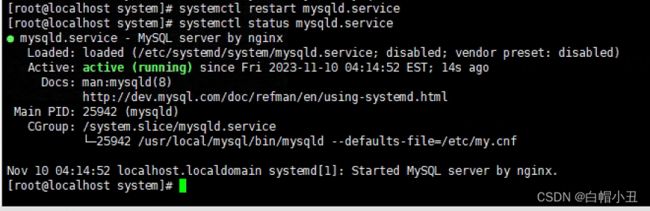
11.登录mysql数据库
先检查下以前有没有默认的MySQL
[root@localhost system]# yum remove mysql -y
Loaded plugins: fastestmirror
No Match for argument: mysql
No Packages marked for removal
[root@localhost system]# which mysql
/usr/bin/which: no mysql in (/usr/local/sbin:/usr/local/bin:/usr/sbin:/usr/bin:/nginx/ngin116/sbin:/root/bin)

编辑profile文件
vim /etc/profile在最后添加
PATH="$PATH:/usr/local/mysql/bin"
重新编译一下
source /etc/profile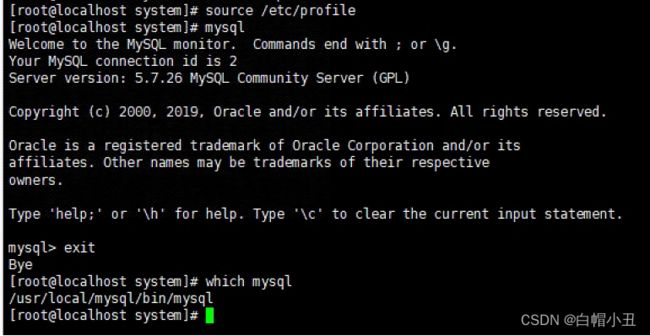
登录默认没有密码
mysql -uroot -p修改密码
mysql> use mysql;
Reading table information for completion of table and column names
You can turn off this feature to get a quicker startup with -A

Database changed
mysql> UPDATE user SET authentication_string=PASSWORD("123456") WHERE User="root";
Query OK, 1 row affected, 1 warning (0.00 sec)
Rows matched: 1  Changed: 1  Warnings: 1

mysql> FLUSH PRIVILEGES;
Query OK, 0 rows affected (0.00 sec)

三、部署php
1.依赖环境
yum install gcc gcc-c++ make zlib-devel libxm12-devel libjpeg-devel libjpeg-turbo-devel libiconv-devel freetype-devel libpng-develgd-devel libcurl-devel libxslt-devel libxslt-devel -y
2.下载php源码
wget http://mirrors.sohu.com/php/php-7.3.5.tar.gz解压源码安装
tar -zxvf php-7.3.5.tar.gz
cd php-7.3.5

./configure --prefix=/usr/local/php7.3.5 --with-mysql-sock=/tmp/mysql.sock  --with-mysqli  --with-iconv-dir=/usr/local/libiconv --with-freetype-dir --with-jpeg-dir --with-png-dir --with-zlib --with-libxml-dir=/usr --enable-xml --disable-rpath  --enable-bcmath --enable-shmop --enable-sysvsem --enable-inline-optimization --with-curl --enable-mbregex --enable-fpm --enable-mbstring --with-gd --with-openssl --with-mhash --enable-pcntl --enable-sockets --with-xmlrpc --enable-soap --enable-short-tags --enable-static --with-xsl --with-fpm-user=nginx --with-fpm-group=nginx --enable-ftp --enable-opcache=no
make && make install
3.配置文件
vimdiff php.ini-development php.ini-production看下两个配置文件的区别(一个用于生产,一个用于开发)

我们用开发版本的
cp php.ini-development /usr/local/php7.3.5/lib/php.ini4.cp模板配置文件
生成新的php配置文件
有关FASTCGI配置文件
cd /usr/local/php7.3.5/etc/
cp php-fpm.conf.default php-fpm.conf
ls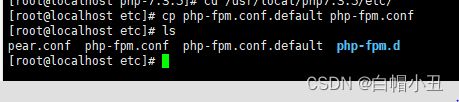
cd php-fpm.d
cp www.conf.default www.conf

5.启动php服务指定fastcgi形式
cd /usr/local/php7.3.5/sbin
./php-fpm
netstat -tunlp | grep php

6.修改nginx支持php代码
vim /opt/nginx-1.16.0/conf/nginx.conf
写入
#user  nobody;
worker_processes  1;

#error_log  logs/error.log;
#error_log  logs/error.log  notice;
#error_log  logs/error.log  info;

#pid        logs/nginx.pid;


events {
    worker_connections  1024;
}


http {
    include       mime.types;
    default_type  application/octet-stream;

    #log_format  main  '$remote_addr - $remote_user [$time_local] "$request" '
    #                  '$status $body_bytes_sent "$http_referer" '
    #                  '"$http_user_agent" "$http_x_forwarded_for"';

    #access_log  logs/access.log  main;

    sendfile        on;
    #tcp_nopush     on;

    #keepalive_timeout  0;
    keepalive_timeout  65;

include extra/my_php.conf;

}
配置虚拟主机的部分
cd /opt/nginx-1.16.0/conf/
mkdir extra
cd extra/
vim /opt/nginx-1.16.0/conf/extra/my_php.conf
server {
listen 80;
server_name _;
location / {
root html;
index index.html;
}
#添加有关php程序的解析
location ~ .*\.(php|php5)?$ {
root html/myphp;
fastcgi_pass 127.0.0.1:9000;
fastcgi_index index.php;
include fastcgi.conf;
}
}
7.创建php的首页脚本文件
mkdir -p /opt/nginx-1.16.0/html/myphp
echo "" >/opt/nginx-1.16.0/html/myphp/index.php
8.测试验证
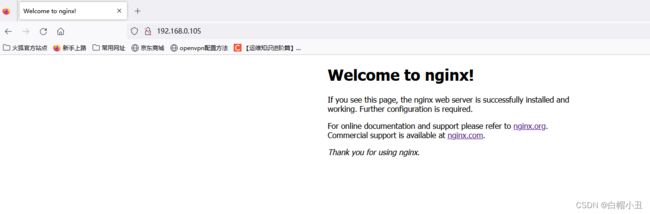
nginx -t
nginx -s reload
访问一下

成功
四、测试php和MySQL链接
1.编写php脚本
vim /opt/nginx-1.16.0/html/myphp/test_mysql.php

五、lnmp环境搭建wordpress
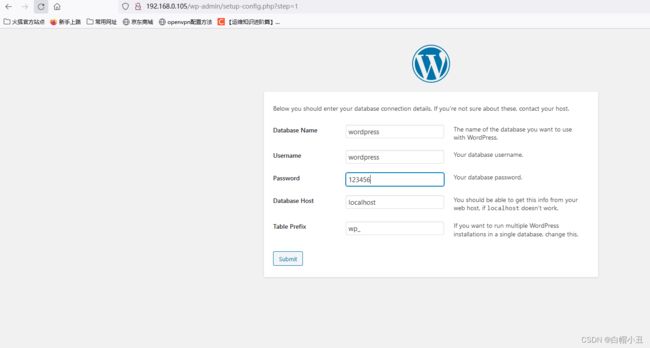
1.创建用于wordpress博客的数据库
mysql -u root -p进入数据库创建wordpress数据库;创建wordpress专用数据库用户;给用户本地登录授权和密码
create database wordpress;


create user wordpress;


grant all on wordpress.* to wordpress@'localhost' identified by '123456';
FLUSH PRIVILEGES;
quit
2.下载和安装源码
wget https://wordpress.org/wordpress-5.3.2.tar.gz
tar -zxvf wordpress-5.3.2.tar.gz
3.移动博客代码到首页
 mv -rf wordpress/* /opt/nginx-1.16.0/html/myphp/
 cd /opt/nginx-1.16.0/html/myphp/
 ls
mv -rf wordpress/* /opt/nginx-1.16.0/html/myphp/
cd /opt/nginx-1.16.0/html/myphp/
ls改下权限
cd /opt/nginx-1.16.0/html/myphp/
chown -R nginx.nginx ./
4.查看下
nginx -s reload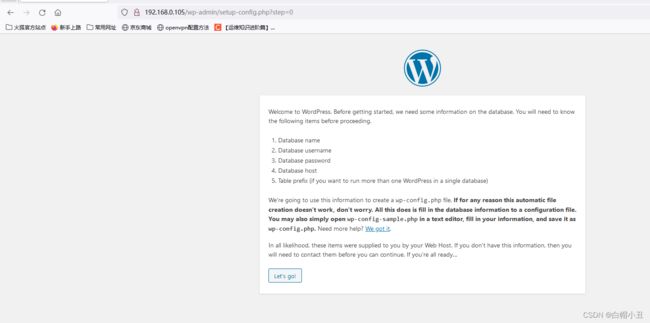
成功
5.初始化配置
和刚刚数据库创建的库和用户名密码一样

填写博客标题和一些默认信息
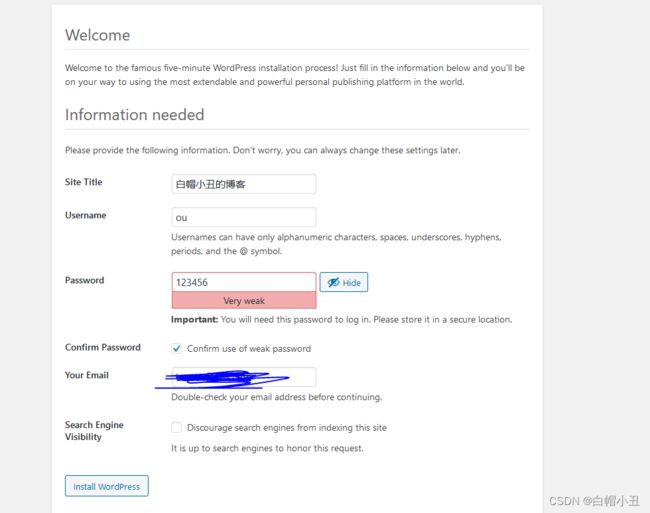

完成!