Sonatype Nexus部署docker安装nexus3
Nexus是一个强大的Maven仓库管理器,它极大地简化了自己内部仓库的维护和外部仓库的访问。
1、查看可用的 Nexus3版本
可以通过 Sort by 查看其他版本的 nexus3,默认是最新版本 sonatype/nexus3:latest。
https://hub.docker.com/r/sonatype/nexus3/tags?page=1&name=3.30.1
因为公司用的版本为nexus3:3.30.1,所以直接搜索下载这个版本。
部署前通过dockerfile连接跳转过去看下构建代码
https://github.com/sonatype/docker-nexus3/blob/main/Dockerfile
Dockerfile
# Copyright (c) 2016-present Sonatype, Inc.
#
# Licensed under the Apache License, Version 2.0 (the "License");
# you may not use this file except in compliance with the License.
# You may obtain a copy of the License at
#
#      http://www.apache.org/licenses/LICENSE-2.0
#
# Unless required by applicable law or agreed to in writing, software
# distributed under the License is distributed on an "AS IS" BASIS,
# WITHOUT WARRANTIES OR CONDITIONS OF ANY KIND, either express or implied.
# See the License for the specific language governing permissions and
# limitations under the License.

FROM registry.access.redhat.com/ubi8/ubi-minimal

LABEL name="Nexus Repository Manager" \
      maintainer="Sonatype " \
      vendor=Sonatype \
      version="3.62.0-01" \
      release="3.62.0" \
      url="https://sonatype.com" \
      summary="The Nexus Repository Manager server \
          with universal support for popular component formats." \
      description="The Nexus Repository Manager server \
          with universal support for popular component formats." \
      run="docker run -d --name NAME \
          -p 8081:8081 \
          IMAGE" \
      stop="docker stop NAME" \
      com.sonatype.license="Apache License, Version 2.0" \
      com.sonatype.name="Nexus Repository Manager base image" \
      io.k8s.description="The Nexus Repository Manager server \
          with universal support for popular component formats." \
      io.k8s.display-name="Nexus Repository Manager" \
      io.openshift.expose-services="8081:8081" \
      io.openshift.tags="Sonatype,Nexus,Repository Manager"

ARG NEXUS_VERSION=3.62.0-01
ARG NEXUS_DOWNLOAD_URL=https://download.sonatype.com/nexus/3/nexus-${NEXUS_VERSION}-unix.tar.gz
ARG NEXUS_DOWNLOAD_SHA256_HASH=845ec18801f1ff36e1309141ebe69bd7ed0f417dac98e0756ebdc902e72036e1

# configure nexus runtime
ENV SONATYPE_DIR=/opt/sonatype
ENV NEXUS_HOME=${SONATYPE_DIR}/nexus \
    NEXUS_DATA=/nexus-data \
    NEXUS_CONTEXT='' \
    SONATYPE_WORK=${SONATYPE_DIR}/sonatype-work \
    DOCKER_TYPE='rh-docker'

# Install Java & tar
RUN microdnf update -y \
    && microdnf --setopt=install_weak_deps=0 --setopt=tsflags=nodocs install -y \
          java-1.8.0-openjdk-headless tar procps shadow-utils gzip \
    && microdnf clean all \
    && groupadd --gid 200 -r nexus \
    && useradd --uid 200 -r nexus -g nexus -s /bin/false -d /opt/sonatype/nexus -c 'Nexus Repository Manager user'

WORKDIR ${SONATYPE_DIR}

# Download nexus & setup directories
RUN curl -L ${NEXUS_DOWNLOAD_URL} --output nexus-${NEXUS_VERSION}-unix.tar.gz \
    && echo "${NEXUS_DOWNLOAD_SHA256_HASH} nexus-${NEXUS_VERSION}-unix.tar.gz" > nexus-${NEXUS_VERSION}-unix.tar.gz.sha256 \
    && sha256sum -c nexus-${NEXUS_VERSION}-unix.tar.gz.sha256 \
    && tar -xvf nexus-${NEXUS_VERSION}-unix.tar.gz \
    && rm -f nexus-${NEXUS_VERSION}-unix.tar.gz nexus-${NEXUS_VERSION}-unix.tar.gz.sha256 \
    && mv nexus-${NEXUS_VERSION} $NEXUS_HOME \
    && chown -R nexus:nexus ${SONATYPE_WORK} \
    && mv ${SONATYPE_WORK}/nexus3 ${NEXUS_DATA} \
    && ln -s ${NEXUS_DATA} ${SONATYPE_WORK}/nexus3

# Removing java memory settings from nexus.vmoptions since now we use INSTALL4J_ADD_VM_PARAMS
RUN sed -i '/^-Xms/d;/^-Xmx/d;/^-XX:MaxDirectMemorySize/d' $NEXUS_HOME/bin/nexus.vmoptions

RUN echo "#!/bin/bash" >> ${SONATYPE_DIR}/start-nexus-repository-manager.sh \
   && echo "cd /opt/sonatype/nexus" >> ${SONATYPE_DIR}/start-nexus-repository-manager.sh \
   && echo "exec ./bin/nexus run" >> ${SONATYPE_DIR}/start-nexus-repository-manager.sh \
   && chmod a+x ${SONATYPE_DIR}/start-nexus-repository-manager.sh \
   && sed -e '/^nexus-context/ s:$:${NEXUS_CONTEXT}:' -i ${NEXUS_HOME}/etc/nexus-default.properties

RUN microdnf remove -y gzip shadow-utils

VOLUME ${NEXUS_DATA}

EXPOSE 8081
USER nexus

ENV INSTALL4J_ADD_VM_PARAMS="-Xms2703m -Xmx2703m -XX:MaxDirectMemorySize=2703m -Djava.util.prefs.userRoot=${NEXUS_DATA}/javaprefs"

CMD ["/opt/sonatype/nexus/bin/nexus", "run"]


2.因为dockerfile内用户为nexus,挂载目录为root权限的文件,所以要授予挂载目录权限
#创建文件夹
mkdir -p /data/nexus/nexus-data
#放开权限
chmod 777 -R /data/nexus
#进入目录查看
cd /data/nexus
二或者创建一个nexus用户也可以
创建 Nexus 用户和组
mkdir -p /data/nexus/nexus-data
useradd -r -s /sbin/nologin nexus
groupadd nexus
usermod -aG nexus nexus
修改 Nexus 目录权限
chown -R nexus:nexus /data/nexus
chmod -R 777 /data/nexus
docker pull sonatype/nexus3:3.30.1

docker run --restart=always -p 8081:8081 --name nexus3 -e TZ=Asia/Shanghai -v /data/nexus/nexus-data:/nexus-data -d sonatype/nexus3:3.30.1

解释:
--restart=always docker重启后容器自动重启
--name: 容器名
通过`-e`参数和`TZ=Asia/Shanghai`指定了容器的时区设定。这种方式更加灵活,可以在启动不同容器时动态指定时区。
-v: 将容器内的目录映射至本地, 前面的路径为本机路径
-d: 镜像名
3.登录页面并且修改密码
ip+port访问可直接看效果:
nexus设置及pom文件使用
nexus默认登录账号为admin, 默认密码需要进入容器内部获取(红色框框内的是密码,不要搞错了! 取出密码后登录nexus):
登录后复制
docker exec -it nexus /bin/bash #进入容器
cat /nexus-data/admin.password #查看密码

这个选项是配置是否开启匿名访问, 默认是禁用的。 如果你开启的话,用户无需凭据即可从存储库中搜索、浏览和下载组件。个人建议: 如果是放在局域网的话可以启用,不用去配置maven的setting文件,如果是放在公网建议禁用。
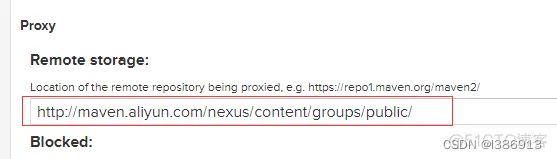
设置代理为阿里仓库
按照下图一次点击:

进入后找到 Proxy->Remote storage将值替换为 http://maven.aliyun.com/nexus/content/groups/public/ 后保存,如下图:
pom文件引用
添加以下代码:
<repositories>
		<!-- 配置nexus远程仓库 禁用了匿名访问 id需要和setting文件中一致  -->
		<repository>
			<id>nexus</id>
			<name>Nexus Snapshot Repository</name>
			<url>http://192.168.0.138:8081/repository/maven-public/</url>
			<releases>
				<enabled>true</enabled>
			</releases>
			<snapshots>
				<enabled>false</enabled>
			</snapshots>
	      </repository>
         </repositories>
-----------------------------------
如果你开启了匿名访问的话现在已经配置好了,如果你禁用了匿名访问需要创建一个用户(或者直接用管理员用户但是不安全), 配置到maven的setting文件中:
<server>
      <id>这个要和pom文件中的id对应</id>
      <username>你的账号</username>
      <password>你的密码</password>
   </server>
4.上传jar包
通过网页上传

上传之后点击 view it now可以查看jar包及引用代码。
