目标检测一 SSD代码复现
SSD
-
背景
这是一种 single stage 的检测模型,相比于R-CNN系列模型上要简单许多。其精度可以与Faster R-CNN相匹敌,而速度达到了惊人的59FPS,速度上完爆 Fster R-CNN。
速度快的根本原因在于移除了 region proposals 步骤以及后续的像素采样或者特征采样步骤。 -
网络模型
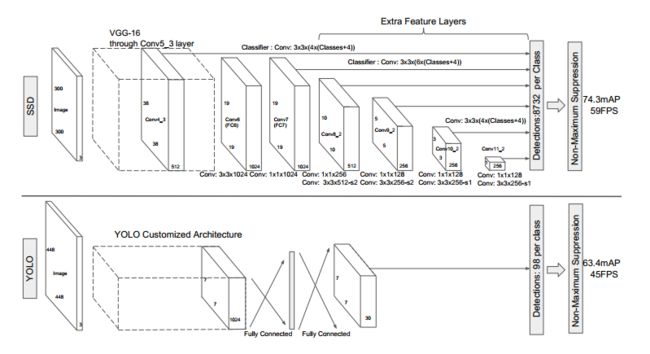
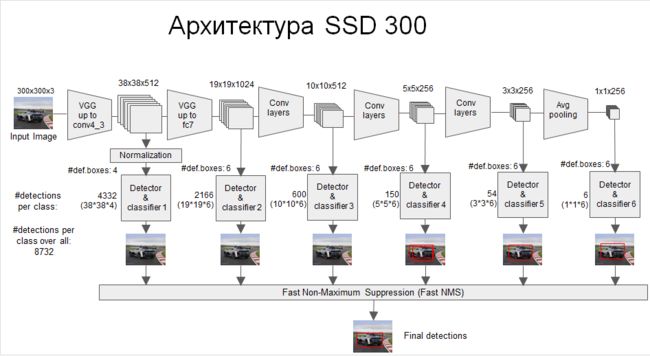
- VGG层用于特征提取,与VGG的区别是把FC6和FC7换成了卷积层,SSD在后面又加了8个卷积层。
- 最终用于预测的是从这些具有金字塔结构的层中选出的特定层,这些层分别对不同scale(scale的平方是面积,这个参数是假设不考虑纵横比的时候,box的边长)和不同aspect ratios(也就是纵横比)的 bounding box进行预测。
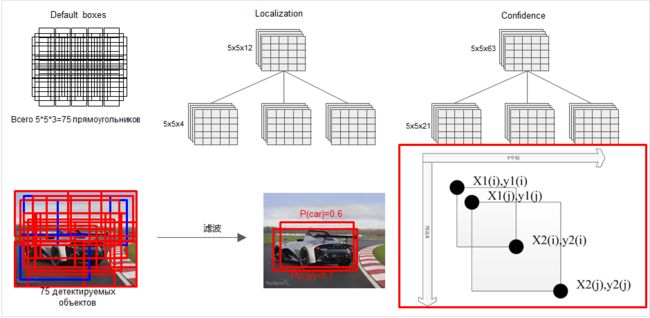
- bounding box是 detector/classifier 对 default box 进行回归生成的,而 default box 是由一定规则生成的,这里可以认为 default box 比较像 Faster R-CNN 中的RPN生成的region proposal ,也就是两步检测方案中候选框的作用。
- detector/classifier (图中没有显示)对这些 default box 进行关于 类别和位置的回归,然后得出一个类别得分和位置坐标偏移量。根据坐标偏移量可以计算出bounding box的位置,根据得分确定此bounding box里的物体类别(每个类别都包含 8732个 bounding box,大部分都是背景 或者说共有 8732个bounding box,每个bounding box 都对一个 C 维的得分,C为类别总数)。
- 最后通过NMS(非最大值抑制)过滤掉背景和得分不是很高的框(这个是为了避免重复预测),得到最终的预测。
图中展示了SSD与YOLO两种方案的不同,主要有两点:
1.SSD是在多个feature map上进行的多尺度(multi-scale)预测(每个feature map预测一种 scale)。而YOLO是只在一个feature map上进行 多尺度预测。
2.SSD中用于预测的层也就是 detector/classifier 是全卷积的,而YOLO中是全连接的。

-
SSD整体结构梳理
每个feature layer预测一种scale,feature layer 上每个位置(cell )的k个default box 的纵横比(aspect ratio)是不同的,这就实现了 multi-scale 预测的方式。
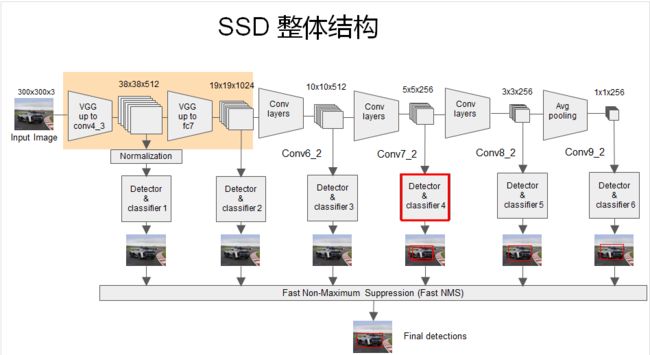
上面图中被红框框起来的 **detector和classifier**的详细结构如下图: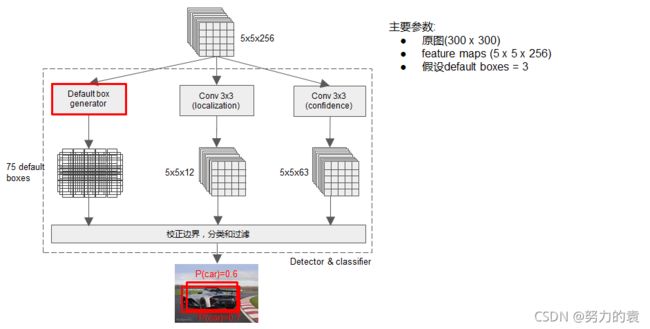
1. 这是其中一个scale的预测流程
2. 可以看出分类和定位都是通过卷积层预测的,假设某个用于预测的feature map是5×5×256的, default box=3,那么用于定位的卷积层输出是 5×5×12 的(4×3=12,每个通道代表一个位置因素(x,y,w,h)),用于分类的卷积层输出是 5×5×63(21×3=63,每个通道代表一个类别)
3. 每个用于预测的feature map后面可以认为接了三个并行的层,一个default box generator,一个detector,一个classifier。上面图中的default box generator如下图:
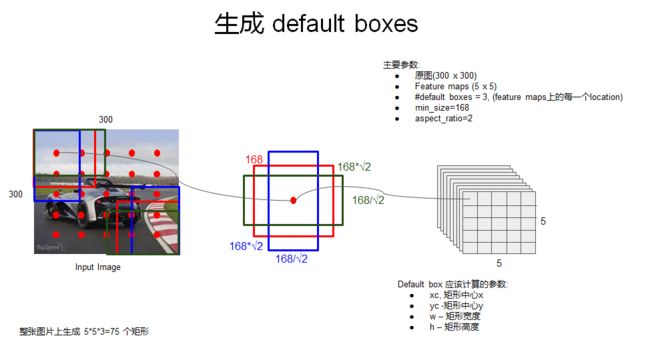
default box 是 bounding box 的初始参考,也就相当于region proposals,那么为了保证预测时对不同面积大小(等同于scale)和不同纵横比(aspect ratio)的目标进行预测,很明显default box也应该是具有不同scale 和 aspect ratio的。RPN中,每个feature map cell所关联的 9 种 anchor box 也是具有不同scale 和aspect ratio的,他们的作用是类似的。在其他一些目标检测模型中比如 overfeat 和 SPPNet中,为了达到对不同 scale 和 aspect ratio的目标的预测效果,采用的方法是对原始图片进行不同程度的缩放,以达到数据扩增。这种方式可以称为 Featurized image pyramids ,如下图示,实际上每个尺度都是一个独立的网络和预测结果。
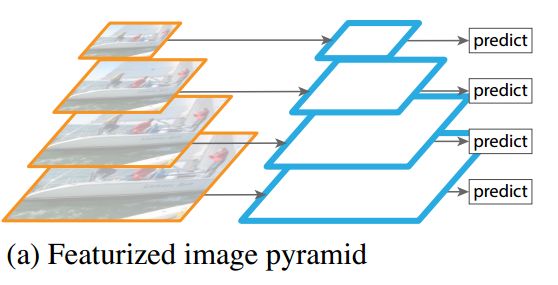
这种方式输入尺寸在变化,然而网络中的全连接层要求固定的输入,所以 overfeat 和 SPPNet 为了解决这个问题,分别使用了 offset pooling和SPP pooling的结构,使得从卷积层输入到全连接层的特征维度固定。
SPPnet的详解: https://zhuanlan.zhihu.com/p/60919662detector 和 classifier对某个 bounding box的回归:

所有的bounding box回归之后,是很乱的,然后再通过NMS过滤掉一大部分:
这只是其中某一个feature map的预测结果当把所有用于预测的feature map进行预测之后(multi-scale),再通过一个NMS,又过滤掉一部分,保留下来的即是最终的结果:
-
训练流程:
小结:
1. Multi-scale feature maps for detection
VGG中的 conv5_3 以及VGG后面又添加的一些层中的某些层,被用来检测和分类。不同的feature layer 预测的bounding box的scale是不一样的,因此不同feature layer上的卷积模型也是不一样的(体现在参数和回归效果上)。
2. Convolutional predictors for detection
每一个被选中用于预测的feature layer,是用一个 3×3 的卷积层用于预测的,比如说某个feature layer的是 m×n×p 大小的,那么卷积核就是 3×3×p,这也是某一个 detector/classifier的参数量,它的输出是对应 bounding box中类别的得分或者相对于default box的坐标偏移量。对应于 feature map 上每个位置(cell),都会有 k 个 default box,那么无疑预测的时候要对每个位置上的每个default box都输出类别得分和坐标偏移。
3. Default boxes and aspect ratios
每一个被选中预测的feature layer ,其每个位置(cell)都关联k个default box,对每个default box都要输出C个类别得分和4个坐标偏移,因此每个default box有(C+4)个输出,每个位置有 (C+4)k 个输出,对于m×n 大小的feature map输出为
(C+4) × k × m ×n 个输出,这个机制跟anchor非常相似,具体可以看后面那个图。
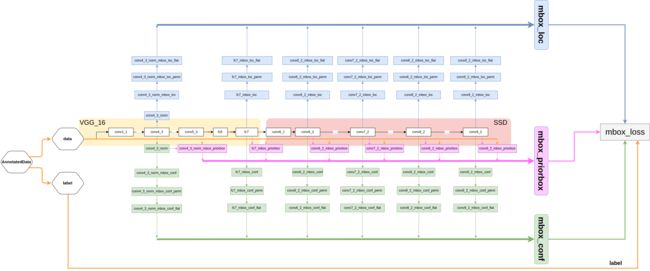
SSD源码解析
https://hellozhaozheng.github.io/z_post/PyTorch-SSD/
https://cloud.tencent.com/developer/article/1548867
https://blog.csdn.net/h__ang/article/details/90316220
0. 从Git下载代码
Code: https://github.com/amdegroot/ssd.pytorch
(pytorch) xiaoxie@xiaoxie-Z10PE-D8-WS:~/data/yx/python$ git clone https://github.com/amdegroot/ssd.pytorch.git
问题: The TLS connection was non-properly terminated.
解决:
(pytorch) xiaoxie@xiaoxie-Z10PE-D8-WS:~/data/yx/python$ sudo git clone https://github.com/amdegroot/ssd.pytorch.git
1. 下载所需要的库
支持Visdom在训练期间进行实时损失可视化
# 首先安装Python服务器和客户端
pip install visdom -i http://pypi.douban.com/simple/ --trusted-host pypi.douban.com
# 启动服务器(可能在屏幕或 tmux 中)
python -m visdom.server
然后在train期间,导航到 http://localhost:8097/
2. 数据集
-
Download COCO 2014
指定要下载数据集的目录,否则默认为 ~/data/(pytorch) xiaoxie@xiaoxie-Z10PE-D8-WS:~/data/yx/python/ssd/data/scripts$ sudo sh COCO2014.sh #这里我修改了VOC2007.sh中的数据保存路径 问题:
curl: /usr/local/lib/libcrypto.so.1.1: version `OPENSSL_1_1_0i' not found (required by /usr/lib/x86_64-linux-gnu/libssl.so.1.1)解决:
https://blog.csdn.net/qq_44747572/article/details/121123713 -
VOC Dataset
Download VOC2007 trainval & testsudo sh VOC2007.sh #这里我修改了VOC2007.sh中的数据保存路径 Download VOC2012 trainval
sudo sh VOC2012.sh #这里我修改了VOC2012.sh中的数据保存路径 将COCO2014和VOC数据集保存在data文件夹下:
3. Training SSD
默认情况下,假设已下载ssd/weights目录中的文件:
.pth下载地址:https://s3.amazonaws.com/amdegroot-models/vgg16_reducedfc.pth (可以直接下载放入weights文件夹下,也可以使用以下命令)
(pytorch) xiaoxie@xiaoxie-Z10PE-D8-WS:~/data/yx/python/ssd$ mkdir weights
(pytorch) xiaoxie@xiaoxie-Z10PE-D8-WS:~/data/yx/python/ssd$ cd weights
(pytorch) xiaoxie@xiaoxie-Z10PE-D8-WS:~/data/yx/python/ssd/weights$ wget https://s3.amazonaws.com/amdegroot-models/vgg16_reducedfc.pth
要使用训练脚本训练 SSD,只需将列出的参数指定train.py为标志或手动更改它们。
(pytorch) xiaoxie@xiaoxie-Z10PE-D8-WS:~/data/yx/python/ssd$ python train.py
python -m visdom.server    # 通过http://localhost:8097查看训练过程
直接运行上面程序,发现会报识别不到文件, 修改coco.py/voc0712.py的路径
# coco.py  coco2014数据是直接下载
/home/xiaoxie/data/yx/python/ssd/data/
# voc0712.py
/home/xiaoxie/data/yx/python/ssd/data/VOCdevkit/
问题1:
RuntimeError: Expected a 'cuda' device type for generator but found 'cpu'
解决:降低pytorch版本
问题2:
IndexError: The shape of the mask [32, 8732] at index 0does not match the shape of the indexed tensor [279424, 1] at index 0
IndexError: invalid index of a 0-dim tensor. Use `tensor.item()` in Python or `tensor.item<T>()` in C++ to convert a 0-dim tensor to a number
解决:https://blog.csdn.net/weixin_36670529/article/details/111246059
问题3:
StopIteration
解决:
将train.py(165行)的
images, targets = next(batch_iterator)
更改成:
try:
	images, targets = next(batch_iterator)
except StopIteration:
	batch_iterator = iter(data_loader)
	images, targets = next(batch_iterator)
4. Evaluation
下载.pth文件,放在weights问价夹下:
SSD300 trained on VOC0712 (newest PyTorch weights)
https://s3.amazonaws.com/amdegroot-models/ssd300_mAP_77.43_v2.pth
SSD300 trained on VOC0712 (original Caffe weights)
https://s3.amazonaws.com/amdegroot-models/ssd_300_VOC0712.pth
 python eval.py
 python test.py
问题:
RuntimeError: Legacy autograd function with non-static forward method is deprecated. Please use new-style autograd function with static forward method
解决:
https://blog.csdn.net/qq_36926037/article/details/108419899
参考资料
https://arleyzhang.github.io/articles/786f1ca3/
推荐阅读
https://zhuanlan.zhihu.com/p/79854543