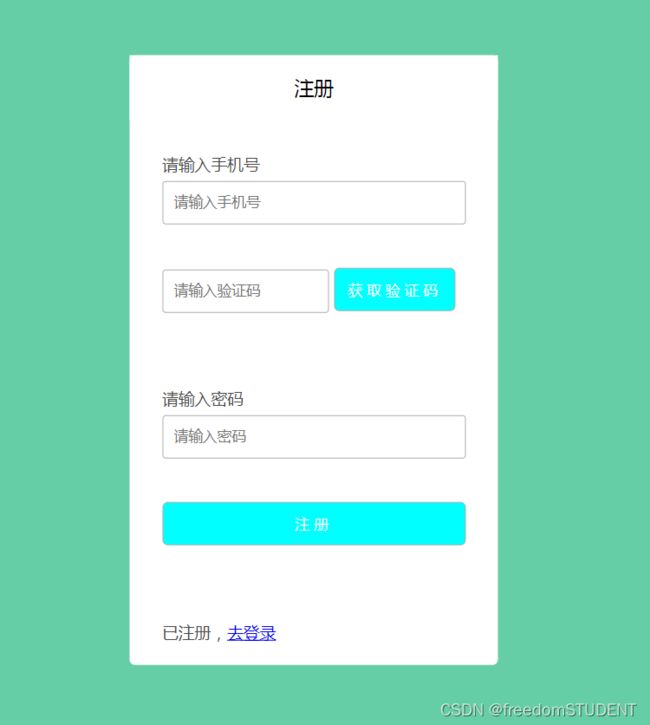
已注册,去登录
【功能栏】基于session的模拟短信注册功能
框架: spring boot mybatis-plus
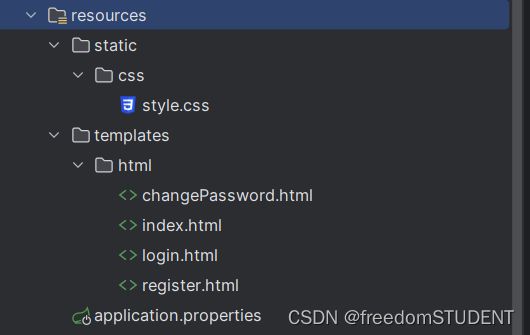
目录
1.创建user表
编辑2. mybatis-plus插件
3.导入相关依赖
4.配置文件
5.前端代码
register.html
style.css
6.后端代码
entity层
mapper层
sevice层
业务层接口
业务层实现类
controller层
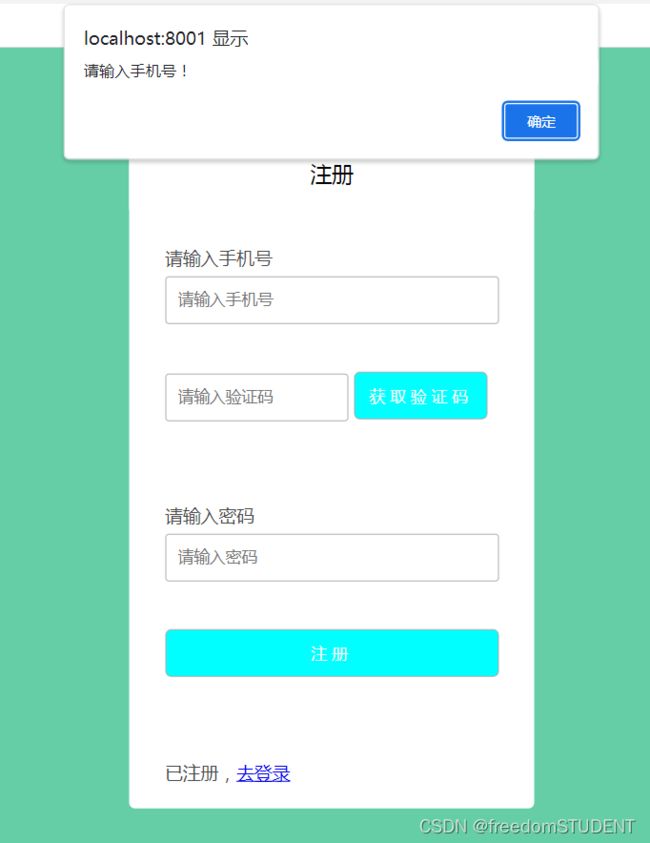
7.调试
1. 未输入手机号的时候,直接点击获取验证码按钮
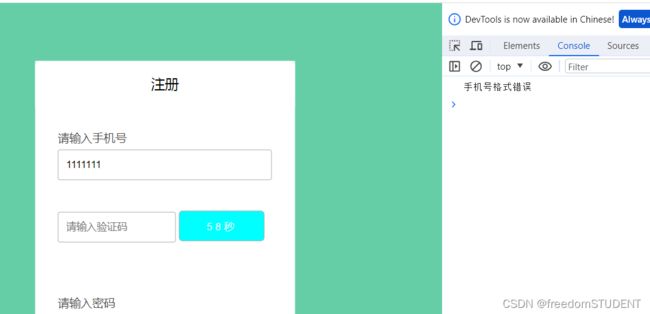
2.输入手机号,但是格式错误
3.输入手机号,并且格式正确
4.调试的时候验证码错误或者手机重复注册都是还在注册页面
8.代码解析
1.创建user表

注意: phone这个字段设置的时候最好大于11位
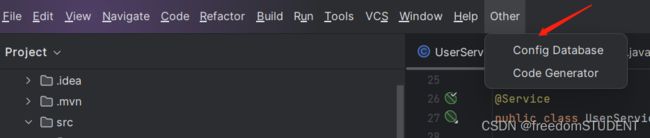
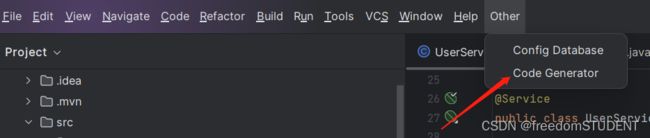
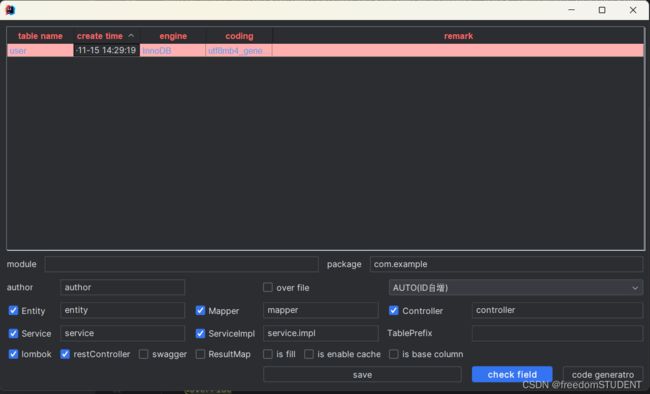
 2. mybatis-plus插件
安装了mybatis-plus插件后,可以根据数据库生成代码

首先连接数据库
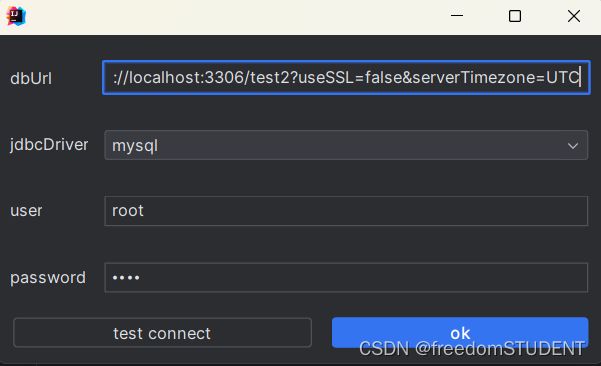
然后

3.导入相关依赖
muybatis-plus依赖com.baomidou mybatis-plus-boot-starter 3.5.2 cn.hutool hutool-all 4.0.12
4.配置文件
server.port=8001
spring.datasource.url=jdbc:mysql://localhost:3306/test2?serverTimezone=GMT
spring.datasource.username=root
spring.datasource.password=1234
5.前端代码
register.html
register
注册
style.css
*{
    margin: 0;
    padding: 0;
}
body{
    background:#65cea7 ;
}
.control{
    width: 340px;
    background: white;
    position: absolute;
    top: 50%;
    left: 50%;
    transform: translate(-50%,-50%);
    border-radius: 5px;
}
.item{
    width: 340px;
    height: 60px;
    background: #eeeeee;
}
.item div{
    width: 340px;
    height: 60px;
    display: inline-block;
    color: black;
    font-size: 18px;
    text-align: center;
    line-height: 60px;
    cursor: pointer;
}
.content{
    width: 100%;
}
.content div{

    margin: 20px 30px;
    text-align: left;
}
p{
    color: #4a4a4a;
    margin-top: 30px;
    margin-bottom: 6px;
    font-size: 15px;
}

.content input[type="tel"]{
    width: 100%;
    height: 40px;
    border-radius: 3px;
    border: 1px solid #adadad;
    padding: 0 10px;
    box-sizing: border-box;
}
.content  input[type="text"]{
    width: 55%;
    height: 40px;
    border-radius: 3px;
    border: 1px solid #adadad;
    padding: 0 10px;
    box-sizing: border-box;
}

.content input[type="password"]{
    width: 100%;
    height: 40px;
    border-radius: 3px;
    border: 1px solid #adadad;
    padding: 0 10px;
    box-sizing: border-box;
}
.content button{
    margin-top: 40px;
    width: 40%;
    height: 40px;
    border-radius: 5px;
    color: white;
    border: 1px solid #adadad;
    background: cyan;
    cursor: pointer;
    letter-spacing: 4px;
    margin-bottom: 40px;


}


.content input[type="submit"]{
    margin-top: 40px;
    width: 100%;
    height: 40px;
    border-radius: 5px;
    color: white;
    border: 1px solid #adadad;
    background: cyan;
    cursor: pointer;
    letter-spacing: 4px;
    margin-bottom: 40px;
}
.active{

    background: white;
}
.item div:hover{
    background: #f6f6f6;
}
6.后端代码
entity层
@Data
@EqualsAndHashCode(callSuper = false)
@Accessors(chain = true)
@TableName("user")
public class User implements Serializable {

    private static final long serialVersionUID = 1L;

    @TableId(value = "id", type = IdType.AUTO)
    private Integer id;

    private String phone;

    private String password;

    private String  code;
mapper层
@Mapper
public interface UserMapper extends BaseMapper {


}
sevice层
业务层接口
public interface IUserService extends IService {


    String register(User user, HttpSession session);

    String sendCode(String phone, HttpSession session);
}
业务层实现类
@Slf4j
@Service
public class UserServiceImpl extends ServiceImpl implements IUserService {


    @Autowired
    private UserMapper userMapper;


    @Override
    public String sendCode(String phone, HttpSession session) {
        //这里手机号码为空则报空指针,判断不严谨
        if (StringUtils.hasText(phone) && RegexUtil.isMobile(phone)) {
            //生成验证码
            String yzmCode = RandomUtil.randomNumbers(6);

            //保存验证码到session
            session.setAttribute("yzmCode", yzmCode);

            System.out.println("发送短信验证码成功" + yzmCode);
            return "发送短信验证码成功!验证码是:" + yzmCode;
        } else {
            return "手机号格式错误";
        }
    }


    @Override
    public String register(User user, HttpSession session) {
        //判断输入手机号的格式
        if (StringUtils.hasText(user.getPhone()) && RegexUtil.isMobile(user.getPhone())) {
            //从session拿出缓存的验证码
            Object cacheCode = session.getAttribute("yzmCode");
            String code = user.getCode();
            if (cacheCode == null || !cacheCode.equals(code)) {
                return "html/register";
            }
            //3.根据手机号查询用户
            User user1 = query().eq("phone", user.getPhone()).one();
            if (user1 == null) {
                userMapper.insert(user);
                return "html/login";
            }
            session.setAttribute("user1", user1);
            return "html/register";
        }
        return "html/register";
    }
}
controller层
@Controller
@RequestMapping("user")
public class UserController {


    @Autowired
    private IUserService userService;

    @RequestMapping("/code")
    @ResponseBody
    public String sendCode(String phone, HttpSession session) {
        return userService.sendCode(phone, session);
    }


    @RequestMapping("/register")
    public String register(User user, HttpSession session) {
        return userService.register(user, session);
    }
}
工具类(utils)
public class RegexUtil {


    public static boolean isMobile(String str) {
        Pattern p = null;
        Matcher m = null;
        boolean b = false;
        p = Pattern.compile("^[1][3,4,5,8][0-9]{9}$"); // 验证手机号
        m = p.matcher(str);
        b = m.matches();
        return b;
    }
}
7.调试
前端页面
1. 未输入手机号的时候,直接点击获取验证码按钮
2.输入手机号,但是格式错误
3.输入手机号,并且格式正确
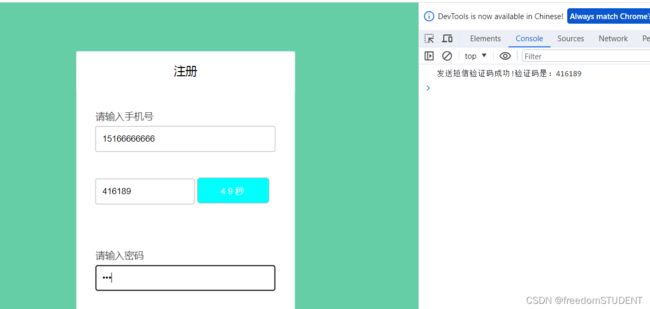

验证码是模拟生成的
String yzmCode = RandomUtil.randomNumbers(6);4.调试的时候验证码错误或者手机重复注册都是还在注册页面
8.代码解析
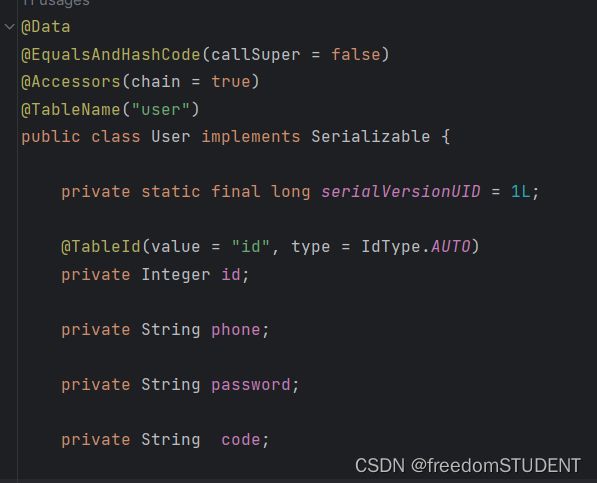
实体类
实体类的属性对应数据user表字段

控制层主要写了两个接口
一个是发送验证码接口,当我们点击前端页面获取验证码按钮的时候,这个接口响应
获取验证码事件
这里主要使用了ajax技术
控制层调用service的接口里的一个方法
实现类实现该方法
方法如下
 @Override
    public String sendCode(String phone, HttpSession session) {
        //这里手机号码为空则报空指针,判断不严谨
        if (StringUtils.hasText(phone) && RegexUtil.isMobile(phone)) {
            //生成验证码
            String yzmCode = RandomUtil.randomNumbers(6);

            //保存验证码到session
            session.setAttribute("yzmCode", yzmCode);

            System.out.println("发送短信验证码成功" + yzmCode);
            return "发送短信验证码成功!验证码是:" + yzmCode;
        } else {
            return "手机号格式错误";
        }
    }
1.首先判断手机号的格式
2.如果手机号格式不为空,且手机号格式正确
通过随机生成验证码,这里只是简单的模拟短信验证码,真正的实现这里可以调用相关的方法
3.将验证码保存到session中
4.在控制台输出该验证码
一个是注册接口
  @Override
    public String register(User user, HttpSession session) {
        //判断输入手机号的格式
        if (StringUtils.hasText(user.getPhone()) && RegexUtil.isMobile(user.getPhone())) {
            //从session拿出缓存的验证码
            Object cacheCode = session.getAttribute("yzmCode");
            String code = user.getCode();
            if (cacheCode == null || !cacheCode.equals(code)) {
                return "html/register";
            }
            //3.根据手机号查询用户
            User user1 = query().eq("phone", user.getPhone()).one();
            if (user1 == null) {
                userMapper.insert(user);
                return "html/login";
            }

            return "html/register";
        }
        return "html/register";
    }
}
1.判断手机号格式
2.判断输入的验证码和session保存的验证码是否相等
3.根据手机号查询该用户是否存在
User user1 = query().eq("phone", user.getPhone()).one();